
Last Updated on April 17, 2026
QuickBooks error 6175 emerges when users attempt to open their company files. This error makes it challenging for a user to continue operating as the essential company file is inaccessible. So, here’s a comprehensive blog you might require to apply when this error strikes your system.
No doubt, QuickBooks is the leading accounting software as it manages all the financial information of a user and helps them create invoices, balance sheets, and bills efficiently. Still, it might be horrifying to get a company file error in QuickBooks, as it contains all the crucial information of a business. QuickBooks encounters an error while setting up multi-user access to a company file: Error 6175, 0. Once you get QuickBooks error 6175 0, QuickBooks displays an error message: “An error occurred when QuickBooks tried to access the company file. Please try again. If the problem persists, contact Intuit® and provide them with the following error code: (-6175,0)”. Follow the entire article for more info.
Are you unable to get rid of the QuickBooks error 6175 that has kept you entangled in its web? Contact us at the Accounting Helpline support number 1.855.738.2784 for immediate qualified assistance to overcome this error.
What is QuickBooks Error 6175, 0?
QuickBooks error 6175, 0 arises while attempting to access the company file. The application throws error messages that state:
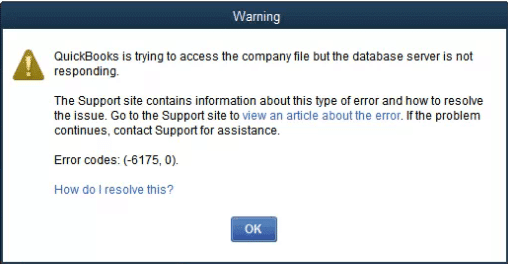
“An error occurred when QuickBooks tried to access the company file. Please try again. If the problem persists, contact Intuit® and provide them with the following error code: (-6175,0).”
Error 6175 0 QuickBooks might also appear when QB can’t read the database services. There may be varying reasons behind this issue, beginning from misconfigured multi-user settings to communication blockage by the firewall. Regardless of the causes behind the problem, it’s crucial to find effective solutions to resolve the error as soon as possible. Otherwise, working on your files and application can normally become challenging.
Here, we bring you the causes, signs, and resolution methods involving verifying your settings. It will enable you to host your company file for other computers on the network and eliminate QuickBooks error 6175.
What Caused the 6175, 0 Error in QuickBooks?
61XX errors are pretty common in QuickBooks, and most of them are related to complications with the company file. QuickBooks DB is a service required by QuickBooks users to host a company file in a multi-user environment, and QuickBooks Desktop error 6175 occurs when the firewall application installed on your system prevents the QuickBooks Database service from running on Windows. Sometimes, installing antivirus and website blockers triggers Error code 6175, 0 to appear on QuickBooks Desktop. Some less common reasons responsible for QuickBooks error code 6175 are listed below:
- The server that shares the company file with other workstations in the network is not responding or is busy with some other tasks.
- The Firewall has blocked access to the company file on the server.
- Cyber Sitter software is installed on the computer.
- QuickBooks Database service is inactive. Conversely, having multiple QuickBooks Database Server Manager instances functioning simultaneously on the system may cause this issue.
- Misconfigured multi-user settings might cause QuickBooks error code 6175 0.
- Other technical errors might lead to this issue while communicating with the system.
- The hosting server file can’t finish other tasks, leading to QuickBooks error 6175 0.
- Content blockers and technical intricacies can lead to this error.
- Outdated QuickBooks and database servers will lead to this error.
- Corrupt or damaged QuickBooks database files may cause QuickBooks error 6175.
- Missing, corrupt, or improper QB installation can lead to QuickBooks 6175.
- Network connectivity problems and improper network setup can lead to QuickBooks error 6175.
- Several QB versions running on the same computer can result in this error.
NOTE: You might also get a different variation of this error with an error message: “QuickBooks is trying to access the company file, but the database server is not responding. Error Codes: (-6175, 0).” Follow the solution listed below in the given order for a quick fix.
Symptoms of QuickBooks 6175 0 error
Before you proceed to fix Error 6175 in QuickBooks Desktop, you should take a look at the signs and symptoms left by the error:
- When you can’t access the company file, the application throws an error message with the 6175 code.
- The system may face issues during communication.
- You may notice that the screen doesn’t respond to any instructions from the mouse and keyboard.
- The QB accounting software might crash frequently.
- Periodic hanging of the system is another symptom of this issue.
- QB Database Service doesn’t start.
Due to these signs, users will need to undertake the following troubleshooting solutions for QuickBooks Enterprise 2023 error 6175 0. It will ensure you continue running the app as usual.
Steps to Fix Error Code 6175 0 in QuickBooks Desktop
Here are the essentials to consider before you sit down to troubleshoot QuickBooks 2023 error 6175:
Essential Points to Consider before following the steps to recover from the error
- Make sure you are using an account with administrative rights on Windows.
- QuickBooks Desktop installed on the server must be updated to the latest version.
Now, let’s jump to the troubleshooting procedure for Error 6175 0 in QuickBooks Desktop.
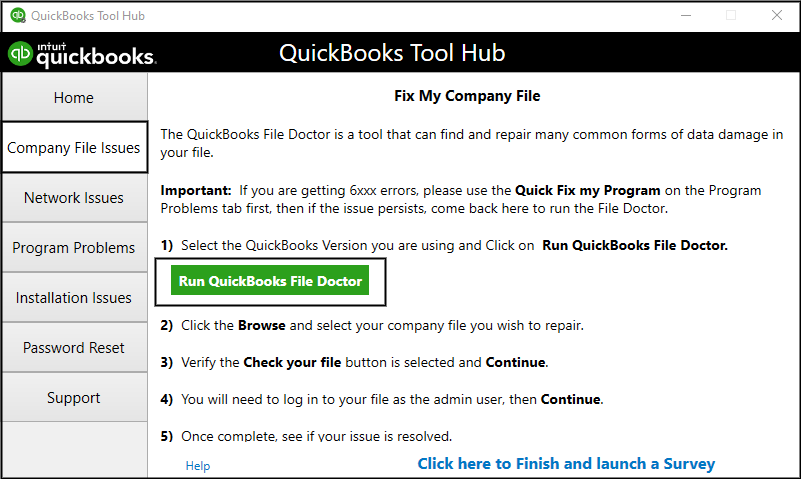
Troubleshooting Step 1: Download and Run QuickBooks File Doctor
QuickBooks File Doctor was previously a standalone application that one could download separately, but it is now integrated with QuickBooks Tool Hub. Follow the instructions below to download and install QuickBooks Tool Hub to launch QuickBooks File Doctor and rectify the QuickBooks 6175 error:
- Download QuickBooks Tool Hub. You can go to the QB Tool Hub download page by clicking the QuickBooks Tool Hub option under the Help tab in QuickBooks.
- Navigate to the Downloads section of your computer and double-click the QuickBooksToolHub.exe file for installation.
- Follow the instructions given on the screen to finish the installation.
- If the application does not start automatically, double-click the shortcut icon of QuickBooks Tool Hub on the desktop to start the application.
- Go to the Company File Issues tab and select QuickBooks File Doctor to launch it.
- Hit the Browse button, locate your company file, select the company file, and click Open.
- Select both file damage and network connectivity options.
- If the application requires an administrator password, enter the password and hit Next.
- If you are performing the troubleshooting on the server, select HOST/Server; otherwise, select Workstation.
- Now, the application will start repairing company files and network errors, and once the repair process for error 6175 QuickBooks Desktop is complete, exit QB File Doctor and open QuickBooks again.
Troubleshooting Step 2: Set up Multi-User Access in QuickBooks Desktop
QuickBooks Multi-User Mode allows users running QuickBooks on the workstation to access the company file on the server. To set up a multi-user environment in QuickBooks, users need to enable multi-user mode on the server and single-user mode on every workstation connected to it. It will help you fix error code 6175 in QuickBooks:
- Under the File tab in QuickBooks Desktop, click Switch to Multi-User Mode.
- Click Yes on the Hosting Setup window.
- Now, click OK on the Multi-user setup information window.
- Click Setup Users and Passwords under the Company tab.
- Click Setup Users and then select Add Users.
- Fill in the correct information for the user who needs access to the company file. Check if the 6175 error in QuickBooks persists.
Troubleshooting Step 3: Assign Administrative Rights to QBDataServiceUser
When some crucial QuickBooks services like QBDataServiceUser lack administrative rights, getting errors like the Company File Error -6175 while accessing the company file from the server is obvious.
- Exit the QuickBooks Desktop application on your system.
- Press the Windows + R key and type Control Panel.
- Hit Enter and select User Accounts.
- Click Manage another account.
- Double-click QBDataServiceUser (QuickBooks Version).
- Click Change Account Type and then select Administrator.
- Check Database Server Manager Error 6175 while accessing the company file.
IMPORTANT: QBDBMgrN.exe is a process that is required by QuickBooks to host company files in a multi-user environment, so make sure this process is running in the background of the computer under the processes. To check, press the Ctrl + Alt + Delete keys together and select Task Manager. Under the Processes tab, you will find the process. If you don’t see the QBDBMgrN.exe under the processes, follow the steps below to restart the process for troubleshooting the Database Server not responding to error 6175.
- Press the Windows + R key on your keyboard and type services.msc.
- Press Enter and find and click QBDBMgrN.exe in the list of services.
- From the left side panel, click Restart.
Troubleshooting Step 4: Add QuickBooks Processes to your Antivirus and Firewall’s Exclusion list
You can remove the Error Message Code 6175 in QuickBooks if it appears due to the firewall blocking the communication. Do so as follows:
- It is impossible to list a single method to add QuickBooks to the exclusion list of every security application, as every security application has a different interface and settings. However, you can easily find the settings in your security application for adding QuickBooks to the exclusion list. If you are having any trouble, contact your application provider or contact the Accounting Helpline at 1.855.738.2784.
- To exclude QuickBooks from the Windows internal firewall, you can follow step 2 from our article on QuickBooks Error 12029.
Troubleshooting Step 5: Reinstall QuickBooks Desktop Application
Reinstalling QuickBooks is the last resort to fix any error, such as “I am getting error 6175 in QuickBooks,” that is not resolved by basic or advanced troubleshooting:
- If none of the troubleshooting helps and you are still struggling to get rid of error 6175, 0, we suggest you clean up the installation of the QuickBooks Desktop application on your server. Before going with the reinstallation, make sure to back up your company file in a safe location.
- To reinstall, go to the Control Panel and double-click QuickBooks Desktop.
- Follow the instructions to completely remove QuickBooks from the computer.
- Download and install the correct version of QuickBooks Desktop from the Download Page.
- Double-click the setup file from the Downloads section of your computer and follow the on-screen instructions for the installation.
- After the installation is completed, set up QuickBooks to host the company file in a Multi-User environment by following step 3 from this article. See if Multi-User Mode Error 6175 resolves.
Troubleshooting Step 6: Review the Hosting Settings
You need to check your hosting settings to rectify QuickBooks Desktop Pro Error 6175. The steps involved are as follows:
Step 1: Check the Workstation Settings
When you have more than one workstation set as your QB server, your workstations may be running in multi-user mode. However, these settings might be incorrect, as only the server computer (the system that hosts company files) should be in hosting mode.
You need to verify every workstation (other computers not hosting the company files) to ensure that the Host Multi-User Access option is off. Also, these steps can happen before opening a company file.
To resolve the Intuit server not responding error, you need to take the following actions:
- Launch QB on workstations where you see the error.
- Go to the File menu and proceed with the Utilities option.
- If the Host Multi-User access option is visible, do not select it. In this case, move to the next workstation because this isn’t the one causing problems.
- If you see a Stop Hosting Multi-User access option, choose it.
- Repeat these steps on all the workstations where QB error 6175 0 is appearing.
Step 2: Review the Server Settings
Depending on your setup, you need to undertake the following steps.
If the complete version of QB Desktop is installed on the server
Reset the hosting settings on the server after all the workstations have been reviewed. The steps include:
- Launch QB on the server computer.
- Go to the File menu and choose the Utilities option.
- If you see Host Multi-user access as an option, select it. Now, repeat the process and choose the Stop Hosting Multi-User Access option. It will reset the multi-user mode.
- Repeat the procedure and choose Host Multi-user access.
When the complete QB Desktop version is not installed on the system
In this case, you only have QuickBooks Database Server Manager on the server computer. You can host your company files over a network through the Database Manager.
After installing the Database Manager directly from Intuit’s Website or through QuickBooks Tool Hub, it’s time to scan the company files. After scanning, you can easily access the company files from other computers on the network. It enables you and others on the network to work on QB Desktop together from multiple computers.
Step 3: Scan the folders
Before sharing the files, you need to scan the folders holding them once:
- Hit the Start menu on your server computer that hosts the company files.
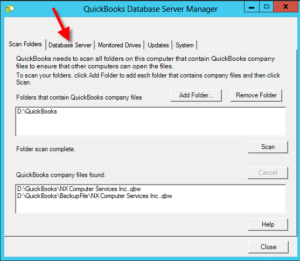
- Now, enter ‘Database’ in the search space and launch the QuickBooks Database Server Manager.
- Move to the Scan Folders tab.
- Choose Browse and hit the folders holding your company file (QBW).
- Hit OK when the process is finished.
- Choose Start Scan when you’re ready.
After the scan finishes, you’ll see the folder in the QuickBooks company files found section. Now, access the company files in these folders from other computers on the network.
Step 4: Monitor the Drives
After scanning the folders, you’ll notice the drivers holding the folders in the Monitored Drives tab. Next, choose the drive to monitor these folders. Finally, it will ensure that you don’t need to rescan the folders when you change or move the company files in them.
- Move to the Monitored Drives tab.
- Hit the checkboxes for the hard drives that hold the company files. Please note that you only need to add drives holding your company files. Also, you can’t monitor the mapped drives.
Step 5: Manage the Database Server Manager
Other tabs in the Database Server Manager are responsible for keeping everything running smoothly.
- From the Systems tab, you’ll find where the Database Manager is installed on your device.
- This tool gives you the real-time status of those who are connected and active on the tool.
When you install QB Desktop and the database server manager, take the following actions:
- Launch QB Desktop on the server.
- Choose the File menu, followed by selecting Open or Restore company.
- Select Open a company file, look for the file, select it, and hit Next.
- Tick-mark the checkbox that says Open file in multi-user mode.
- Choose Open and sign in to the company file.
- Move to the File menu and select the Close Company/ Log off option. The company file will close on the server.
- Head to the Windows Start menu.
- Write the database and choose QB database server manager from the results.
If the error persists, you need to restart the QB Database service.
Troubleshooting Step 7: Update QuickBooks Desktop
An outdated QuickBooks Desktop is one of the primary reasons you keep getting QuickBooks error 6175. Let’s look into the steps to fixing it:

- Launch the QB application and navigate to the Help menu.
- Opt for the Update QuickBooks Desktop option.
- Select Get Updates and see if any become available.
- Now, tap the Update Now option.
- Finish the update, download, and installation procedure, and check the presence of QuickBooks error code 6175 0.
Troubleshooting Step 8: Move QuickBooksDBXX Service to a Local System
Alter the location of the QuickBooksDBXX service to a local system through the following steps:
- Head to the Start menu or open the Run window by pressing the Windows and R keys together.
- Type Services.msc in the search field and hit Enter.
- Locate and click the QuickBooksDBXX service.
- Further, opt for the Properties option and hit the Log On tab.
- Now, you need to click the Radio tab, followed by Next.
- Tap Apply and OK.
- Finally, open QuickBooks, go to the File menu, and switch to multi-user mode.
If you still see QB error 6175, attempt other solutions.
Troubleshooting Step 9: Terminate all QuickBooks Processes
If you have multiple QuickBooks instances open, causing QuickBooks error 6175.0, try the following steps to reach and End Processes on the Task Manager:
- Press the Ctrl, Shift, and Esc keys altogether to launch the Task Manager. Alternatively, right-click the taskbar and choose Task Manager.
- In the Task Manager window, head to the Processes section.
- Here, select QBW32.exe, QBDBMgrn.exe, and QBUpdate.exe, right-click them, and opt for End Processes.
- Finish the process, return to QB, and check for error 6175 0 in QuickBooks Desktop.
Troubleshooting Step 10: Add QB Program as Exceptions to Windows Firewall
Allow QuickBooks executable files like QBW32.exe, QBDBMgr.exe, and QBupdate.exe through Windows Firewall by adding them as exceptions. It will help remove QuickBooks error code 6175:
The steps involved in adding QB programs as exceptions are as follows:
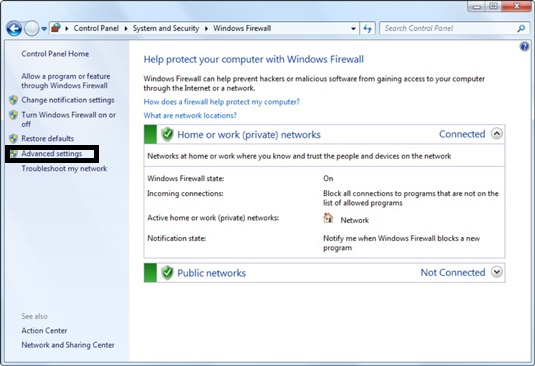
- Tap the Start menu and type Windows Firewall in the search field.
- Enter and open the Windows Firewall window.
- Hit the Advanced Settings option.
- Now, right-tap Inbound Rules and click New Rule.
- Opt for Program, followed by Next.
- Click This Program Path, then Browse.
- Now, search for the required executable files and tap Next.
- Hit the Allow the Connection option, then Next.
- If the prompts appear, ensure to mark all the profiles and hit Next.
- Finish creating a new rule and name it along the lines of “QBFirewallException(name.exe).”
- Repeat all these steps for Outbound Rules too.
Here’s a table of executable files and their respective locations.
| Executable files (.exe) | Location |
| IntuitSyncManager.exe | C:\Program Files\Common Files\Intuit\Sync |
| Dbmlsync.exe | C:\Program Files\Intuit\QUICKBOOKS YEAR |
| QBLaunch.exe | C:\Program Files\Common Files\Intuit\QuickBooks |
| FileManagement.exe | C:\Program Files\Common Files\Intuit\QuickBooks |
| QBCFMonitorService.exe | C:\Program Files\Intuit\QUICKBOOKS YEAR |
| QuickBooksMessaging.exe | C:\Program Files\Intuit\QUICKBOOKS YEAR |
| DBManagerExe.exe | C:\Program Files\Intuit\QUICKBOOKS YEAR |
| AutoBackupExe.exe | C:\Program Files\Intuit\QUICKBOOKS YEAR |
| QBServerUtilityMgr.exe | C:\Program Files\Common Files\Intuit\QuickBooks |
| FileMovementExe.exe | C:\Program Files\Intuit\QUICKBOOKS YEAR |
| QBW32.exe
| C:\Program Files\Intuit\QUICKBOOKS YEAR |
| QBUpdate.exe | C:\Program Files\Common Files\Intuit\QuickBooks\QBUpdate |
| QBDBMgrN.exe | C:\Program Files\Intuit\QUICKBOOKS YEAR |
| OnlineBackup.exe | C:\Program Files\QuickBooks Online Backup |
Shift to multi-user mode after configuring firewall settings.
An alternative way of performing these steps to fix error 6175 in QuickBooks Desktop, depending on your firewall and Windows versions, is as follows:
Open the Windows Firewall settings:
Tap the “Start” button and type “Firewall” in the search bar. Opt for the option that says “Windows Defender Firewall” in the search results.
Hit the option that helps you “Allow an app or feature through Windows Defender Firewall”:
Now select the option that says “Allow an app or feature through Windows Defender Firewall” on the left side of the menu bar.
Tap “Change Settings”:
Choose the option that lets you “Change Settings” in the next window.
Click on “Allow another app”:
Now, tap the “Allow another app” button in the subsequent window.
Browse for the QuickBooks executable files:
Navigate to the QuickBooks installation directory (usually located in “C:\Program Files\Intuit\QuickBooks”). Select the QuickBooks executable files that you want to add as exceptions to the firewall (for example, “QBW32.exe”, “QBDBMgrN.exe”, “QBDBMgr.exe”).
Hit “Add”:
Once you have selected the QuickBooks executable files, tap the “Add” button.
Select the checkbox for “Private”:
In the “Add an app” window, make sure the checkbox next to “Private” is selected.
Click on “OK”:
Hit “OK” to exit the “Add an app” window displayed on your screen.
Save the changes:
Select “OK” to save your changes to the firewall settings.
Restart QuickBooks:
Restart QuickBooks Desktop on your system to ensure that the changes take effect.
If you keep seeing error 6175 QuickBooks Desktop, try other methods.
Troubleshooting Step 11: Install QuickBooks Database Server Manager Successfully
You may need to install/ reinstall QuickBooks Database Server Manager to rectify the 6175 error QuickBooks. The steps involved in quickly installing QuickBooks database server manager are as follows:
- Download the QuickBooks installer: Download the QuickBooks installer from the official Intuit website or use the CD that came with your purchase.
- Launch the installer: Double-click on the installer to launch it.
- Select the installation type: Select the “Custom and Network Options” installation type and click “Next.”
- Choose installation location: Choose where you want to install QuickBooks and click “Next.”
- Select installation option: Select the “Yes” option to install the Database Server Manager and click “Next.”
- Accept the terms: Read the terms and conditions and select “I accept the terms in the license agreement” if you agree to them. Click “Next.”
- Provide license number and product code: Enter your license number and product code, then click “Next.”
- Choose the installation type: Select “Server only” and click “Next.”
- Select folder location: Choose the folder location where you want to install the Database Server Manager and click “Next.”
- Begin installation: Click “Install” to begin the installation process.
- Complete the installation: Once the installation is complete, click “Finish.”
- Set up the Database Server Manager: After the installation is complete, you will need to set up the Database.
- Server Manager: To do this, open QuickBooks and select “File” > “Utilities” > “Set Up QuickBooks Database
- Server Manager: Follow the prompts to set up the Database Server Manager.
- Update the Database Server Manager: After setting up the Database Server Manager, make sure to check for updates regularly to ensure that your software is up to date and functioning properly. You can do this by selecting “File” > “Utilities” > “Update QuickBooks Database Server Manager.”
Hopefully, installing the database manager correctly will rectify QuickBooks error code 6175.
Troubleshooting Step 12: Repair QuickBooks Application
Consider fixing QuickBooks error 6175, 0 by repairing the app as follows:
- Tap the Windows icon on the desktop and access the Start menu.
- Look for Settings and open it.
- Head to the Apps tab.
- Further, click Apps and Features.
- Now, look for QuickBooks Desktop from the programs currently installed on your computer.
- Resolve QuickBooks error message 6175 by tapping the three dots at the end of the app name.
- Tap Modify.
- Run the on-screen prompts to resolve QuickBooks error 6175.
Alternatively, you can take the following actions while learning how to fix QuickBooks error 6175:
- Shut down QuickBooks.
- Launch the Control Panel app on your system and navigate to the “Programs and Features” section (or the “Add or Remove Programs” section in older versions of Windows).
- Find QuickBooks in the list of installed programs and select it.
- Hit the “Repair” button and follow the prompts to repair the installation.
Do not forget to prepare a backup of your files to prevent data loss while you repair QB to fix QuickBooks error 6175 hosting.
Before attempting any repairs, it’s crucial to create a backup of your company file to prevent any data loss in case something goes wrong. To create a backup, open QuickBooks and select “File” > “Back Up Company” > “Create Local Backup.” Follow the prompts to create a backup.
Conclusion
These types of errors that occur while hosting a company file in multi-user mode require multiple troubleshooting steps for a resolution. We understand getting rid of error 6175 from QuickBooks is a tedious task, and it might take hours to get fixed. If you want immediate help resolving QuickBooks Error 6175, then you can get in touch with Accounting Helpline experts who have years of experience troubleshooting such errors at 1.855.738.2784.
FAQ’s
What else can I implement to fix QuickBooks error 6175?
Rectify QB error 6175 by running the re-image repair tool. You can do so as follows:
– Download the tool from the official site on the internet.
– Undertake its installation by double-tapping the installer package.
– After finishing installing it, let the tool scan and repair the files for any issues.
– The tool will show the errors affecting the system and ask for the next action.
– Hit the Repair option to begin the procedure of rectifying the problem.
What can I do to prevent QuickBooks Error 6175?
Prevent getting QB error 6175 by following these techniques:
– Keep QuickBooks updates.
– Run the database server manager.
– Access the company file through the UNC path.
– Verify file and folder permissions.
– Turn off the firewall and antivirus temporarily.
– Use QB with admin privileges.

Edward Martin is a Technical Content Writer for our leading Accounting firm. He has over 10 years of experience in QuickBooks and Xero. He has also worked with Sage, FreshBooks, and many other software platforms. Edward’s passion for clarity, accuracy, and innovation is evident in his writing. He is well versed in how to simplify complex technical concepts and turn them into easy-to-understand content for our readers.