
Last Updated on April 16, 2026
Despite the regular security updates, QuickBooks put forward QuickBooks error 6131, 0. QuickBooks 6000 series errors usually stop the authorization required by the users to access the company file. It can appear on both local and network setups with a message that QuickBooks cannot open your company file. A possible cause of this error is that you have opened the file locally. Since this software comprises critical data, the information stored in the company file is of utmost importance. In this blog, we will learn to resolve this issue securely and efficiently.
Dealing with the technical issues associated with the company file poses severe consequences, such as data loss and corruption. To overcome all these issues, you should call the Accounting Helpline support team at 1.855.738.2784.
General Solutions for the QuickBooks error 6131, 0
Here are the solutions you need to try to fix the QuickBooks error 6131, 0:
Solution 1: Download the Latest QuickBooks Update
Follow the steps below to get the latest QuickBooks version and resolve the error 6131, 0:
On Windows
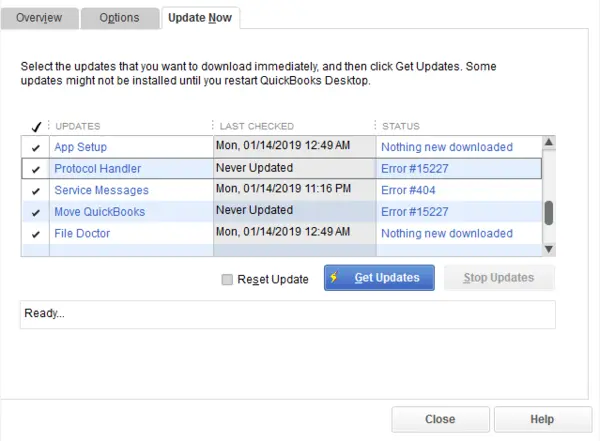
- Click Help, then choose the Update QuickBooks Desktop
- Hit Update Now, then tap the Get Updates
- Exit and open your QB Desktop again to install the update from the Update available
- Tap Install Now.
- Wait till the app updates and open QB once it’s installed.
On Mac
- Tap the QuickBooks menu, then choose Check for QuickBooks updates.
- Hit Install and relaunch.
Solution 2: Get Help by Running QB File Doctor
Running the QuickBooks File Doctor can help resolve the QuickBooks error 6131, 0. So, take the steps below:
Step 1: Begin with QuickBooks Tool Hub Download
- Exit your QB program.
- Now, download the latest QuickBooks Tool Hub package from Intuit. Save this package on your desktop or Downloads folder for quick access.
- Now, launch the downloaded exe file.
- Install the program by following the InstallShield instructions and accepting the License Agreement.
- After ending the installation, double-tap the tool hub icon on the Windows desktop to access it.
Step 2: Use the QuickBooks File Doctor Tool
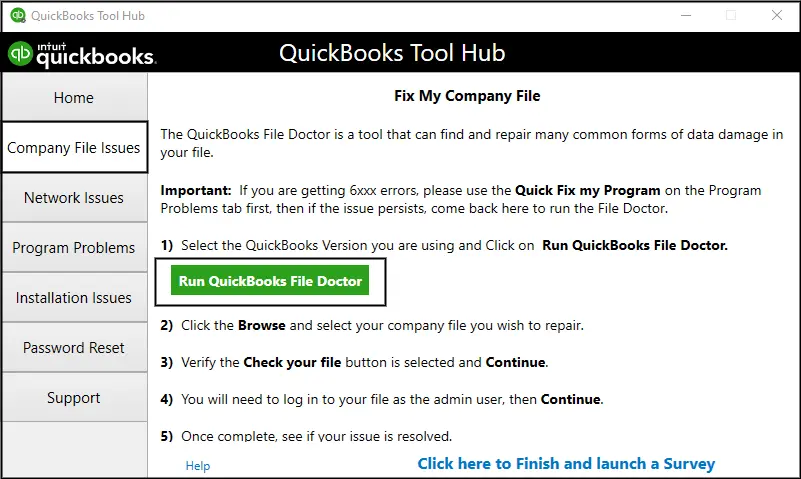
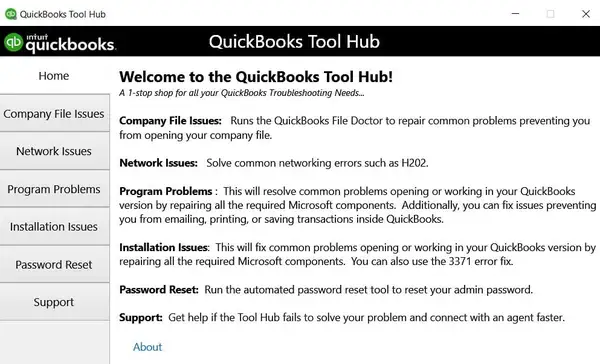
- Tap Company File Issues from the QuickBooks Tool Hub.
- Choose the Run QuickBooks File Doctor Wait for a minute to open it.
- Tap your company file from the dropdown list in QB File Doctor. If you can’t see your file, hit Browse and search.
- Choose the check your file option, then
- Input your QB admin password, then
Follow other steps if QuickBooks File Doctor doesn’t work for you.
Troubleshooting when you Open the File Locally
Opening the file locally means you access it on the same computer where you have installed QuickBooks.
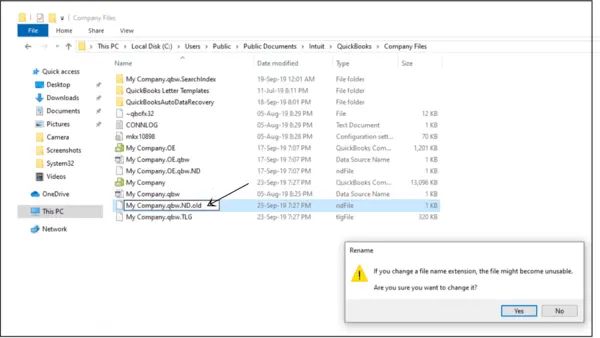
Solution 1: Add an Extension to the QuickBooks Network Data and Transaction Log Files
The .ND and .TLG files form an integral part of your QuickBooks data. They serve as configuration files, enabling QuickBooks to connect to a company file within a network or multi-user setup.
In the event of damage to these files, errors may arise upon opening your QuickBooks files. Renaming these files does not result in any loss of QuickBooks data. QuickBooks will automatically regenerate these files when you scan using the QuickBooks Database Server Manager and when you access your company file.
- Navigate to the folder where you’ve stored the company file.
- If not there, then head towards the hard drive in which you store all the files.
- Look for the network data file with a ‘.nd’ extension and a Transaction Log file with a .tlg
- Right-click on the files and select Rename to add a different extension.
- Start renaming the files by inserting an extension ‘.old.’
- Access QuickBooks again and try signing into your company file. If the issue persists, proceed with the following solutions.
Solution 2: Access a Sample Company File
When you try opening a sample company file, you’re trying to test whether the issue lies within your company file or QuickBooks itself. If attempting to open a sample company file results in an error rather than successful access, it indicates potential damage to your QuickBooks installation. In such cases, it is advisable to repair your QuickBooks installation.
To perform this test:
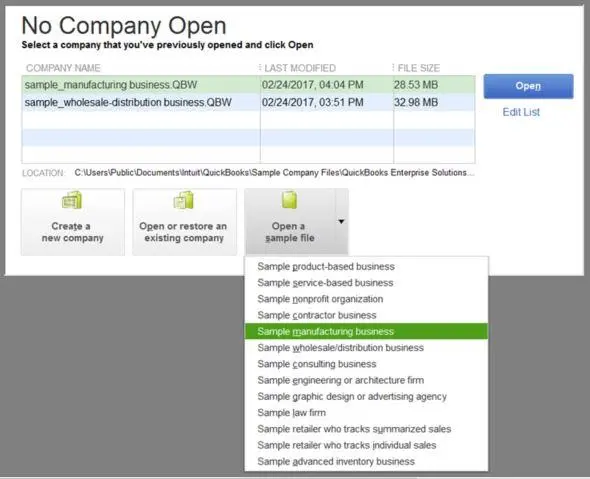
- Navigate to the No Company Open window, select “Open a Sample File,” and choose any sample company file from the provided list.
- Should the sample file open without issues, proceed to solution 3. However, if you encounter the same error message with the sample file, it signals the need to repair your QuickBooks installation files.
Solution 3: Transfer a Copy of the Company File into a Distinct Folder
By copying the file to the desktop and attempting to open it, you’re essentially testing if there’s an issue with the location of the company file.
If the file successfully opens from the desktop, it indicates damage or complications associated with the original file location where you typically save your file. This could be attributed to the file being saved within too many folders, potentially exceeding the limitations of the file system path.
However, if the file still fails to open even after being relocated to a different location, it raises the possibility of file damage or corruption. Further investigation and potential file recovery measures may be necessary in such cases.
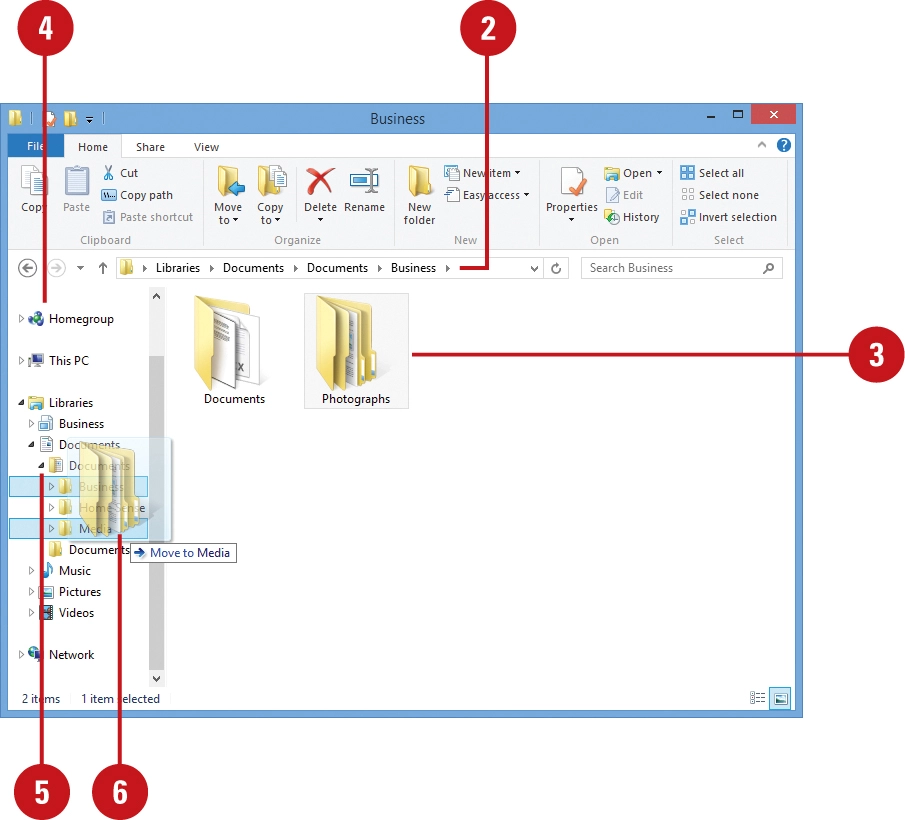
- The first step to troubleshoot the QuickBooks error 6131, 0 would be to create a new folder.
- Go to the previous folder where you have stored the company file and right-click on it.
- Select Copy and then come back to the newly created folder.
- Paste the company file into that new folder.
- Hold the Ctrl key and launch QB.
- Click Open or restore an existing company.
Access your company file on the desktop and open it. If the same error appears, try other solutions.
Solution 4: Restore the Copy of your Backup
If you wish to verify a problem with the current company file (.QBW), restore a backup copy. Crucial Note: If your backup company file is stored on an external device such as a USB drive or a hosting service like Box, it must be transferred to your local hard drive before proceeding. Once done, follow the steps below.
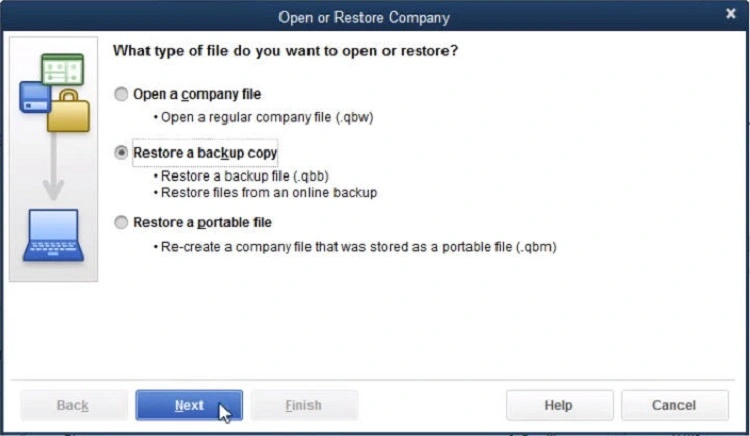
- Access the File menu in QuickBooks and choose Open or Restore Company.
- Click Restore a backup copy and proceed with the Next
- Choose Local Backup and then hit Next.
- Browse your computer to locate your backup company file, typically named [Your company name].qbb.
- Specify a folder for saving the restored company file, then select Open. Note: If you open the backup in the same folder as your existing company file, there’s a risk of overwriting your data.
- To prevent overwriting, consider renaming your existing company file or the backup to ensure unique names. Alternatively, you can save the backup in a completely separate folder.
- When ready, click Save. If any messages appear regarding potential data overwriting, choose the option that aligns with your preferences. Exercise caution and avoid overwriting unless it is intentional.
- Your new company file is now ready for use.
If an error arises while doing so, follow the steps below:
First, verify that your computer is not serving as a host.
- Open your company file.
- Navigate to the File menu and select Utilities.
- If “Stop Hosting Multi-User Access” is present:
- Choose “Stop Hosting Multi-User Access.”
- Confirm by selecting “Yes” in the “Stop hosting multi-user access” prompt.
- Again, select “Yes” in the “Company file must be closed” window.
Next, ensure the path to your company file does not exceed 210 characters.
- Locate your company file.
- Copy the path from the address bar.
- Paste it into Notepad, then count the characters and spaces.
Attempt to restore your company file once more. If the error persists, proceed to solution 5.
Solution 5: Recover Lost Data with ADR
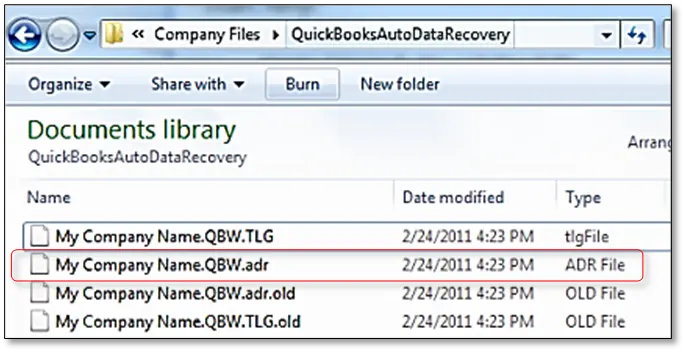
Auto Data Recovery can help you recover your lost data if your company file is damaged.
Troubleshooting When Opening the File Over a Network
When you access the file saved on a server or another PC, try the following steps:
Solution 1: Ensure Hosting is Enabled on all Workstations
Use one PC or server to host the company files:
- Hit F2 to get the Product Information
- Locate Local Server Information and see if hosting is off.
Solution 2: Change the TLG and ND Files Names and Run the Database Server Manager
After following the steps mentioned above (Solution 1- Troubleshooting when opening the file locally) regarding renaming ND and TLG files, run the QuickBooks Database Server Manager as it hosts your company files:
- Open QuickBooks Tool Hub.
- Tap Network Issues.
- Click QuickBooks Database Server Manager.
- Within this utility, you need to select Start Scan. Tap Browse if you can’t see your company file and choose the Start Scan
- Finally, access QB and attempt to open the company file
Solution 3: Access a Sample Company File from the Workstation
Follow the steps mentioned in Solution 2 (opening the file locally) to implement this solution.
Solution 4: Duplicate the QB Files to a Desktop
Again, follow the steps mentioned above (open the file locally) in Solution 3.
Solution 5: Exit all QB Processes
Close all QB processes to resolve the error 6131, 0:
- Log in as the Administrator on the server computer.
- Press Ctrl + Shift + Esc to launch the task manager.
- Display processes for all users and click on Users.
- Terminate each QuickBooks process (EXE, qbupdate.exe, and QBDBMgr.exe).
- Access the company file in multi-user mode.
- If the error persists, proceed to solution 6.
Solution 6: Manage Folder Permissions Manually
Ensure your folder where your company file is saved has the right permissions:
- Access the Windows Start menu and open File Explorer.
- Right-click on the folder with the company file and choose Properties.
- Navigate to the Security tab and click on Advanced.
- Choose QBDataServiceUserXX and click on Edit.
- Adjust the following settings to Allowed:
- Traverse Folder/Execute File
- List Folder/Read Data
- Read Attributes
- Read Extended Attributes
- Create Files/Write Data
- Create Folders/Append Data
- Write Attributes
- Write Extended Attributes
- Read Permissions
If your permissions are not configured correctly:
- Right-click on the folder containing the company file and select Properties.
- Click on Security, then Edit.
- Tap QBDataServiceUserXX and choose Full Control, then Allow.
- Click Apply, followed by OK.
Try opening your file and see if the error stays.
Solution 7: Undertake Firewall and Antivirus Configuration
Ensure your firewall and antivirus ports are open to QB by adding exceptions as follows:
- Access the Start menu in Windows.
- Open “Windows Firewall” by searching in the Start menu.
- Choose Advanced Settings.
- Right-click Inbound Rules. Now, click New Rule.
- Tap Port, then
- Choose
- Put the specific ports required for your QB version in the Specific local ports field.
- After entering the port number, hit
- Choose Allow the connection, then
- Mark all profiles if asked, then click
- Create and name the rule.
- Tap
- Repeat everything for Outbound Rules.
Ensure Windows Firewall exceptions for QB programs:
- Click the Start menu in Windows.
- Input Windows Firewall in search to open it.
- Tap Advanced Settings.
- Right-click Inbound Rules and choose New Rule.
- Hit Program > Next.
- Click This Program Path > Browse.
- Choose any executable file, then hit
- Tap Allow the Connection, then
- Mark all profiles, then hit (If asked)
- Create and name the rule.
- Repeat everything for Outbound Rules.
| Executable files | Location |
| AutoBackupExe.exe | C:\Program Files\Intuit\QUICKBOOKS YEAR |
| QBLaunch.exe | C:\Program Files\Intuit\QUICKBOOKS YEAR |
| DBManagerExe.exe | C:\Program Files\Intuit\QUICKBOOKS YEAR |
| QBW32.exe | C:\Program Files\Intuit\QUICKBOOKS YEAR |
| QBServerUtilityMgr.exe | C:\Program Files\Common Files\Intuit\QuickBooks |
| QuickBooksMessaging.exe | C:\Program Files\Intuit\QUICKBOOKS YEAR |
| FileManagement.exe | C:\Program Files\Intuit\QUICKBOOKS YEAR |
| IntuitSyncManager.exe | C:\Program Files\Common Files\Intuit\Sync |
| FileMovementExe.exe | C:\Program Files\Intuit\QUICKBOOKS YEAR |
| QBCFMonitorService.exe | C:\Program Files\Common Files\Intuit\QuickBooks |
| Dbmlsync.exe | C:\Program Files\Common Files\Intuit\QuickBooks |
| QBUpdate.exe | C:\Program Files\Common Files\Intuit\QuickBooks\QBUpdate |
| QBDBMgrN.exe | C:\Program Files\Intuit\QUICKBOOKS YEAR |
| OnlineBackup.exe | C:\Program Files\QuickBooks Online Backup |
This was how the troubleshooting of the QuickBooks error 6131 0 could be done. If you want to rectify data issues securely without risking any technological consequences, immediately call the Accounting Helpline professionals at 1.855.738.2784 and get all the data-affiliated issues fixed securely and quickly.
FAQ’s
How do I configure antivirus to resolve the error 6131, 0?
Configuring the antivirus settings for the error 6131, 0 requires following the steps mentioned by your particular antivirus developer/ vendor.
What are the ways to resolve QuickBooks error 6131, 0?
QuickBooks error 6131, 0 can be resolved easily with the following steps:
1. Run QuickBooks File Doctor
2. Update QuickBooks
3 Rename ND and TLG files
4. Run QB Database Server Manager
5. Open a sample company file
6. Copy the company file to another location
7. Configure firewall ports for QB
8. Terminate QuickBooks processes
9. Manage folder permissions manually
10. Ensure accurate hosting settings
11. Restore the backup copy
12. Use Auto Data Recovery

Edward Martin is a Technical Content Writer for our leading Accounting firm. He has over 10 years of experience in QuickBooks and Xero. He has also worked with Sage, FreshBooks, and many other software platforms. Edward’s passion for clarity, accuracy, and innovation is evident in his writing. He is well versed in how to simplify complex technical concepts and turn them into easy-to-understand content for our readers.