
Last Updated on April 23, 2026
Aren’t you tired of just facing the same problem again and again related to the QuickBooks update errors? If yes, then you must be doing something wrong with the basic settings, like the internet settings or the antivirus settings. QuickBooks won’t update if these settings are unadjusted. In case of a desktop error in QuickBooks, you need to identify the cause and the problem associated with it. You don’t need to be a pro to get QuickBooks up and running again, but just learn and implement the solutions depending on the cause of the problem. By the end of this blog, you’ll have a much clearer understanding of why QuickBooks updates fail and how to get them fixed in easy and quick ways.
Are you unable to fix the ‘QuickBooks won’t update’ issue? Speak to our dedicated Accounting Helpline experts by dialing our toll-free number 1.855.738.2784. They will understand your concerns and help you fix the software update issues instantly in simple and quick methods.
Understanding the QuickBooks Won’t Update Error Message
If it is indicating that your QuickBooks won’t update, it may be because of issues such as a poor network connection, conflicting firewall settings, system date and time mismatch, corrupted installation files, or conflicting background processes. The users have to attempt to check their network connection, change firewall settings, check system time, run a system file checker, and possibly reinstall QuickBooks using a clean install tool if needed.
These same issues can also make the errors display ‘QuickBooks Update Not Working.’ This is all because of the issue with the .NET Framework on your system. You simply need to reboot your computer and verify the necessary settings. If the error still occurs, QuickBooks will not update in such a way. You need to apply the troubleshooting steps to resolve the error. QuickBooks won’t update if you do not include QB as an exception to the antivirus software. If the QuickBooks update server is not responding, you should wait and attempt again after a while.
Symptoms of QuickBooks Won’t Update Error
QuickBooks is a great accounting software, but it can sometimes fail to update correctly. This can stall your work and annoy you. Identifying the symptoms early prevents wasting much time. The following are the common symptoms that mean QuickBooks isn’t updating as it should:
- Update failure message: QuickBooks displays an error when attempting to download or install updates.
- Stuck progress bar: The updating process begins, but hangs in the middle.
- Outdated features: The program continues to display outdated features after an update.
- Slow performance: QuickBooks performs more slowly than expected after an attempt to update.
- Crashes or freezes: The application crashes abruptly or becomes unresponsive.
- Missing updates: No updates are displayed in the list of available updates, despite them being present.
- Login issues: You could experience difficulties logging in after a failed update.
- Error codes: It displays messages such as “Error 12007,” “Error 1603,” or “Update Failed.“
- Damaged files: Features become inactive as a result of interrupted updates.
These are some of the common symptoms of the QuickBooks won’t update error. If you experience these symptoms, you need to get your error fixed right away. Let’s have a look at the causes of the issue.
Causes of QuickBooks’ Failed to Update Error on Your Desktop
There can be many reasons that can cause the QuickBooks update to fail. You need to understand the causes to reach a conclusion to resolve the error. Here are the causes that will stop QuickBooks from updating:
- Inadequate or unstable internet will disrupt the downloading and installation of updates.
- Older versions won’t be able to accommodate the most recent updates, creating errors.
- Broken program files might hinder successful updates.
- Lack of storage space on your computer may prevent updates from being installed.
- Antivirus programs can block QuickBooks updates.
- A lack of admin permissions may limit update installations.
- Temporary issues with the update servers of Intuit can lead to failures.
- Other applications that are running in the background can disrupt QuickBooks updates.
- An incorrect system date and time can disturb communication with Intuit servers.
- Incomplete or corrupted files to be updated can lead to installation errors.
- Running multiple versions of QuickBooks can prevent updates.
- An outdated or unsupported Windows version can block updates.
These are the causes that will stop QuickBooks from updating. Now that you have learned about the causes of the error, let’s look at the solutions to fix the issue.
Methods to Fix the QuickBooks Won’t Update Issue on Your Computer
There can be several methods to fix the error, but you have to choose the solutions based on the root cause of the issue. Based on the causes stated above, we have curated some solutions to fix the error. An overview of the solutions to fix this update issue in QuickBooks is stated below:
- Adjusting the Date and Time Settings
- Checking the Connection of Your Internet
- Updating the QuickBooks Desktop Version
- Repairing Broken/Damaged Program Files in QuickBooks
- Removing Unnecessary Files to Manage Storage
- Opening Firewall Ports for QuickBooks
- Using Windows as an Administrator
- Clean Install of QuickBooks
- Renaming the ND and TLG Files
- Downloading the Updates in Safe Mode
These are the solutions that we will implement to remove the QuickBooks won’t update error in QuickBooks. Now, we will help you know about these steps in detail.
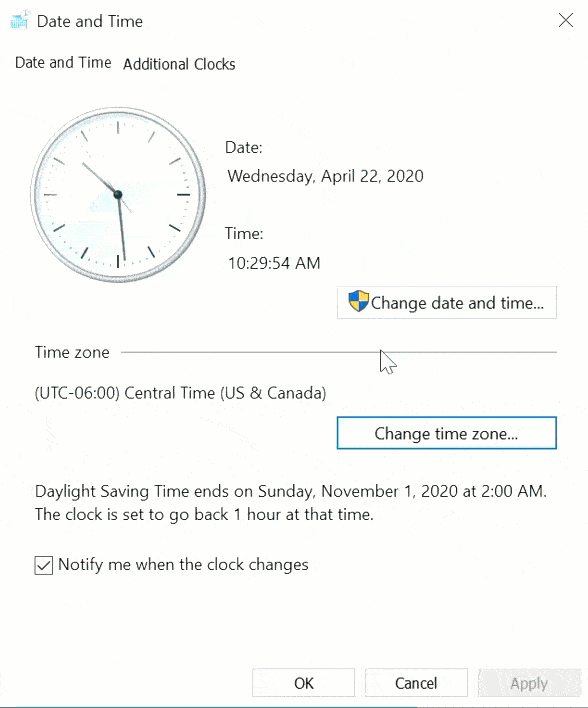
Solution 1: Adjusting the Date and Time Settings
If the date and time on your system are not set to real-time updates, you may face update errors in QuickBooks Desktop. You can follow these steps to set the date and time on your PC properly:
- You must right-click on the date and time at the bottom right corner of your screen.

- A window will be opened; there, you must click on the Adjust Date/Time tab.
- There, you must select the proper time and date and make any additional adjustments if necessary.
We have completed the steps to change the date and time on your PC. If the problem persists, you should consider adjusting your internet settings. Otherwise, you can move towards the next choices.
Solution 2: Checking the Connection of Your Internet
If your internet connection is poor, you can try checking the quality of the internet connection through the web browser. If you are unable to visit the site, call your internet service provider. But if you are able to browse the internet through the browser, follow the steps below.
- Go to the Help menu in QuickBooks.
- Select Internet Connection Setup and click on Use my computer’s Internet connection settings to make a connection whenever this application connects to the Internet.
- Click on Next and proceed to Advanced Connection Settings.
- Go to the Advanced tab and select Restore Advanced Settings.
- Finally, click on OK and Done.
- Attempt to update QuickBooks again.
Verifying the internet connection settings is an important step in fixing the QuickBooks won’t update issues. Now, go to the next solution if this does not help.
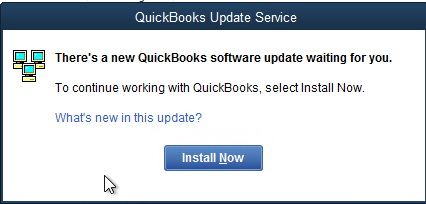
Solution 3: Updating the QuickBooks Desktop Version
The user simply needs to resolve the error by updating QuickBooks Desktop to its latest version. The process for updating QBDT is explained below:
- Head to the File menu at the top of the screen.
- Close Company/Logoff.
- Again, head to the File menu and choose Exit.
- Right-click the QuickBooks Desktop icon on the desktop and choose Run as administrator.

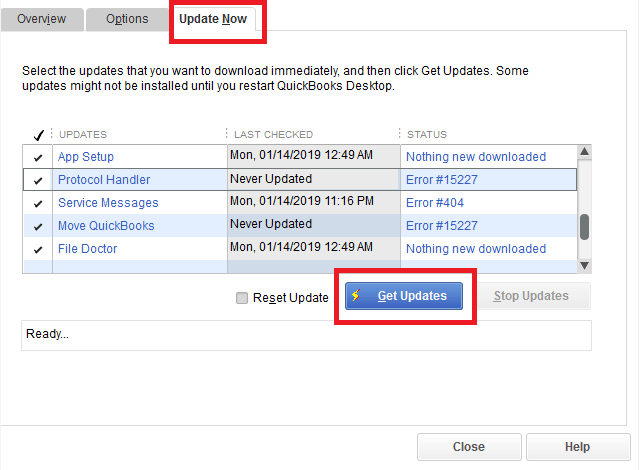
- From the No Company Open screen, choose Update QuickBooks from the Help menu.
- In the Options tab, click Mark All and Save.
- Uncheck the Reset Update box in the Update Now tab.
- Click the Get Updates button.

- When Update Complete comes on, shut down and restart the application.
- If the install update message appears, press Yes.
When reinstalling the QuickBooks application, restart the computer. If updating the QB did not repair the update error, go to the next step for a solution.
Solution 4: Repairing Broken/Damaged Program Files in QuickBooks
If you are constantly facing QuickBooks update errors, you can also consider repairing the broken or damaged program files. The steps to repair these broken/damaged program files are as follows:
- Start by ensuring QuickBooks is closed completely. Save any work and close the program.
- Visit the official Intuit website and download the QuickBooks Tool Hub. It’s a free utility from Intuit to repair common QuickBooks issues.
- Double-click the file after downloading to install it. After installation, open it.
- In the Tool Hub, select the Program Problems tab. Then select Quick Fix My Program. This will close any running QuickBooks processes in the background and perform a quick repair.
- Still in the Tool Hub, navigate to the Installation Issues tab. Click on QuickBooks Install Diagnostic Tool. It will scan and fix corrupted QuickBooks installation files.
- After the tools have completed, restart your computer. This assists in implementing the changes.
- Now, try opening QuickBooks. It should function fine if the fix was successful.
Following the steps mentioned above can help you repair the damaged or corrupted program files/company files in QuickBooks. This can help you remove the QuickBooks update issues.
Solution 5: Removing Unnecessary Files to Manage Storage
If QuickBooks will not update, a possible cause might be low storage or having too many unnecessary files. Here’s how to tidy up to enable QuickBooks to update successfully: Begin by closing QuickBooks on your system. Save any work you have open before proceeding.
Step 1: Clearing Temporary Files
Cleaning the temporary files can help you make up for the QuickBooks update. You can follow the steps mentioned below to clean the temporary files:
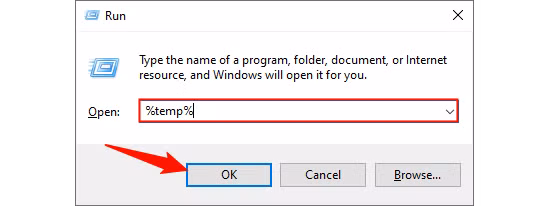
- Press Windows + R to bring up the Run window.
- Type %temp% and press Enter.

- This will open the Temp folder. Highlight all files (Ctrl + A) and click Delete. Ignore any files that won’t delete.
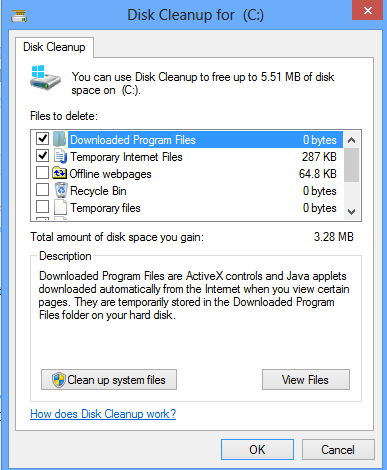
Step 2: Using the Disk Cleanup
You can also use the disk cleanup tool to clear up some space to fix the QuickBooks update issues. The steps to use the disk cleanup tool are as follows:
- In the Start menu, type Disk Cleanup and run it.

- Select your system drive (most likely C:), then select files to remove, such as temporary files, system logs, and Recycle Bin contents.
- Click OK and agree to clean up.
Step 3: Deleting Old QuickBooks Backup Files
You can also delete the old QuickBooks backup files to free up some space. The steps to deleting the previous QB backup files are mentioned below:
- Visit the folder containing your QuickBooks backup files.
- Remove unnecessary or duplicate older backup files you no longer require.
- Ensure you retain the latest ones.
Step 4: Removing Unused Company Files
You can also remove the unused company file to clean up some space in QuickBooks. Here are the steps to remove the unused company files:
- In QuickBooks, navigate to File > Open or Restore Company.
- Eliminate any unused or test company files (ensure you do not require them).
- Following the cleanup, reboot your PC to update the system.
- Try opening QuickBooks and check for updates. It should now function better.
Cleaning up the space can help you fix the QuickBooks won’t update issue. If this does not help, you can follow the next solution.
Solution 6: Opening Firewall Ports for QuickBooks
Security settings or firewall rules may disrupt the update process. You need to verify that your internet security and personal firewall software are properly configured. Open Ports 80 and 443 and provide access to the following files (explained steps and file locations discussed below:
- AutoBackupExe.exe
- Dbmlsync.exe
- DBManagerExe.exe
- FileManagement.exe
- FileMovementExe.exe
- IntuitSyncManager.exe
- QBCFMonitorService.exe
- QBDBMgr.exe
- QBDBMgrN.exe
- QBGDSPlugin.exe
- QBLaunch.exe
- QBServerUtilityMgr.exe
- QBW32.exe
- QuickBooksMessaging.exe
There is very little chance that these ports are being used by other processes; the QuickBooks Database server will use a fallback port, which is 56719.
To alter firewall ports and create exceptions for QuickBooks, follow these instructions:
- Use the Windows logo key on your keyboard to open the Start menu.
- Go to “Windows Firewall” via the search field in the Start menu.
- Click on Advanced Settings.
- Right-click Inbound Rules and click New Rule to open a new rule.
- Select the Port and go to the next step by clicking Next.
- Select TCP.
- Enter the important ports for your specific version of QuickBooks Desktop in the Specific local ports field.
- Put the port number in the field and click Next.
- Click the Allow the Connection button and Next.
- Select Mark all as required, then select Next.
- Make a rule and give it a name.
- Click Finish.
- Do the same procedure for Outbound Rules, using Outbound instead of Inbound in Step 4.
Also, make sure there are Windows Firewall exceptions for QuickBooks programs:
- Open the Start menu by pressing the Windows logo on your keyboard.
- Go to “Windows Firewall” from the search field in the Start menu.
- Click Advanced Settings.
- Right-click Inbound Rules and click New Rule to open a new one.
- Select Program, then go to the next step by clicking Next.
- Click This Program Path and click Browse.
- Choose any executable file, then go to Next.
- Click the Allow the Connection button and select Next.
- If asked, choose all profiles and then click Next.
- Generate and assign a name to the newest rule.
- Repeat the procedure to include exceptions for QB programs in Outbound Rules.
After following these solutions seriously, the QuickBooks update error should be fixed now. In case this is a little technical for you, you may attempt the next solution for its resolution.
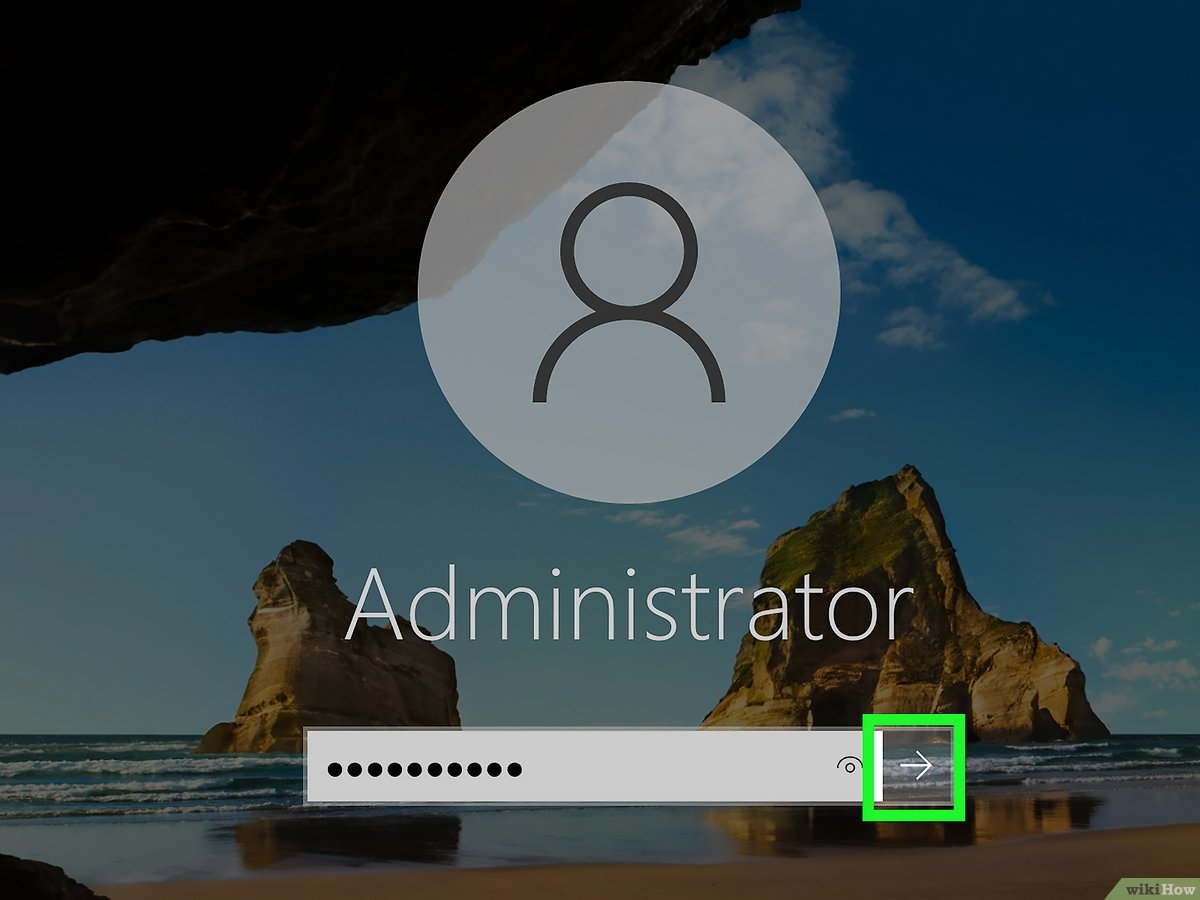
Solution 7: Using Windows as an Admin
Make sure that you have administrative rights on the Windows operating system if you are encountering QuickBooks won’t update problems. Here is how you generate a Windows account user and move to Administrator type on Windows 11/10:
- Open the Start menu, open Settings, and click Accounts. Then select Family & Other Users (In some versions of Windows, it could be termed Other Users).
- Search for the Add Other User, select the check box beside it, and choose the Add Account option.
- Select “I don’t have this person’s sign-in information” and click “Add a user without a Microsoft account” on the next page.
- Enter a username, password, or password hint—or touch security questions—then click Next.
- Convert a local user account to an administrator account by going to the Start menu > Settings > Accounts.
- In Family & Other Users, choose the name of the account owner ( “Local Account” will be beneath the name of the account), and click on Change Account Type.
- On the Account Type tab, select Administrator and click OK.
Now, all you have to do is log in using the help of the newly created administrator account, and you are ready to go. If this does not fix your issue, continue to the next one.
Solution 8: Clean Install of QuickBooks
If you are experiencing a QuickBooks update problem and it compels you to update whether you like it or not, we suggest you perform a clean install of QuickBooks. It will resolve any problems that are giving you trouble. The process of un/installing and reinstalling is simple. But after uninstalling, you have to rename the current installation folders manually by following the steps below. Before doing that, we will first proceed to show hidden files using the steps below:
- Select the folder symbol on your Desktop or System Tray to open File Explorer.
- Next, click the View tab and select Hidden Items.
After showing you hidden files, proceed as follows:
- Open the Windows Start menu and search for “File Explorer,” then open the File Explorer window.
- Find and open the folder that holds your QuickBooks company files, usually in your QuickBooks folder. The typical places are:
- C:\\ProgramData\\Intuit\\QuickBooks (year)
- C:\\Users(current user)\\AppData\\Local\\Intuit\\QuickBooks (year)
- C:\\Program Files\\Intuit\\QuickBooks (year)
- For 64-bit systems: C:\\Program Files (x86)\\Intuit\\QuickBooks (year)
- Right-click the folder > select Rename.
- Insert the word “old” at the end of the folder name, so that QuickBooks will not access it when you reinstall.
- Now reinstall the QuickBooks Desktop.
If you receive an access error message, “Hold tight, we’re updating your QuickBooks” while trying to rename the folder, take the following steps:
- Right-click the Windows Taskbar, and then click Task Manager.
- Open the Processes tab.
- Click the Name column heading to sort.
- Select the following processes (right-click) and close each by clicking End Process: QBDBMgrN.exe, QBDBMgr.exe, QBCFMonitorService.exe, & Qbw32.exe.
- Choose Yes if you see the message, “WARNING: Terminating a process can cause undesired results…”
This will help you in cleaning and installing the QuickBooks desktop to fix the QuickBooks won’t update error.
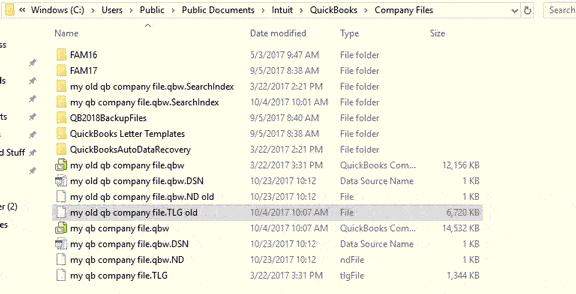
Solution 9: Renaming the ND and TLG Files
Network Data and Transaction Log configuration files will become bulky if left in that state. Thus, rename the files following a cold reboot (system-wide shut down) because they will get re-created:
- Open the directory in which your company files are located.
- Look for ND and TLG files named by your company file name (such as SQTCompany.qbw.nd and SQTCompany.qbw.tlg).
- Right-click on both the ND and TLG files, select “Rename,” and append OLD to the name (i.e., SQTCompany.qbw.nd.old and SQTCompany.qbw.tlg.old).

- Restart QuickBooks.
This solution will help you in renaming the ND and TLG files to fix the QuickBooks won’t update error. If renaming the file does not help, you can move to the last solution for resolution.
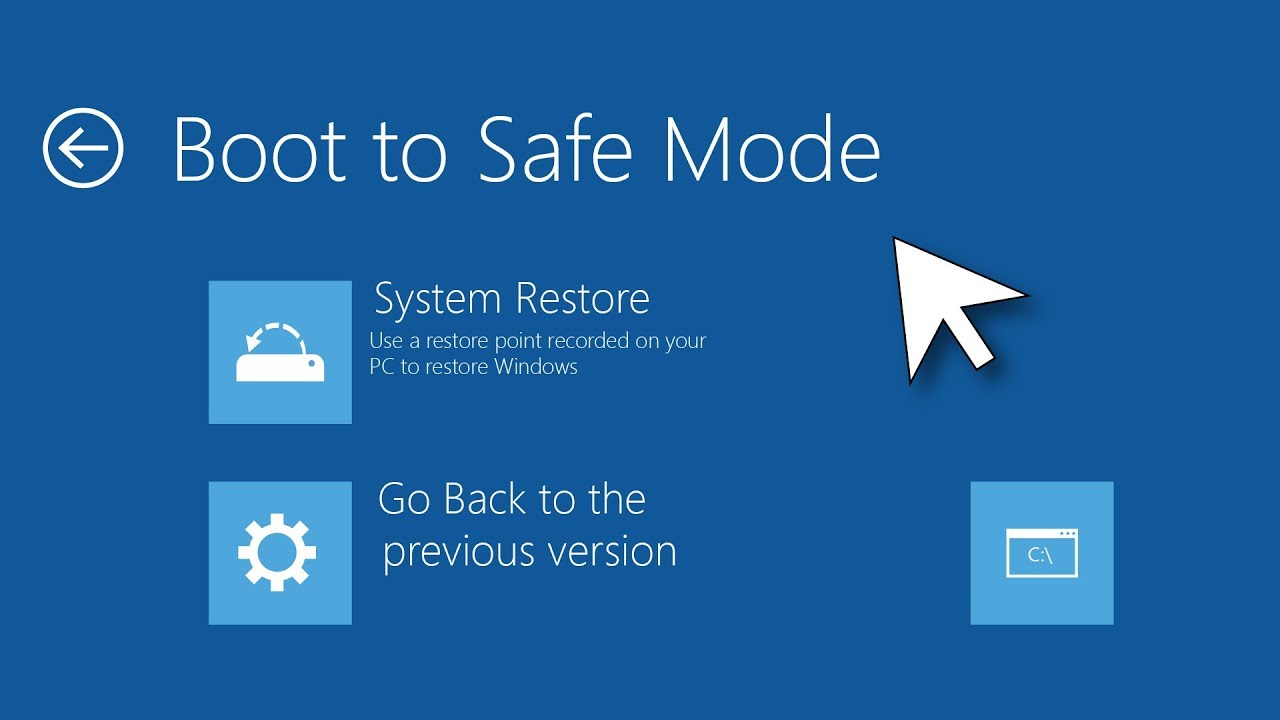
Solution 10: Downloading the Updates in Safe Mode
Safe mode does not allow any program to run automatically without the user launching it. In case another program is causing disturbance in the QuickBooks update download, the user can attempt downloading the QB updates in safe mode.
- Close QuickBooks and restart your computer with the Shift key pressed.
- The computer will boot to Choose an Option.

- Click Troubleshoot and then Advanced options.
- Select Startup Settings and hit Restart.
- After it reboots, press the F4 key to boot the computer in Safe Mode.
- Download the QuickBooks updates.
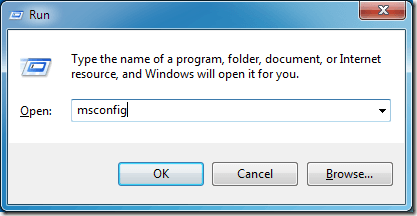
- After the updates have been downloaded, press the Windows Key + R to launch the Run
- Type MSConfig in the search box and press Enter

- Under the Boot tab, click on Boot options and uncheck the Safe Boot 34%, repair files with the File Doctor, or attempt to reinstall QuickBooks.
Now, you must reboot the PC to launch it in Normal Mode and apply updates by launching QuickBooks Desktop.
QuickBooks Won’t Update – Memory Table for Future Reference
The memory table will help you keep a note of the type of errors, their symptoms, and their causes. You can follow any of the ten solutions provided above to fix the update issues in QuickBooks Desktop.
| Category | Symptoms | Possible Causes |
| Update Failure | Error messages like “Update Failed,” “QuickBooks won’t update,” or “Error 1603” | Broken files, unstable internet, firewall/antivirus block |
| Frozen Progress | Sluggish software after an update or random crashes | Firewall ports not opened, background processes interfering |
| Slow/Crashy Behavior | Sluggish software after update or random crashes | Damaged program files, low storage, and an outdated OS |
| No Update Notification | Update doesn’t appear even though it exists | .NET Framework issues, incorrect system time/date |
| Login/Permission Issues | Trouble signing in or running the update | No admin rights, Windows user permissions issue |
| Security Block | Antivirus/firewall blocks the update process | Firewall settings and antivirus exclusions are not configured |
| Looping Errors | Update keeps failing in a loop | Corrupted ND/TLG files, multiple QB versions installed |
| Silent Failures | No clear error, but the update doesn’t happen | QuickBooks is not set to use a proper internet connection, or Safe Mode is not used for a clean download |
You can save a snapshot of the memory table for further reference. Now, we will also give you a toolbox table.
| Tool | Purpose | Where to Use |
| QuickBooks Tool Hub | Diagnostic repair for installation/program | Solution 4 |
| Disk Cleanup | Free up storage space | Solution 5 |
| Windows Firewall | Open/adjust ports | Solution 6 |
| Clean Install Utility | Fresh install of QB Desktop | Solution 8 |
| Safe Mode | Isolate conflicting processes | Solution 10 |
| Admin Account Access | Run with higher permission | Solution 7 |
You can keep a note of this toolbox table for future reference. It will help you prevent the occurrence of update issues in QuickBooks Desktop.
Summing It Up!
This was all you needed to know regarding the QuickBooks won’t update issue. You just follow the solutions with the steps mentioned in this blog. Following the necessary steps as mentioned above, make some necessary changes in some settings to get things to fall into place. These solutions are more than enough to resolve the QuickBooks update errors if followed properly. You can also seek professional help if nothing works out.
Frequently Asked Questions (FAQs)
Why won’t QuickBooks update transactions?
There can be many reasons why QuickBooks does not update the transactions. You need to check your account for messages, notifications, or alerts. Also, check for any display problems while browsing the website. These might prevent QuickBooks from downloading fresh transactions.
How do I fix QuickBooks desktop update errors?
You can follow many steps to fix QuickBooks update errors. Launch the Open QuickBooks Tool Hub and select Installation Issues from the left pane. Choose the QuickBooks Install Diagnostic Tool button and allow the tool to complete its process. After completing the diagnostic, reboot the system and attempt to download the update again.
How do I reset the QuickBooks update?
Resetting the QuickBooks update can help you fix the issue in case of update errors. You can reset the update by going to the Help menu, choosing Update QuickBooks Desktop, and clicking on the Update Now option. You need to put a check mark in the recent update checkbox, click on get updates, and accept the Terms and Conditions.
Why is my QuickBooks unable to update?
QuickBooks update failures may be caused by several factors, such as unstable internet connections, low disk space, incompatible programs, or outdated Windows settings. Moreover, problems such as incorrect system time, corrupted installation files, or QuickBooks being run from its download location rather than the correct installation directory may also lead to update issues.
Why does QB compel me to update?
Upgraded QB versions receive backing from Intuit. Further, getting a new operating system may also require an upgraded version for compatibility.
How do I upgrade my QuickBooks?
Before upgrading your QuickBooks, you first need to check the available pricing plans to see which subscription plan is the best for you. After that, you need to choose a new plan in QuickBooks and upgrade your subscription.
How do I update my QuickBooks to 2022?
On the No Company Open screen, you need to visit the Help menu and select Update QuickBooks Desktop. Then, go to the Options tab, select Mark All, and then select Save. Finally, go to the Update Now tab and select the Reset Update checkbox.
How do I fix a frozen QuickBooks window?
Frozen QuickBooks can easily be fixed with the help of Quick Fix My Program from QuickBooks Tool Hub. You just need to open the QuickBooks tool hub, proceed to program problems, and select the QuickBooks Program Diagnostics Tool.
How do I refresh QuickBooks?
Refreshing QuickBooks can resolve some minor glitches by itself. You need to go to the Menu icon, then click on More Options, head to settings, and then refresh the data. Now, you need to make a final call by clicking on the Confirm button.
Why will QuickBooks not update?
If your QuickBooks is not updating, this can be because of a slow or poor internet connection, incompatible browser settings, insufficient permissions, or something wrong with the Windows operating system.
How do I reset the QuickBooks desktop update?
First, you need to close the company files and QuickBooks, then open the Windows Start menu and search for QuickBooks Desktop. Now, proceed to the Help menu and select Updates for QuickBooks Desktop. Then, go to the Options tab and select the Recent Updates checkbox.
How do you update QuickBooks?
Once you log in to QuickBooks using your credentials, it will take you to the update now tab. Here, you need to select the most appropriate and current version of QuickBooks. Now, you just need to make your selection and click the Get Updates option.
When does the QuickBooks not updating error arise?
The QuickBooks won’t update, or the QuickBooks Update Is Stuck problem arises when you’re doing the following:
1. Undertaking manual updates
2. Automatic updates show no results
3. The update loading screen halts
How do I forcefully update QB Desktop?
The immediate update method includes the following:
1. Open QBDT.
2. Tap Help.
3. Select Update QB Desktop.
4. Pick the updates to download.
5. Hit Get Updates.
6. Close and reboot QuickBooks.
7. A wizard will emerge asking to install the app now or later.
Related Posts-
Is Your QuickBooks Update Stuck? Know How to Fix It!
QuickBooks 941 Form: Filing, Due Dates, Errors, & Solutions
QuickBooks Check Alignment Problems – Troubleshoot Guide
Resolving QuickBooks Payroll Not Deducting Taxes Issue With Causes & Solutions to Fix
Fixing the ‘QuickBooks Requires that You Reboot Loop’ Issue in Simple Methods
Complete Guide on QuickBooks Payroll Update: Errors & Solutions

Edward Martin is a Technical Content Writer for our leading Accounting firm. He has over 10 years of experience in QuickBooks and Xero. He has also worked with Sage, FreshBooks, and many other software platforms. Edward’s passion for clarity, accuracy, and innovation is evident in his writing. He is well versed in how to simplify complex technical concepts and turn them into easy-to-understand content for our readers.