A QuickBooks Desktop update error includes error codes 12045, 12157, 12037, 12038, and some 15xxx error series codes as well. Such errors prevent you from updating QuickBooks to the latest release. As has been noted, if you don’t update the software, you may find yourself in a spot of bother. Another key point is when you encounter this software update error, an error message appears on the screen that states, “There’s a new QuickBooks update waiting for you.” This prompts you to update your QB Desktop version again and again. All things considered, it’s essential to eliminate the error as quickly as possible. Go through this blog and learn the working solutions to fix the error.
Are you unable to fix the QuickBooks Desktop update error? Speak to our dedicated experts by dialling our toll-free number 1.855.738.2784. They are all ears to understand your concerns and help you fix the software update issues instantly.

Causes of A QuickBooks Update Error
Here are the reasons why you get a QuickBooks update error:
- The PC’s time and date settings are incorrect.
- Update issues may arise from your internet connection.
- Firewall ports and personal applications might cause interruptions during updates.
- If QuickBooks Desktop can’t verify the digital signature of your file, you’ll face problems with the QB Desktop update.
- Insufficient admin permissions on QB or Windows can trigger problems with QB updates.
- There may be compatibility issues because your system doesn’t meet minimum requirements.
- If you have various instances of QuickBooks Desktop on your system, you will receive QuickBooks update problems.
- Users may have a damaged file, requesting them to update.
- The file may be read incorrectly on a Windows PC.
- Hard disk corruption or damage.
- Missing or damaged QBWUSER.INI file.
- An extended company name can cause a reboot problem while updating.
- Incorrect installation of QuickBooks Desktop.
- Outdated and old operating system.
- The configuration files might get bloated over time.
Solutions for QuickBooks Update Problems
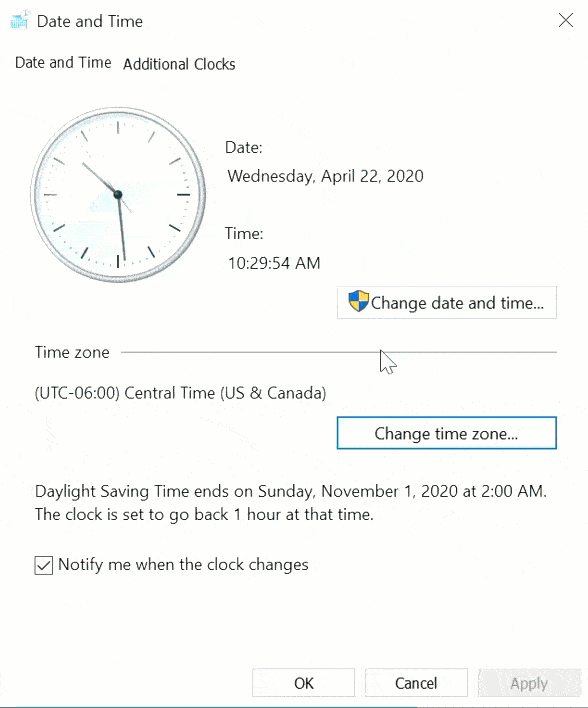
Fix 1: Correct the Date & Time Settings
If you have the wrong time and date on your system, you may get update issues. We recommend you correct your system’s date and time through the detailed steps mentioned below:
Verify Time Date Settings
- Right-click the system clock on the desktop and tap Adjust Date/Time.
- Click on Change date and time and set the current date and time.
- Select OK twice.
- Close and then access QuickBooks Desktop again.
- Re-run the update for QuickBooks Desktop.
Fix 2: Look into the Internet Connection Settings
Update issues may stem from problems with your internet connection.
To assess the secure internet connection, open a web browser and visit a secure website, like your financial institution’s (FI) site. If you’re unable to access the banking or FI page, QuickBooks updates may be affected. Get in touch with your internet service provider (ISP) for assistance.
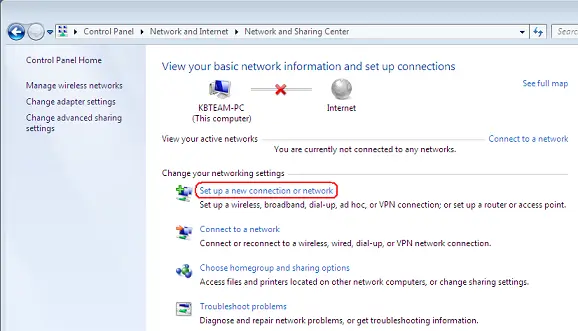
Internet Connection Settings
If the banking or FI’s site is accessible, follow these steps in QuickBooks Desktop:
- Go to the Help menu and tap Internet Connection Setup.
- Select “Use my computer’s Internet connection settings to establish a connection when this application accesses the Internet.”
- Click Next.
- Choose Advanced Connection Settings.
- On the Advanced tab, go with “Restore Advanced Settings.”
- Click OK.
- Click Done.
- Proceed to update QuickBooks Desktop again.
Consider the following:
- Disable download accelerators before downloading updates, as they may disrupt the process. Consult your ISP for guidance.
- For dial-up connections, ensure a minimum connection speed of 28.8 kilobits per second (Kb/s).
- If using America Online (AOL), log in with the primary login name, if possible, and ensure that Parental Controls settings are disabled. Refer to AOL’s online support for more details.
Fix 3: Open Firewall Ports for QB Programs And App
Security measures or firewall configurations can interrupt the update process. Ensure the setup of your internet security and personal firewall software is correct. Enable Ports 80 and 443 and grant access to the following files (detailed steps and file locations mentioned later:
- AutoBackupExe.exe
- Dbmlsync.exe
- DBManagerExe.exe
- FileManagement.exe
- FileMovementExe.exe
- IntuitSyncManager.exe
- QBCFMonitorService.exe
- QBDBMgr.exe
- QBDBMgrN.exe
- QBGDSPlugin.exe
- QBLaunch.exe
- QBServerUtilityMgr.exe
- QBW32.exe
- QuickBooksMessaging.exe
In the unlikely event that these ports are occupied by other processes, the QuickBooks Database server will utilize a fallback port, which is 56719.
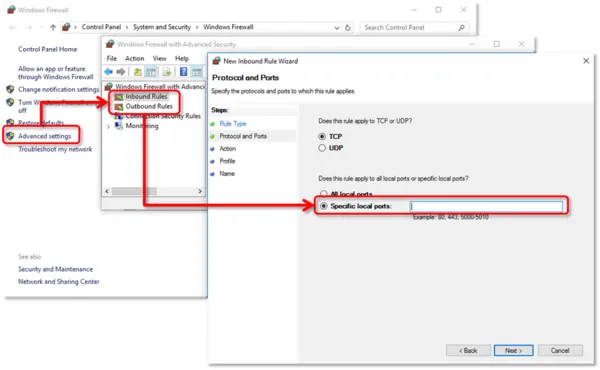
Configure Firewall Ports
Follow the instructions below to modify firewall ports and establish exceptions for QuickBooks:
- Open the Start menu using the Windows logo on your keyboard.
- Access “Windows Firewall” through the search area in the Start menu.
- Click on Advanced Settings.
- Right-click Inbound Rules and tap New Rule to create a new one.
- Choose Port and proceed to the next step by clicking Next.
- Select TCP.
- Input the crucial ports for your particular QuickBooks Desktop version in the Specific local ports area.
- After putting the port number in the field, click Next.
- Click the Allow the Connection button and Next.
- Mark all profiles as required, then select Next.
- Create a rule and assign a name.
- Click Finish.
- Repeat the process for Outbound Rules, replacing Inbound with Outbound in Step 4.
Additionally, ensure there are Windows Firewall exceptions for QuickBooks programs:
- Open the Start menu using the Windows logo on your keyboard.
- Access “Windows Firewall” through the search area in the Start menu.
- Click on Advanced Settings.
- Right-click Inbound Rules and tap New Rule to create a new one.
- Choose Program, then proceed to the next step by selecting Next.
- Click This Program Path and tap Browse.
- Select any executable file, then proceed with Next.
- Click the Allow the Connection button and choose Next.
- If prompted, select all profiles and click Next.
- Create and assign a name for the latest rule.
- Repeat the steps to add exceptions for QB programs in Outbound Rules.
Executable File | Location |
QBW32.exe | C:\Program Files\Intuit\QUICKBOOKS YEAR |
AutoBackupExe.exe | C:\Program Files\Intuit\QUICKBOOKS YEAR |
Dbmlsync.exe | C:\Program Files\Intuit\QUICKBOOKS YEAR |
FileManagement.exe | C:\Program Files\Intuit\QUICKBOOKS YEAR |
DBManagerExe.exe | C:\Program Files\Intuit\QUICKBOOKS YEAR |
QuickBooksMessaging.exe | C:\Program Files\Intuit\QUICKBOOKS YEAR |
FileMovementExe.exe | C:\Program Files\Intuit\QUICKBOOKS YEAR |
C:\Program Files\Intuit\QUICKBOOKS YEAR | |
QBServerUtilityMgr.exe | C:\Program Files\Common Files\Intuit\QuickBooks |
IntuitSyncManager.exe | C:\Program Files\Common Files\Intuit\Sync |
QBLaunch.exe | C:\Program Files\Common Files\Intuit\QuickBooks |
QBUpdate.exe | C:\Program Files\Common Files\Intuit\QuickBooks\QBUpdate |
QBCFMonitorService.exe | C:\Program Files\Common Files\Intuit\QuickBooks |
OnlineBackup.exe | C:\Program Files\QuickBooks Online Backup |
Fix 4: Update the Multiple Instances of QB Desktop on the PC
Errors in updating QB may arise if multiple installations of QuickBooks Desktop with the same version and year are present on a single computer (e.g., QuickBooks Enterprise Solutions 19.0 and QuickBooks Premier 2019).
In such cases, resolve the issue by downloading and manually installing updates for one or more versions of QuickBooks Desktop through the steps below:
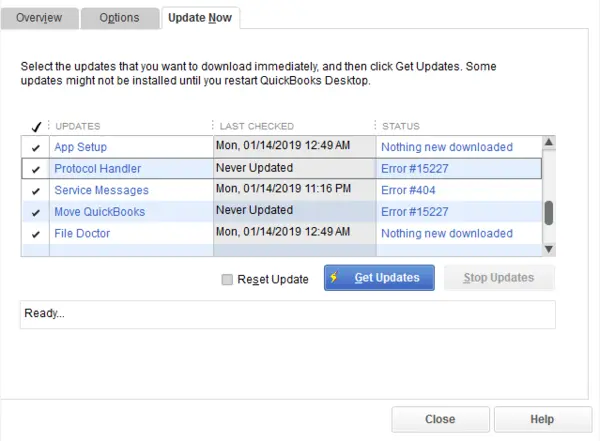
Update QuickBooks Desktop
- Close currently open company files and exit the QuickBooks Desktop program.
- Press the Windows logo to access the Start menu.
- Type “QuickBooks Desktop” and right-click on the application’s icon in the search results.
- Choose “Run as administrator” From the list of options on the screen after right-clicking on QB.
- Once you reach the No Company Open screen, go to the Help menu.
- Select “Update QuickBooks Desktop.“
- Choose the Options button and hit “Mark All.”
- Click Save to confirm your selections and switch to the Update Now tab.
- Check the checkbox labelled “Reset Update.”
- Click “Get Updates” when you are prepared.
- After updating QuickBooks Desktop, exit and then reopen the application.
- Select “Yes” to apply QB updates.
- Once the QuickBooks update installation ends, restart your system.
You can also try installing the updates from the internet through the steps below:
- Access the Downloads & Updates page of Intuit QB.
- Choose the download link you need from the site.
- Click ‘Get the latest updates.’
- Click to run the executable file.
Fix 5: Reinstall QuickBooks Desktop
If you keep facing problems with a QuickBooks critical update, remove the application from your system and install it again. The reinstallation will help resolve the problems interrupting the latest updates. So, follow the steps below:
Prerequisites
- Download the QB Desktop installer you use.
- Keep the license number in hand. Find it on the original package or the purchase confirmation email when you buy it online.
Remove QB Desktop
- Access the Start menu, find ‘Control Panel’, and click to open it.
- Click Programs of Features > Uninstall a Program.
- Choose the QB Desktop version to delete from the programs list.
- Tap Uninstall/ Change > Remove > Next. Sign out and in as Windows admin of the uninstall option is not present.
Reinstall QuickBooks Desktop
- Verify that your computer fulfills all crucial QuickBooks requirements.
- Download the required QuickBooks Desktop version from official Intuit sources and save it in a convenient location, such as the desktop or downloads folder.
- Have your product and license numbers readily available for reference.
- Initiate the installation process by launching the QuickBooks.exe file.
- Follow the on-screen instructions, agree to the license agreement, and proceed by clicking Next.
- Enter your product and license numbers in the designated fields, then click Next.
- Choose either Express Install or Custom and Network Install based on your specific requirements.
- Conclude the installation by following the prompts to ensure a successful QuickBooks installation.
Fix 6: Update Windows
Updating Windows is another essential measure after updating QuickBooks. Follow the easy steps below to update your windows:
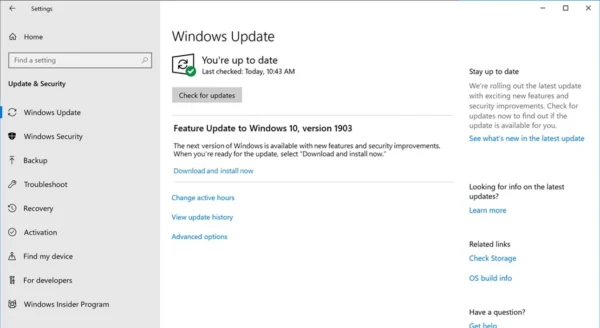
Update Windows
- Tap the Windows logo on the keyboard or the desktop to access the Start menu.
- Write “Check for updates” in the search and click Enter.
- Look for the latest Windows updates and hit Install now.
Fix 7: Use Windows as Admin
Ensure you have admin rights on the Windows operating system if you face QuickBooks Desktop update errors. Here’s how you create a Windows user account and switch to Administrator type in Windows 11/10:
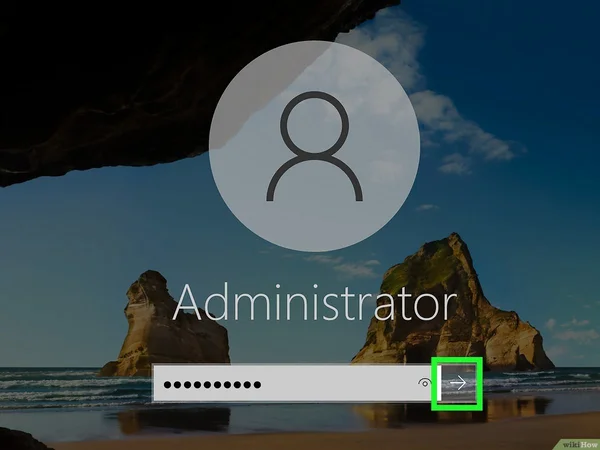
Login as an Administrator on your Computer
- Open the Start menu, select Settings, and click on the Accounts option. Then, choose Family & Other Users (On some Windows versions, it may be labelled as Other Users).
- Look for the Add Other User option, check the box next to it, and click the Add Account option.
- Choose “I don’t have this person’s sign-in information” and click on “Add a user without a Microsoft account” on the subsequent page.
- Fill in a username, password, or password hint—or tap security questions—then click Next.
- Modify a local user account into an administrator account by navigating to the Start menu > Settings > Accounts.
- Under Family & Other Users, select the account owner’s name ( “Local Account” should be below the account name), and click on Change Account Type.
- Choose Administrator under the Account Type tab and click OK.
- Sign in with the help of the newly created administrator account.
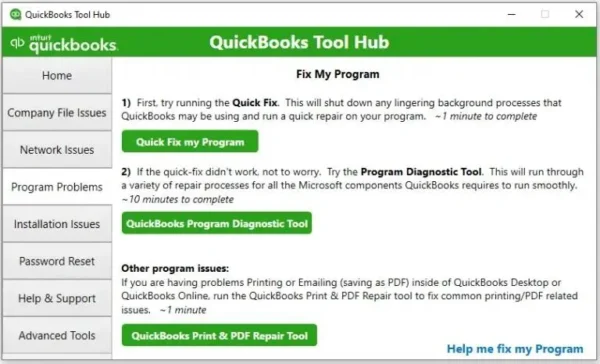
Fix 8: Get Help of Quick Fix My Program
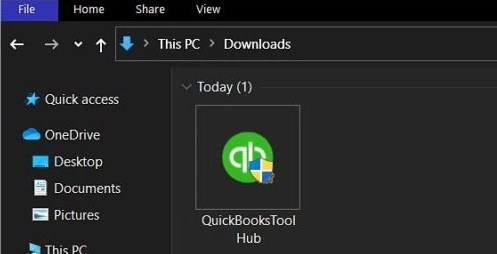
Use Quick Fix My Program, a highly effective utility within QuickBooks Tool Hub, to address application performance issues. It is user-friendly and involves minimal steps outlined below:
- Visit the Intuit site and click the download link for QuickBooks Tool Hub.
- Save the downloaded file in a location that is easily reachable, such as the desktop or downloads folder.
- Once downloaded, open the QuickBooksToolHub.exe file by double-clicking on it.

Double-click the QuickiBooksToolHub.exe file
- Agree to the InstallShield instructions and the license agreement.
- Complete the installation of QuickBooks Tool Hub and launch the application.
- As you open QuickBooks Tool Hub, navigate to Program Problems.
- Click on Quick Fix My Program.

Quick Fix My Program
- Allow it to run until it detects and resolves the identified issues.
Fix 9: Meet Minimum System Requirements
Ensure you meet the minimum requirements required for your system to maintain compatibility with QuickBooks. These include compatible Windows/ Mac operating systems, browser support, RAM needs, etc.
Fix 10: Repair QuickBooks
You should use the Control Panel to repair the QuickBooks program and fix the issues when QuickBooks fails to reset the update. This repair process fixes all the components and files necessary to run QuickBooks. the following repair steps:
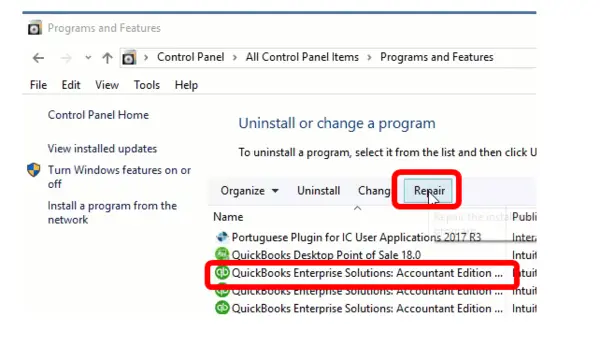
Repair QuickBooks
- Reboot your computer to eliminate any potential interference from other programs during the repair process.
- Access the Windows Start menu and navigate to the Control Panel.
- Select Programs and Features, followed by the Uninstall a Program button.
- Locate QuickBooks in the list of Programs and choose Uninstall/Change.
- Click Continue or Next.
- Choose Repair and then click Next.
- Once the utility repairs QuickBooks, click Finish.
- Proceed to update your QuickBooks to the latest release.
Fix 11: Run QB Install Diagnostic Tool
Take the help of QuickBooks Install Diagnostic Tool, a QB Tool Hub utility that helps resolve installation problems. The steps to run this excellent tool are as follows:
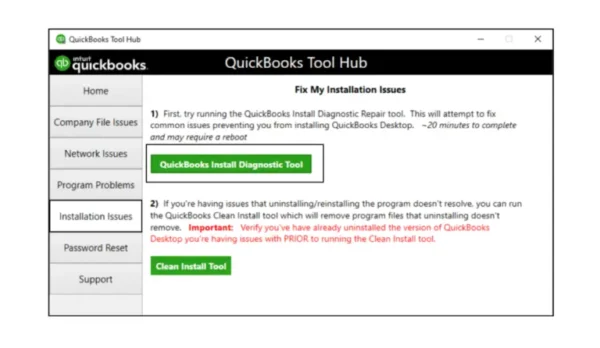
QuickBooks Install Diagnostic Tool
- Open QuickBooks Tool Hub.
- Select Installation Issues.
- Click QuickBooks Install Diagnostic Tool.
- Run the tool, access QB Desktop, and then your data file.
Fix 12: Run Verify And Rebuild Data Utilities
Verify and Rebuild data utilities are ideal to help you get back to business. The Verify tool pinpoints any data issues in your company file, and the Rebuild tool automatically addresses them. Follow the steps outlined below:
Verify data:
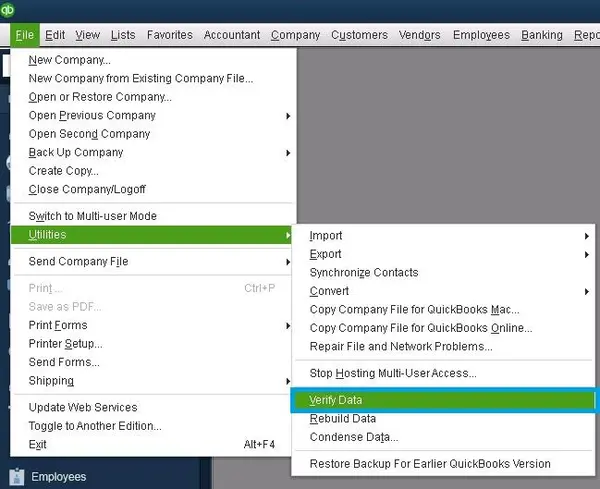
QuickBooks Verify Data Tool
- Navigate to the File menu, then click Utilities, and select Verify Data.
- If an error is detected, proceed to Rebuild your data.
Rebuild data:
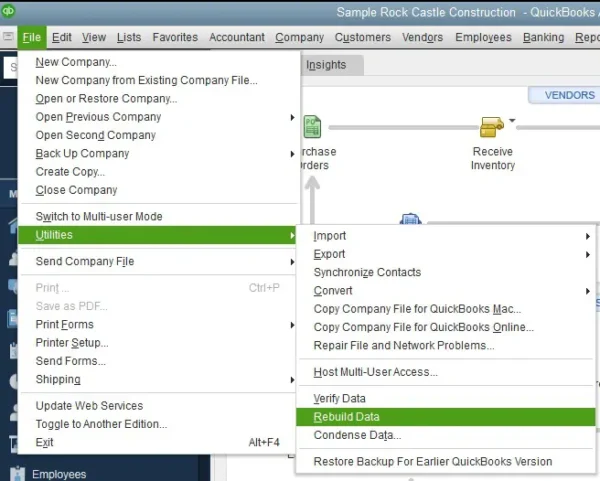
QuickBooks Rebuild Data Utility
- Return to the File menu, then tap Utilities, and choose Rebuild Data.
- Select OK if prompted to back up your company file.
- After creating the backup, the Rebuild Data utility will run automatically.
- Click OK when you receive the message indicating the completion of the rebuild.
Fix 13: End QuickBooks Update on Task Manager
When QB runs in the background, it’s identified as a process (QBW32.exe) in the Windows task manager. You can choose to turn off the preference using the instructions below and re-open the program. Here are the steps outlined for you to follow.
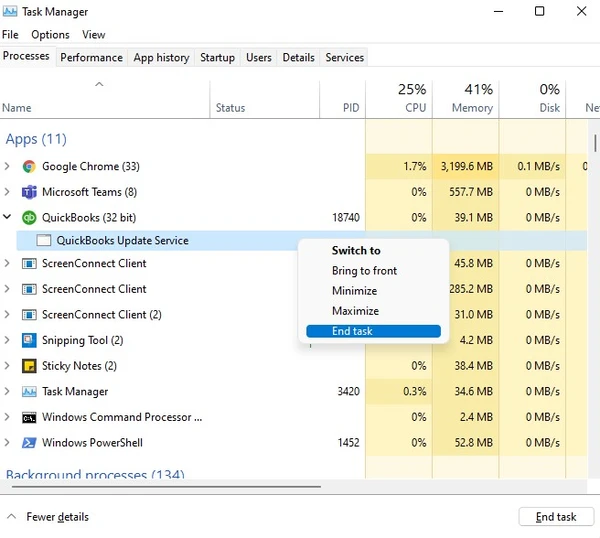
End QuickBooks Update on Task Manager
- Right-click the task bar and choose Start Task Manager.
- Move to the Processes tab and tap the Image Name tab.
- Select the each QB processes one-by-one and click End Process.
- Ensure only QB processes are ended and then close the Task Manager.
Fix 14: Run QuickBooks File Doctor
If you keep getting requests for updates, try the File Doctor tool from QuickBooks Tool Hub. It resolves issues with the file as well as the network issues. So, run it through the steps below:

QuickBooks File Doctor
- Open QB Tool Hub.
- Tap Company File Issues.
- Select Run QuickBooks File Doctor for 20 minutes or so. Then, results will appear.
- You can now open QB Desktop and the data file.
Fix 15: Clean Install QuickBooks
If you have a ‘QuickBooks software update waiting for you’ issue and it forces you to update even if you don’t want to, we recommend you clean install QuickBooks. It will help fix any issues causing trouble. The procedure of uninstalling and reinstalling is easy to follow. However, after uninstalling, you need to rename the existing installation folders manually through the steps below. Before doing so, we will first follow the steps to display hidden files:
- Choose the folder icon on your Desktop or System Tray to open File Explorer.
- Then, click on the View tab and choose Hidden Items.
After displaying hidden files, take the following steps:
- Open the Windows Start menu and search for “File Explorer,” then access the File Explorer window.
- Locate and launch the folder containing your QuickBooks company files, typically in your QuickBooks folder. The common locations include:
- C:\ProgramData\Intuit\QuickBooks (year)
- C:\Users(current user)\AppData\Local\Intuit\QuickBooks (year)
- C:\Program Files\Intuit\QuickBooks (year)
- For 64-bit versions: C:\Program Files (x86)\Intuit\QuickBooks (year)
- Right-click the folder > choose Rename.
- Add the word “old” at the end of the folder name, preventing QuickBooks from accessing it when you reinstall.
- Now, reinstall QB.
If you encounter an access error message while attempting to rename the folder, follow these steps:
- Right-click the Windows Task Bar, then hit Task Manager.
- Access the Processes tab.
- Click on the Name column header to sort the list.
- Choose the following processes (right-click) and end each one by selecting End Process: QBDBMgrN.exe, QBDBMgr.exe, QBCFMonitorService.exe, & Qbw32.exe.
- Select Yes if you come across the message, “WARNING: Terminating a process can cause undesired results…”
Fix 16: Install a Digital Signature Certificate
You need to have the correct digital signature certificate for QB to verify and authenticate it. The steps you need to take for this solution are as follows:
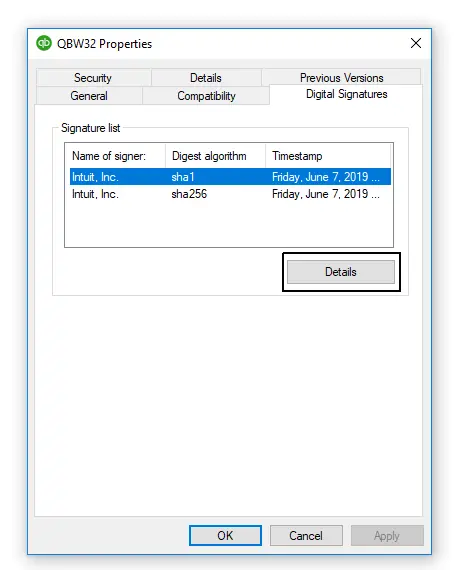
QuickBooks Desktop Digital Signatures Details
- Navigate to C:\Program Files\Intuit\QuickBooks.
- Right-click on QBW32.exe and hit Properties.
- Select Digital Signature, and make sure to choose Intuit in the signature list.
- Click on Details.
- Within the Digital Signature Details window, tap View Certificate.
- In the Certificate window, access Install Certificate.
- Continue selecting Next until Finish is displayed. Then, click Finish.
- Restart your computer.
- Open QuickBooks, then proceed to download the update again.
Fix 17: Turn-on the Microsoft .NET Framework
Ensure access to an administrator account to address the update issue. Follow the steps outlined below to eliminate the error:

Enable Microsoft .NET Framework
- Sign in to Windows using the Windows administrative account.
- Access the Start menu, select the Control Panel, and click on Programs.
- Choose to turn Windows features on or off.
- Turn on .NET Framework 3.5.
- Reboot your system.
Afterwards, proceed to reinstall the QuickBooks update:
- Go to Help and access Update QuickBooks Desktop.
- Click on Update Now, then hit Get Updates.
- Close and reopen QuickBooks to reinstall the update.
Fix 18: Reinstall Microsoft Visual C++
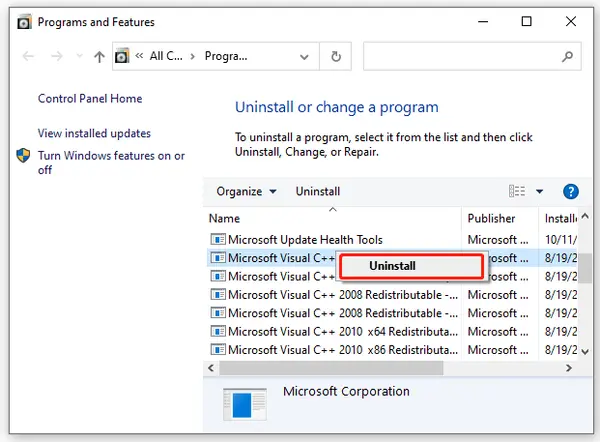
Reinstall Microsoft Visual C++
Remove Microsoft Visual C++, then proceed to reinstall Visual C++ for the years 2008, 2010, 2013, 2015, and 2017. After completing this process, proceed to update the program again.
Fix 19: Rename ND and TLG Files
The configuration files named Network Data and Transaction Log may get bloated over time. So, rename these files after cold rebooting (complete shutdown of the system) as they get re-created:
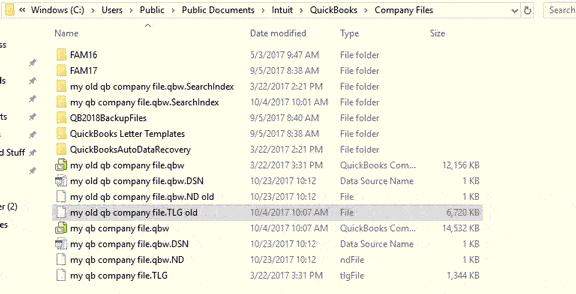
Modify the Names of the .TLG & .ND Files
- Open the directory where your company files are stored.
- Locate files with.ND and .TLG extensions corresponding to your company file name (e.g., SQTCompany.qbw.nd and SQTCompany.qbw.tlg).
- Right-click on each ND and TLG file, choose “Rename,” and add.OLD at the end (e.g., SQTCompany.qbw.nd.old and SQTCompany.qbw.tlg.old).
- Restart QuickBooks.
All users must exit the application and switch to single-user mode before updating.
Fix 20: Run The QB Update
The following steps will help you fix the update issue:
- Locate the file C:\Program Files (x86)\Intuit\QuickBooks 20xx.
- Find the QBUpdateUtility.
- Run it and fix the issue causing problems while updating the app.
Summing Up
We hope our in-depth guide about the QuickBooks Desktop update error resolves the problem easily. We have mentioned all the solutions in detail so you can apply the fixes easily without hassle. However, if you find yourself stuck or require expert supervision, we recommend contacting our dedicated team. They can not only provide practical solutions but also help resolve the error instantly.
FAQ’s
What are the various instances of receiving QuickBooks Desktop update errors?
The numerous instances of QB Desktop update errors include the following:
1. Suddenly, two users can’t access QB without updating, causing problems accessing the file. The error message “There’s a new QuickBooks software update waiting for you” flashes on the screen.
2. Bypassing the software update becomes challenging as it is mandatory, causing issues.
3. When attempting to open QuickBooks, the only available option is to click ‘Install Updates.’ However, upon clicking, there is no response. A brief loading symbol appears on the cursor for half a second, and the process fails to proceed further.
4. After receiving a message indicating an update waiting to be installed in QuickBooks, an additional prompt appears, stating, “Don’t have required permission. Contact administrator. close QuickBooks.” Even after attempting to open QuickBooks using the “Run as Administrator” option, the same message persists.
5. Numerous users are encountering difficulties logging in or performing actions due to insufficient permissions to install an update in QuickBooks. When attempting to log in, they receive a prompt instructing them to “Close QuickBooks.” Despite running the same version as the server, these users are unable to access the system. Even when attempting to launch QuickBooks as a system administrator, the system consistently requests a computer reboot without resolving the issue.
6. When the user tries to reset updates, it says QuickBooks failed to reset the updates.
7. An essential update is necessary to access QuickBooks. However, attempts to update are unsuccessful, resulting in error messages and an inability to complete the update. Consequently, users are locked out of QuickBooks, a program for which they have paid. This situation raises concerns as it restricts access to a paid program due to update-related issues.
8. The issue is particularly troublesome as users without admin permissions get locked out of QuickBooks, necessitating the completion of updates and, in turn, requiring server reboots.
Where do users face QB update errors?
Users face QB update errors in the following systems:
QuickBooks Enterprise 20 (R6)
QB Premier 19
QB 2019
QB Enterprise 2021
QuickBooks 2022
QB Pro/ Premier 2020
QB Enterprise 2022
Why is QB forcing updates and not accepting the install later option?
QuickBooks issued essential updates for some QB Desktop versions. The key reasons for these updates include the following:
Administrative users can now edit their user ID when signing into the Intuit account. Additionally, they can request access to a Secondary Admin role in the Intuit account.
QuickBooks Desktop now provides support for both print and e-filing of 1099-NEC and 1099-MISC forms.
The sign-up process for QuickBooks Payments has been enhanced for improved simplicity and efficiency.
How do you verify if you have successfully logged in as an admin in Windows to get QB updates?
Confirm that you have successfully logged in as an administrator by following these steps:
Navigate to the top menu and select the Company option.
Click on the Users tab.
Choose View Users.
After verifying your administrator status, proceed to update your QuickBooks Desktop account once again.
How should I manage the QB Desktop update problems as a standard and admin user?
Depending on your company/group policy configuration, a user on the machine must maintain administrator privileges throughout the entire update process. This can be achieved either by using an admin user or elevating the standard user to admin status before initiating the update.
If using an Admin user:
Complete the update.
Reboot the system.
Allow 5-10 minutes after logging back in without any interaction (i.e., refrain from touching the keyboard).
Launch QuickBooks to check for the success of the update.
If successful, log out and log back in as the standard user to verify QuickBooks again.
If using the Standard User:
Attempt to elevate the user to the Administrator group (this can be done through an elevated Computer Management console or Control Panel – Users).
Log out and log back in.
Install the update.
Reboot the system.
Again, wait 5-10 minutes and check QuickBooks to ensure the update was successful (the user should retain administrator privileges throughout this entire process).
How do I eliminate QuickBooks Desktop update error?
Resolving a QuickBooks Desktop update error requires following the steps below:
Configure firewall settings
Reset QB updates or download update patches from the internet
Run the QB Update Utility
Run QuickBooks File Doctor, Quick Fix My Program, and QB Install Diagnostic Tool
Rename ND and TLG files
Install a digital signature certificate
Update Windows
Run Verify and Rebuild Data utilities
Update multiple instances of QB
Reinstall or clean install QB
Terminate QB update on Task Manager
Repair QuickBooks through the Control Panel
Look into date and time settings
Meet the minimum system requirements
Use Windows as an admin user
Use QB as an admin
Manage the internet connection settings

Edward Martin
Edward Martin is a Technical Content Writer for our leading Accounting firm. He has over 10 years of experience in QuickBooks and Xero. He has also worked with Sage, FreshBooks, and many other software platforms. Edward’s passion for clarity, accuracy, and innovation is evident in his writing. He is well versed in how to simplify complex technical concepts and turn them into easy-to-understand content for our readers.