Last Updated on April 16, 2026
QuickBooks users need the feature to print their invoices and send/ email them to clients. However, they may commonly notice QuickBooks printing problems with invoices. These issues may range from a black box covering the interface when you save it as a PDF and print/ email it, the margins may be cut off, the content may be missing, or it may not print at all. The error may appear in Windows and Mac, and you might find it challenging to execute your operations. This guide will assess what you need to do to fix this problem without facing any issues.
Are you unable to print invoices from QuickBooks and want a sure-shot solution to resolve Invoice printing errors? Contact Accounting Helpline Support at 1.855.738.2784 Now.
Reasons for QuickBooks Printing Problems with Invoices
Here’s why you face QuickBooks printing problems with invoices in QB Online and Desktop:
- Printing setup or layout problems may cause issues.
- An outdated or damaged Adobe Acrobat or Reader can cause printing problems.
- TEMP Folder Permissions may be wrong and cause printing issues.
- Browser problems are major reasons for printing issues.
- Incompatibility with operating system updates and QB may cause this issue.
- Third-party plugins installed on Safari can lead to this error.
- Your printing layout or format may be wrong, causing QuickBooks invoice printing problems.
- Your printer’s drivers might be outdated and lead to incompatibility with QB.
Solutions to Resolve Printing Problems with Invoices in QB
Here’s what you need to do when you encounter QuickBooks printing problems with invoices in QB Desktop:
Solution 1: Run QB Print and PDF Repair Tool
The first solution calls for running the QuickBooks Print and PDF repair tool in the tool hub through the following steps:
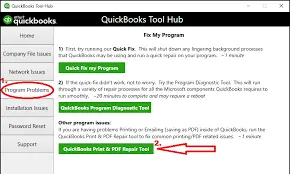
- Download the QuickBooks Tool Hub file, and once downloaded, open QuickBooksToolHub.exe.
- The steps to install will be shown on the screen. Follow them and agree to the terms and conditions.
- On complete installation, double-click the QuickBooks Tool Hub.
- Select Program Problems in the QuickBooks Tool Hub.
- Click on QuickBooks Printer Repair Tool and let the tool run.
- After running the QuickBooks printer repair tool, try to print the invoices again.
Solution 2: Reboot and Reset Permissions for the TEMP Folder
The next solution to try when you encounter issues while printing invoices in QB is as follows:
Step 1: Reboot PC
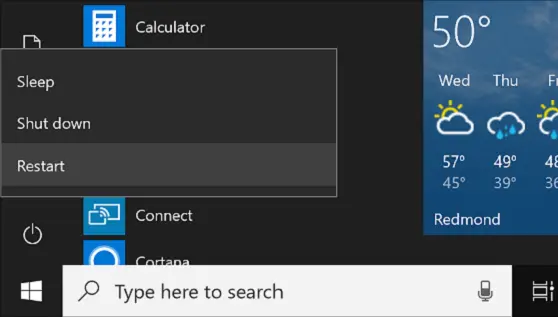
Restarting your PC and trying the printing again may help resolve the problem. However, if it doesn’t fix the printing issue, proceed with other steps.
Step 2: Reset TEMP Folder Permissions
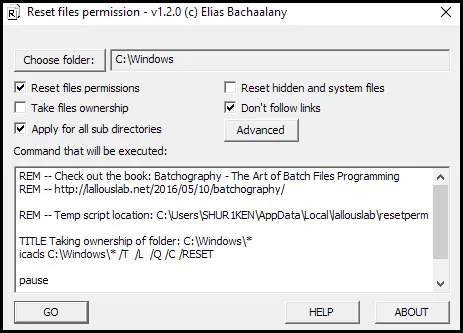
- Open the RUN command by pressing the Windows key + R.
- Type %TEMP%, then hit Enter.
- Right-click on an empty area within the temp folder and hit Properties.
- Navigate to the Security tab.
- Ensure all user names and groups in the Security settings have Full Control.
- Once Full Control permissions are set, attempt to save it as a PDF again in QuickBooks.
Solution 3: Adjust Columns and Widths for Printing
Attempt to adjust the printing columns and widths to address the problem.
To do this, you can switch the layout to a portrait by accessing the Print tab and clicking Customize data layout, then filtering details as needed. Here’s a step-by-step guide:
- Navigate to Customers, then go to the Customers Center.
- Select the invoice transaction you wish to print.
- Click on Formatting and then choose Customize Data Layout.
- Click the Print button.
- Choose the radio button of Use specified printer settings below for this Invoice.
- Under ORIENTATION, select Portrait.
- Click OK.
Solution 4: Check Settings in Preview When Using Safari in MacOS X
If you face the problem of the right margin being cut off when printing your invoice, we want you to check your settings in Preview. When this situation arises, you should adjust your printing setup and alignment in QB Online:
- Choose Sales or Invoicing.
- Tap an invoice for printing.
- After opening it, click Print or Preview.
- In the Print preview window, select Print or use Command+P.
- Select Show Details to customize print settings.
- Navigate to the Orientation section, ensuring that the Scale is set to 100%.
- Verify that Paper Handling is chosen in the dropdown menu and that Scale to fit paper size is unchecked.
- Ensure that the Layout section has the border set to None.
Solution 5: Update or Repair Adobe Acrobat Installation
Printing issues in QuickBooks Online can go away by updating Adobe Acrobat to the latest version. The various ways you can do so are as follows:
Automatic Adobe Reader and Acrobat Updates
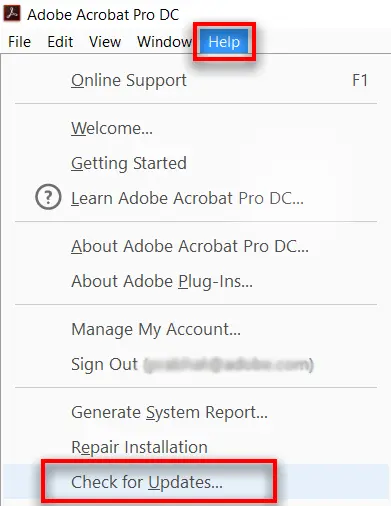
- Open Adobe Reader or Acrobat.
- Click Help > Check for updates.
- Download and install the latest updates by following the instructions of the update window.
Updating Adobe Reader on the Web
- Access Reader, then choose Help > About Adobe Reader. Write your product version.
- Reach the Adobe Reader Downloads page. The web page will recognize your OS and Reader version itself.
- If the web page detects that a new version is here, click Install Now.
- Tap the downloaded file and follow the commands.
Manually updating Adobe Reader and Adobe Acrobat
- Launch the software.
- Access Help > About Acrobat or Adobe Reader.
- Take note of the version.
- Close the application.
- If you’re not using the latest version, download the required Adobe Reader or Acrobat installer.
- Tap the Adobe Acrobat Reader installer to initiate the download. Once the download is finished, double-click the downloaded file and follow the on-screen instructions to complete the Adobe Acrobat or Reader installation.
Repair Adobe Acrobat Reader
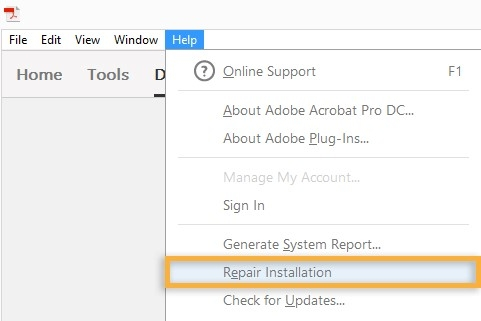
If you’ve upgraded to the most recent version of Adobe Reader/Acrobat and the issue persists, you should repair your Adobe installation.
- Close Acrobat/Reader and any open web browser windows.
- Click the Start button at the taskbar’s bottom left.
- Input Control Panel and press the Enter key.
- Choose Programs and Features.
- Tap Acrobat or Adobe Reader and click Uninstall/Change.
- In the Setup dialog box, click the Next option.
- Hit the Repair option, then tap Next.
- Click Install.
- Once the process ends, hit Finish.
- Restart your computer.
- Reconnect to QuickBooks Online and attempt to print again.
Solution 6: Troubleshoot the Browser
If you face QuickBooks printing problems with invoices in QB Online, you may need to troubleshoot the browser through the following steps:
Turn to Incognito Mode
Private browsing or incognito mode can help resolve the error:
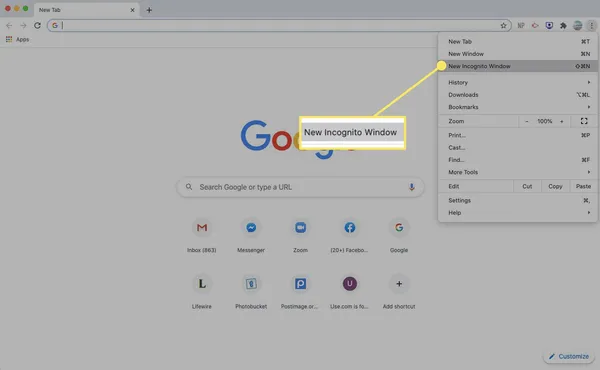
- Ctrl + Shift + N for Google Chrome private browsing
- Ctrl + Shift + P for Mozilla Firefox
- Ctrl + Shift + N for Microsoft Edge
- Command + Shift + N for Safari
Try printing again in private browsing mode, as the web cookies don’t get saved.
Reprint Invoices
After logging in, reprint invoices to see the result:
- Tap Sales, then Invoices.
- Find the transaction, and choose Print from the Action column.
- Hit the printer icon to move forward.
Clear your Cache
If the print process works here, clear your cache in the regular browser for a smooth browsing experience:
Firefox:
- Hit the Menu icon and open Settings.
- Tap the Security and Privacy panel.
- Hit the Clear Data option in the Cookies and Site Data tab.
- Remove the mark against Cookies and Site Data.
- Click Clear after checking the Cached Web Content box.
- Exit Settings.
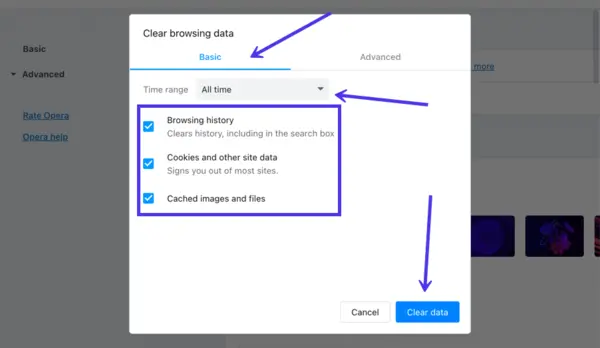
Google Chrome:
- Open Chrome.
- Click More.
- Choose More Tools, then Clear browsing data.
- Tap a time range at the top. Choose All time to delete everything.
- Tick the Cookies and other site data, Cached images and files boxes, then hit Clear data.
Safari for Mac:
- Open the Safari App on Mac.
- Select History > Clear History.
- Tap the pop-up menu and go back as far as you want your history cleared.
Microsoft Edge:
- Tap the “Settings and more” option, then hit “Settings” > “Privacy, search, and services.”
- Tap “Clear browsing data now” under “Clear browsing data,” and choose “Choose what to clear.”
- From the dropdown list under “Time range,” select the required time range.
- Hit the types of browsing data you wish to clear. For instance, you might want to delete browsing history and cookies while saving passwords and form fill data.
- Finally, click on “Clear now.”
Also, consider using supported browsers.
Solution 7: Remove Third-party Plug-ins
To disable third-party plug-ins in Safari and allow Safari’s internal PDF viewer to handle PDFs by default, follow these steps:
- Close Safari.
- Open a new Finder window and go to the Go menu, then choose Go To Folder.
- Enter the following path: /Library/Internet Plug-Ins/.
- If you find plugins named PDF Browser Plugin.plugin, AdobePDFViewerNPAPI.plugin, or AdobePDFPDE.plugin, relocate them to the recycle bin or another location on your system. You may need to provide your password to authorize the removal.
- Restart Safari and log in to QuickBooks Online.
- Attempt to print your document.
Solution 8: Use Ctrl + P
If the print still doesn’t come out completely, you can use Ctrl + P as follows:

- Choose the invoice to print.
- Click Ctrl + P.
- Change the layout you want in the left menu.
- You’ll see the invoice format and see if any printing issues are visible here.
- Now, start printing.
Solution 9: Print from within Mozilla Firefox
If you’re using QB Online on Mac, print from within Mozilla Firefox.
Solution 10: Change Your Invoice’s Font
When Mac updates, it may cause a change in your font to Helvetica. Changing it to another font can help fix the printing problems with invoices in QB.
Solution 11: Use Notepad
Use Notepad to ensure the file prints fine outside of QB:
- Click Start.
- Tap Notepad.
- Input some text.
- Hit File.
- Click Print.
Solution 12: Update Printer Drivers
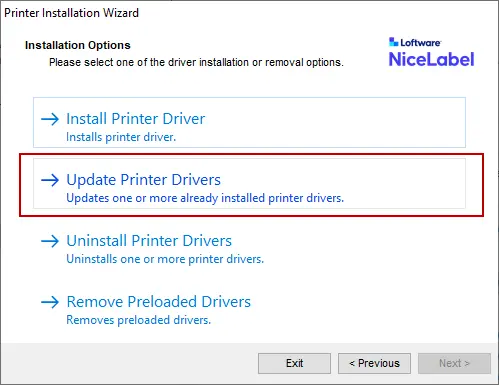
Ensure to update the outdated printer drivers and run the printing process again.
Solution 13: Update QuickBooks Desktop for Windows and Mac
Undertake QuickBooks Desktop updates for Windows and Mac to ensure you have the latest security patches and enhancements:
Update QuickBooks Desktop
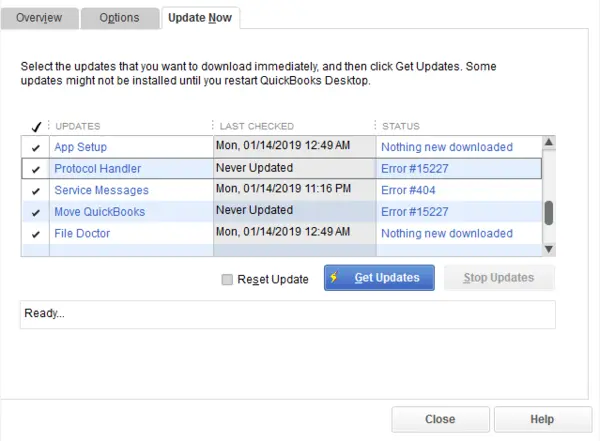
- Click Help in QB and tap Update QuickBooks Desktop.
- Select Update Now, then choose the Get Updates button.
Update QB Desktop for Mac
- Choose the QuickBooks dropdown and tap Check for QuickBooks Updates.
- Hit Install update if a newer version is available.
- Tap Install and relaunch when prompted.
- QB for Mac automatically opens after the update.
Solution 14: Get Reports and Transactions Printed with Every Detail
You can use the following solutions to ensure that your reports and transactions are printed with all the details:
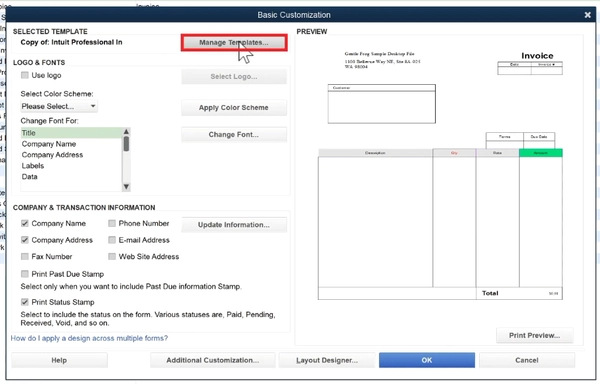
- If you are printing an Invoice, switch the Template to Airy New. This can be done in the Custom Form Styles page or under Customize for an existing Invoice.
- If printing a Report, export it to Excel or download it as a PDF and print it from Adobe rather than the browser.
- If you want, log in to QuickBooks Online using a Windows or Mac machine that is not on the Sonoma OS release.
Solution 15: Verify and Rebuild Data
Resolve any program-related issues through the Verify and Rebuild Data utilities as follows:
To Confirm Data Integrity:
- Click on Window in the top menu bar and then Close All.
- From the File menu, tap Utilities.
- Choose Verify Data.
To Rebuild Data:
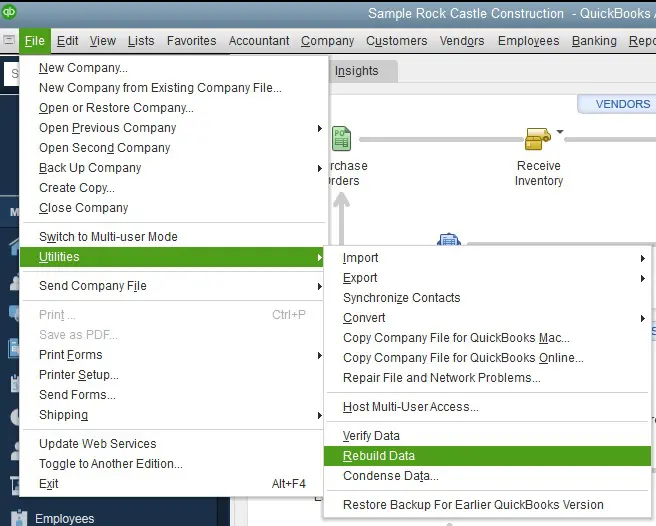
- Click on Window in the top menu bar and then Close All.
- From the File menu, hit Utilities.
- Click Rebuild Data.
- You will be prompted to back up your company file; click OK.
- Press the OK option when the message “Rebuild has completed” appears.
- After completing these steps, proceed to perform a print test on your invoices.
Solution 16: Configure Print Settings
To print invoices displaying items with zero amounts (0.00) on the printed copy, ensure that your settings are adjusted correctly.
Here’s the process:
- Navigate to the top menu bar, click on Edit, and then tap Preferences.
- Go to the Sales & Customers section and open its Company Preferences tab.
- Unmark this box: “Don’t print items with zero amounts when converting to Invoice.”
- Tap OK to save the changes.
After turning off this setting, attempt to print a copy of an invoice with zero amount items.
Troubleshooting Printing Issues in QB Desktop
If you’re encountering issues while printing invoices in QB Desktop, try the following solutions:
Solution 1: Print from the Notepad
We have detailed these steps above in Solution 11. If you can’t print from Notepad, you’ll need to try the next solution. If you can, then go to Solution 3.
Solution 2: Test the Printer Setup
Here’s how you test the printer setup to ensure the problems get resolved while printing invoices:
Step 1: Ensure the Printer is set up accurately
- Restart the computer after turning off the printer. Once the computer restarts, turn on the printer.
- Ensure to load it correctly.
- Open the Control Panel from Windows Start.
- Double-click on Printers and Faxes. If the printer shows Offline, right-click the printer and select Use Printer Online.
- On double-clicking the printer, if there are jobs in the queue, cancel all documents.
- After closing the window, right-click on the printer.
- Choose Properties and click on Print Test Page.
Step 2: Ensure the Printer is the Right One
- Access the File menu in QB and tap Printer Setup.
- Hit the specific form you wish to print.
- Verify that the printer name matches the exact name of the printer you intend to use. If not, make the necessary corrections in your computer’s Printer Setup beforehand.
- Refer to the Help option in this area for additional assistance with these settings.
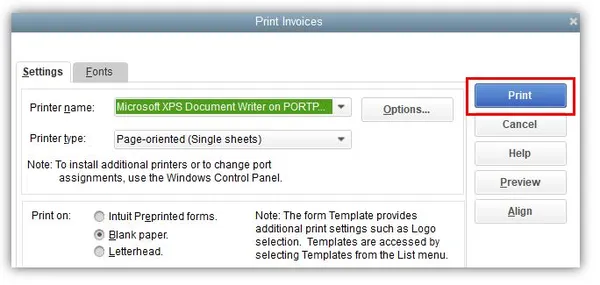
Step 3: Print to Another Printer
- In QuickBooks, tap the File menu, then hit Printer Setup.
- Tap the specific form you wish to print.
- Click a different printer, such as the Microsoft XP printer.
- For further assistance with these settings, refer to the Help option in this area.
Solution 3: Test Company File and QB Installation
Attempt to print an alternative form, or if you are using customized forms or memorized reports, test a standard form or report.
- If you were initially printing a batch of forms in QuickBooks, attempt to print a single form. If successful, print smaller batches.
- Open one of the QuickBooks sample company files and attempt to print the same type of form or report. If successful, address any data damage in your company file through the Verify/ Rebuild Data utilities and the QuickBooks File Doctor tool, then retry printing.
If printing from a sample file still poses challenges, proceed to Solution 4.
Solution 4: Run QB Print and PDF Repair Tool
You can use this tool from the tool hub through the steps in Solution 1.
Troubleshooting Printing in QB Desktop for Mac
The general troubleshooting steps for various printing problems in QB Desktop for Mac are as follows:
Solution 1: Solution When Lines on the Invoice are Missing
Try these steps to adjust the width by increasing the margins on your standard form:
- Access a report and tap the Print icon.
- Choose QuickBooks.
- Tap Options or Margins to select your alignment.
- Hit Print.
Solution 2: When the Dollar Amount on The Invoice Doesn’t Show Cents
When you can’t see the cents in the dollar amount, you can customize your invoice to reduce its horizontal alignment.
Solution 3: Printing Logo on Checks
If you want to print the logo on checks, try the following steps:
- Choose Print, then click QuickBooks.
- Hit Logo.
- Drag the logo on the box, then tap Print company logo.
Solution 4: When the Dates on The Register Get Clipped Off
If the dates in the report are being cut off, it may be due to the report font size being too large. To address this:
- Go to the Print menu and choose QuickBooks.
- Select Format and then Show Fonts.
- Adjust the font size to 10 or smaller.
Solution 5: When the Text Near the Edges of Reports is Missing
The report margins may be too small, causing this problem. So do the following:
- Choose File, then Print Setup.
- Hit Reports/ Graphs/ Lists.
- Increase your margin size.
Conclusion
Invoice printing error in QuickBooks has been affecting the application now and then. The above methods to solve QuickBooks printing problems with invoices have proved to work in the majority of cases. But what if the company file errors are the issue? In such a case, we do not recommend going forward on your own. This could result in data loss. To fix issues printing invoices in QuickBooks with the help of experts, contact Accounting Helpline Support at 1.855.738.2784.
FAQs
What are the various QuickBooks printing problems in invoices?
The numerous issues you may encounter while printing in QB are as follows:
– A black box might cover the logo after you customize your invoice and print or email it after saving it as a PDF.
– The printing of invoices and packing slips on a Mac only prints the logo and the coloured bar.
– No text prints while using Google Chrome on Mac.
– Lines on the invoice are missing
– Unable to print the invoice after the macOS update
– The last two letters of the company name and the second line get cut.
– Your logo doesn’t print completely.
– The print is getting zoomed in, and the logo may get unclear.
– Any line with zero value or no value does not print
– Invoices suddenly start printing in an unusable format
Where do QuickBooks printing problems with invoices arise?
The following operating systems and QB versions may see QuickBooks printing issues with invoices:
– Windows 7
– QB Desktop
– 2012 Pro
– QB Online
– Mac OS X
– Safari 11 or later
– MacOS 14 “Sonoma”
What to do before troubleshooting printing issues in QB Desktop?
The following considerations might help resolve printing issues in QB Desktop:
– Update QB
– Connect the computer to the printer
– Have the latest printer driver installed
– No error messages or warning lights should be on your printer.

Edward Martin is a Technical Content Writer for our leading Accounting firm. He has over 10 years of experience in QuickBooks and Xero. He has also worked with Sage, FreshBooks, and many other software platforms. Edward’s passion for clarity, accuracy, and innovation is evident in his writing. He is well versed in how to simplify complex technical concepts and turn them into easy-to-understand content for our readers.