
Last Updated on April 16, 2026
QuickBooks error H505 commonly arises when users try to switch to multi-user mode. It can be a frustrating error, especially when businesses are set to allow multiple users to access the company file and work simultaneously. The error can suggest various things and require immediate attention, so you can resolve the problem effectively. That is why our experts have brought this in-depth blog, where we will discuss the reasons for the H505 error in QuickBooks and provide expert recommendations to resolve it.
Is QuickBooks error H505 making it challenging to run multi-user mode and access your company file? Call our Accounting Helpline experts at 1.855.738.2784 and let them use their proficiency to resolve the issue.
What is QuickBooks Error H505?
There are a number of different H-series errors that occur in QuickBooks, and the majority of them are associated with network-related problems that develop when you try to access the company file on the server. Whenever QuickBooks experiences problems connecting to the server, it displays an H-series error on the screen.
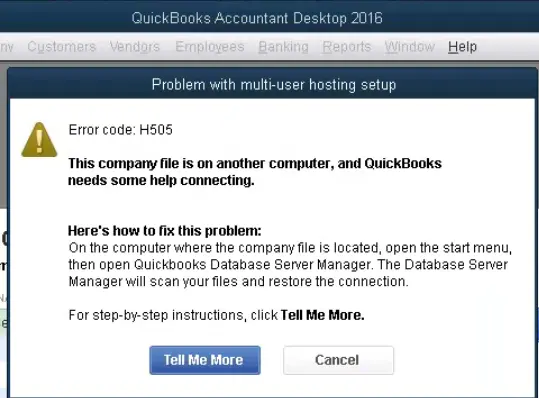
QuickBooks Error Code H505 is shown when QuickBooks on the user’s machine cannot connect with the other machine in the network that is hosting the company file. This error shows that there are technical issues in the network setup that are disrupting the connection between various workstations in the network.
Symptoms of QuickBooks Error H505
When the error takes place, some of the symptoms that are developed are as follows:
- The multi-user cannot be utilized.
- The QuickBooks program windows have crashed.
- The system crashes again and again.
- Windows freezes and becomes unresponsive from time to time.
- Users are unable to open the company file in QuickBooks that is saved on the server.
- The Error H505 appears on the screen.
These are some of the symptoms of the error code H505 in QuickBooks Desktop. Now, the time has come to know about the causes and solutions in detail.
What Triggers QuickBooks Error Code H505?
There can be several triggering points for the QuickBooks error code H505. You need to understand several causes of the error before jumping to the conclusion section directly. Some of the common causes of the H505 error in QuickBooks are as follows:
- Multiple workstations are hosting your company file instead of the server. This incorrect hosting configuration can cause the error H505.
- Something may be interfering with your QuickBooks connection, blocking or restricting it.
- The firewall may restrict incoming or outgoing communication to the company file.
- A damaged or incorrect ND file can cause this error.
- QuickBooks encounters issues in obtaining the IP address of the system or server housing the company file.
- Workstations are configured to access the file via the host’s Full Qualified Domain Name (e.g., computername.domain.com).
- The QuickBooksDBXX service has not been initiated.
- The file is on a non-native installed server, such as a Virtual Machine (VMware, VirtualBox, Microsoft Virtual Server, etc.).
- Permissions for QBDataServiceuserXX lack READ/WRITE access and have not been set to “Include Inheritable permissions from the object’s parent.”
- The QuickBooks files folder on the server has not been scanned with the QuickBooks Database Server.
These are the common causes of the error H505 in QuickBooks Desktop. Now, you must know about the best solutions to fix this error. You can implement the solutions mentioned below to get rid of the H505 error in QuickBooks Desktop.
How to Fix Error H505 in QuickBooks Desktop?
There can be several steps that you can take to resolve the error H505 in QuickBooks Desktop. Let’s have an overview of these steps before we jump into the descriptive steps:
- Running the QuickBooks Database Server Manager
- Turning Off the Host Multi-User Access Option
- Updating QuickBooks Desktop
- Creating a New Company File Folder
- Verifying Workstation’s Communication in QuickBooks
- Configuring the Windows Firewall Settings
- Opening Network Ports in QuickBooks
- Opening QB Sample File and Running in Multi-User Mode
- Providing Windows Access Permissions
- Editing Windows Host Files
These are the solutions that you can follow to eradicate the error code H505 in QuickBooks Desktop. Let’s have a look at these solutions in brief.
Solution 1: Running the QuickBooks Database Server Manager
You need to run the QuickBooks Database Server Manager to resolve the issue of QuickBooks error H505. There are three steps that you need to follow under this solution. These steps are mentioned below:
- Downloading and Installing QuickBooks Tool Hub
- Running the QuickBooks Database Server Manager
- Running the QuickBooks File Doctor Tool
Now, let’s look at these three steps in detail in the sections mentioned below.
Step 1: Downloading and Installing QuickBooks Tool Hub
The QuickBooks Tool Hub resolves common issues. To utilize the tool hub, you will need to close QuickBooks. To have the best experience, we suggest using Tool Hub on Windows 10, 64-bit.
- Close QuickBooks.
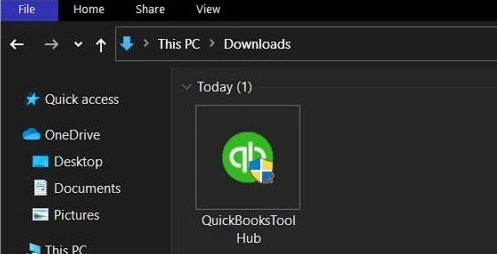
- Download the latest version of the QuickBooks Tool Hub. Save the file in a place where you can easily locate it (such as your Downloads folder or your Windows desktop). Note: If you’ve previously installed Tool Hub, you can see which version you have. Choose the Home tab. The version will be at the bottom.
- Open the file you downloaded (QuickBooksToolHub.exe).

- Install and accept the terms and conditions following the instructions on the screen.
- Once the installation is complete, double-click the icon on your Windows desktop to launch the tool hub.
After you have successfully downloaded and installed the tool hub in QuickBooks, you are ready to proceed to the second step.
Step 2: Running the QuickBooks Database Server Manager
Your server computer is where your QuickBooks company file(s) are stored. Your other computers on your network are your workstations.
- Go to the QuickBooks Tools Hub and choose Network Issues.
- Choose QuickBooks Database Server Manager. If QuickBooks is not on your server, it will ask you to install it.

- Within the QuickBooks Database Server Manager, choose Start Scan if you are able to view your company file folder(s). If not, browse to your company file’s location and then choose Start Scan.
- QuickBooks Database Server Manager automatically fixes your firewall permissions. When the scan is complete, click Close.
- Open QuickBooks in every workstation where you find Error H505. Choose File, then Switch to Multi-user Mode.
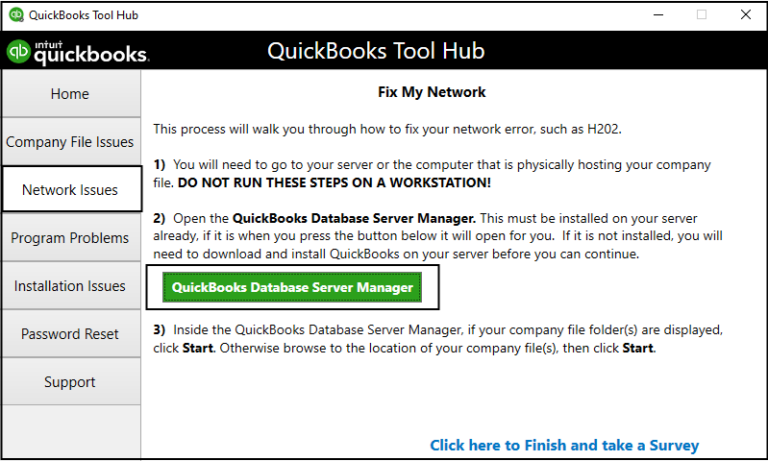
If you are using your server computer as a workstation, do not forget to check it as well. Now, you can proceed to the third step for a solution.
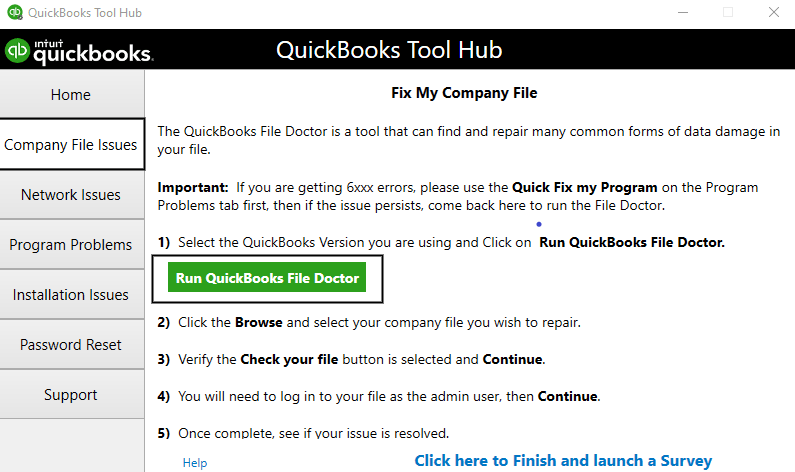
Step 3: Running the QuickBooks File Doctor Tool
Now, the final step will be to run the file doctor tool in QuickBooks. The steps to run the QuickBooks file doctor tool to fix the error code H505 are as follows:
- From the tool hub, choose Company File Issues.
- Choose Run QuickBooks File Doctor. It will take a minute to open. Note: If the QuickBooks File Doctor won’t open, look for QuickBooks Desktop File Doctor and manually open it.

- In QuickBooks File Doctor, choose your company file from the dropdown. If you don’t see your file, choose Browse and look for your file.
- Choose Check your file and Network (top choice), and then Continue.
- Enter your QuickBooks admin password and then Next.
- If your workstations can enter multi-user mode without problems, all is resolved.
In case you continue to have Error H505, proceed to the next solutions mentioned in this blog.
Solution 2: Turning Off the Host Multi-User Access Option
If you notice Error H505 in QuickBooks, one or several of your workstations are configured to be the server for QuickBooks. Your server (computer hosting your company files) needs to be the sole computer that is configured to host multi-user mode.
You need to turn off the Host Multi-User Access option on your workstations. These are the computers in your network that do not host your company files. Your server computer alone should host.
Note: You can perform these steps before you open a company file.
- Open QuickBooks on any workstation that displays error code H505.
- Don’t open your company file. Instead, go to File, then Utilities.
- If you find Host Multi-User Access in the list, do not choose it. Go to the next workstation. This one is not the culprit.
- If Stop Hosting Multi-User Access is a choice, choose it.
- Do these steps on every workstation you find displaying Error H505.
Once you’ve checked your workstations, proceed to your server computer. This is the computer that typically has your company files.
- Open QuickBooks on your server computer.
- Choose File, then Utilities.
- If Host Multi-User Access is available, choose it. If Stop Hosting Multi-User Access is available, don’t choose it.
These are the steps to turn off the host multi-user access option to resolve the QuickBooks H505 error.
Solution 3: Updating QuickBooks Desktop
Sometimes, updating QuickBooks can help you resolve the QuickBooks error H505. An outdated version of the application may cause some important company files to get damaged or corrupted. The steps to update QB Desktop are as follows:
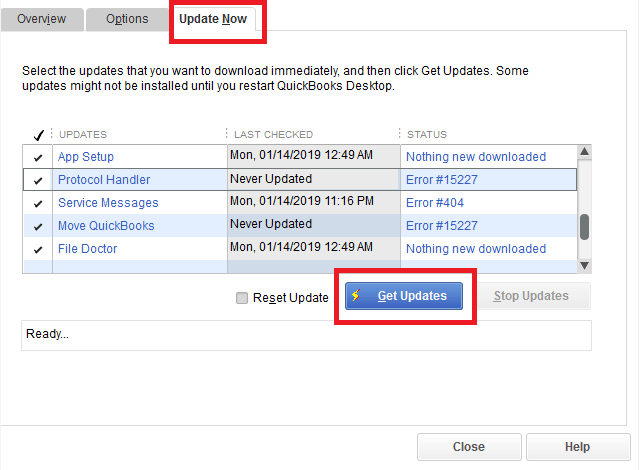
- Open QuickBooks Desktop and from beneath the Help tab, click on About QuickBooks.
- From the Update QuickBooks window, click the Update Now button.
- Be sure to tick-mark the New Features, Maintenance Releases, and Reset Updates boxes.
- Click the Get Update button.

- Re-start QuickBooks and if asked to Install Updates, then click on Install Now.
- Once the updates are installed, restart your computer and try to open the company file again.
Following these solutions will help QuickBooks update to the latest version. This might be a great attempt to fix the error code H505 in QuickBooks Desktop. If the error is still there, proceed to the next solution.
Solution 4: Creating a New Company File Folder
Creating a new company file folder also helps in resolving the error code H505 in QuickBooks Desktop. The steps to create a new company file folder are as follows:
- Go to the company file folder on the computer hosting the company file.
- Make a new folder on your desktop and copy the company file into it.
- Right-click the folder and choose Properties.
- Under the Share tab, choose Advanced Sharing.
- Mark the Share This Folder checkbox and click the Permissions.
- Choose the Full Control checkbox for the Everyone Group and click Apply and OK.
- Click Apply and OK again, and now attempt to open the company file again from the workstation.
These are the steps to create a new company file folder in QuickBooks to resolve the error code H505 in QuickBooks. If this does not help you, try moving to the next solution for resolution.
Solution 5: Verifying Workstation’s Communication in QuickBooks
Verifying the workstation’s communication in QuickBooks can help you locate the presence of error H505. The steps for the verification are as follows:
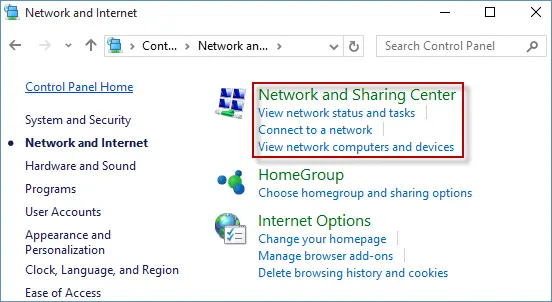
- Go to the Control Panel and choose Network and Sharing Center.

- Click on the Change Advanced Sharing Settings option and make sure the Turn on Network Discovery option is chosen under the Network Discovery and File and Printer sharing section.
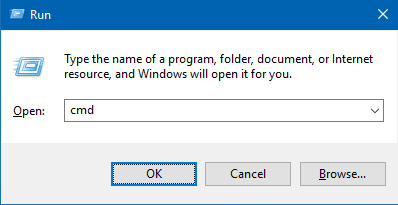
- Press Windows + R to bring the Run program onto the screen.
- Type CMD and Press Enter or click OK to execute the Command Prompt program.

- As soon as you observe a black screen on your monitor, input the ipconfig/all command and execute it by hitting the Enter key.
- Make a note of the server name and close the command prompt window.
- Now, execute the same command prompt application on the workstation computer and execute the ping (your server name) command without the brackets.
- This command will send a few data packets to the server, and if your server receives all of them, you will see no packet loss, and this means there are no problems in the connection between the server and the workstation.
- Repeat the same steps on every workstation that is providing you with the error code H505.
These are the steps for the verification of the workstation’s communication. If this does not help you, you can move to the next solution for resolution.
Solution 6: Configuring the Windows Firewall Settings
Sometimes, your current firewall settings may conflict with QuickBooks and cause the error H505. The steps to configure the firewall settings in Windows are as follows:
- Press Windows + R and type Control Panel.
- Press Enter and search for Windows Firewall.
- Click the Allow an app through Windows Firewall option.
- Click the Change Settings.
- Check the box below the Public list for the QuickBooks application.
- If you don’t see QuickBooks in the list, then click the Allow another app option and search for QuickBooks.
- Click OK and then choose the Public option for the application.
Finally, you need to click OK and attempt to open the company file a second time on the workstation and see if you are still receiving the error H505.
Solution 7: Opening Network Ports in QuickBooks
Firewall settings can also block the network ports in QuickBooks. You need to make sure you have enabled these ports in QuickBooks to resolve the QuickBooks error H505. The steps to open network ports in QuickBooks are as follows:
Step 1: Setting the Firewall Settings
You can begin the process by going to the Windows firewall settings and right-clicking on the Windows option to click on the control panel.
- Search for firewall in the search option, and also press the Enter key.
- Click on the Windows firewall and go to advanced settings
- The user is then needed to hover to the left and also right-click on the outbound rules and go to the new rule.

- Click on the ports, and also click on the next tab
- Then hit the TCP tab and in the given local ports, type the following ports:
- For QuickBooks desktop 2015: 8019,56725,55363-55367.
- For QuickBooks desktop 2016: 8019,56726,55368-55372 QuickBooks.
- desktop 2017: 8019,56727,55373-55377.
- For QuickBooks desktop 2018: 8019,56728,55378-55382.
- The user must select the next tab and also click on Allow the connection tab.
- Now, click next to enter the name, and also click the finish tab.
- The user will then have to repeat steps 1-5 for inbound rules.

The final step here is to switch over to the multi-user mode once again and also launch QuickBooks
Step 2: Enable Network Fiscovery Option
Under this step, you only have to open the control panel and then click on System and Security.
- Then click on the Windows firewall.
- Also, click on the Allow Associate App/feature on the Windows firewall.
- Press the modification option.
- Choose network discovery and press the OK button.
Now, you are ready to proceed to the next step.
Step 3: Determining the Server’s Name
Now, the last step involves determining the server’s name. The steps to determine the server’s name are as follows:
- The user must open the run command, click on Windows + R and type in CMD, and also press Enter.
- Also, type in config/all and press Enter.
- Then, after that, look for the hostname in the IP configuration section.
- The user will now see the name of the server on the right.
- The final step is to click the save tab and click the next tab.
These are the steps to help you determine the server’s name to fix the error H505 in QuickBooks Desktop. Now, even if the error is still there, you can proceed to the next solution for resolution.
Solution 8: Opening QB Sample File and Running in Multi-User Mode
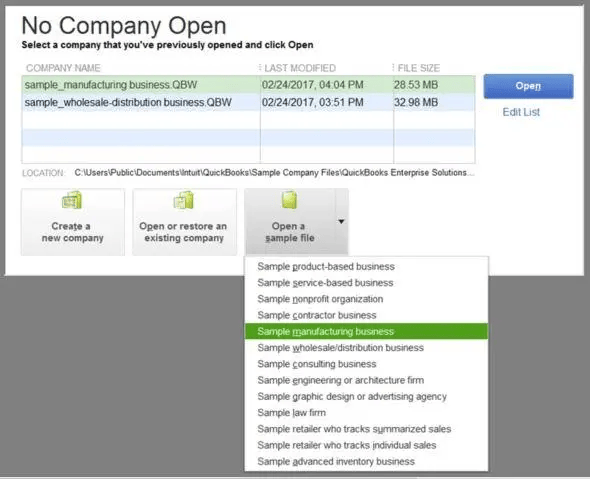
You can try resolving the multi-user error by looking at your file size. If it’s big, condense it. Then, open your sample company file in multi-user mode to isolate the cause of the error code h505 QuickBooks as follows:
- Hold the Ctrl key and launch QB to access the No Company Open screen.
- Click Open a sample file to launch it.

- If the file opens and you can run it in multi-user mode, the problem might be with your QuickBooks company file. In other cases, your QB installation might need a fix.
These are the steps to open a sample company file and run it in multi-user mode to fix the QuickBooks error H505. If this does not help, you can move to the next solution.
Solution 9: Providing Windows Access Permissions
Ensure QuickBooks has the appropriate access level to mitigate potential future issues when working with your company files on the network.
For Windows 10
- Press the Windows key, access the Windows Start menu, and launch File Explorer.
- Find and right-click on the QB folder with your company files.
- Choose Properties, then go to Sharing, and tap Share Add.
- Hit the relevant QBDataServiceUserXX for your version.
- Set Full Control as the permission level for both users, and then click Share.
For Windows Server 2012
Make sure File and Storage Services are installed before proceeding with the following steps:
- Press Windows (keyboard key) to open the Windows Start menu and type “Run” into the search bar. Thus, the Run Command will launch.
- Type in ServerManager and click OK.
- Hit File and Storage Services and then Shares in the Server Manager window.
- On the Task dropdown list, click New Share. A list of File Share Profiles will be displayed, and you can explore the differences between them by clicking on each profile and reading the description.
- Select SMB Share – Quick. Note: SMB Share – Quick is the default profile, but this choice may differ.
- In the Share location section, choose the Type a custom path option, then click Browse to locate the folder you want to share.
- Select the appropriate folder, click Select a folder, and then tap Next.
- You can leave the default selections under the Configure Share settings window and then click Next again.
Now, access QB on your server and workstations and look for the error H505. If the error is still there, you can also look for professional help by dialling the toll-free number.
Memory Table Regarding QuickBooks Error H505
This memory table will help you sum up the information in an organized way. You can take a snapshot of this memory table for future reference.
| Topic | Details in Simple Words |
| What is Error H505? | A network problem that blocks access to the company file on the server. |
| Symptoms | Freezing, crashing, can’t switch to multi-user mode, error message pops up. |
| Main Causes | Wrong hosting setup, firewall blocking, damaged ND file, and permission issues. |
| Quick Fixes Overview | Use Tool Hub, run Database Server Manager, update QB, and check the firewall. |
| Solutions | Running the QuickBooks Database Manager, turning off the Multi-user host access, updating QuickBooks, verifying workstation communication, opening network ports, etc. |
The table represents the information related to the error H505 in QuickBooks Desktop.
Summing It Up!
We hope our comprehensive blog about QuickBooks error H505 helps you resolve the error at the root. However, if you find this error appearing again or you are noticing other problems on your system, contact our Accounting Helpline expert team immediately. We will investigate the issue by scanning your files and acquiring relevant details in a secure environment. Call us at 1.855.738.2784 and resolve the H505 error immediately.
Frequently Asked Questions (FAQs)
How to fix error code H505?
To repair QuickBooks Error H505, begin by verifying if only the server is configured to host the company file (and not any workstations). Next, employ the QuickBooks Tool Hub to install and run the Database Server Manager and File Doctor tools. Ensure QuickBooks is updated to the latest version.
How to fix the error cannot communicate with the company file due to the firewall?
First, ensure your firewall is not blocking QuickBooks. Go to the firewall settings on your computer and permit QuickBooks through by including it as an exception. You might also need to open certain network ports that QuickBooks utilizes (e.g., ports 8019, 56728, and others based on your QuickBooks version).
How do I fix a connection error in QuickBooks?
To repair a connection error in QuickBooks, first try checking your network settings. Make sure your server computer is hosting the company file correctly and that workstations are not. Utilize the QuickBooks File Doctor tool to scan and repair file and network problems.
How to fix the QuickBooks registration error?
If you encounter a registration error while using QuickBooks, initially check that your system date and time are correct. Next, attempt to run QuickBooks in administrator mode by right-clicking its icon and clicking on “Run as administrator.” Also, ensure you’re running the latest version of QuickBooks and update it if necessary.
Related Posts-
Is Your QuickBooks Update Stuck? Know How to Fix It!
QuickBooks 941 Form: Filing, Due Dates, Errors, & Solutions
Resolving QuickBooks Payroll Not Deducting Taxes Issue With Causes & Solutions to Fix
Fixing the ‘QuickBooks Requires that You Reboot Loop’ Issue in Simple Methods
Complete Guide on QuickBooks Payroll Update: Errors & Solutions
Getting Rid of QuickBooks Error 1603: Error Causes & Fixing Methods

Edward Martin is a Technical Content Writer for our leading Accounting firm. He has over 10 years of experience in QuickBooks and Xero. He has also worked with Sage, FreshBooks, and many other software platforms. Edward’s passion for clarity, accuracy, and innovation is evident in his writing. He is well versed in how to simplify complex technical concepts and turn them into easy-to-understand content for our readers.