Last Updated on April 16, 2026
QuickBooks Payroll Error Message 15240 is a part of the 15XXX error series that occurs while trying to download QuickBooks or payroll updates. This update error is accompanied by the following error messages, stating different circumstances in which the error occurs:
“Error 15240: The payroll update did not complete successfully.”
“File Exists: The file you specified cannot be opened. Make sure that it is not being used by another program.”
“Internet connection error: unknown error.”
As we all know, QuickBooks requires regular updates and maintenance releases to function seamlessly. On the contrary, error code 15240 in QuickBooks makes the update process unsuccessful, which, in turn, prevents users from accessing the latest features. Apart from this, your QBDT may become prone to errors and glitches if it is not updated to the latest release. Another key point is that incorrect Internet Explorer security settings and Windows firewall blockages are mainly responsible for triggering this error in QB.
All things considered, getting rid of this update issue is crucial to ensure that users are able to access the latest QuickBooks and payroll features. To guide you through the resolution process, we have created this detailed guide with the best solutions in it. So, let’s explore this blog further, eliminate the QuickBooks payroll error message 15240, and accomplish your essential payroll tasks seamlessly.
Although the solutions given in this resolution guide will help you tackle the update issues in QB, if you are unwilling to troubleshoot the error on your own, you might need external help. For this, you can contact our Accounting Helpline professionals at 1.855.738.2784 to get direct assistance in resolving the QuickBooks payroll error message 15240.
Major Causes for QuickBooks Update Error 15240
Knowing the root triggers behind this update error can help you resolve the error with more clarity and better understanding. Therefore, let’s first learn about the main reasons behind QuickBooks error code 15240 below:
- Your current QB Desktop version might be old or outdated, which can prevent users from running the payroll updates.
- You are not running the update process with proper admin rights, and your current user account might lack sufficient access permissions for QB.
- You are running the QuickBooks Desktop application in a multi-user environment, which is unsuitable for installing QuickBooks updates.
- Your Windows has registry errors, and essential Windows files might be damaged, broken, or corrupted.
- Your QuickBooks Desktop is not correctly installed, and the installation process might be incomplete, corrupt, or faulty.
- The QuickBooks installation folders might lack proper access permissions.
- The Internet Explorer security settings might be incorrectly configured, which can cause internet connection issues while downloading the updates.
- The internet connection might be poor or unstable, and a weak network can cause update problems.
- Your system’s date and time settings might be incorrectly set while running QB updates.
- The third-party firewall application might interrupt the QB update process, causing blockages and obstructions.
- Essential services, like the File Copy Service, might be inactive, disabled, or not running correctly.
- The shared download drive is incorrectly mapped, or the download location might be wrong or invalid.
- The last QuickBooks update might be damaged, which can trigger the update error.
- Any other application or program might have removed essential QB files accidentally.
These are the reasons why QuickBooks payroll error message 15240 occurs. Now that we have understood the causes of this update issue, let’s learn about troubleshooting solutions that can eliminate it.
Practical Steps to Resolve QuickBooks Desktop Error 15240
We know that QuickBooks payroll error message 15240 can disrupt the update process, and unless the error is resolved, users can’t update the app correctly. Hence, it is important to undertake the resolution process and tackle this issue once and for all.
Solution 1: Run QuickBooks Desktop with Admin Privileges
Many tasks and functions in QuickBooks require proper admin privileges. The update process is one of them. Insufficient administrator permissions may lead to QuickBooks desktop update error 15240. Hence, you need to run QuickBooks with admin rights by following these steps –
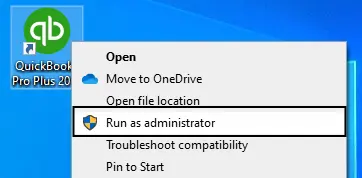
- Move to the Windows desktop, right-click QuickBooks, and select Run as Administrator.
- Select Yes when a message stating, “Do you want to allow this program to make changes to your computer?” appears on the screen, then run QuickBooks with admin privileges.
If this solution doesn’t work, it means the error hasn’t arisen due to insufficient QB permissions. In such a scenario, you can follow the next troubleshooting solution to tackle the update issues.
Solution 2: Re-run the QB and Payroll Update Process with Admin Privileges
Sometimes, update problems can arise when the update process is not undertaken correctly. You can try running the updates again as an admin user (see solution 1) by following the steps below.
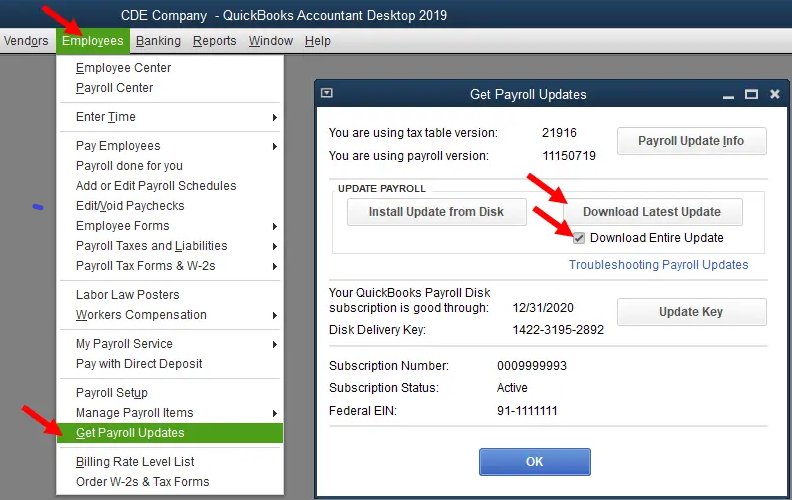
- Firstly, go to the Help tab and select Update QuickBooks Desktop, followed by clicking the Update Now option.
- Select Get Updates, then rerun QuickBooks to install the updates by choosing the Install Now button.
- Once QB updates are installed, go to the Employees menu and choose Get Payroll Updates.
- Click Download Entire Update, then select Update, and wait for the Informational Window to appear, indicating that the process was successful.
If you are still unable to update the software and payroll function, try the next solution.
Solution 3: Allow Permissions for the QuickBooks Installation Folder
Inadequate folder access permissions can cause problems while updating QuickBooks. Thus, to ensure that QuickBooks payroll error message 15240 is rectified, you need to provide proper permissions to the QB installation folder through the following instructions:
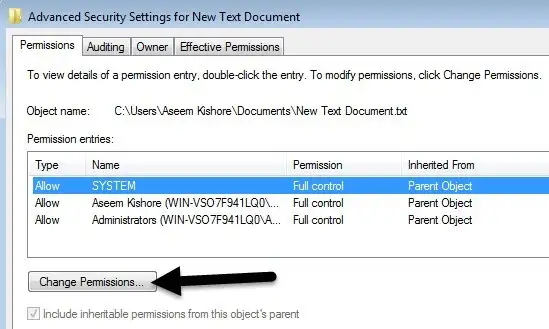
- Exit the QuickBooks Desktop application and navigate to the C:\Program Files\ folder (use C:\Program Files (x86) if you are a 64-bit user).
- Next, right-click the Intuit folder, click Properties, and go to the Security section.
- Hit the Advanced tab and check if the User Group is set to be the Owner.
- If the User Group is not set to be the Owner, follow these steps to take ownership of the Intuit folder –
- Access the Advanced Security Settings tab and select Change beside the Owners
- Now, under the “Enter the object name to select” section, type Users, click Check Names, ” and then hit OK.
- Checkmark the Replace owner on the containers and objects option, then click Apply and OK.
- Under the Permissions section, choose Users, then select Full Control and hit Apply & OK.
After applying proper permissions to the QuickBooks installation folder, try again to install the updates. If the error persists, follow steps 1 to 4 for the following folders:
- C : \Users\ Your User Name\ AppData\ Local\ Intuit
- 64-bit users C :\ Program Files (x86)\ Common Files \Intuit
- C :\Program Files \Common Files\ Intuit
- C :\ ProgramData\ Intuit
See if you still get QuickBooks error message 15240, and if the error persists, move to the next solution to edit the IE settings.
Solution 4: Change Internet Explorer’s Security Settings
Incorrect Internet Explorer settings can restrict the update process in QB. If none of the above solutions worked, you can try modifying the IE security settings to troubleshoot QuickBooks error code 15240 –

- Open Internet Explorer and click the Gear icon, then select the Internet Options tab.
- Navigate to the Advanced tab, then access the Security section, and checkmark the Use SSL 3.0 and Use SSL 2.0 options.
- Lastly, click Apply and then hit OK to save the changes, then rerun QuickBooks.
Now, check if the update issues are rectified; if not, follow solution 5.
Solution 5: Configure Windows Firewall and Antivirus
Your Windows Firewall may restrict QuickBooks from making changes to the system. In such cases, you need to configure the settings to create firewall exceptions for QB. It will help you resolve Error 15240 in QuickBooks Update. Here are the steps to do the same.
Step 1 – Download & Install QB Tool Hub
The QuickBooks Tool Hub is designed to resolve common errors in the QB application, including network problems. You can install this utility in the following manner to utilize its various features and tools –
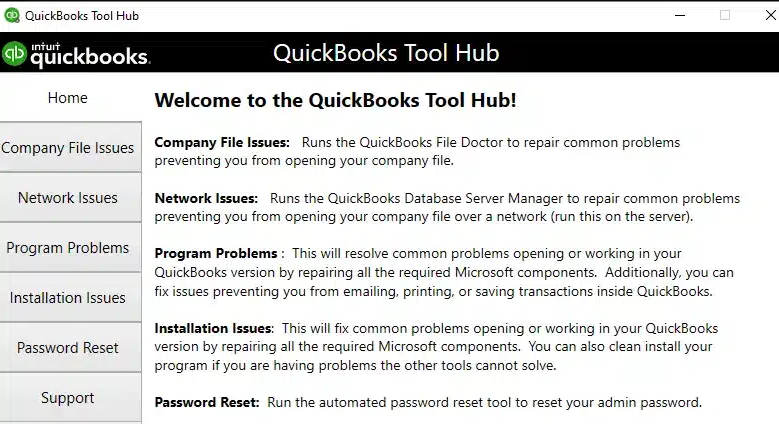
- Close QuickBooks and get the latest QB Tool Hub version from Intuit. Click here to download the Tool Hub. Then, save the downloaded file at an easily accessible location on your PC.
Note: If you’ve installed QB Tool Hub before, you can find your current version at the bottom of the Home section. - Double-click to open the downloaded setup file (QuickBooksToolHub.exe), then go through the on-screen commands to install and accept the License Agreement.
- Once installed, double-click the QB Tool Hub icon to launch it. However, if you can’t locate the Tool Hub icon, search “QuickBooks Tool Hub” in Windows and select to open the utility manually.
Next, run the QB File Doctor Tool in the next section.
Step 2 – Utilize QB File Doctor
Now that your QuickBooks Tool Hub is installed, you can access it to utilize the QuickBooks File Doctor Tool. This tool is used to resolve QB data damage and network issues and can configure the Windows firewall automatically. Follow the detailed instructions below for the same.
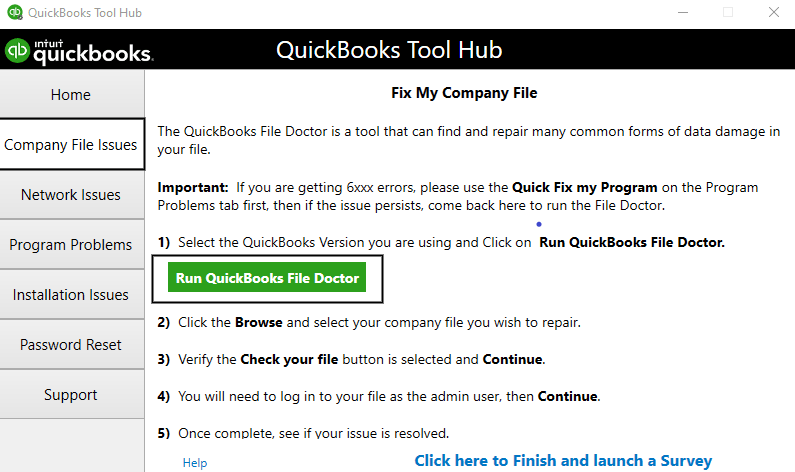
- Open the QuickBooks Tool Hub, go to the Company File Issues tab, then select QuickBooks File Doctor.
Note: It might take a minute for the file doctor to open, and if the tool remains inaccessible, you can manually search for “QuickBooks Desktop File Doc” in the Windows search bar to access it. - Next, choose your company file from the given dropdown menu, and if it’s not visible, select Browse to find the company file you wish to repair.
- Choose the Check your file and Network option, then hit Continue and enter the admin credentials for QuickBooks.
- Select Next to run the scan and repair process, and once the tool stops running, reopen QuickBooks and access the company file.
The file scanning time depends on your file size and can take up to 5 minutes, so ensure that you don’t close the tool in between the process. Another key point is that the scan may indicate that the process was unsuccessful, even if the data and network issues are fixed. Now, check whether the issue has been resolved. If not, proceed to the next section to manually configure the Windows firewall.
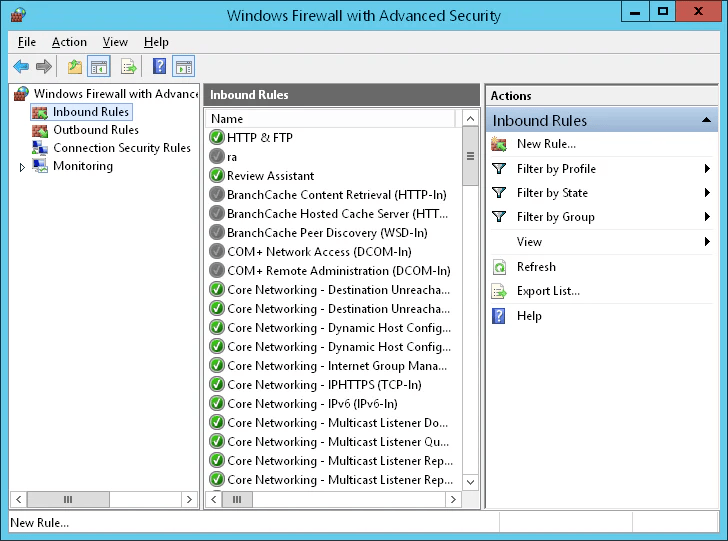
Step 3 – Edit the Firewall Settings to Create Exceptions for QB
If QB File Doctor didn’t help in fixing the firewall blockage issues, you can manually configure the firewall in the following manner –
Add Firewall Port Exceptions for QB
If you use more than one QB Desktop version on the same PC, these steps need to be performed for each version. Therefore, follow the steps below to configure the firewall manually.
- Open the Windows Start tab, type “Windows Firewall” in the search panel, and then open the Windows Firewall utility.
- Now, move to the Advanced Settings tab, then locate and right-click Inbound Rules, and choose New Rule.

- Select Port, click Next, and ensure that the TCP option is selected.
- Next, enter the specific ports as per your QB version in the Specific Local Ports field from the port list below, and ensure that ports 80 and 443 are not blocked.
- QuickBooks Desktop 2020 and later: 8019, XXXXX.
- QuickBooks Desktop 2019: 8019, XXXXX.
- QuickBooks Desktop 2018: 8019, 56728, 55378-55382.
- QuickBooks Desktop 2017: 8019, 56727, 55373-55377.
Note: Remember, if you have more than one QB version, you need to add each year’s (versions) ports to the list.
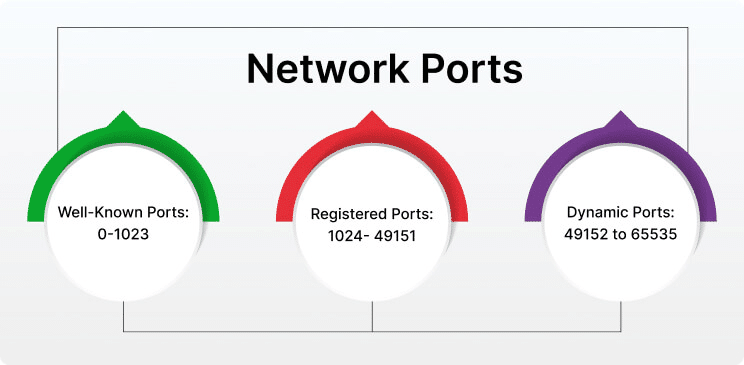
Important: QuickBooks Desktop 2019 and later versions use dynamic ports, as these specific firewall ports are assigned during installation to make sure that the app gets exclusive use of a particular port.
- Follow these steps to find and enter the Dynamic Port Number according to your QB Desktop version.

- Open the Start menu, enter “QuickBooks Database Server Manager” in the search panel, and open to access the utility.
- Go to the Port Monitor tab, find your QuickBooks version, and note down the Port Number to add to the port exceptions list
Note: You can edit the assigned port number (for QB Desktop 2019 and later versions) by clicking Renew. If you choose to renew the port number, you can reset firewall permissions by selecting Scan Now from the Scan Folders menu.
- After you enter the port number, select Next and choose Allow the Connection, followed by clicking Next again.
- Make sure all profiles are checkmarked (if prompted), then select Next and create the new rule named “QBPorts(year).”
- Once done, select Finish and repeat the steps above in the same manner to create Outbound Rules.
Note: To create Outbound Rules, follow steps 1 to 7 as it is; however, select Outbound Rules instead of Inbound Rules in step 2.
Once both Inbound and Outbound Rules are created, access QuickBooks in a multi-user mode. You can also access QuickBooks over the network from the host PC, and if you still see issues, create firewall exceptions for QB executable files in the next section.
Solution 6: Fix the Incorrect Date and Time Settings on Your System
If the date and time on your computer are faulty, you may see QuickBooks 2023 error 15240. In such circumstances, you need to correct the date and time setup by following the following steps –
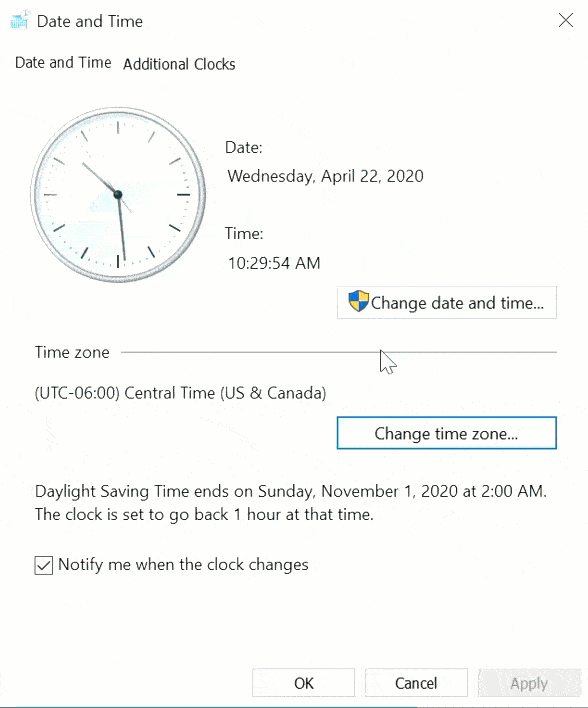
- Tap the time display on your screen and select Change date and time settings, then set the correct date and time..
- Once the settings are modified, hit Apply and OK to finish the process.
If you can’t eliminate error 15240 in QuickBooks even after fixing the date and time settings, perform the next solution.
Solution 7: Repair QuickBooks with QB Tool Hub Utilities
If you have performed all the above solutions but the QuickBooks payroll error message 15240 persists, you can repair the QB program by using QuickBooks Tool Hub utilities.
Step 1 – Run the Quick Fix My Program Tool
Sometimes, general program problems can hinder the update process in QB. To resolve these problems, you can install QB Tool Hub from step 1 of solution 5 and utilize the Quick Fix My Program. This tool will shut down any background processes that QB might be using and then run a quick repair on the program. Follow the steps below for the same.
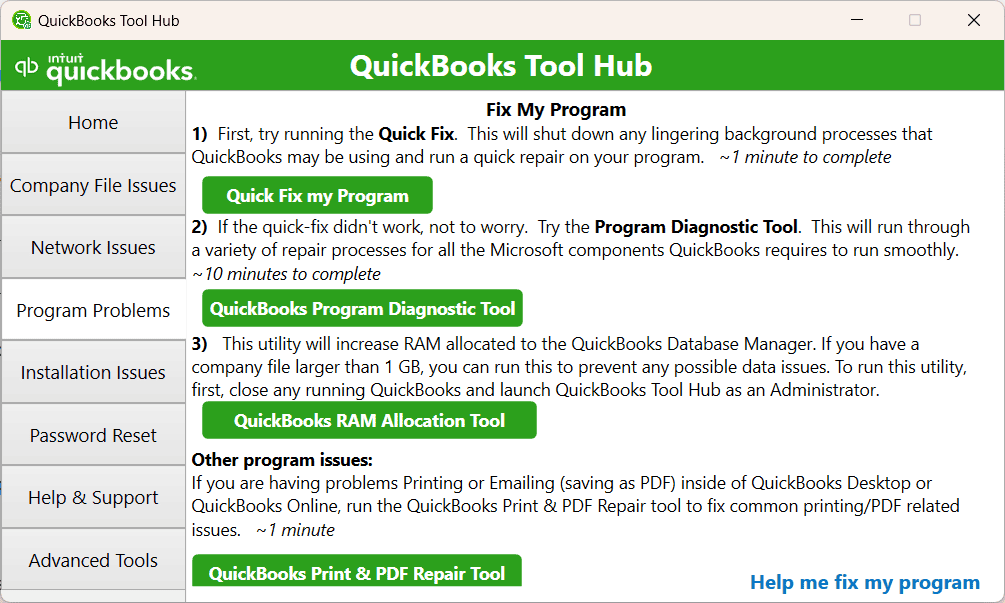
- Open QuickBooks Tool Hub and go to the Program Problems, then locate & choose Quick Fix My Program.
- Run the tool, and once the repair process ends, reopen QB and the company files to check if the issue has been resolved.
If you still get the 15240 QuickBooks error, you can delete QB components and re-run the update process.
- Close QuickBooks and go to this navigation path – C:\ProgramData\Intuit\QuickBooks XX\Components, wherein XX represents the QB version.
Right-click Components, then hit Delete and reopen QB. - Go to the QB Help tab, then select Update QuickBooks Desktop, and choose Update Now.
- Select the Reset Update checkbox, click Get Updates, and once the download is complete, reopen QuickBooks Desktop to install the updates.
Try updating QuickBooks again, and if the issues persist, you can repair QB installation by using the QB Install Diagnostic Tool in the next section.
Step 2 – Use the QB Install Diagnostic Utility
Issues with QB’s installation process can be rectified by using the QuickBooks Install Diagnostic Tool in the following manner –
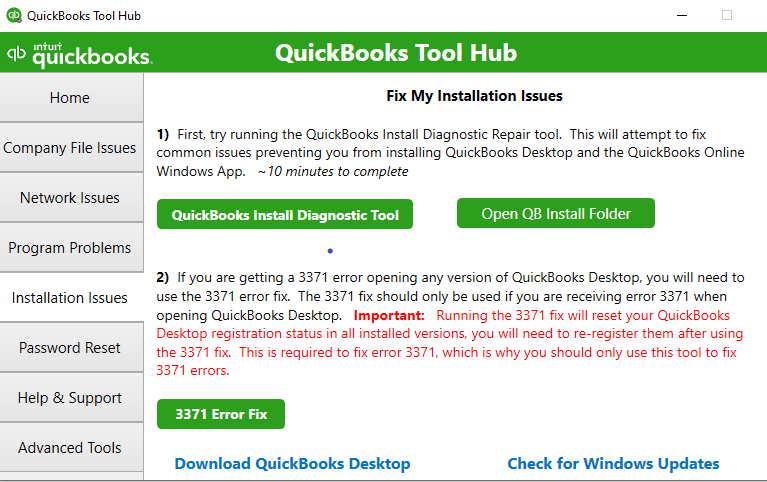
- Go to the Installation Issues tab in the QB Tool Hub and select QuickBooks Install Diagnostic Tool to run a scan.
- The tool may take up to 20 minutes, and once the tool stops, re-run QuickBooks and then consider updating the software.
If QuickBooks payroll error message 15240 persists, you can reinstall the app to fix the installation problems in the next solution.
Solution 8: Clean Install QuickBooks Desktop
If you are unable to resolve the installation problems with QB Install Diagnostic Tool, you can clean install QuickBooks to fix the update problems. This process ensures that QuickBooks is freshly installed and that any problems with the incorrectly installed version are removed.
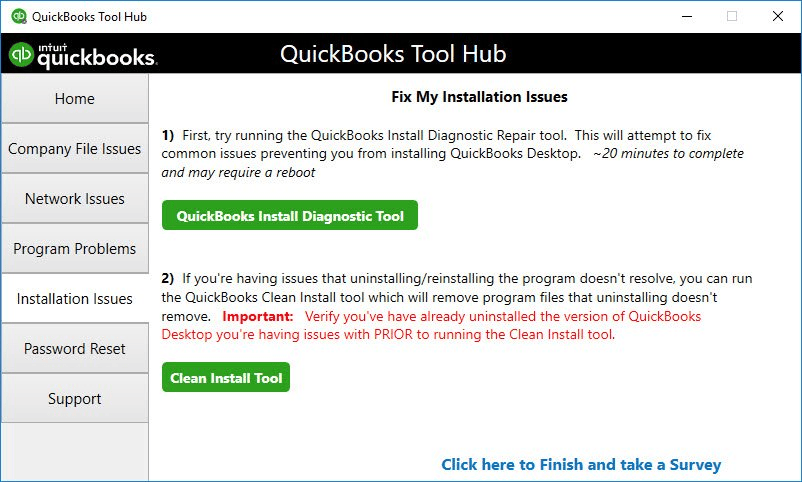
To perform this process, you need to remove QuickBooks from the PC, rename the installation folders, and finally reinstall the software.
Step 1: Uninstall QuickBooks
You can delete QuickBooks easily on your device. However, you need to back up your files beforehand to ensure your data isn’t at stake. Similarly, you must note down the product and license information of the current QuickBooks version. The details will help you once you reinstall the app. Now, let’s dive into the uninstall process:
- Open the Windows Start menu and select Settings to open the Settings window with numerous options.
- Select the Apps tab, choose Apps and Features, and then select QuickBooks from the app list.
- You can also choose to search QuickBooks Desktop manually or look for it by typing QB Desktop in the search space.
- When the QB result appears, tap the three dots at the end of the app name.
- Choose Uninstall from the available options, like Advanced Options, Modify, Uninstall, etc, and hit OK on the uninstallation wizard.
- The process will begin, and after managing the instructions and deleting QuickBooks, you can move to the next step.
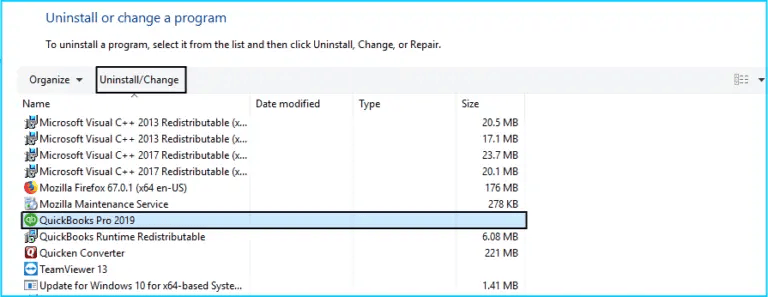
Alternatively, you can use the Control Panel to uninstall the app. The actions will involve –
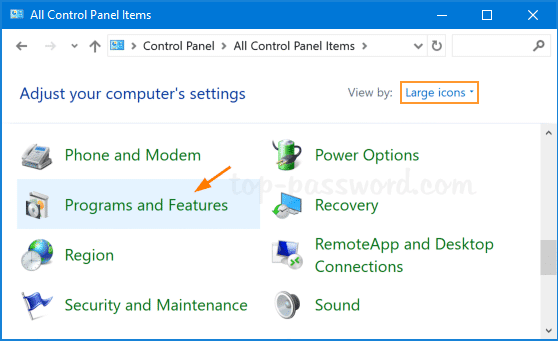
- From the Windows Start menu, search for the Control Panel utility and then tap open it.
- Navigate to the Programs and Features or Uninstall a program option and select it.

- Select QuickBooks from the list of installed apps on the desktop.
- Initiate the uninstallation by selecting Uninstall/Change/Remove.
- Lastly, hit Next to conclude.
Now, move to the next step to rename the installation folders.
Step 2 – Rename the Installation Folders
Once QuickBooks is removed from the PC, you need to rename the installation folders. This step prevents QuickBooks from opening the installation folder during the reinstallation process. You can proceed with renaming the folders in the following manner –
- Open the Windows Start menu, search for “File Explorer” in the search panel, and open File Explorer.
- Locate and open the folder containing your QuickBooks company files, which is usually the QuickBooks Folder. You can find the QB folder in one of the following location paths –
- C:\ProgramData\Intuit\QuickBooks (year)
- C:\Users\(current user)\AppData\Local\Intuit\QuickBooks (year)
- C:\Program Files\Intuit\QuickBooks (year)
- 64-bit version C:\Program Files (x86)\Intuit\QuickBooks (year)
- Right-click the folder and select Rename, then add “.old” at the end of the folder name and hit Enter to save the changes.
Once done, perform the QB reinstallation process in the next section.
Step 3: Reinstall QuickBooks
After QuickBooks is removed and the installation folders are renamed, proceed to reinstall QuickBooks Desktop by following these steps –
- Ensure that the PC meets the minimum system requirements for QuickBooks.
- Download the QuickBooks setup file for your QuickBooks version.
- Save the .exe setup file, then ensure that you keep your license and registration number handy.
- Launch the .exe setup file, follow the given prompts, and accept the license agreement.
- Further, hit Next and enter the product and license numbers.
- Hit Next again and ensure that the internet connection is active, then choose Express Install as the Installation Type.
- Hit Next once again, then click Install, and reopen QuickBooks once the process is complete.
- Further, register QuickBooks from the Help tab by choosing Activate QuickBooks Desktop.
- Follow the given steps to verify your info, enter the Product and License Info to complete registration, and then rerun the update process.
Note: During the reinstallation, QuickBooks will set up new folders and rename the existing folder automatically.
Solution 9: Install the Digital Signature Certificate
If the digital signature certificate is invalid or expired, you won’t be able to download the updates unless you get a fresh certificate. Hence, you can install a new digital signature certificate to fix QuickBooks Desktop error 15240 in the following way –
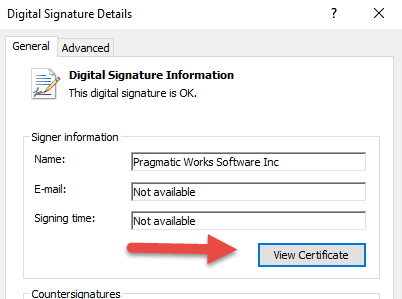
- Go to this navigation path – C:\Program Files\Intuit\QuickBooks and locate the QBW32.EXE file, then right-click the file.
- Select Properties, then click Digital Signature, and verify that Intuit is checkmarked in the signature list.
- Select Details, go to the Digital Signature Details window, and then select View Certificate.
- Select Install Certificate from the Certificate window, then hit Next until Finish is displayed.
- Select Finish, restart your computer, and reopen QuickBooks to download the updates.
If the update problems continue to appear, move to the next solution to activate the QuickBooks File Copy Service.
Solution 10: Activate QuickBooks File Copy Service
Intuit QuickBooks FCS is an essential service to initiate and execute the update process in QuickBooks. You might be unable to download the QB updates if the QuickBooks File Copy Service is inactive or disabled. Thus, you need to enable QuickBooks FCS before updating QB in the following manner –
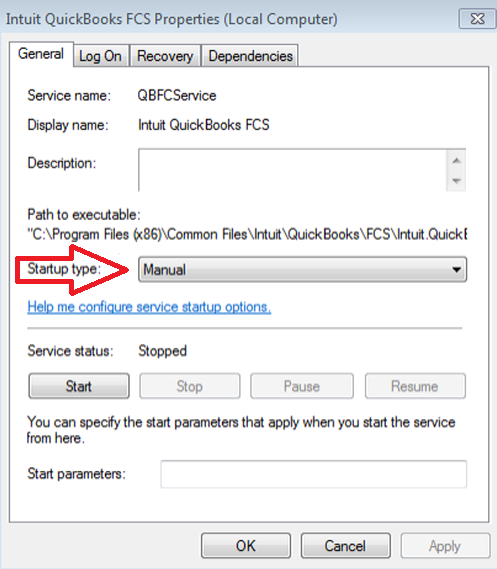
- Press Windows + R on your keyboard and access the Run tab, then type COMPMGMT.MSC in the Run command box.
- Hit OK to run the command, then wait for the Computer Management Window to appear, and select Services and Applications.
- Choose Services, scroll down, locate Intuit QuickBooks FCS, and then double-click the service to open it.
- Select Manual as the Startup Type, then hit Apply and OK to complete the process.
- Once done, you need to revalidate the Payroll Service Key and refresh the connection before running the updates in QB.
- Access the QuickBooks Employees menu, then choose My Payroll Service and click Activate Service Key.
- From the Service Keys window, highlight the current payroll, then select Edit and hit Next until Finish comes up.
- Lastly, hit Finish to end the process and rerun QuickBooks Desktop.
Now, check the status of QuickBooks update error 15240, and if the error remains unresolved, try remapping the shared drive in the next solution.
Solution 11: Review the Shared Mapped Drive
QB update problems can arise due to an incorrectly mapped shared drive. This issue can be fixed by reviewing the download location and remapping the drive letter in the following manner –
- Press Ctrl + 1 to open the Product Information window, then locate the mapped path and write down the location.
Note: for example, the mapped path will look something like this – [x]:\[folder name]\[data file name]. - Once the location is noted, go to the QuickBooks Help menu, then update QuickBooks by following solution 2.
- Next, go to the Options tab, then follow these steps to review the Shared Download settings –
- If the Shared Download is set to Yes, check that the drive in the Download Location and the drive in the Product Information section are the same.
- If the Shared Download is set to No, ensure that the directory in the Download Location and the QB Installation Directory are the same.
- Now, if the download location isn’t correct, you need to modify the state of the location with these steps –
- If Yes is already selected for Shared Download, select No, then hit Save to save the changes.
- On the other hand, if No is already chosen for Shared Download, click Yes, then hit Save.
- If the shared download location is correctly set, remap the drive to a new letter.
- Access the This PC or My Computer section, then select Map a Network Drive and select a mapped letter.
Note: Ensure that the mapped letter you select is not correctly used by QuickBooks. - Next, click Browse to search and select the Network Location of the stored company file, then hit OK.
- Hit Finish to complete the remapping process, then relaunch QuickBooks Desktop.
- Access the This PC or My Computer section, then select Map a Network Drive and select a mapped letter.
- Now, go to the Help tab, select Update QuickBooks, and then navigate to the Options tab.
- Turn the Shared Download Location Off and on again to ensure that the download location is correctly mapped to the new drive letter.
- Hit Save and Close to complete the process, then rerun the QB updates and check the status of QuickBooks payroll error message 15240.
If the update issues persist even after following all these solutions, move to solution 12 to restore the system to an earlier build.
Solution 12: Restore the System to An Earlier Point
Sometimes, the recent modifications in the system might lead to update issues, like Quickbooks Error 15240 Windows 10. This can happen when the modifications or changes weren’t correctly done or are making the system incompatible with QB. To resolve this scenario, you must restore the system to an earlier point by performing these steps –
- Tap the Windows icon to launch the Start menu, then type System Restore in the search field.
- Hit Enter and follow the on-screen steps mentioned in the wizard to reach a preferred restore point.
- After restoring the computer, rerun QuickBooks updates and check if QuickBooks error 15240 is rectified.
Conclusion
The solutions mentioned in this detailed guide must have helped you tackle the QuickBooks Payroll Error Message 15240 effectively. The solutions were provided in detail for your convenience. In spite of that, if you are stuck at a particular step or the solutions are unsuccessful in fixing the update issues, you can call our Accounting Helpline experts at 1.855.738.2784 to get immediate help with the problem.
FAQ’s
What does the QuickBooks Payroll Error Message 15240 state?
QuickBooks Payroll Error Message 15240 is a common update issue, and it might be accompanied by the following error messages –
– “Error 15240: The payroll update did not complete successfully.”
– “File Exists: The file you specified cannot be opened. Make sure that it is not being used by another program”.
– “Internet connection error: unknown error”
Which Microsoft Windows OS encounters QuickBooks error 15240 frequently?
The following Windows OS versions and variants might experience QuickBooks Payroll Error Message 15240:
– Windows Vista
– Windows 8
– Windows XP
– Windows 10
– Windows 7
– Windows ME
– Windows 2000
When you encounter QuickBooks Payroll Error Message 15240 in these operating systems, check if the Windows user has proper access permissions to perform the solutions. If not, you need to configure the permission setup.
Why does QuickBooks Payroll Error Message 15240 affect my device?
QuickBooks Payroll Error Message 15240 problem may emerge due to the following common reasons –
– Misconfigured Internet Explorer settings.
– Incorrect system date and time settings.
– Windows firewall or security software blockages and obstructions.
– Expired or invalid digital signatures.
– Internet connectivity problems.
– Incomplete or corrupt QuickBooks installation.
– Issues with Windows file components.
– Inadequate administrator rights.
– Old QuickBooks version.
– Running QuickBooks in a multi-user environment while downloading updates.
– Windows registry problems.
– Incorrect shared download drive.
– Damaged previous update.
When and why does error 15240 emerge?
The error 15240 QuickBooks arises while downloading QuickBooks and payroll updates. This error can emerge while undertaking the update process and cause hindrances, which can make the process unsuccessful.
Common triggers for this update error include incorrect system date and time settings, firewall or security software blockages, expired or invalid digital signatures, and internet connectivity issues. Understanding the reason behind this error and resolving it is essential to ensure that QuickBooks and payroll updates are downloaded smoothly.
How do I get rid of QuickBooks Payroll Error Message 15240?
The QuickBooks Payroll Error Message 15240 can be resolved as follows:
– Running the QB updates with admin privileges.
– Ensure that the time and date settings are correct.
– Adding Windows permissions to QB installation folders.
– Configuring the Internet Explorer security settings.
– Investigating the third-party firewall settings.
– Reviewing digital certificates.
– Ensuring strong internet connectivity.
– Repairing or reinstalling QB.
– Addressing issues with Windows components and the registry.
How can I update the QuickBooks payroll?
To update QuickBooks payroll, access the QB Employees tab and choose Get Payroll Updates. Then, select Download Entire Updates and wait for the process to complete.

Edward Martin is a Technical Content Writer for our leading Accounting firm. He has over 10 years of experience in QuickBooks and Xero. He has also worked with Sage, FreshBooks, and many other software platforms. Edward’s passion for clarity, accuracy, and innovation is evident in his writing. He is well versed in how to simplify complex technical concepts and turn them into easy-to-understand content for our readers.