Last Updated on April 16, 2026
Activating multi-user mode in QuickBooks allows more than one user to work on the company file at the same time, resulting in improved coordination and proficiency. You also get results that are more accurate, as every user accesses the most updated information.
However, activating QuickBooks multi-user mode also triggers QuickBooks multi-user mode errors, like QuickBooks Multi-User Mode Not Working, which can be rectified with proper troubleshooting instructions. In this article, we are going to discuss the types of common errors one can face while using QuickBooks multi-user mode not working, and their troubleshooting methods.
QuickBooks multi-user mode error can be very frustrating as it prevents you from working on the company file on the workstations. For a faster resolution, contact the Accounting Helpline team of professionals at 1.855.738.2784 for immediate assistance.
What Types of Errors Occur in QuickBooks Multi-User Mode
One can face numerous technical difficulties while using multi-user mode in QuickBooks. Below is the list of the most common errors that users face while using QuickBooks in a multi-user environment:
- QuickBooks multi-user host stops working.
- Error switching between single-user and multi-user mode.
- The application quits while switching to multi-user mode.
- The company file is not accessible to the user.
- H505, H101, H202, and H303 error messages.
Now, let’s go through some of the key reasons that often lead to the QuickBooks multi-user mode error in the section below.
What Causes Errors in QuickBooks While Using it in Multi-user Mode
An incorrect hosting configuration is one of the most common reasons that trigger QuickBooks multi-user mode not working. Following is the list of all the other reasons that might cause errors in QuickBooks multi-user mode:
- The firewall is blocking access to the company file in the network.
- You have a Damaged data file in the QuickBooks network.
- QuickBooks DB service is not running.
- The user does not have proper read and write permissions on Windows.
- QuickBooks is unable to obtain the IP address of the server that is hosting the company file.
- The QuickBooks Enterprise might not be installed on the server computer.
- Antivirus software may cause restrictions on the network between QB and other computers.
- The company file won’t open through QuickBooks Database Server Manager.
- The firewall permissions in Windows might not be configured correctly.
- The hosting settings are incorrect on QuickBooks Enterprise.
- The DNS settings may be corrupt or incorrect, leading to QuickBooks multi-user mode not working.
We have developed a strong understanding of the causes that are related to the QuickBooks multi-user mode not working. Now, in the next segment, we will discuss how to resolve them.
Solutions to Fix Multi-User Mode Errors in QuickBooks for Windows
After reviewing the cause and symptoms, here’s the section explaining the possible methods to rectify the QuickBooks multi-user mode not working issue. You may follow the following troubleshooting steps to address this error.
NOTE: Before following the troubleshooting steps, make sure to update your QuickBooks Desktop application with the latest updates and take a secure backup of your company file.
Solution 1: Check your network for any connectivity issues
Sometimes, you may face issues regarding your network connection. Here are the steps to check your network connection for any problems:
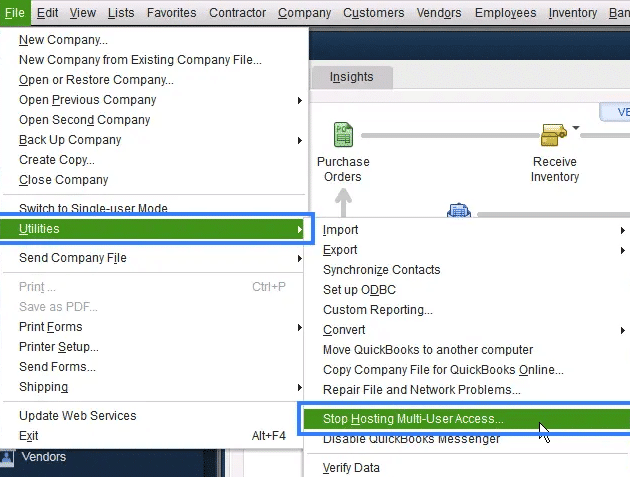
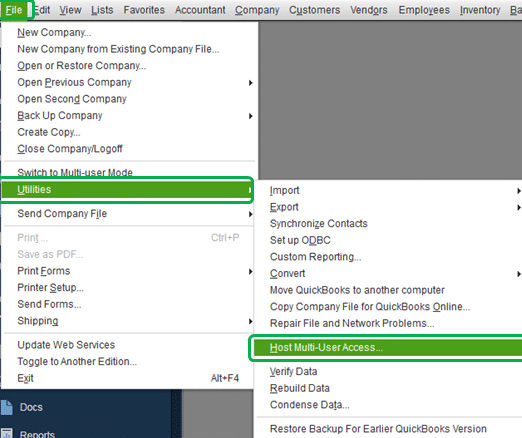
- On the computer that is hosting the company file, open QuickBooks, and from under the File menu, select Utilities.
- Click Stop Hosting Multi-User Access.

- For the confirmation, click Yes.
- Click Yes once again to close the company file.
- Now restart the computer and follow the same process on the other computer connected to the network.
If you fail to resolve the QuickBooks multi-user mode not working with this solution, then move on to the process below.
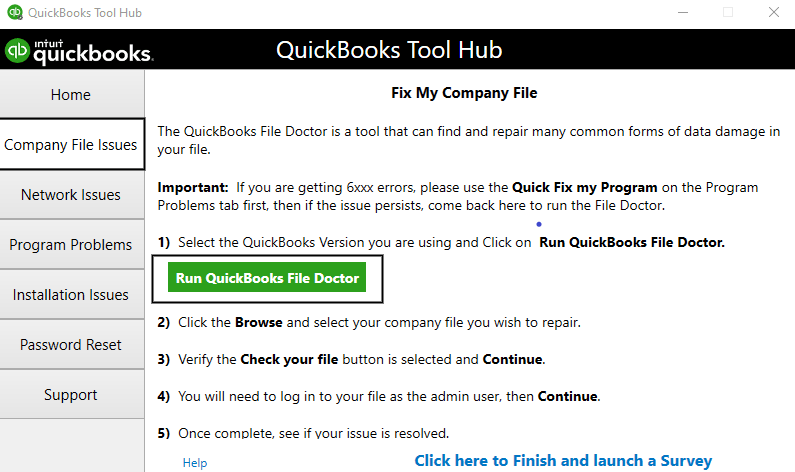
Solution 2: Download and run QuickBooks File Doctor
You can follow this method for running the QB file doctor tool to get rid of the QB multi-user mode error. But, before you proceed with the tool, take your company file backup as follows:
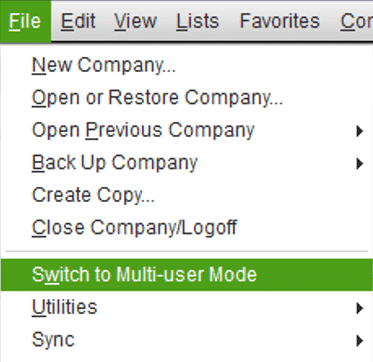
- Within QuickBooks, navigate to the File menu and choose the option to Switch to Single-user Mode.

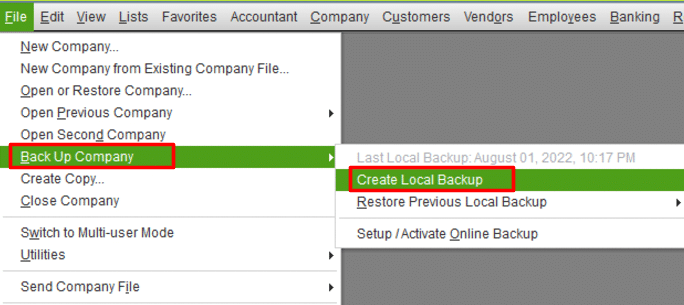
- Again, access the File menu, hit Back up Company, and then tap Create Local Backup.

- In the next window, click Local Backup and proceed with Next.
- Within the Local Backup Only section, click on Browse to designate the location where you want to store your backup company file.
- When prepared, click OK.
- Select Save it now and proceed with Next.
Now, run the QB File Doctor utility to fix the network corruption as follows –
- Download QuickBooks File Doctor and double-click the setup file on your computer to start the installation.

- Follow the on-screen instructions to complete the installation.
- Once the installation completes, check the Check Your File and Network checkbox and hit Next.
- Now select QuickBooks, which is hosted on this computer. [Both File Damage and Network Connectivity]
- Hit Next to start the repair process.
- Once the repair process is completed, restart your computer and try using QuickBooks in Multi-user mode once again.
Once you are done with the QuickBooks file doctor tool, the error should not occur anymore. If it does, then take the steps outlined in the next resolution to get rid of the QB multi-user mode not working issue.
Solution 3: Exclude QuickBooks from the Firewall’s program-blocking list
By excluding QuickBooks from Firewall settings, you can prevent it from blocking the server connection between QB Enterprise and Intuit. To complete this process for resolving the issue where QuickBooks is not opening in multi-user mode, you can refer to solution two on QuickBooks Payroll Error 12029.
If you fail to resolve this problem with this method, then skip to the next solution and get rid of the QuickBooks multi-user mode not working.
Solution 4: Set the QuickBooks DB service startup type to Automatic
For the cases when your QuickBooks Database service startup type is not set to automatic, and requires manual startup. This may cause issues and result in a QuickBooks multi-user mode error, which can be fixed with the steps given below.
- Press the Windows + R key on your keyboard at the same time.
- Once the Run window appears on the screen, type services.msc in the search box.
- Hit Enter and search for the QuickBooksDB service from the list of services.
- Right-click the service and choose Properties.
- Now select the Startup Type as Automatic.
- Now, from the left side panel, click Stop.
- Once the service is stopped, click Start.
- Exit this window and restart QuickBooks.
If the Multi-user issues in QuickBooks Desktop persist, then move on to the following method for modifying the multi-user permissions.
Solution 5: Configure the Multi-User Permissions
You can take the steps outlined in the following procedure to update the permissions for multiple users, so that you can avoid QuickBooks not opening in multi-user mode.
- Hit the Windows Start menu and tap File Explorer.
- Right-click the company file in the folder where it is saved and choose Properties.
- Navigate to the Security tab and choose the Advanced
- Tap QBDataServiceUserXX and select Edit.
- Adjust the following database server settings to Allowed:
- Traverse Folder/Execute File
- List Folder/Read Data
- Read Attributes
- Read Extended Attributes
- Create Files/Write Data
- Create Folders/Append Data
- Write Attributes
- Write Extended Attributes
- Read Permissions
In case your multi-user permissions are not configured correctly:
- Right-click the folder with your company file and choose Properties.
- Click on Security and then choose the Edit
- Tap QBDataServiceUserXX and hit Full Control, then Allow.
- Tap Apply, followed by Done.
After you are done with this process, you should not face the QuickBooks multi-user mode not working error anymore. If you do, then move on to the following method.
Solution 6: Download QB Tool Hub and Use QuickBooks Database Server Manager
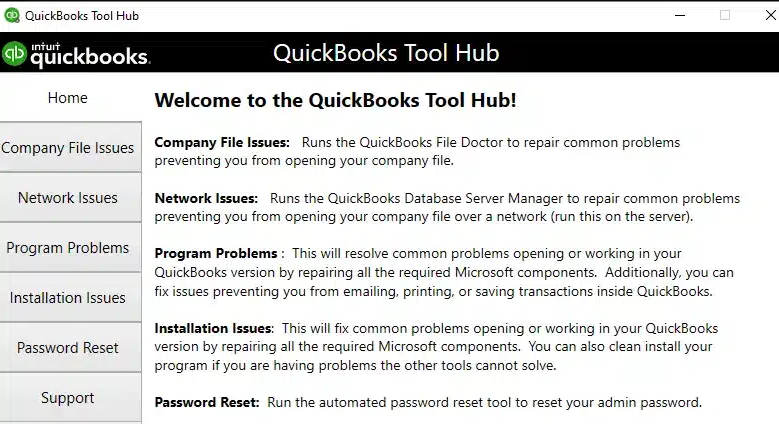
The QuickBooks Tool Hub presents outstanding utilities to resolve various issues, including QuickBooks multi-user mode not working problems. The complete procedure for running the database server manager is as follows:
QuickBooks Tool Hub
- Get the latest QuickBooks Tool Hub from Intuit.
- Download this file and save it in a place where it’s easily accessible.
- After the download, double-click QuickBooksToolHub.exe and run the InstallShield instructions.
- Then, accept the License Agreement and ensure your QB Tool Hub install finishes successfully.
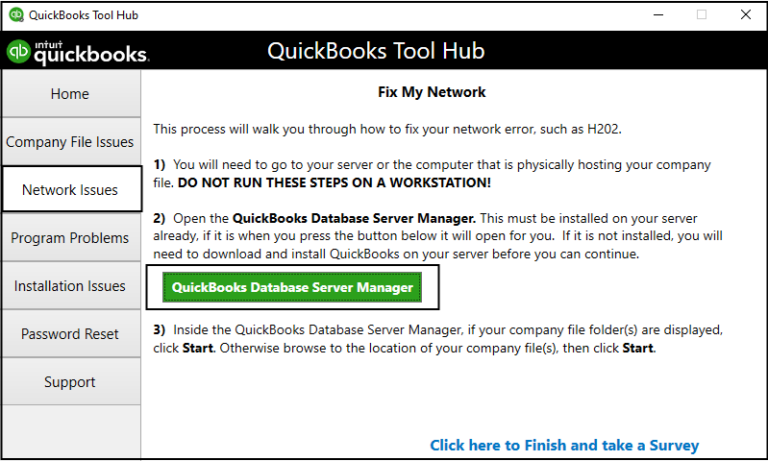
- After its installation ends, open the Tool Hub and go to Network Issues.

- Choose QuickBooks Database Server Manager in multi-user mode and tap the Start Scan.
Another method to use the Database Server Manager is as follows:
- On your server PC (the one responsible for hosting your company files), access the Windows Start
- Input “Database” into the search section and open QuickBooks Database Server Manager.
- Launch the Scan Folders
- Click on Browse, then tap the folders where your company files (QBW) are stored.
- Select OK once you’ve made your selections.
- When you’re prepared, click on Start Scan.
- After the scan is complete, the folders will be displayed in the QuickBooks company files found section. Now, other computers on your network can access the company files located in these folders.
Once done, the QuickBooks multi-user mode not working should be resolved, and you should be able to work as usual. If that’s not the case, then consider the following resolution.
Solution 7: Configure Multi-User Access Hosting Settings
If the QuickBooks problem with a multi-user hosting setup emerges, you should ensure that only one computer, your server, is hosting the multi-user mode. It means the Host Multi-User Access option should be disabled on all your workstations:
Configure Multi-User Access Hosting Settings
- Launch QuickBooks on any workstation displaying the QuickBooks multi-user setup.
- Avoid opening your company file. Instead, click on File, then hit Utilities.
- If you encounter the Host Multi-User Access option, do not select it. Proceed to the next workstation, as it is not causing the issue.

- If you have the option to Stop Hosting Multi-User Access, select it.
- Repeat these steps on all workstations where you get QuickBooks problems with a multi-user hosting setup.
After checking workstations, proceed to your server computer, which hosts your company files.
- On your server computer, launch QuickBooks.
- Select File, then hit Utilities.
- If Host Multi-User Access is available, choose it. If Stop Hosting Multi-User Access is an option, refrain from selecting it.
Now, you can work on QB Enterprise without any issues hindering your work. However, if you are still facing the QuickBooks multi-user mode error on your system, then verify your services on the server with the method below.
Solution 8: Verify the Server’s Services
Use the default settings and restart the QuickBooks Database and QBCF Monitor Service to resolve the QuickBooks multi-user mode not working issues:
Verify the Server’s Services
- Enter the Windows Start.
- Input “Services” in the search area and open the Services.
- Locate and access QuickBooksDBXX(XX represents the version number).
- In the General section, check the Service status. If it’s indicated as Started or Running, tap Stop.
- Choose Automatic under Startup type.
- Move to Logon and hit the Local System account.
- Move to the Recovery section and select “Restart the Service” for each of the following: First failure, Second failure, and Subsequent failures.
- Return to the General section and tap Start to initiate the restart of Database Server Manager.
- Repeat everything for QBCFMonitorService.
By following the steps above, you can verify the services of your server for both QuickBooks Database and QBCFMonitorService. This should resolve the issue, and it should no longer occur. In case you still continue to face the QuickBooks multi-user mode not working, then move on to the following process.
Solution 9: Provide Admin Permissions on the Server PC
Ensure to offer Windows admin permissions to QuickBooksDBXX and QBCFMonitorService on your server PC:
Provide Admin Permissions on the Server PC
Windows 10:
- Access the Windows Start menu and then File Explorer.
- Find and right-click on the folder containing your company files.
- Choose Properties, then navigate to Sharing and select Share Add.
- Hit the corresponding QBDataServiceUserXX for your version.
- Set the permission level for both users to Full Control and click Share.
Windows Server 2012:
Before proceeding with the steps below, ensure that File and Storage Services are installed.
- Launch the Windows Start. Put “Run” into the search and open the Run Command.
- Type in ServerManager and click OK.
- Select File and Storage Services, then go to Shares.
- On the Task drop-down, hit New Share. A list of File Share Profiles will appear. You can learn about the differences between the profiles by clicking on each profile and reading the description.
- Choose SMB Share – Quick. Note: SMB Share – Quick is the default profile, but this selection may vary.
- From the Share location section, tap Type a custom path, then Browse to locate the folder you want to share.
- Choose the appropriate folder and hit Select a folder, then Next.
Note: You can leave the default selections under the Configure Share settings window and click Next.
If you fail to resolve the QuickBooks multi-user mode not working with this solution, then move on to the process below.
Solution 10: Ping the Server from the Workstation
Test the connection to your server by pinging it from a workstation. Ping the server from each workstation experiencing multi-user errors.
To begin, activate Network Discovery on both your server and workstations with multi-user issues:
- Launch the Start menu on your server and workstations.
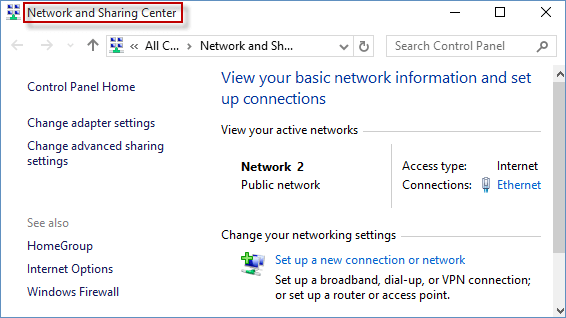
- Type “Network” in the search and launch the Network and Sharing Center.

- Choose Change advanced sharing.
- Ensure that Turn on network discovery is selected in both the Network Discovery and File and Printer sharing
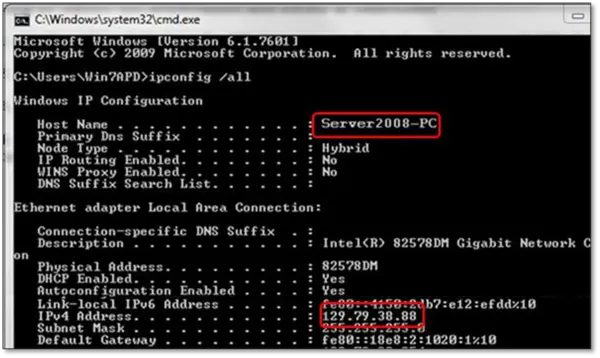
Next, retrieve your server name:
- Open the server’s Start
- Type “Run” in the search to launch Run.
- Enter “CMD” in the Run window and press Enter
- Put “ipconfig/all” in the CMD window and hit Enter.
- Identify the Host Name in the Windows IP Configuration section, located on the right. Note or copy this server name for future reference.
Return to your workstation to test the server:
- Open the workstation’s Start
- Type “Run” in the search to launch Run.
- Enter “CMD” in the Run window and press Enter
- Input “ping [your server name]” and press the Enter button(exclude the brackets around your server name).
Repeat these steps for each workstation encountering QuickBooks multi-user mode not working problems. Your server will function properly if you receive a reply for each packet with no loss. If there is packet loss or a slow reply, stop and seek assistance from an IT professional for network troubleshooting.
Solution 11: Edit the Windows Host File
You may need to edit the Windows Host file to resolve QuickBooks multi-user mode not working. You may have an unknown IP Address hosting your file. So, changing it becomes crucial:
- Close QuickBooks.
- Access the server PC’s Windows Start
- Choose Computer.
- Navigate to either:
- C:\Windows\System32\Drivers\Etc
- C:\Windows\Syswow64\Drivers\Etc
- Double-click the host file and access it with Notepad.
- Input the IP address followed by the computer name, using the Tab key to create space. Ensure that the server computer includes the workstation’s IP and computer name, and vice versa.
- Save your changes to the host file on both the server computer and workstations:
- In Notepad, access the File menu, then select Save.
- Save the file with the name “hosts,” including the quotation marks.
- Choose Desktop as the saving location and click Save.
- Locate the saved file, right-click, and select Copy.
- Navigate to the file location used in Step 2 (either C:\Windows\System32\Drivers\Etc or C:\Windows\Syswow64\Drivers\Etc).
- Find the host file, right-click, and choose Rename.
- Rename the host file to “hosts old” and select Continue.
- Press Ctrl+V on your keyboard to paste the copied file, then select Continue.
Once you have edited the Windows host file with the steps outlined in this process, the QuickBooks multi-user error should be gone. If it does continue to hinder your work, then proceed to the following solution.
Solution 12: Open the Sample Company File in Multi-User Mode
Try accessing the sample company file in multi-user mode to isolate the root cause of the problem with QuickBooks Desktop in multiple users in different locations:
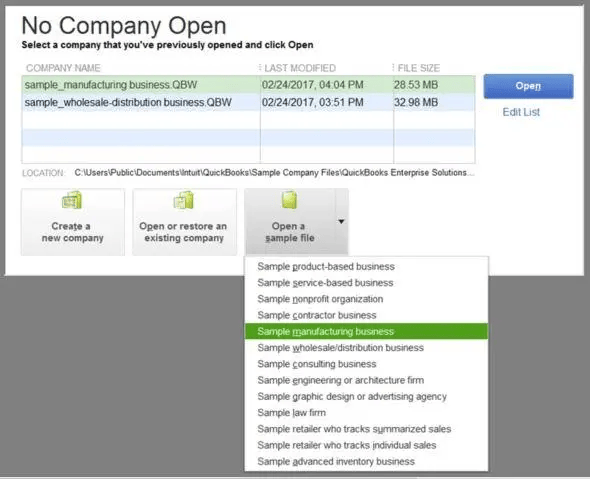
- Access the No Company Open
- Choose Open a sample file.
Now, try to see if you can open this file and the size of your company file. If you can’t and the QuickBooks multi-user mode not working continues to occur, then move on to the following method.
Solution 13: Run the QuickBooks Condense Data Utility
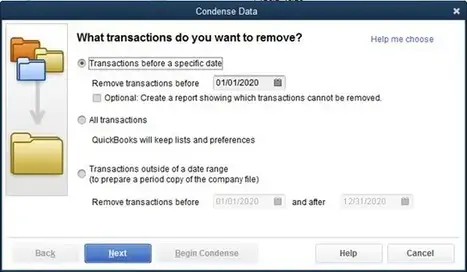
After opening a sample file, run the Condense Data utility for your company file. It’s possible that your file size is too big, which is causing problems with multi-user running. See if the errors appear during the Condensing process.
Solution 14: Use a Trial Version
You can use a trial version of private cloud software, which will help in detecting the root cause of QuickBooks multi-user mode not working. Once you come to know the root cause, you can search the relevant error code or describe the issue within the search box on the top right of the screen to learn how you can resolve the QuickBooks stuck in single-user mode.
Solution 15: Undertake a Manual Clean Install
You may have to clean and install your QuickBooks application manually to resolve the QuickBooks stop hosting multi-user access problem. A clean install removes any missing or damaged components and ensures everything needed to run QuickBooks is up-to-date and correct.
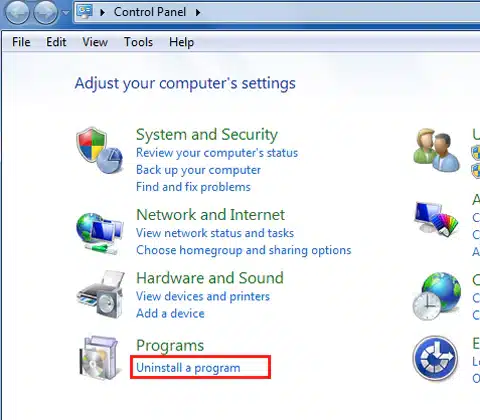
- Remove the QB app by accessing the Control Panel from the Start.
- Tap Uninstall a program in the Control Panel wizard.

- Choose QuickBooks from the apps list that appears on the screen.
- Click Uninstall/ Change, then tap Remove, followed by
QuickBooks Desktop is Uninstalled now.
- Now, display all the hidden files, access the Start Type File Explorer, and launch it.
- Locate and access the folders that have your company files. They are usually available in the following places:
- C:\ProgramData\Intuit\QuickBooks (year).
- C:\Users\(current user)\AppData\Local\Intuit\QuickBooks (year).
- C:\Program Files\Intuit\QuickBooks (year).
- 64-bit version C:\Program Files (x86)\Intuit\QuickBooks (year).
- Right-click the folder you want to manage and hit.
- At the end of the folder name, type and add ‘OLD.’ QB will not open it after you reinstall it.
- Now, reinstall QuickBooks.
After you have reinstalled the QB Enterprise, there should not be any errors or issues with the application, and you should be able to work seamlessly. However, if the QuickBooks multi-user mode still does not work on your system, then there might be an issue with previously installed program files. To get rid of them, follow the outlined resolution below.
Solution 16: Uninstall or Disable All Previous QuickBooks Database Services
Uninstalling or disabling all the QuickBooks Database Services of previous versions can help you fix the QuickBooks database server manager multi-user mode issues.
Solution 17: Ensure Proper Folder Permissions Set Up
Ensure that QuickBooks has the appropriate access level to prevent issues while interacting with the company file over the network. Here’s a step-by-step guide:
- Look for the folder you wish to share and right-click on it.
- Select Properties.
- Navigate to the Sharing tab and click on Share this folder.
- Proceed to the Security tab and choose Permission to configure permissions for each user intending to access the folder.
- Upon completion, click Apply and then OK.
System, then there might be an issue with previously installed program files. To get rid of them, follow the outlined resolution below.
Solution 18: Open Database Server Manager as an Admin
You may have to access your database server manager through the Start menu instead of QuickBooks Tool Hub to resolve the issue with multi-user access. Further, right-click and choose the Run as administrator option to launch QuickBooks Database Server Manager as an admin. Hopefully, your problem with how to use multi-user mode in QuickBooks gets sorted.
Solution 19: Remove 32-bit QBFC Install
If you have a 32-bit QBFC Monitor Service, remove it and replace it with a 64-bit version through program repair as follows:
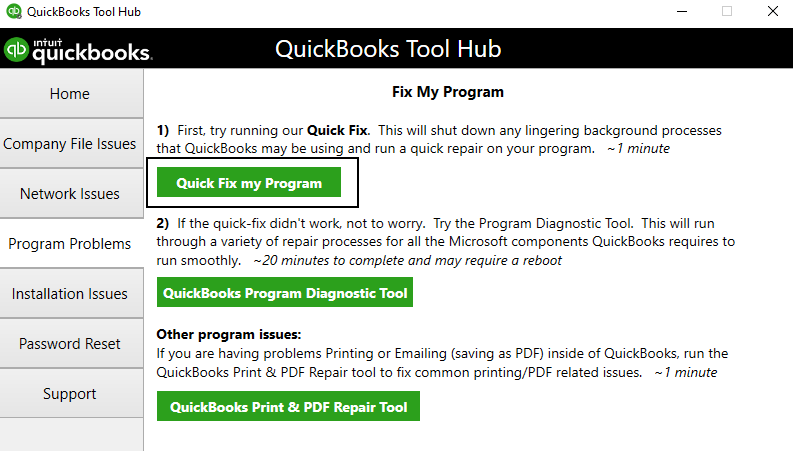
- Open QuickBooks Tool Hub.
- Tap Program Problems.
- Choose Quick Fix My Program.

You can also run the Install Diagnostic Tool, which fixes installation problems that trigger multiple user problems. This diagnostic tool looks into the root cause of multi-user problems due to installation issues:
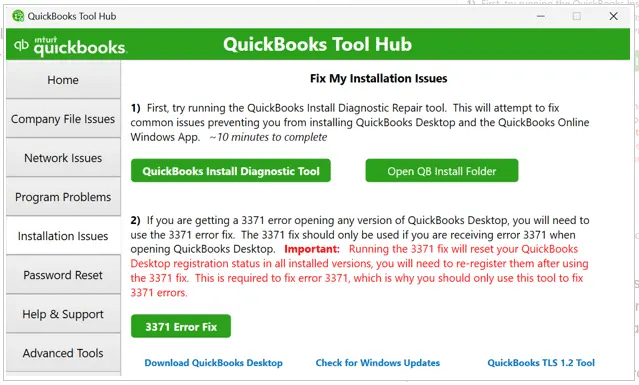
- Open QuickBooks Tool Hub.
- Choose Installation Issues.

- Tap QuickBooks Install Diagnostic Tool.
After completing this process, the issues and errors should no longer occur in your application. If that’s not the case and the QuickBooks multi-user mode not working error continues to hinder your work, then go through the next resolution.
Solution 20: Repair QuickBooks Through the Control Panel
It would be better to repair your QuickBooks program through the Control Panel when you face problems with QuickBooks Enterprise multi-user mode. This action fixes the damaged components in the app and the supporting Windows files and framework:
- Back up the QuickBooks company file.
- Close any unnecessary programs that might disrupt QuickBooks and restart your computer.
- Click on Start and then hit Control Panel.
- Proceed to Programs and Features and tap Uninstall a program. (If these options are not visible, select Programs and then Program Features.)
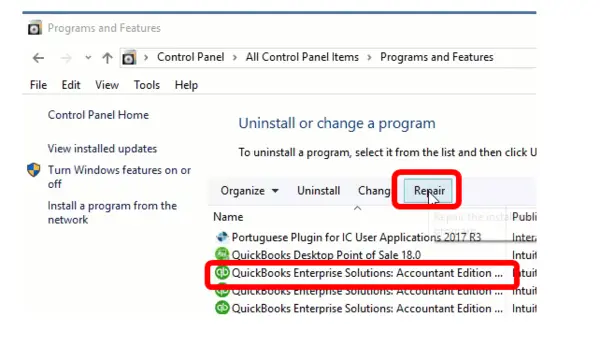
- Locate QuickBooks in the program list and move forward with Uninstall/Change.
- Tap Continue, followed by Next.
- Choose Repair and then hit Next. Allow time for the repair process to conclude.
- Select Finish. If prompted, restart your computer.
After you restart your computer, run QuickBooks Enterprise and verify if the error persists or has been resolved. In case the QB not opening in multi-user mode is still occurring, then move to the following process.
Solution 21: Close the Company File Correctly
When you consistently face problems with a multi-user hosting setup in QuickBooks, prevent the issue by ensuring you close your company files correctly. Instead of choosing the X button to exit QB, try the following steps:
- Choose the File menu and then select Close Company.

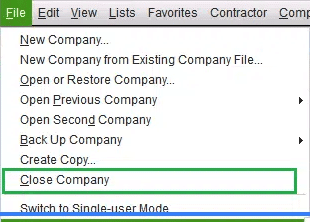
Now, if you want to exit QuickBooks afterwards, follow the steps below:
- Pull up the File menu and choose Exit.
This will exit the QB Desktop application. You can now restart it and resume the operations. If the QuickBooks multi-user mode error still persists, then try the troubleshooting method outlined below.
Solution 22: Change *.TLG and *.ND Files Name
QuickBooks uses configuration files like the network data (.ND) and transaction log (.TLG) files to connect with and access the company file; if any of these files are damaged, then you will fail to access the company file, leading to the QuickBooks multi-user mode not working.
- Open the QuickBooks company file folder.
- To check the Product Information, press F2 on the QB home page.
- Locate the files in your company file that have the (.ND) and (.TLG) extensions at the end of their names.
- For each file, right-click and choose ‘Rename‘ from the menu.
- After each file, type “.old“, then click “Save“.
Note: Make sure you have checked the “show hidden files and folders” option in File Explorer so that you don’t have any trouble finding the .ND and TLG configuration files.
Check to see if the QuickBooks multi-user mode not working problem has been fixed after renaming these configuration files.
Multi-User Problems with MacOS
Here are the solutions and Prior Considerations you must keep in mind when troubleshooting QuickBooks multi-user mode not working errors in macOS:
Prior Considerations
Satisfying the following considerations is crucial to resolving the QuickBooks multi-user mode not working problems in macOS:
Has the computer hosting QuickBooks Server entered sleep mode?
To prevent your computer from entering sleep mode, adjust your preferences. Follow these steps:
- Select System Settings, then move to Energy Saver.
- Adjust your energy preferences as desired, then close the window.
Have there been any alterations to the network configurations on your computer or the QuickBooks Server computer?
Ensure that the QuickBooks Server is actively sharing the company file and refrain from modifying the network settings.
To verify your settings:
- Access System Settings, then proceed to Network.
- If your configurations are accurate, close the window. If adjustments are necessary, make the required changes and then click on Apply.
Is your computer relying on Wi-Fi?
A potential cause for the disruption in your connection to the QuickBooks Server could be a weak Wi-Fi signal. Relocate to an area with a robust Wi-Fi signal or use an Ethernet connection.
Troubleshooting Multi-User Problems with Solutions for MacOS
We are going to discuss every possible solution that is used to troubleshoot QuickBooks Multi-User Problems with Solutions for macOS.
Solution 1: Confirm the QB Server Status
Users need to confirm the QB Server Status and verify if the company file is shared:
- Click on Go, then go to Applications.
- Move your mouse and double-click the QuickBooks 20XX Server.app.
- If necessary, share the file.
- If the file is listed under NOT SHARED, select the file and initiate sharing by selecting Start Sharing.
- If the file is not listed, click on the “+” sign to add the file.
Note: The QuickBooks Server app should only be installed and active on a host computer. Ensure that the company file is located on the same computer where the QuickBooks Server app is installed.
Solution 2: Verify the MacOS Firewall Settings
Ensure your macOS firewall settings don’t restrict the QuickBooks multi-user connections. The steps involved in removing firewall restrictions for QB Mac are as follows:
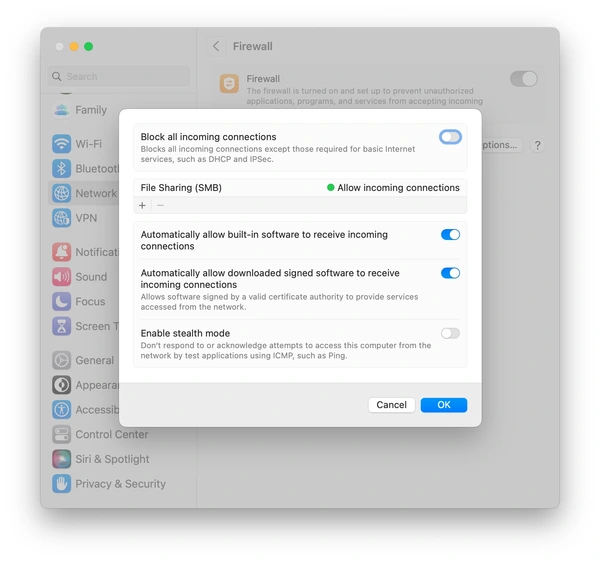
- Navigate to the Apple menu, then hit System Preferences.
- Tap the Security & Privacy icon, and then select Firewall.
- Select Firewall Options. If the button is inactive, click on the lock icon to unlock it.
- Ensure that the QuickBooks Server app is configured to Allow Incoming Connections.
After you complete this process and add QuickBooks Firewall exceptions, the issue should be resolved. If it does occur, then try the following method to resolve the QB Mac multi-user error.
Solution 3: Ensure Accurate File Share Permission Settings
You must see that your file-sharing permissions in Mac are set correctly on the host PC:
- Access the Apple menu and click on System Preferences.
- Choose the Sharing.
- Enable the File Sharing option by checking the corresponding checkbox.
- Include the folder containing the company file in Shared Folders.
- Click on the “+” symbol under the Shared Folder.
- Navigate to the location of the folder with the company file, and then select Add.
- Ensure that under the Users column, permissions are configured as Read and Write for Everyone or for the specific users who will be using QuickBooks.
Once done, head to QBO and verify whether the error has been resolved or not. In case the multi-user issues in QuickBooks Desktop for Mac continue to disrupt your work, then you can resort to the next solution to get rid of them.
Solution 4: Look into the Bonjour Service
Problems with QuickBooks Mac multi-user can be resolved by looking into your Bonjour service and ensuring everything works correctly on all systems:
- Choose File, followed by New Finder window.
- Other computers using QB should show in the Shared
- Ensure to open these ports: 56565 TCP, 5297 TCP, 5298 TCP/UDP, and 5353 UDP.
Once done, close this window and verify the QuickBooks multi-user error for Mac. If the error has not yet been resolved, then you might have incorrect internet settings. Follow the method outlined below for testing the network settings on your computer.
Solution 5: Test the Network Configuration
Ensure your hardware doesn’t block communication between QuickBooks Desktop and QB Server as follows:
- Disconnect the Ethernet cable, or if wireless internet is in use, disable Wi-Fi.
- Restart your computer.
- Launch QuickBooks and activate multi-user mode.
Note: Ensure that computers using wireless internet are connected to the same network.
Now, the QuickBooks multi-user mode not working for Mac should be gone, and you should be able to use the application normally without any issues.
However, if you still run into such errors, then proceed with the following method.
Solution 6: Set the Peer-to-Peer Direct Connection Properly
Through a peer-to-peer connection, you can link two computers using an Ethernet cable.
- Power down both computers and establish a connection by plugging the Ethernet cable into the respective Ethernet ports of each computer.
- Reboot both computers. The Bonjour service should facilitate both PCs to view each other. Confirm this by selecting File, then New Finder Window, and ensuring that the other computers using QuickBooks are visible in the Shared
- Make a computer the host for QuickBooks Server. Open QuickBooks, go to File, and enable Multi-user mode.
- On the second computer, launch QuickBooks, and from Shared Files, access your company file.
After you have completed this procedure and linked two computers by using an Ethernet cable, the QuickBooks Mac multi-user error should disappear. If it doesn’t work, you can move on to the following method and try it out.
Solution 7: Ensure No User is Logged In
Ensure that no other users are currently logged into QuickBooks and actively working. On your QuickBooks Mac version, go to File, then select Enable Multiuser Admin mode. Subsequently, you will have the ability to modify the preferences. You can check the problem with QuickBooks not allowing multi-user mode now.
With that, the issue should not occur anymore. If you continue to face any complications, then you can reach out to a QB expert and get assistance for multi-user issues in QuickBooks Desktop for Mac.
Conclusion
In this detailed guide, we have discussed all the possible reasons and fixes you can try in QB Desktop for Windows and Mac to resolve the QuickBooks multi-user mode not working issue. You can use these solutions to fix the issue; however, if the solution doesn’t work, you might need outside assistance. If this error remains unresolved or you face any other QB issues, you can ring the Accounting Helpline team at 1.855.738.2784 anytime and get your queries sorted straight away.
FAQ’s
Which QuickBooks edition encounters multi-user mode problems?
You may see the QuickBooks multi-user mode not working issues in the following systems:
– QB Premier Plus Contractor 2023
– QuickBooks Desktop Pro 2020
– Windows 10 Pro
– 2019 QuickBooks Premier Manufacturers and Wholesale
– Windows 10
– QB Pro 2021
– QB Pro 2020
– QuickBooks Enterprise 2023
– QB Desktop for Mac
– QB 2022 Premier/ Accountant
– QuickBooks Pro Plus 2022
– QB 2022 Database Server Manager
– QB Enterprise 2018
– Server 2012
– QB Mac 2020
– QB 2019
– QB Pro 2022
– QB 2022 R8 for Mac
What errors or problems can you face with multi-user mode?
The following problems occur with the QuickBooks multi-user mode not working:
– Multiple users can’t connect to the files simultaneously. Only one PC can access it at a time.
– Error H202 or H505 are multi-user error codes you might encounter.
– When you try accessing the multi-user mode, it crashes.
– You may be unable to get into the single-user mode for maintenance.
– Computer 1 acts as the host and uses QuickBooks daily, occasionally switching to Single-user mode multiple times throughout the day. However, when Computer 1 transitions from Single-user mode back to Multi-user mode, Computer 2 encounters difficulty logging into QuickBooks. Thus, Computer 1 has to exit QB. Subsequently, Computer 2 can log in and switch from Single-user to Multi-user mode, and only then can both Computer 1 and Computer 2 access the same company file simultaneously. It’s noteworthy that Computer 1 is unable to transition the company file to multi-user mode successfully; only Computer 2 can accomplish this task.
– QB tells you you’re in single-user mode even when you are not.
– File sharing between the server and workstation becomes compromised, and constant freezes and reboots are required.
– Multi-user switches to single-user automatically.
How to open QuickBooks in multi-user mode?
If you want to open QuickBooks in multi-user mode, you must allow QuickBooks Database Server Manager to run on your remote PC. After installing QB and switching to the multi-user mode through the File menu, do the following:
– Tap Yes in the required window for the multi-user hosting setup.
– Important: QuickBooks Desktop installs and uses QBDBMgrN.exe as a background service. This service is essential for the computer that hosts the company file, even if QuickBooks Desktop is not actively running.
– Click OK on the Multi-user setup information window.
– Add the required users by navigating to Company, selecting Users, then choosing Set up Users and Roles, and finally clicking New.
Now, you can launch your QuickBooks company file after locating it as follows:
– Tap File > Open or restore company > Open a company file > Next.
– Browse to reach the company file location.
– Choose the .qbw file from the list and tap Open.
– Input your username and password details when requested.
How do you set up a QuickBooks server to host multi-user access?
Setting up a QuickBooks server to host multi-user access requires carrying out the following steps:
– Set up QB Desktop.
– Arrange folder permissions.
– Install Database Server Manager.
– Manage firewall and security settings.
– Provide admin rights.
– Use Database Server Manager.
– Enable hosting as follows:
– Choose File, then go to Utilities.
– Tap Host Multi-user Access, then click Yes.
Once the files are hosted on the server, you must install QuickBooks on a workstation to access them.
Related Posts-
Complete Guide on QuickBooks Payroll Update: Errors & Solutions
How to Fix QuickBooks Error 12031- Answered by Experts
QuickBooks Error 6000 103 – 4 Method that will Fix it
A Comprehensive Guide to Troubleshoot QuickBooks Error 12009
QuickBooks Error H202 in Multi-User & Solutions to Fix it
Quick Fixes to Resolve the QuickBooks Payment Link Not Working Issue

Edward Martin is a Technical Content Writer for our leading Accounting firm. He has over 10 years of experience in QuickBooks and Xero. He has also worked with Sage, FreshBooks, and many other software platforms. Edward’s passion for clarity, accuracy, and innovation is evident in his writing. He is well versed in how to simplify complex technical concepts and turn them into easy-to-understand content for our readers.