
Last Updated on April 16, 2026
QuickBooks Migration Failed Unexpectedly; an error arises when you try to transfer QuickBooks data from one system to another or from one storage to another on the same system. This error message appears right after you run the Move_QuickBooks.bat file to complete the QuickBooks migration process. The manual process to migrate QuickBooks Data is simple but time-consuming. The need to use the QuickBooks Data Migration tool arises when you want to save time and effort by manually transferring the data.
No matter if you are trying to move QuickBooks Desktop to a new computer or transferring data from a different platform to QuickBooks, if you encounter an error message that reads QuickBooks migration failed unexpectedly, this article will help you get rid of it in no time.
Are you facing difficulties moving your QuickBooks files from one place to another due to the QB Migration Failed Unexpectedly error? Either read this blog till the end or reach out to our Accounting Helpline experts at 1.855.738.2784 for guidance in the right direction.
What Exactly is QuickBooks Migrator Tool, and How Does it Help?
With the advancement in technology, the software is getting better every day, and the same is true for QuickBooks Desktop. As we all know, QuickBooks is a large application and requires a good amount of resources to function at its full potential. This creates the need to upgrade the hardware and supporting components every couple of years. However, upgrading the system and supporting components is not an issue. It is moving QuickBooks from the old system to the new one. Intuit, being aware of this fact, has developed the QuickBooks Migrator Tool that automatically moves all your data to the new system and activates QuickBooks.
Manually moving QuickBooks from one system to another is a big hassle, as you will need to get QuickBooks on the new system, move the data from the old to the new one, deactivate it on the old system, and activate it on the new one. This is a complex process and also poses a risk to crucial company data. With the introduction of the QuickBooks Migrator Tool, all this hassle has been taken care of, and all you need to do is download the QuickBooks Desktop Migration Tool and run the QuickBooks Migrator Tool on the system to migrate the QuickBooks data.
Next, in this article, we will look at the prerequisites to run the QuickBooks migrator tool on the system so that you don’t face any issues while running it.
System Configuration You Must Have to Avoid QuickBooks Migration Errors
Make sure to fulfill the following hardware and software requirements before using the QuickBooks Migrator Tool to move QuickBooks Desktop from one system to another.
Operating System Requirement:
- Windows 11, 64-bit, natively installed
- Windows 10, all 64-bit editions, natively installed
- Windows Server 2022, Standard and Essentials
- Windows Server 2019, Standard and Essentials
- Windows Server 2016, Standard and Essentials
- Windows Server 2012 R2, Standard and Essentials
- Windows Server 2012, Standard and Essentials
As Microsoft discontinued support for Windows 8.1 after 10th January 2023, it is not recommended that QuickBooks be installed on Windows 8.1 and any earlier versions.
Database Server Requirement:
- Windows Server 2022, Standard and Essentials
- Windows Server 2019, Standard and Essentials
- Windows Server 2016, Standard and Essentials
- Windows Server 2012 R2, Standard and Essentials
- Windows Server 2012, Standard and Essentials
These are the server systems you can use if you plan to use QuickBooks in multi-user mode by hosting the company file.
Browser Requirement:
With QuickBooks Desktop 2023, you do not need an additional browser to let QuickBooks connect to the internet. QuickBooks now has its browser integrated with the application, and all you need is an active internet connection every 14 days to sync the license data online.
Configuration Required for System Hardware and Operating System
| Processor | QuickBooks requires a minimum of 2.4 GHz to run optimally. |
| RAM (workstation) | 8 GB minimum, 16 GB recommended for smooth performance. |
| RAM (server) | For 1-5 Users: Minimum 8 GB • For 10 Users: Minimum 12 GB • For 15 Users: Minimum 16 GB • For 20+ users: Minimum 20+ GB |
| Disk Space | 2.5GB of additional disk space is required for data files. If you have any additional software: 60MB for Microsoft .NET 4.8 Runtime, which you get with the installation files. • If you use Intuit Data Protect in QuickBooks Connected Services offerings, here are the requirements: • A minimum of 4.0 GB RAM is required. • At least twice the size of free space is required for the largest file you have to back up in addition to an additional 100 MB of storage. You must have this space in this folder: LocalApplicationData+”Intuit\Intuit Data Protect.” Note: Using an SSD drive is suggested for best performance. |
| Windows | North American version of Windows. • Regional settings are supported when set to English. • Having admin rights is a must on the server computer when hosting multi-user access. • Natively installed and doesn’t need to run in a virtual environment or emulation software. |
| Optical drive | For physical CD installations, a 4X DVD-ROM drive is required. |
| Screen resolution | Display must be set to 1280 x 1024 resolution or higher with up to 2 extended monitors. • Default DPI setting on the system for best display. |
Apart from the above requirements, here are some crucial additional requirements that you must have for a seamless data migration.
- QuickBooks Desktop 2019 or later version, as the migration feature is only available in these versions.
- Access to the admin account is required as data migration can only be done by an administrator of the system.
- An active internet connection is a must to download the tool and updates.
- You will also need an external storage device to move the QuickBooks data from the old system to the new one.
QuickBooks Migration Failed Unexpectedly! EXPLAINED
Users may change their QuickBooks setup from one computer to another every few years in search of more space, speed, and other requirements. Therefore, they must seamlessly move their QuickBooks files from the previous system to the latest one. This migration process can be undertaken manually or through the Data Migration Tool for QuickBooks.
QuickBooks Migration Failed Unexpectedly is an error message that shows up right after you move QuickBooks Desktop data to Online or vice-versa, or from one system to another. There are a number of possible reasons that can contribute to data migration failure in QuickBooks, which you can go through in the next section of this article.
Reasons Why QuickBooks Migration Failed Unexpectedly on Windows 11/10?
Here are some common reasons you can’t migrate your QuickBooks data because of unexpected failure:
- Outdated Windows: Whether you are running QuickBooks on Windows 10, 11, 7, or 8, if its version isn’t updated and you continuously rely on the outdated one, you will undoubtedly face QuickBooks Migrator Tool failure unexpectedly or QuickBooks Migrator Tool Not Working.

- Issues with the Migrator Tool: If you’re using the QuickBooks Online Migration Tool for your files to migrate to QuickBooks Online, errors in its processing or anything else might be why QuickBooks cannot migrate to the new version.
- Unsupportive QuickBooks version: If your new computer’s QuickBooks version does not support your existing files, the migration process will not finish successfully or yield adequate results.
- Windows OS Misconfiguration: If the Windows operating system is misconfigured, issues may arise during migration and may fail.
- Damaged Company File Folder: If the QB file folder is corrupted or the folder path is broken, you can face issues while moving your company data.
- Compatibility issues: You can face compatibility issues between the Migrator Tool, QuickBooks Desktop version, and the operating system if you have updated one of them, not the others.
Thus, all or a few of these triggers can result in an error during QuickBooks Migration, causing it to fail. In such situations, QuickBooks users must undertake the following troubleshooting solutions.
This is How to Fix QuickBooks Migration Failure or Not Working
When users encounter the QuickBooks Migration Failed Unexpectedly Windows 11/10 or QuickBooks Migration Tool Not Working error, they should perform the following troubleshooting solutions-
Note – Back up your essential data before fixing the migration tool failure issues. It will help prevent accidental data loss or mismatch in the conversion process.
Solution 1: Moving the company file folder to another location
Manually locate the QB company file in the QB installation folder and fix the QB Migration Tool Not Working issue:
- Begin by copying the backup files onto the new computer.
- Now, open the folder and find the backup file.
- Access the Restored_CompanyName_Files folder.
- Right-click and choose the Copy option on the folder name.
- Directly paste this file to the desired location.
- The files you will need to copy and paste are as follows:
- Cash Flow Projector
- Financial Statement Designer
- QB Letters
- QB Templates
- Printer Settings
Solutions 2: Restore Company Files
You can shift your QuickBooks Desktop manually to the new location and restore your backup files. You cannot move your files manually from one computer to another, but you can move your QuickBooks Desktop between SSDs as follows:
- Install QB Desktop on your new system.
- Form backup files on the old computer as follows:
- Initially, switch to the Single-user mode.
- Then, in the QB Desktop, go to the File menu.
- Find the Backup Company option and proceed to click Create Local Backup.
- Once you choose the local backup of files, browse and hit the folder where you wish to save these files.
- Click OK > Save > Next > Finish.
- Copy the backup files to a new computer.
- Launch the QB app on the new system.
- Restore the backup file and follow the prompts on the screen.
- Complete restoration and download the latest tax tables.
Solution 3: Repair the Program Files
The repair tool for QB in the Windows Control Panel helps users fix their program files. Instead of reducing the workload by uninstalling the app, hit the Repair option. Use the Admin Windows account to sign in to Windows:
- Launch the Control Panel from the Desktop or Start menu.
- Hit the Programs and Features or the Apps option.
- Locate the QuickBooks Migrator Tool in the apps list.
- Choose the Uninstall/ Change option.
- Hit the Repair option on the screen.
- Follow the prompts on the screen to finish the repair process.
- Now, attempt to migrate the data seamlessly.
Solutions 4: Update Windows Operating System
An outdated, incompatible, or misconfigured Windows Operating System will not let QuickBooks Migration succeed. Therefore, update your Windows OS as follows:
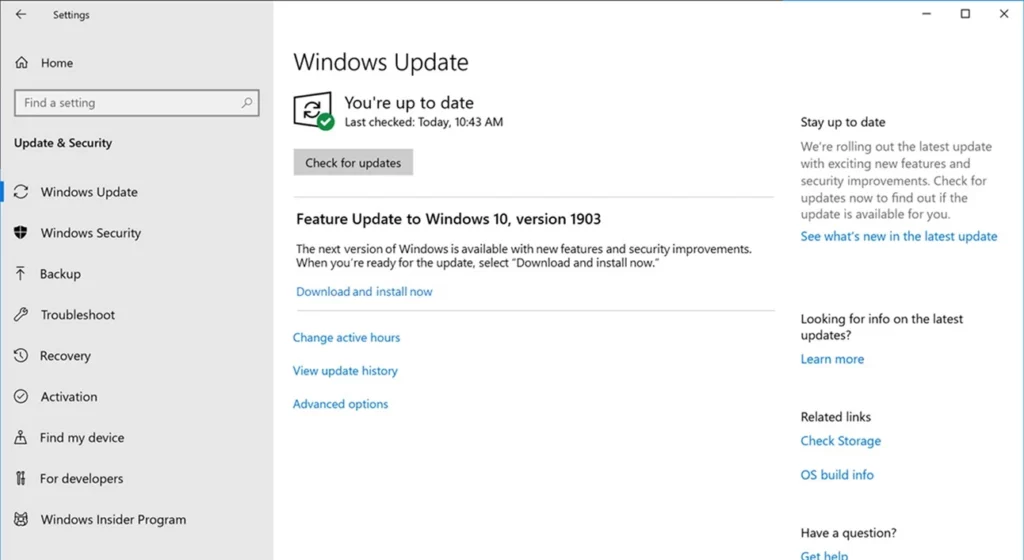
- Go to the Start tab on your Desktop.
- From the menu, choose Settings.
- Now, search the window that opens and find Windows Update.
- Once you locate this option, click it and get the Windows updates.
- Open your QuickBooks Desktop again to start the migration process once the Windows update process has finished and you have rebooted the system.
Solutions 5: Troubleshoot Compatibility Issues with QuickBooks
When QuickBooks Migration Fails due to compatibility issues in the application, do as follows:
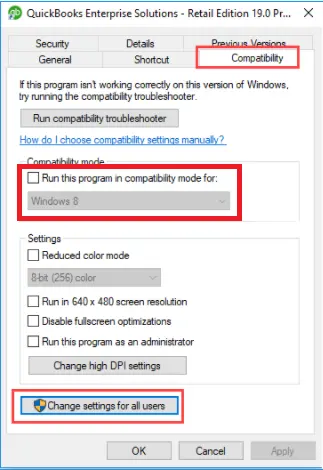
- Locate the QuickBooks application icon and right-click on it. Further, hit the Properties and ‘Open File Location‘ options from the list.
- When the properties dialog box appears, go to the Compatibility tab.
- Choose the Windows version in the “Run this program in the compatibility window for” drop-down.
- Hit Apply and OK to save the changes.
Solutions 6: App Compatibility Troubleshooter Utility
Run the compatibility troubleshooter in Windows as follows:
- Launch the Control Panel from the Start menu or Desktop.
- In the Control Panel window, choose the Programs and Features section.
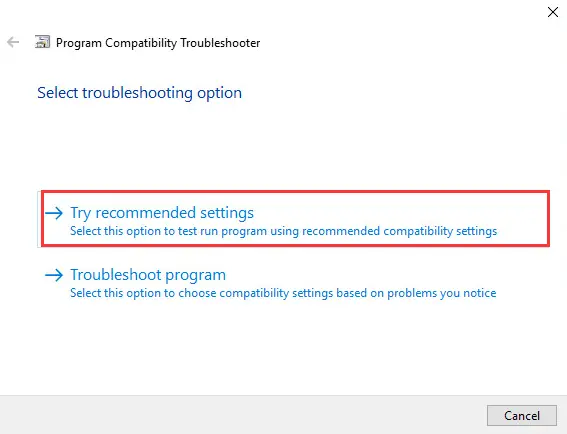
- You must hit the “Run programs made for previous Windows versions.”
- Further, click the Windows Program Compatibility troubleshooter.
- Now, click the Next or Advanced button and choose QuickBooks from the list of available programs.
- You will see the compatibility troubleshooter run and list the issues on the screen about the application.
- After all the problems are diagnosed, hit Next to let the repair process begin.
Solutions 7: Update QuickBooks to the Latest Release
Sometimes, using an outdated or previous QuickBooks version on one computer and a new one on the other may also lead to this issue. Therefore, undertake the updation process on one of the computers’ QB applications as follows:
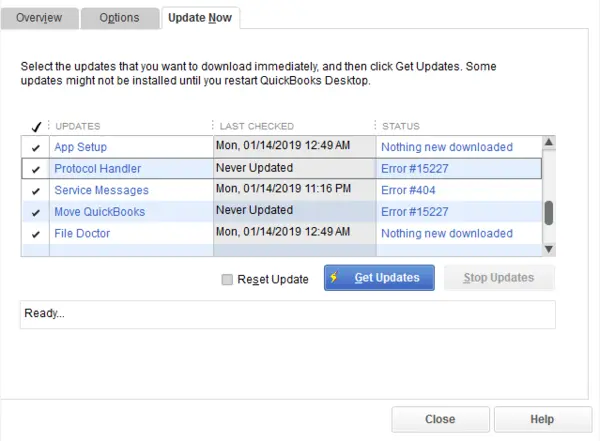
- You will find the Update QuickBooks Desktop option in the application’s Help menu.
- Hit the Update Now option and proceed to choose the Get Updates option.
- Now, exit and open the QuickBooks application, install the updates if prompted, and restart the computer once the updates are installed.
- If you’re facing trouble updating QuickBooks, end these processes in the Task Manager (Ctrl + Shift + Esc) and re-run the update process:
- Qbw32.exe
- QBCFMonitorService.exe
- Qbupdate.exe
- QBDBMgrn.exe
- QBMapi32.exe
Solution 8: Move the QuickBooks Data Folder
Move the entire QB data folder if you can’t or don’t want to create a copy of the backup file. The instructions required for this method to resolve the Move QuickBooks Migration Failed Unexpectedly error are as follows:
- Begin by launching the QuickBooks application and searching for the company file.
- Visit the Product Information screen by pressing the F2 key on the keyboard.
- Here, move to the File Information section.
- Now, find the location of the company file.
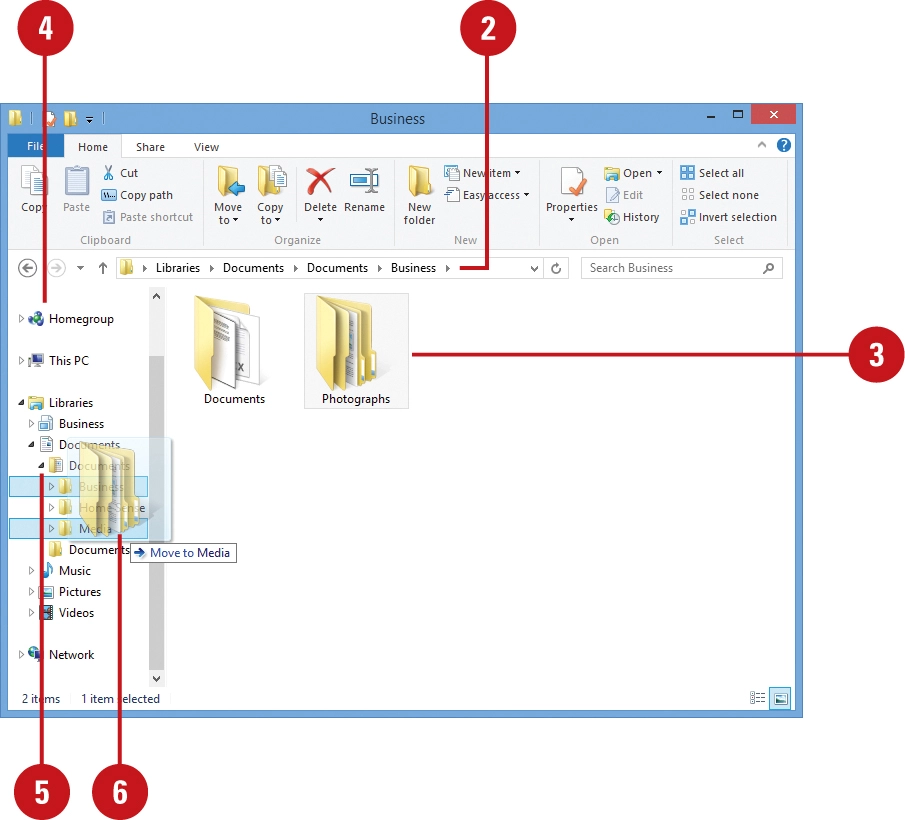
- Further, go to the Start menu and look for File Explorer.
- Once found, open the company file folder.
- Right-click the folder name and choose to copy. Alternatively, hit Ctrl + C.
- Paste the folder into the required location (Ctrl + V).
Solutions 9: Utilize Intuit Data Protect Plan
The Intuit Data Protect plan takes a backup of your entire PC, including a single file or non-QuickBooks-related files. You can fix the QuickBooks Migration Failed Unexpectedly issue using this as follows:
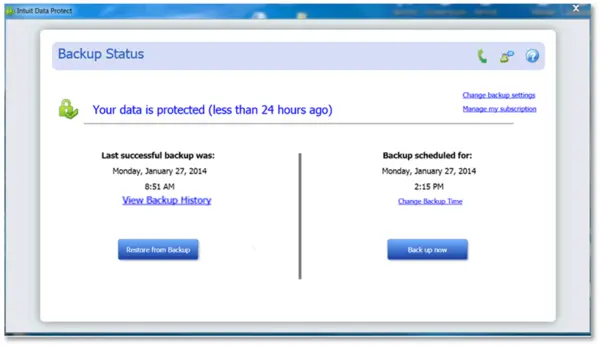
- Begin by taking a backup of your QuickBooks company files on your old computer.
- Now, you need to sign in to Intuit Data Protect on your new computer with the login credentials of your old computer.
- Move to the File tab in the QB application.
- Hit the Backup Company option in the opened window.
- Choose the Setup or Activate Online backup option.
- Now, choose the QuickBooks company file, and then Continue.
- Mark the checkbox against the Backup local selected documents option.
- Now, hit Continue and create a backup. The files you will see in these folders are as follows:
- Business Planner Files
- Cash Flow Projector Files
- Loan Manager Files
- Logos and Image files
- Network Data Files
- Transaction Log Files
Solutions 10: Eliminate any Third-Party Backup App
If you think any unwanted third-party app interferes with the QuickBooks Migration procedure, remove it from the computer to resume QBDT Migration:
- In the Edit menu, hit the Preferences option to open the preferences window before removing an integrated program in QuickBooks.
- Load your Company Preferences by choosing the Integrated Applications option from the list on the left side of the window. Now, select the Company Preferences tab.
- Remove the check mark against the Integrated Program you want to uninstall. Once you uncheck an application, it won’t be able to access your QB information and company files or connect with the application.
Solutions11: Uninstall any Pending QB Maintenance Release Update
Before proceeding with this solution, save your pending work and close the QB program:
- Firstly, Windows is set to display the hidden data and folders to view the Program Data directory.
- You will find the Download location in the Update QuickBooks Desktop window of the Options tab.
- Locate the EPatch and New Features directories after arriving at the download location. It should match the dates when QuickBooks downloaded the last update.
- Select All to highlight the contents in the EPatch directory.
- Now, hit Delete to erase all the content in this directory and close it.
- Go to the New Features directory, highlight the content, and hit Delete to remove everything. Then, exit it.
- Now, you have removed the Windows update maintenance release. You can proceed by leaving the Windows Explorer.
Solutions 12: Set up your QB Online Cloud Profile to Export Data to QuickBooks Online
This additional method can move your QuickBooks Desktop data to QuickBooks Online. Follow the procedure given below to log in to your cloud profile for the data migration process –
- Log in to your QuickBooks Desktop and move to the Company menu to see the Export option at the bottom of the screen.
- Select the Export Company File to QB Online option and log in to your cloud profile.
- If you don’t already have a cloud profile, set up the profile and enter the required credentials.
- Select the destination to migrate the company file and sign in to QB Online Accountant.
- Check the Move My Stock using the FIFO option and select the Starting Date to migrate the data.
- Hit Continue to initiate the process, and once it ends, check if all your data is migrated successfully.
Avoid These Mistakes While Transferring QuickBooks Data
There are certain unintentional mistakes that can result in QuickBooks Migration Failed Unexpectedly in Windows 11. Go through the info below and ensure you avoid these mistakes for an uninterrupted data migration.
Not having a secure backup.
Back up your company file and other vital data before transferring QuickBooks to a new computer. If this is not done, data loss or corruption may occur throughout the transfer procedure.
Failure to check compatibility
Check that your new computer has the QuickBooks minimum system requirements. Failure to do so may result in software issues such as slow performance or crashes.
Do not remove QuickBooks from the old computer.
If you do not deactivate QuickBooks on your old computer before transferring it to the new one, you may have license and activation issues.
Having an outdated QuickBooks Desktop
Before transferring QuickBooks to the new computer, ensure that you are using the most recent version. Failure to update the program may cause compatibility issues or other issues.
Failure to transfer all essential files
When transferring QuickBooks to a new computer, be certain that all relevant files are transferred, including company files, templates, and other settings.
Hurrying up while transferring the data
When migrating QuickBooks to a new computer, take your time and carefully follow all necessary processes. Hurrying up through the process may result in errors or other problems.
What if QuickBooks Migration Failed After Troubleshooting?
There is a huge possibility that even after implementing all the troubleshooting solutions above to eradicate the root causes, the QuickBooks migration will still fail. In such circumstances, here are some of the additional points that you need to look at.
Ensure Compatibility: Verify that the source and destination QuickBooks files are compatible with the Migration Tool by running a compatibility check. The utility may not work correctly if the files are not in the correct version or format.
Verify the Data Size: If the data file is too big, the migration may not succeed. Think about dividing the data into manageable portions and transferring each one separately.
Verify the Internet Connection: The QuickBooks Migration Failed Unexpectedly. The problem may be caused by a slow Internet connection. Prior to starting the migration procedure, make sure your internet connection is working fine.
Install the Migration Tool Again: Try uninstalling the Migration Tool and then reinstalling it if problems with the software continue.
Try Another Method: Try manually migrating the data by exporting it from the old system and importing it into the new one if the Migration Tool is still not working.
Conclusion
This in-depth guide about the QuickBooks Migration Failed Unexpectedly error will let you know all the nooks and crannies of the issue. Follow all these steps to get rid of the error. If these steps don’t work or you get stuck somewhere, contact our Accounting Helpline experts of desktop migration services at 1.855.738.2784 and receive professional assistance.
FAQ’s
What should you do if QuickBooks Migration Failed Unexpectedly?
In situations where QuickBooks Migration Failed Unexpectedly, you can proceed as follows:
– Ensure the migration tool is installed on the new computer.
– Make sure the device, as well as the QuickBooks Desktop app, is up-to-date. Check by opening the QB file and seeing the data status at the bottom.
– Keep all the files in the exact location as when you backed them up. If not, copy and paste them into one area.
Why does QuickBooks migration fail?
The QuickBooks migration procedure may halt or crash without a warning due to the following causes:
– Damaged company file
– Incompatible QuickBooks or Windows on the new computer
– Problems with the migrator tool, QuickBooks Desktop
– Virus infections
When does the QuickBooks Migration fail unexpectedly?
QuickBooks users encounter sudden migration failures when the procedure is underway. For instance, technical complexities may halt the process when they’re using the migrator tool to fish files from old to new computers.
How do I use the Migration Tool in the QB application?
– Choose the Utility section in QuickBooks’ File menu to move it from one location to another.
– Hit the I’m Ready option and enter your one-time password.
– Select the USB flash disc to use, follow the steps, and wait for the files to copy.
Is it Necessary to upgrade your QuickBooks Company File after Migrating to a New Computer?
No, you do not need to upgrade your QuickBooks company file after the migration process. This is because the same QB version will be installed on your system after you are done migrating your data. Hence, upgrading the QB file is not required.
How long does it take to migrate QuickBooks?
The answer to ‘How long does it take to migrate QuickBooks using the QuickBooks migrator tool’ is simply the size of the data file. The larger the data file, the longer it will take the migrator tool to complete the data migration.
How do I transfer my QuickBooks to a new computer?
Here are the four steps you will need to follow to transfer your QuickBooks to a new computer.
Step 1: Make a backup of your company file
Back up your company file before transferring QuickBooks to a new computer. To accomplish this, launch QuickBooks on your previous computer and choose File > Backup Company > Create Local Backup. Select a location for the backup file and click Save.
Step 2: Transfer the Backup File to the New Computer
You must transfer the backup file to your new computer once it has been generated. This can be done using an external hard drive, a cloud storage service, or a network connection. Connect an external hard drive to your old computer and copy the backup file to the local disk. Then, attach the drive to your new computer and unplug it. Open the backup drive and transfer the backup file to your new computer.
Step 3: Install QuickBooks on Your New Computer
The next step is to install QuickBooks on your new computer. Install the software by inserting the installation CD or downloading the installation file from the Intuit website. Follow the on-screen instructions to install the software on your new computer.
Step 4: Restoring the Backup File
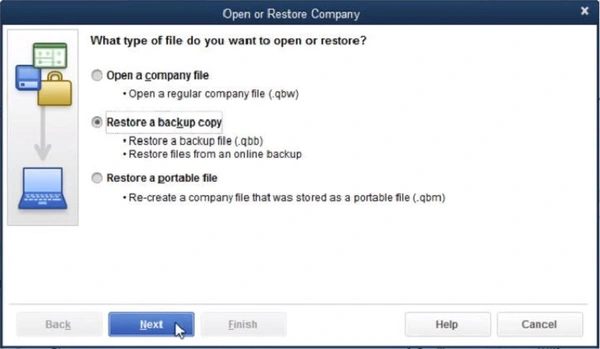
After installing QuickBooks on your new computer, launch it and navigate to File > Open or Restore Company. Click Next after selecting Restore a backup copy. Select Local Backup and then click Next. Select the backup file from the location where it was saved. Click Next, then Open. Select a location to save the restored company file and press the Save button. Finally, click OK to finish the procedure.

Edward Martin is a Technical Content Writer for our leading Accounting firm. He has over 10 years of experience in QuickBooks and Xero. He has also worked with Sage, FreshBooks, and many other software platforms. Edward’s passion for clarity, accuracy, and innovation is evident in his writing. He is well versed in how to simplify complex technical concepts and turn them into easy-to-understand content for our readers.