Last Updated on March 11, 2025
You may suffer heavily if your QuickBooks subscription has lapsed, as you cannot run monetary tasks in QuickBooks until the issue is resolved. The most frustrating aspect of this issue is that you’ll encounter recurring pop-ups that hinder the software operations and make things complex for you. An apparent reason for the pop-up might be QB’s failure to read or process the product and license information file (EntitlementDataStore.ecml file). It must be remembered that the financial data in the company file isn’t affected due to the issue, but it won’t let you operate QuickBooks seamlessly either. Therefore, seeking an effective solution becomes crucial to get rid of the QuickBooks expired message. This blog has covered all the practical fixes for the subscription-lapse issue and the root causes triggering the issue. Therefore, read the blog thoroughly to tackle the problem and ensure your business operations aren’t affected by it in the future.
If you are not tech-savvy, removing the QuickBooks subscription’s lapsed message might become challenging for you. However, you needn’t panic as you can contact our Accounting Helpline dedicated specialists at 1.855.738.2784 and let them fix the error on your behalf.
Reasons Behind QuickBooks Expired Message Occurrence
Only QuickBooks can’t be held responsible for the issue as there are many other reasons that can trigger the error message “It seems your QuickBooks subscription has lapsed” on the screen. We have mentioned all of them below to help you grasp the problem better and choose the best way to resolve it from QuickBooks-
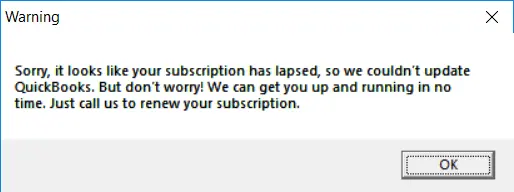
- Billing issues due to outdated details (if you change your credit card or bank account) are a primary trigger.
- You may be in need of the latest QB Desktop updates as compatibility issues become imminent due to obsolete software version.
- The subscription lapsed issue can also develop if the QuickBooks Desktop installation is corrupt or the software files get damaged.
- The QBWUSER.ini file holding the product and license info may be damaged or stored in a restricted location on your system.
- Your system’s internet settings (TLS & SSL) may be incorrect, causing connectivity issues while syncing data with the Intuit servers.
- Running QuickBooks on a regular (non-admin) Windows account can limit the software functions.
- The subscription lapsed message might be genuine if you didn’t renew the subscription on the assigned date.
- Your web browser might be incompatible with QuickBooks Desktop.
- The issue lies on the Intuit server’s end, due to which the QB subscription renewal can’t be validated.
- Too much temporary data in the web browser, like- Cache, Cookies, browsing history, etc., can also cause network issues while verifying the QB subscription.
Troubleshooting Solutions to Eliminate the QuickBooks Subscription Lapsed Message
It’ll be easier to rectify the “QuickBooks subscription has lapsed error” now as you may have acknowledged the specific reason for its occurrence. We have mentioned the most effective techniques that can be applied to terminate the error instantly. Find them below-
Fix 1: Update Your Billing Details
Intuit servers might fail to validate or renew QB subscription if billing issues emerge during payment. For that, you must update your billing details in the Customer Accounts Management Portal (CAMPS) when you encounter a QB subscription lapsed error:
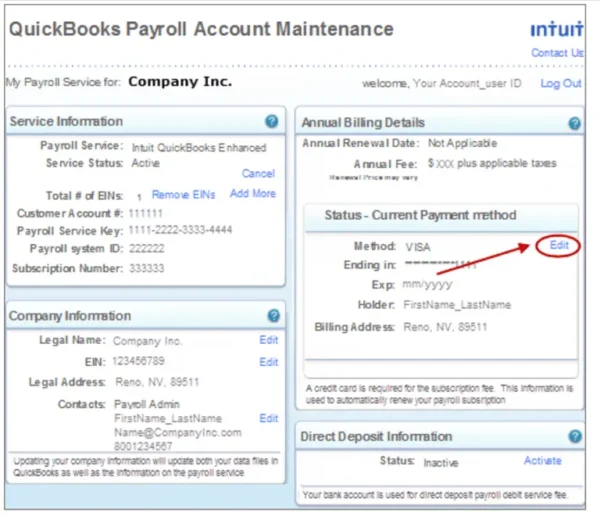
- Use your Inuit account credentials to access the Customer Account Management Portal (CAMPs) as an administrator.
- Locate and select your QuickBooks Desktop version in the list of products and services.
- Choose the “Details” option adjacent to your QuickBooks Product.
- Click “Edit” next to your Payment Method and review the payment information (Credit card and bank account).
- Once you’re done, go with the Save and Close option and relaunch QuickBooks Desktop.
- Navigate to the Help menu and click Manage My License, then click on Sync License Data Online.
If the QB subscription error persists, proceed to Fix 2.
Fix 2: Install the Latest QB Desktop Update
Subscription errors in QuickBooks Desktop may appear if your software is outdated or missing the latest security patches. You must download the latest QB Desktop updates to fix the existing bugs and prevent compatibility issues with other applications. Here is how you can get the newest QB Desktop update:
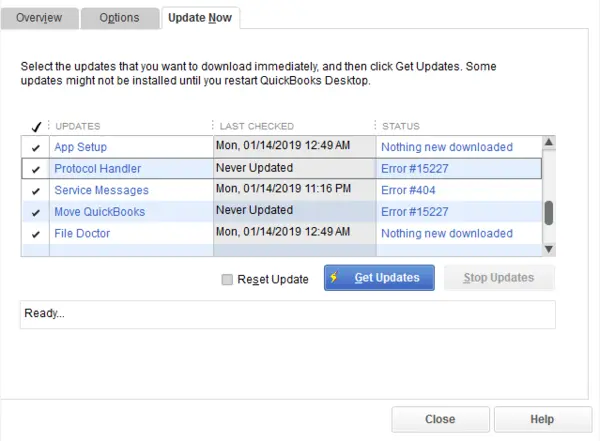
- Click the QuickBooks Desktop icon with the right mouse button and select Run as Administrator to launch the software in admin mode.
- Go to its Help menu and click the Update QuickBooks Desktop
- Navigate to the Options tab and select the Mark All
- Switch to the Update Now tab and click the checkbox adjacent to Reset Update.
- Tap Get Updates to download the updates and relaunch the software to install them by clicking the Install Now option in the software prompt.
If the “QuickBooks subscription lapsed” issue persists even after QB is up-to-date, let’s proceed to the next solution.
Fix 3: Run the QuickBooks Install Diagnostic Tool
Hindrances while setting up QuickBooks Desktop can damage the installation and trigger the “subscription lapsed” error. In such cases, the QuickBooks Install Diagnostic tool from the QuickBooks Tool Hub comes to the rescue. This tool diagnoses installation-related issues and sorts them out automatically (All within a few minutes. So, let’s use this tool as shown in the following steps:
- You need to download QuickBooks Tool Hub on your computer to begin with the installation repair.
- Choose a place to save the downloaded files, which must be easily accessible.
- Double-click the exe file in the downloaded package to run the InstallShield.
- Accept the software license agreement and finish QuickBooks Tool Hub installation using the on-screen directions.
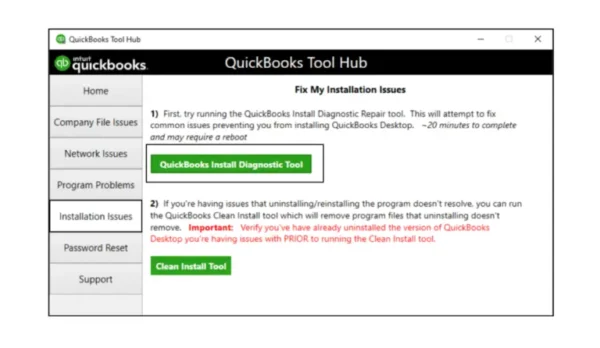
- Once the installation is complete, you can open the Tool Hub and click Installation Issues.
- Choose QuickBooks Install Diagnostic Tool from the drop-down menu.
- Wait for some time and click Ok when this tool finishes the scan.
- Access QuickBooks Desktop after rebooting your system and perform the task that triggered the subscription issue earlier.
In case the subscription error isn’t fixed, move to the next solution.
Fix 4: Recover the Product and License File
QuickBooks Desktop has an EntitlementDataStore.ecml file containing your product and license details stored in the system’s HDD. If this file gets damaged or QuickBooks faces problems accessing the file due to insufficient folder permissions, the user authentication fails, and you see the subscription lapsed pop-up message on the screen. You can resolve the issue by restoring the license file through the following steps:
- Get the product and license details from the Product Information Window (F2) in QuickBooks.
- Close QuickBooks Desktop and type “Run” in the search panel.
- Launch Run from the results and paste “C:\ProgramData\Intuit\Entitlement Client\v8”
- Press Enter to open the folder, and if nothing happens, try entering “C:\ProgramData\Intuit\Entitlement Client\v6”
- Locate the file named ecml and right-click on it.
- Choose Delete from the options and tap Yes to confirm.
- Open QBDT and follow the wizards on the screen to register QuickBooks again through the product and license info.
If the subscription issue develops again after recreating the product and license file, check out the next solution.
Fix 5: Modify the Internet Connection Settings
If it seems that your QuickBooks subscription has lapsed, you may need to adjust the Internet settings in your Windows and within QuickBooks Desktop, too. You can judge the quality of your network connection by measuring the Internet speed it delivers or by accessing your Financial Institution’s website to see if the problem lies in incorrect Internet settings (TLS & SSL) in Windows.
- Tap the Help menu in your QB Desktop and access Internet Connection Setup.
- Choose “Use my computer’s Internet connection settings to establish a connection when this application accesses the Internet.”
- Click Next and select Advanced Connection Settings.
- Navigate to the Advanced tab and click Restore Advanced Settings.
- Click Ok and tap Done.
Additional considerations:
We recommend configuring the TLS & SSL settings in Windows to avoid server connectivity problems. QuickBooks syncs data with the Intuit servers to authenticate the user’s license details and might face problems. Internet access is blocked due to misconfigured TLS or SSL settings in Windows. Configure the system settings with these steps-
- Type ‘inetcpl.cpl’ as a command in the Run window and hit Enter to launch the Internet Properties
- Go to the Advanced tab and scroll down to locate the TLS and SSL settings.
- Ensure only the Use TLS 1.2 and Use SSL 3.0 checkboxes are selected and close the settings window after saving the changes.
- Relaunch QuickBooks Desktop.
If QB malfunctions or crashes after displaying the subscription lapsed message again, jump to the next solution.
Fix 6: Configure the QuickBooks Folder Permissions
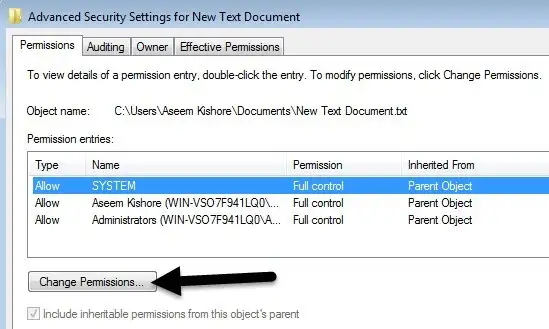
QuickBooks can also encounter subscription issues if the software fails to access the license and product files during launch. This happens if the file’s location is restricted for non-admin Windows account. The software won’t be able to verify your subscription if it can’t access the product and license file and keeps displaying ‘Subscription has lapsed in QuickBooks Desktop.’ To tackle such issues, we suggest you use your Windows admin account to run QuickBooks. You can also make the QB folder contents accessible by configuring the Windows permissions as shown below-
- Go to the QuickBooks folder location using the file explorer and right-click it.
- Select the Properties option and go to the Security
- Choose your Windows account from the pre-mentioned list and allow permissions like Read, Write, Modify, etc. Clicking Full Control lets you allow all the permissions at once.
- Save the settings and close the Properties
- Re-perform the QB task that caused the subscription lapsed issue earlier.
If QB subscription lapsed messages recur, move to the next solution.
Fix 7: Change QB’s License Number & Product Code
QuickBooks can also fail to verify the subscription if Intuit servers can’t process the software’s license number or product code. This is a rare issue that mostly happens due to problems at the server’s end. QuickBooks won’t run properly as the subscription lapsed message appears every time the license file is processed or Intuit servers try to authenticate the subscription of the user account.
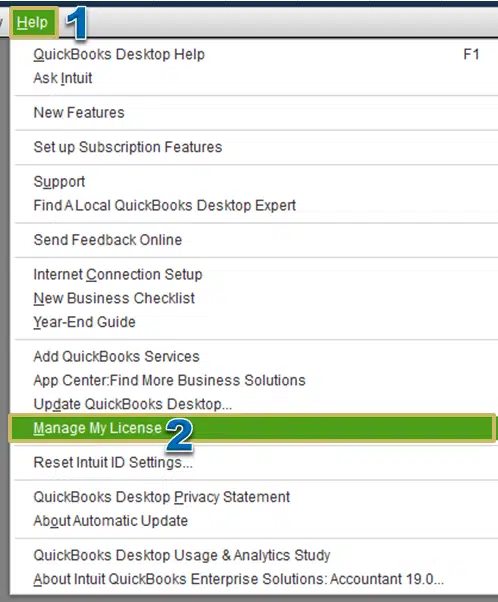
To proceed, you’ll need to change the license number to access the company file and perform other accounting tasks. You don’t need to reinstall the software, and it can be quickly done through the steps provided below-
QB Desktop for Windows
Use the following method if you use QuickBooks Desktop on Windows OS-
- Go to the QB’s Help menu and select Manage My License.
- Click the Change My License Number and enter your new license number.
- Tap Next, then Finish.
QB Desktop for MAC-
Apply these steps if you use QuickBooks Desktop on MAC OS-
- Go to the Manage My License option in your QB menu and click Deauthorize this computer.
- Click the Deauthorize and Quit option and relaunch QB Desktop.
- Complete the registration process to enter a different license number.
You can easily purchase or check license number by signing in to your Intuit account and visiting the Products & Services section.
Change the Product Code in QB Enterprise
Coming to the product code, if you use QuickBooks Pro, Premier, or Enterprise in five or fewer systems, you can easily change the product code by reinstalling the software. However, if you aren’t comfortable reinstalling QuickBooks, you can change the product code by editing the qbregistration.dat file in QuickBooks Enterprise. Refer to these steps-
- Press F2 and then F3 in QB to launch the Tech Help window.
- Choose DAT in the Open File tab and click Open File to launch the file in Notepad.
- Go to the Notepad’s File menu and save the file on your Desktop from the Save As
- Reopen the QBREGISTRATION.DAT file from the Tech Help window and close QuickBooks Desktop, not the Notepad.
- Press Ctrl+H in the notepad and type your old product code in the Find What
- Enter the new product code (XXXX-XXXX format) in the Replace With field and click Replace All.
- Save the changes and consider closing the file.
- The product code will be updated in the Product Information window when you relaunch QB.
If QB cannot run due to the subscription lapsed messages, move to the next solution.
Fix 8: Access the Data File without Internet Connection
If the current QuickBooks Desktop (QBDT) version is no longer supported, you may encounter messages that say the QuickBooks subscription has expired while syncing data with the Intuit servers. To continue utilizing the software, you can access your company file without an internet connection. You won’t be able to register any changes in the company file or perform any accounting task involving it. If you are Ok with it and just need to access the company file, apply the following steps-
- In QuickBooks Desktop, navigate to the Help menu and access Internet Connection Setup.
- Tap I do not have a way to connect to the Internet and click Next.
- Click Done and reopen your QuickBooks Desktop.
As warned earlier, if you face problems accessing your company file, try the next solution.
Fix 9: Access the Account by Resolving Web Browser Problems
QuickBooks can also face problems connecting to the Internet due to an incompatible web browser or junk files stored in the browser. Let’s attempt to access your account through an incognito window to eliminate any potential webpage issues. Such issues may cause the “subscription lapsed in QuickBooks Desktop” issue. You can use the following shortcut keys to open an incognito window in all QB-supported browsers:
- Chrome: Ctrl+Shift+N
- Firefox: Ctrl+Shift+P
- Safari: Command+Shift+N
Once you’re in the incognito window, log in to your account and review your billing information. If it shows as active, we suggest clearing the cache to ensure a fresh start when accessing QuickBooks as follows:
To clear the cache in Chrome:
- Click on the More icon through your mouse in the upper right corner of the Chrome window.
- Select Settings from the dropdown list.
- Scroll down to the bottom of the page and access Advanced.
- In the Privacy and Security section, choose Clear browsing data.
- Tick the box next to Browsing History.
- Hit All Time via the Time Range drop-down list.
- Check the box with Cached images and files.
- Click on Clear Data to proceed.
In Microsoft Edge:
- Click on the three dots icon or More Actions and then choose Settings.
- Navigate to the Privacy and Security
- Click on Choose what to clear.
- Specify the type of data you wish to delete, such as Browsing history, Download history, Cached images and files, etc.
- Finally, click the Clear button to complete the cache-clearing process.
For Firefox:
- Open the Menu icon and tap Settings.
- Choose the Security and Privacy
- Click on Clear Data within the Cookies and Site Data
- Uncheck the option for Cookies and Site Data.
- Check the box with Cached Web Content and hit Clear.
- Close the Settings
For Safari on Mac:
- Launch the Safari app on your Mac.
- Click on History, then hit Clear History.
- Select the time range for clearing cache, history, and data from the dropdown list.
Bottom Line
We hope our detailed guide regarding the “QuickBooks subscription has lapsed” issue has helped you get through the error. We have curated a list of reasons triggering this issue and the troubleshooting approaches for QB Desktop and Self Employed. In case the subscription issue reappears after these resolution steps, we want you to ring our Accounting Helpline toll-free number 1.855.738.2784 to fix the problem with the immediate help of the experts.
FAQ’s
What are the different instances where the QB subscription has lapsed error appears?
The various instances of the QB subscription lapsed error include:
1. You may find logging into QB or running accounting tasks challenging after this error develops. A prompt stating “QuickBooks Subscription has lapsed” comes up whenever you try accessing a data file and asks for updated billing info. This also prevents you from migrating your data from QB Desktop to QB Online without paying for the subscription renewal.
2. The program won’t open because of a notification indicating that the QuickBooks subscription has lapsed. However, this message may become persistent if you don’t require the subscription, as you don’t handle payroll or other related tasks.
3. The QB subscription automatically renews, but sometimes, it might become difficult to log in to the QB account due to a recurring message indicating that the QB subscription has lapsed. Despite being informed that the account is active when logging into Intuit, access to QB is still restricted due to an inactive subscription.
4. You may receive the error “your QuickBooks subscription has expired,” despite not having a subscription, leading to failures while launching QB Desktop.
5. Logging into the company file may be difficult as you continually receive a prompt indicating the subscription has lapsed despite not having had a subscription since the trial. The issue persists despite checking and manually updating, preventing access to the company file.
6. After renewing the subscription through iTunes, logging in still brings the subscription has expired message.
7. The software might freeze or crash abruptly during the accounting tasks if the QuickBooks service has expired.
Which versions face the subscription lapsed message in QB?
The following versions can face the subscription lapsed message in QB:
QB Desktop Pro Plus 2022
QB Premium Plus 2021
QB Desktop Pro Plus 2021
QB Desktop Pro 2017
QB Desktop Pro Plus 2019
QB Self-Employed
QB Desktop Pro 2019
QB Pro 2020
What does the backup restoration process entail after purchasing a new license?
Restoring the backup is a simple process following the steps below:
Move to the QuickBooks File menu and click Open or Restore company.
Click Restore a backup copy > Next.
Choose Local Backup > Next.
Look for your backup file on the PC. It should be companyfilename.qbb.
Choose a folder to save the restored company file, then tap Open.
Once done, hit Save. If any messages about possible overwriting appear, choose the best-fitting option and don’t overwrite anything unless you wish to.
Can I still use QuickBooks Desktop after its subscription expires?
You can’t use or access QB Desktop when your QB Desktop subscription ends.
How to cancel the QuickBooks Desktop subscription?
If you need to terminate your subscription, follow these steps:
Sign in to your CAMPs account.
Choose the QuickBooks Desktop Account you wish to adjust.
If you have multiple accounts, your login profile will indicate the currently selected one.
In the Products & Services section, locate your subscription or service and click Details.
Confirm that this is the product or service you want to discontinue, then select Cancel Service under the active status.
Provide feedback on why you are cancelling to help us improve our services (optional), then click Continue to cancel.
Confirm your cancellation by selecting Cancel Now.
You’ll receive a confirmation message and an email regarding the success of the QB Desktop subscription cancellation.
Keep in mind:
If you’re within the 60-day money-back guarantee period and purchased your product directly from Intuit, you’ll automatically receive a full refund for your subscription within two weeks.
How to renew a QuickBooks Desktop subscription?
If you wish to renew your QuickBooks Desktop subscription, call (800) 591-0302.
What happens when a QuickBooks Desktop subscription expires?
If you choose not to renew your subscription to QuickBooks Desktop, you can still access your company file. However, without renewing, you won’t receive ongoing security updates and access to online services like:
QuickBooks Desktop Payroll Services
Live Support
Online Backup
Online Banking
You’ll be limited to manual tracking and managing your company data using the software.
Is QuickBooks available without a subscription?
After July 31, 2024, Intuit will discontinue the sale of new subscriptions for certain products, including:
QuickBooks Desktop Pro Plus
QuickBooks Desktop Premier Plus
QuickBooks Desktop Mac Plus
QuickBooks Desktop Enhanced Payroll
However, existing QuickBooks Desktop Plus and Desktop Payroll subscribers can still renew their subscriptions beyond this date. Intuit will maintain support, security updates, and product updates for existing subscribers.
This change does not affect QuickBooks Desktop Enterprise products, and customers can still purchase Enterprise subscriptions after July 31, 2024.

Edward Martin is a Technical Content Writer for our leading Accounting firm. He has over 10 years of experience in QuickBooks and Xero. He has also worked with Sage, FreshBooks, and many other software platforms. Edward’s passion for clarity, accuracy, and innovation is evident in his writing. He is well versed in how to simplify complex technical concepts and turn them into easy-to-understand content for our readers.

