Last Updated on September 9, 2025
This guide is developed to help you setup email in QuickBooks to fit your requirements and provide the necessary functionality to streamline your business.
When you wish to send invoices, reports, and transactions to your clients, colleagues, etc., scanning, printing, saving as PDFs, and then sending can become a challenging and hectic procedure. However, if you’re using the top-rated accounting and bookkeeping application QuickBooks, you have an excellent feature on your hands. All you have to do is learn to setup email in QuickBooks and then send and track everything you have sent them. It’s a hassle-free process, and our comprehensive guide aims to simplify it for you.
Setting up your email service in QuickBooks can have multiple benefits, and the instructions below will help you complete the setup. However, if you are unwilling to perform the email setup yourself, our Accounting Helpline’s expert assistants at 1.855.738.2784 can help you with the QuickBooks email integration process.

System Requirements for Setting up Email Service with QuickBooks Desktop
Operating System Requirements
- Windows 7 Service Pack 1
- Windows 8.1
- Windows 10
- Windows Server 2008 R2 Service Pack 1
- Windows Server 2011
- Windows Server 2012 R2
- Windows Server 2016
Hardware Requirements
- Minimum 2.4 GHz of Processor speed
- Minimum 4 GB of RAM
- 5 GB of free disk space
- 4X DVD-ROM drive for QuickBooks Installation
- 1280 x 1024 or higher screen resolution
Software Requirements
- Internet Explorer 11
- Microsoft Office 2010 or later
- Microsoft Word and Excel for preparing letters and reports
- QuickBooks Contact Sync for Outlook
List of Main Benefits of Setting Up Email in QuickBooks
Before we discuss how to proceed with the email setup, let’s learn why it is essential to undergo the QuickBooks email setup process –
- QuickBooks email integration allows you to email invoices, quotes, and other crucial documents right from the app, which saves substantial time and effort.
- You can undertake branded communications and create personalized email templates, which help improve your professional image and make a good first impression on clients and consumers.
- Automating email operations in QuickBooks eliminates manual work, which minimizes the risk of manual errors and makes up time for more productive operations.
- By integrating your email account with QuickBooks, users can access and manage their email correspondence, which helps keep them organized and easily accessible.
- Setting up your email service in QuickBooks Desktop promotes effective email communication, which provides rapid replies to client inquiries and enhances loyalty and customer satisfaction.
Setup Email in QuickBooks Desktop
QuickBooks Desktop users can set up their email services on Webmail and Outlook. However, before getting started, you should ensure you have Outlook 2010 or newer and a working Outlook profile.
Set up Outlook to Send Emails with QuickBooks
Here are the detailed steps you must undertake to perform the QuickBooks Outlook integration process –
- Open Outlook, and from under the File tab, select Account Settings and then click Manage Profiles.
- Click Choose Profiles and select Add.
- Type the name for your profile in the Profile Name box and then click OK.
- For more detailed info on creating profiles in Outlook, follow the article How to Create an Outlook profile.
- Make sure to keep all the information ready for your account, such as password, username, type, address of the incoming server, er, and the outgoing server address.
- Configure Outlook with all the correct information and open QuickBooks.
- Select Preferences under the Edit tab and then click Send Forms.
- Choose Outlook and then click OK.
Set up Webmail to Send Emails with QuickBooks
QuickBooks will automatically fill in the information about your email provider if you are using some of the most common email services like Outlook, Gmail, and Yahoo Mail, but if you are using email services from some other email provider, then make sure to get the port and server info from your internet service provider as you will need it later while configuring email service in QuickBooks.
Essential Points to Remember Before Configuring QuickBooks Webmail Service
Before we move forward with QuickBooks webmail integration, it is important to consider the following important points –
- Only the recent version of QuickBooks Desktop can use secure Webmail, which allows an easy, secure, and reliable connection for your email.
- When you link your Intuit account to your Webmail account, you must review the connection to ensure secure Webmail works appropriately.
- QuickBooks is capable of auto-filling details for the typical email providers.- by using the history, but if there are changes, you must update them.
- After linking Webmail to QuickBooks, you don’t need to enter the password whenever you send the email, only the first time.
- For extra security, your webmail service providers will ask you to enable two-step verification in your account, which will be used when sending the email through QuickBooks.
Now follow the steps to set up webmail to QuickBooks:
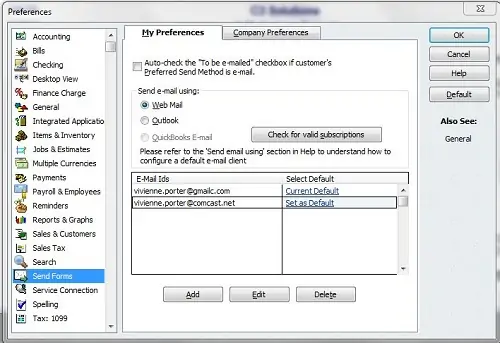
- Open QuickBooks, click Preferences under the Edit menu, and then click Send Forms.
- Click Webmail and then select Add.

- Enter all the required information to add the email service under the Add Email Info section and then click OK.
- Press the OK button once again to save the changes you have made.
- Now try to send an email, and if QuickBooks Desktop requires you to enter the login info of your webmail, then enter it and proceed.
Learn Detailed Steps on How to Set Up Gmail In QuickBooks
Connecting QuickBooks to your Google account can help you email invoices to your customers using the Gmail address. You need to connect your Gmail address to QuickBooks, but you can connect only one Gmail account to QuickBooks to send email using the detailed steps below –
- The first step to change QuickBooks email settings is to open an existing invoice in QuickBooks or create a new one.
- Then, fill in the necessary fields with the relevant information, select Save and Send, and once the preview window appears, go to the customer’s email address.
- Above the customer’s email address, select the email drop-down, then click Add Gmail address and select the Connect Google account option.
- Further, when the sign-in window appears, enter your Gmail address, click Next, and enter your Gmail password.
- Finally, click Next, select the Allow button, and you are all set to send invoices using Gmail in QuickBooks.
Setting up Emails in QuickBooks Desktop for Mac
Now, we’ll look into sending and tracking emails by setting it up in QB Desktop for Mac. You have the option to configure multiple email accounts, and QuickBooks will remember the association between each email address and the corresponding type of message. Here’s a guide on how to establish this setup:
For QuickBooks Desktop Mac Plus 2022
The steps are detailed below:
- Navigate to QuickBooks and tap Preferences.
- Choose the Email icon.
- Reach the “For sending Emails…” section and choose one of the following options:
- Send using your Default Email handling application: This uses your system’s default email application, such as Mail or Outlook.
- Send directly out of QuickBooks using your Email Account: This option involves adding your email account through an external service like Gmail.
- If you click the default email application, you’re set. If you prefer a different email account, tap Gmail or Custom from the Email Provider dropdown. Then, proceed with the steps below.
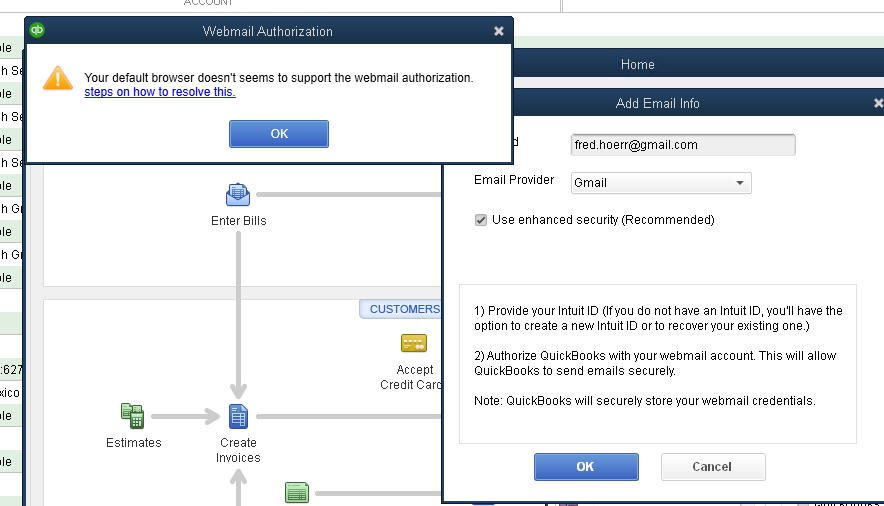
If you choose Gmail as your email service provider, perform the following tasks:
- Tick the Enhanced Security checkbox, as we recommend.
- Proceed with the steps to grant authorization for accessing your email address. Click OK to initiate this process.
For Custom email provider selection, the steps are as follows:
- If you click Custom or you didn’t tap the Enhanced Security checkbox, assign an identifiable name to the account and complete the remaining fields. Note: Your email provider can furnish the correct SMTP settings. Ports 25, 465, and 587 are commonly used for email. If encountering connection issues, experiment with various port and connection type combinations. For instance, consider using Port 465 with Connection Type SSL/TLS or Port 465 with Connection Type Start TLS.
- Click OK. QuickBooks will try to validate the connection to your email provider’s server. Upon successful validation, QuickBooks will close the sheet and display the account in the Email Accounts list.
For QuickBooks Desktop Mac 2021 and Earlier
Let’s look into the steps to set up email in QB Mac 2021:
- Navigate to QuickBooks and click on Preferences.
- Hit the Email icon.
- Access the “For sending Emails…” section and choose one of the following options:
- Send using your Default Email handling application (e.g., Mail or Outlook).
- Send directly out of QuickBooks using your Email Account (if you wish to add your email account through a separate service like Gmail).
- If you click your default email application, you’re good to go.
- For a different email account, provide an easily identifiable name for the account and complete the remaining fields. Note: Your email provider can offer the appropriate SMTP settings, with common ports being 25, 465, and 587. If you encounter connection issues, experiment with different combinations of port and connection types. For instance, consider using Port 465 with Connection Type SSL/TLS or Port 465 with Connection Type StartTLS.
- Upon selecting OK, QuickBooks will attempt to validate the connection to your email provider’s server. If successful, QuickBooks will close the sheet and display the account in the Email Accounts list.
You’ll find the email address listed in the From field of your message, and you can select any account to send from.
Internet Service Provider (ISP) and Port Details
| ISP (Internet Service Provider) | SMTP Server | SMTP Port |
| 1AND1.com | smtp.1and1.com | 587 (SSL turned on, with password) |
| ADELPHIA | mail.adelphia.net | 110 |
| AOL | smtp.aol.com | 465 or 587 *(SSL turned on for incoming and outgoing mail server) |
| BELL SOUTH | mail.bellsouth.net | 110 |
| COMCAST | smtp.comcast.net | 587 |
| COMPUSERV | smtp.compuserve.com smtp.aol.com | 110 or 587 |
| COX Business | smarthost.coxmail.com | 25 |
| COX CENTRAL | smtp.central.cox.net | 25 |
| COX EAST | smtp.east.cox.net | 25 |
| COX WEST | smtp.west.cox.net | 25 |
| EARTHLINK | smtpauth.earthlink.net | 25 (with password) |
| LYCOS | smtp.mail.lycos.com | 25 |
| MICROSOFT OUTLOOK 365 | outlook.office365.com | 587 (SSL turned on) |
| NETSCAPE | smtp.isp.netscape.com | 25 (SSL turned on) |
| PRODIGY | smtp.prodigy.net | 25 (SSL turned on) |
| ROADRUNNER | smtp-server.sc.rr.com | 587 |
| SPRINT PCS | smtp.sprintpcs.com | 25 |
| VERIZON | outgoing.verizon.net | 465 |
| VERIZON YAHOO | outgoing.yahoo.verizon.net | 465 |
Common Issues Users Encounter While Setting Up Email in QuickBooks and How to Troubleshoot Them
While configuring the QuickBooks Desktop email settings, users can face various common issues, which are mentioned below –
- One common issue for users while learning how to set up email in QuickBooks is the incorrect selection of the email provider, which triggers communication and integration challenges. One should ensure the selected email provider is compatible with QuickBooks to avoid any hitches when sending and receiving information and to promote effective data management.
- Other common problems that lead to the QB email setup issues include wrong email credentials, such as an email address or a password. When encountering such problems, verify the accuracy of the email address and password and update them if required to ensure that they match the account details.
- Challenges with email server settings, particularly the outgoing server configuration, can cause problems with QuickBooks SMTP settings. You can diagnose these problems with the email server; the focus troubleshooting areas include the server settings, account credentials, and app compatibility review.
- Windows firewall or your PC’s antivirus software can block or hinder QuickBooks, which can lead to email setup issues, highlighting the need for effective tech support and security-related resolutions. To fix the firewall blockages, you can try reconfiguring the firewall settings before trying to set up the email service.
The steps and detailed instructions in this blog will help you set up email in QuickBooks with ease. However, if you are still unable to set your preferred email as the service in QuickBooks, you must contact our Accounting Helpline’s assistants at 1.855.738.2784 to get prompt and expert guidance in resolving QuickBooks email issues.
FAQ’s
How do I track emails in QuickBooks?
When you send an email to a customer in QuickBooks, the system logs the message. While we’ll use tracking customer email as an illustration, the steps are identical for jobs and vendors.
– Navigate to Customers and click on Customer Center.
– Choose the specific customer to whom you sent the form.
– Access the Email tab, where you’ll find a list of the forms you emailed to that customer.
To view a particular transaction, select the corresponding item in the email list. If you wish to cease tracking an email, you can delete it.
What do I do if there are Webmail password issues in QB Desktop?
You need to check the following things to ensure nothing blocks messages going out to your vendors and customers:
Step 1: Update QB
Step 2: Verify the email settings
Step 3: Verify the antivirus settings
Are there some considerations to note after securing the Webmail setup in QuickBooks?
Yes, there are certain things to consider after you have secured Webmail as the email service in QuickBooks –
– If you set up Secure Webmail for your QBDT company file, create a complex/strong password to ensure the data file is secure.
– If you’re using a Hosted Environment to operate QuickBooks, then you must sign in every time you want to send mail.
– Further, you must remember that QuickBooks will ask you to provide your Webmail credentials while sending the first email.
– If QuickBooks rejects your password, call your Webmail providers to execute the two-step verification process and ask users to review the account settings.
What information is necessary to keep handy before setting up Outlook as the email service in QuickBooks?
Before setting up Outlook in QuickBooks, you must have the following list of information ready for a seamless setup process –
– Username & Email Password
– Incoming email server type
– Ingoing and outgoing email server address
What are the resolution steps if QuickBooks is unable to connect to your email provider’s server?
One of the main issues while setting up emails in QuickBooks is server connection issues, which can be fixed using the extensive steps below –
– From the QuickBooks Edit menu, select Preferences, then from the left pane, choose Send Forms.
– Now. under My Preferences, select the email account you are using, click Edit, and move to the Edit Email Info screen.
– Further, navigate to the SMTP Server Details section, set the email server name, and port to your email provider settings to complete the configuration.

Edward Martin is a Technical Content Writer for our leading Accounting firm. He has over 10 years of experience in QuickBooks and Xero. He has also worked with Sage, FreshBooks, and many other software platforms. Edward’s passion for clarity, accuracy, and innovation is evident in his writing. He is well versed in how to simplify complex technical concepts and turn them into easy-to-understand content for our readers.