Last Updated on November 6, 2024
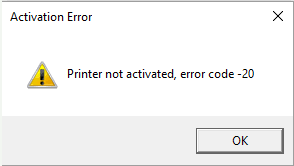
Have you ever run into an error where, after updating Windows to a higher version, your printer started giving an error message “Printer not Activated, Error code -20”? The error pops up on the screen whenever a user tries to print a pay slip, form, or PDF using the QuickBooks Desktop application. Some users have also experienced this error while emailing invoices to their customers. Once the user clicks the OK button on the error message window, the system displays, “Could not print to the printer. Check your printer selection. Printing may have been canceled from another program”. In this article, we will discuss the factors that cause QuickBooks error 20 and its troubleshooting method.
Receiving errors while trying to activate the printer is really a headache, especially for QB users. Therefore, you can use the information provided in this guide to successfully rectify QuickBooks error 20. But if you don’t have time to fix the error yourself or need a faster resolution process, you can always call our specialists at 1.855.738.2784. The team will assist you quickly in solving the error and any printer activation problems.
What Causes QuickBooks to Encounter PDF Converter Activation Error 20
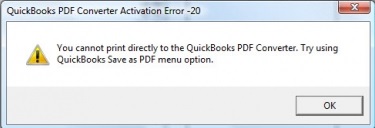
Multiple reasons cause QuickBooks PDF Converter Activation Error -20 to display on Windows with the error message “You cannot print directly to the QuickBooks PDF Converter. Try using the QuickBooks Save as PDF menu option.” It is necessary to grasp the reasons below if you want to address QuickBooks printer not activated error code 20 with less ambiguity. Below are the main causes of this printer activation error –
- QuickBooks PDF converter is not appropriately configured.
- If your PDF converter can’t read the activation code, it can lead to this activation error.
- The QuickBooks version you are using is not compatible with the Windows version you are using.
- Outdated Windows and QuickBooks Desktop application.
- Windows has registry errors.
- Incomplete or corrupt installation of QB software.
- You may have set up the wrong printer, or the printer settings are wrong when using the printer.
- Essential files, like the qbprint.qbp file might not be running correctly or might be damaged.
- The Windows printer spooler service is not activated on the PC, or the service isn’t running correctly.
- Your system’s UAC settings can also be responsible for QB error code 20.
Critical Points to Examine Before Rectifying printer not activated error code 20
You must take care of the following essential points before performing the troubleshooting process for printer not activated error code 20
- Make sure you are not using a discontinued version of QuickBooks; every QuickBooks version is good for three years from the year it is launched.
- If you have updated Windows rather than installing a fresh one, then consider reinstalling a fresh copy of Windows on your system.
- Make sure to update QuickBooks Desktop software and Windows drivers.
- Ensure that you are logged in as an administrator on Windows.
- If you have two different versions of QuickBooks installed on your Windows, then make sure that both of them have different installation directories.
- Try installing the 32-bit version of Windows if you are using Windows XP or Vista.
Once these considerations are fulfilled, move to the next section to learn about the practical solutions to fix QuickBooks printer not activated error code 20 error.
In-depth Troubleshooting Instructions to Fix PDF Creation Problem Error 20 in QuickBooks
Until QuickBooks error 20 is resolved, you won’t be able to run the printing functions. Thus, you must perform the practical solutions given below to eliminate the printer not activated error code 20-
Solution 1: Stop UAC (User Account Control) from Monitoring Applications on Windows
The User Account Control settings can cause restrictions due to security reasons. You can turn the UAC off on your PC in the following manner to stop it from monitoring the applications –
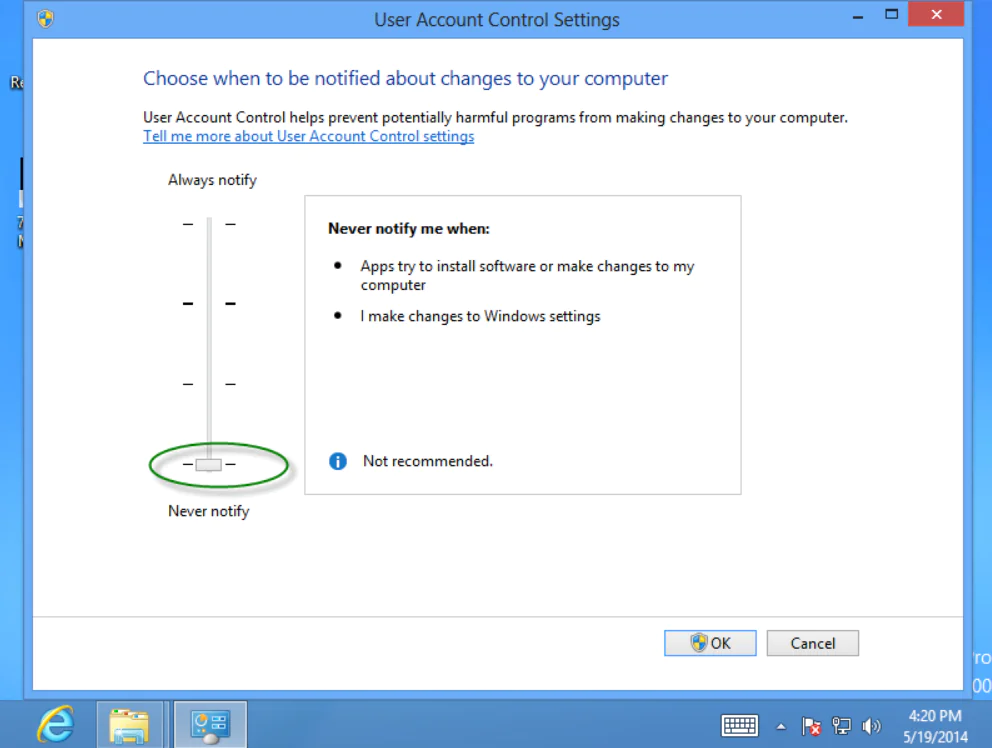
- Press the Windows + R key on the keyboard and type Control Panel inside the Run window.
- Hit OK and click User Accounts under the Control Panel.
- Now select Change User Access Control Settings and move the slider to Never to Notify.
- Hit OK and restart your computer.
After turning the UAC off, rerun QuickBooks and try to activate the printer. If you still encounter QuickBooks error code 20, move to the next solution to fix the error.
Solution 2: Switch to Built-in Administrator Account to Fix Printer Not Activated Error Code 20
Possible reasons that can lead to the emergence of activation problems include insufficient administrative rights being used for the function. This is how the admin account needs to be activated in relation to QB error 20 –
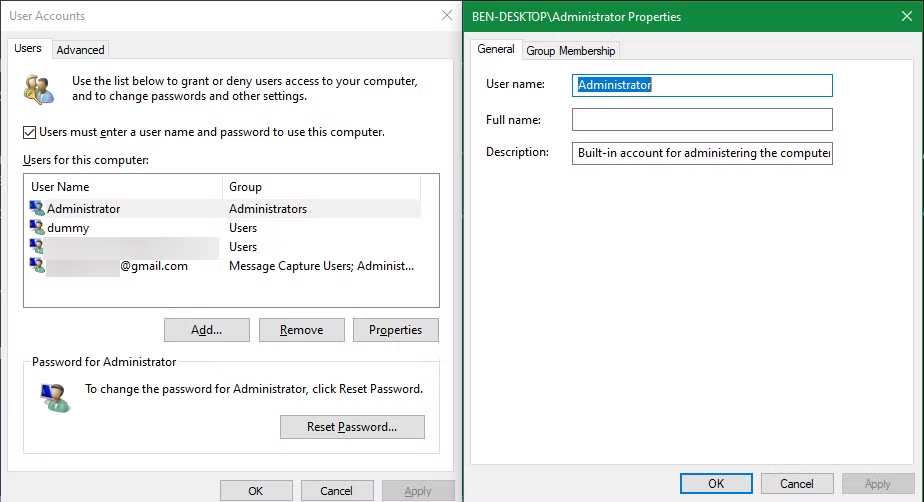
- Type ‘cmd.exe’ in the Windows Start menu bar, and then click the ‘Run as administrator’ tab and select cmd.exe.
- Now, to enable the administrator account, type “net user administrator /active: yes” and run the command.
For detailed information on other methods to activate the admin account, follow Article three ways to enable an administrator account in Windows. However, if the error code still appears, follow the next troubleshooting solution to eliminate it.
Solution 3: Delete qbprint.qbp & wpr.ini Files from QuickBooks Installation Folder
The next solution is to completely remove the qbprint.qbp and wpr.ini file from the QB installation folder as follows –
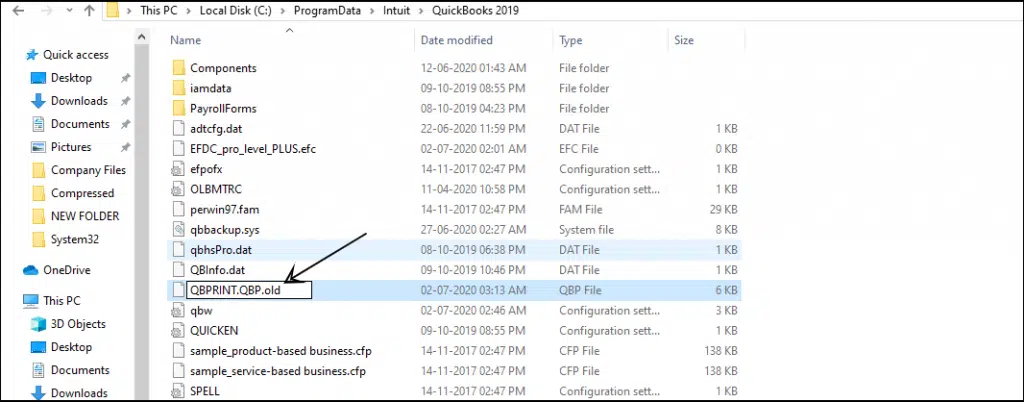
- Open Windows File Manager and navigate to C:\Program Data \Intuit \QuickBooks folder.
- Right-click and delete qbprint.qbp & wpr.ini files from the QuickBooks folder.
- Now delete qbprint.qbp & wpr.ini files from C:\Users \All Users \Intuit \QuickBooks folder.
Now, it’s necessary to verify whether there are still problems with the printer activation after the files have been deleted. However, if you still get the QuickBooks Printer Not Activated Error Code 20 during printer activation, then move on to the next step.
Solution 4: Run QuickBooks Desktop Print and PDF Repair Tool
The PDF Print and Repair Tool can help fix general PDF and printing issues within the QBDT application. You can run the PDF Print and Repair utility to initiate a repair process.
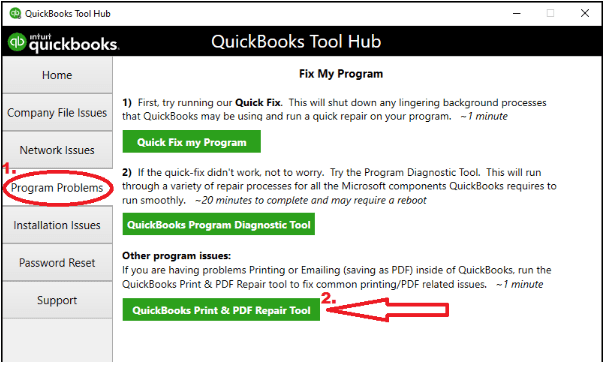
After the tool stops running, rerun QuickBooks and check if you can activate the printer without errors. If you still notice QuickBooks error code 20 on your screen, proceed to the next resolution in order to remove it.
Solution 5: Check the Default Email Program in the Windows Registry
Ensure you are using the default email program in the Windows registry to fix QuickBooks error 20 as follows –
- You can open the Run dialog by pressing Win + R on your keyboard – then, in the new window, type Regedit and press OK.
- Navigate to HKEY_CURRENT_USER -> Software -> Clients -> Mail.
- At the left side panel, check the default email name, if it is not the default email program you are using then double-click the Default section and type the name of your email program.
- Hit OK and then Restart Windows.
If the problem still persists and you are getting the error code 20 while activating the printer then go to the next solution.
Solution 6: Activate the Windows Print Spooler Service
The printer spooler service is an element of the operating system executing on the PC and is responsible for the management of printing jobs on your PC; if the printer spooler service is misbehaving, then you will experience printing problems. Thus, you must activate the printer spooler service by implementing the steps given below –
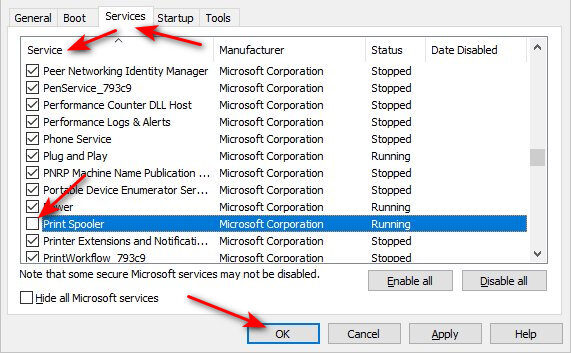
- Press the Windows + R key on your keyboard together and type services. msc in the Run window.
- Press Enter and search for the Print Spooler service in the services list.
- Right-click the Print Spooler service and select Start.
- Try printing any document using QuickBooks again.
If you are still unable to activate or use the printer, follow the next solution to address QB error 20.
Solution 7: Try Printing from Another Program
As you are on a Windows-based operating system, kindly type some test in notepad and try to print that text in correct printer. If you are able to print from the other program then problems in the QB application may be the reason for the printer activation error.
For the QuickBooks installation issues, consult with Solution 8 below. On the other hand, if you cannot print from Notepad, the setting of printer may not be right (refer to the solution 9 to revise the setting of printer below).
Solution 8: Reinstall QuickBooks using QB Clean Install Tool
Sometimes, installation problems in QuickBooks can be responsible for QuickBooks error code 20. To fix this error, you can reinstall the application using the Clean Install Tool and have a fresh version on your PC.
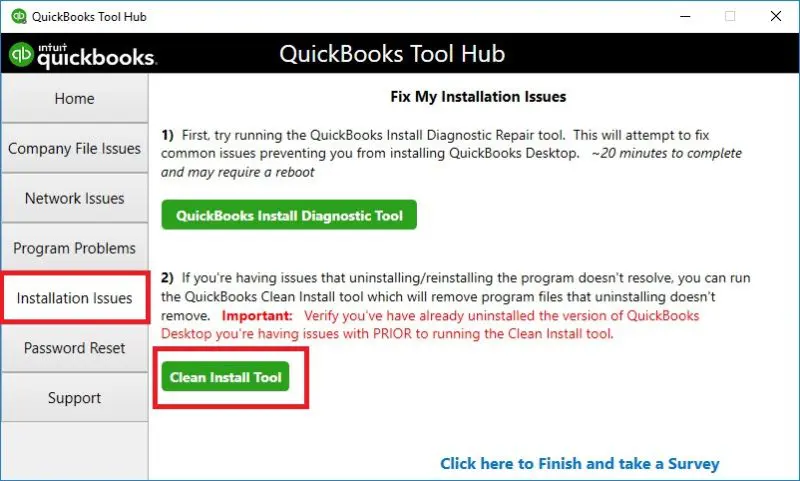
After QB is reinstalled, activate it and try to connect to the printer again. However, if the error code still exists, you can check the printer setup in the next solution.
Solution 9: Review the Printer Setup
You need to make sure that the printer is properly configured, or else you are going to get an activation error. In order to review the setup which has been described above, follow the detailed, sequential instructions listed below –
- This you can try by: Powering off the printer, powering your PC off then powering on the printer and lastly make sure you are correctly loading the printer paper.
- You can now go to the Windows start menu, click on the control panel option, and double-click on Printers and Faxes.
- If the printer shows Offline, right-click the printer and click Use Printer Online to activate the online mode.
- Double-click the printer, and if there are print jobs in the queue, select Printer, click Cancel All Documents, and then close the window.
- Right-click the printer, select Properties, then select Print Test Page and check if the printer is working.
Note: If the printer is a network one and the test page doesn’t print, network issues could be responsible. You can contact your IT expert for assistance with the related network problems.
If the printer doesn’t work and QB error code 20 persists, perform the next solution.
Solution 10: Set Full Control Access for the Software Folder in Windows Registry
You must provide full control to the software folder in the Windows registry to prevent access issues in the following manner –
- Hit the Start button on your keyboard and type Regedit.
- Right-click the Regedit icon and select Run as Administrator.
- Navigate to the HKEY_CURRENT_CONFIG folder and right-click the Software folder inside it.
- Select Permissions and check Full Control for the Users.
- Click OK and close Registry Editor.
Open QuickBooks and try to print a PDF to check if you are still getting error 20 in QuickBooks or if the problem is resolved. If the problem persists, follow Solution 11 below to eliminate the QuickBooks Printer Not Activated error code 20.
Solution 11: Permit PowerShell Script Usage
It is already established that Windows registry problems do cause printer activation issues. All of the solutions listed above should work; if none of them do, you can use the PowerShell script below to update the registry key editor manually. The steps that you need to take in order to do the permissions for the PowerShell script are given below –
Note: This step permits the PowerShell script to be applicable only to Windows 10 users.
- Open the Windows Start menu, type CMD in the command box, then choose the Run as Admin option.
- When the command prompt opens, type “Powershell” and hit Enter to run the command.
- Lastly, copy and paste the following code in the window to grant the PowerShell permissions –
PowerShell.exe -NoProfile -NoLogo -NonInteractive -Command “$key = [Microsoft.Win32.Registry]::CurrentConfig.OpenSubKey(‘Software’,[Microsoft.Win32.RegistryKeyPermissionCheck]::ReadWriteSubTree,[System.Security.AccessControl.RegistryRights]::ChangePermissions); $acl =$key.GetAccessControl(); $rule = New-Object System.Security.AccessControl.RegistryAccessRule (‘Users,’’ FullControl,’’ ObjectInherit, ContainerInherit,’’ None,’’ Allow’); $acl.SetAccessRule($rule); $key.SetAccessControl($acl);”
Once the permissions are granted, rerun QuickBooks and check if the printer activation error is fixed.
Conclusion
We hope this detailed guide helps you fix the printer activation issues with ease. However, if these solutions don’t help and if you still get the QuickBooks error 20 during printer activation, you might need outside assistance. You can call our QB support team at 1.855.738.2784 to get direct help in eliminating the error code.
FAQs
What are the QuickBooks versions affected by the QuickBooks error 20?
QuickBooks error code 20 is seen in QuickBooks Desktop Pro, Premier, Enterprise, QuickBooks Online, as well as the QuickBooks Point of Sale. This error can occur when starting the printer or using, the PDF, when printing or even when emailing, the jobs.
Is it possible to rename the QBprint.qbp file to solve QuickBooks printer activation problems?
Yes, since a damaged QBprint.qbp file can cause printer activation issues; you can rename the file in the following manner to fix them:
– Firstly, find the QBprint.qbp file from this navigation path: C:\ProgramData\Intuit\QuickBooks 20xx.
– Now, right-click the QBprint.qbp file as per your QBDT version, click Rename and add the old to the end of the file name, then hit Enter.
– Open QuickBooks Desktop, go to the File, click Printer Setup, then pick a transaction from the Form Name list, and hit OK.
Can the QuickBooks Tool Hub tools help with QuickBooks error 20?
Yes, as mentioned above, you can use the PDF and Print Repair tool to fix the printing issues in QBDT. Further, if the problem happens due to problems in the application, one can beat the problems of the program with the help of Quick Fix My Program.

Edward Martin is a Technical Content Writer for our leading Accounting firm. He has over 10 years of experience in QuickBooks and Xero. He has also worked with Sage, FreshBooks, and many other software platforms. Edward’s passion for clarity, accuracy, and innovation is evident in his writing. He is well versed in how to simplify complex technical concepts and turn them into easy-to-understand content for our readers.
