
Last Updated on March 10, 2025
Do you want to learn how to create custom liability payments in QuickBooks? Creating liability payments is a fairly simple process and involves a few detailed steps. However, you might face issues with the payroll liability payments, like the liabilities not showing up. In some cases, users found liabilities missing from the pay scheduled liabilities section under the Employee Center, and there are several reasons for this inaccuracy in the application. In this article, we will discuss how to create custom liability payments in QuickBooks and how to resolve issues with payroll liabilities in detail.
This guide will help you create custom liability payments in QuickBooks and deal with liability issues in QuickBooks payroll. However, if you don’t want to perform the process on your own or are facing liability payment issues, you can contact our Accounting Helpline’s experts at 1.855.738.2784 for immediate assistance with liability issues.

Steps to Create Custom Liability Payments in QuickBooks Desktop
If you want to create custom liability payments in QuickBooks Desktop, implement the following detailed steps –
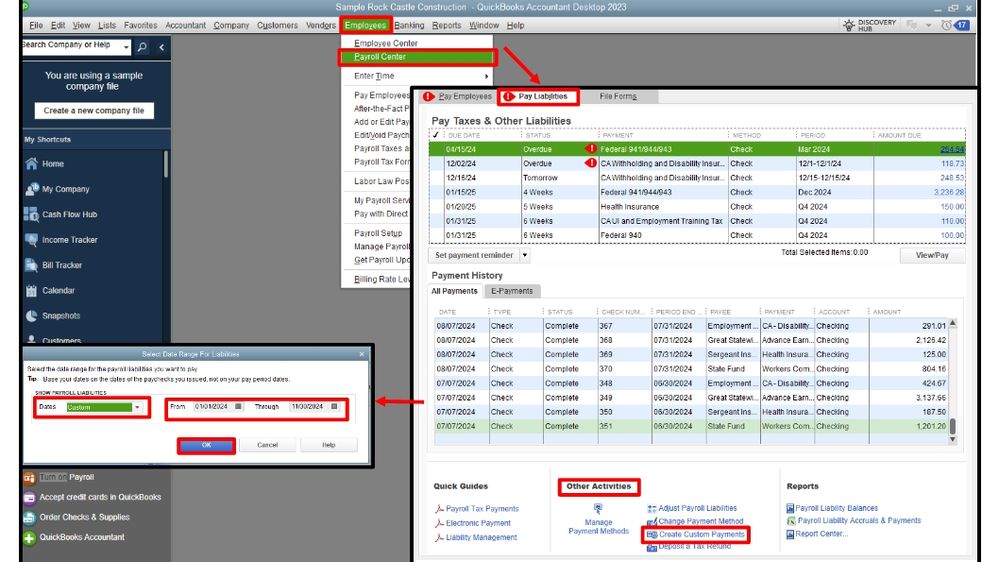
- Go to the Employees menu, select Payroll Center, and move to the Pay Liabilities tab.
- Under Other Activities, select Create Custom Payments, and a pop-up window will appear.
- Further, select the date range for the payroll liabilities you want to pay and click OK.
- If you want to print the liability check, select To be printed; otherwise, leave it blank.
- Now, choose the bank account and the date you want to appear on the liability check.
- Select Review your liability check to enter expenses/penalties or click the Create a liability check without reviewing option.
- Choose the payroll item you want to pay, then edit the payment amount by selecting the box under the Amount to Pay column. Input the desired value in the pay column and click Create.
- If you have selected to Review your liability check to enter expenses/penalties, a liability check will appear. From there, create changes to the Balance amount and click Save and Close.
- If you have selected Create a liability check without reviewing, you can see the liability check in the check register and create changes to the payment’s balance if required.
Once the process ends, you will have successfully created a custom liability payment in QB Desktop.
Steps to Create Custom Liability Payments in QuickBooks Online
If you want to create custom liability payments in QBO, you must set up QuickBooks to track and tax your retirement plan contributions and those of your employees. Then, you must review the limits for your plan types and set up a retirement plan deduction or company match as follows –
- Open the Payroll menu, select Employees, and choose your employee.
- Go to the Deductions & Contributions section, click Start or Edit, and choose + Add deduction/contribution.
- Select Retirement Plans in the Deduction/Contribution type dropdown, and for Type, select the applicable retirement plan.
Note: If you want to track a company-only contribution with no employee match, you must choose the Company-only plan as the type.
- Now, fill in the provider’s name or plan in the Description (which appears on the paycheck).
- Finish the remaining fields, and if you have a company match, go to Company Contribution and choose the dropdown menu to select how to calculate the amount.
- Finish the new fields to enter the amount or percent per paycheck and annual maximum, and click on Save and Done.
Once done, you will have the retirement plan deduction in QBO.
Steps to Troubleshoot Issues While Creating Custom Liability Payments
You can successfully create custom payment liabilities in QB by using the steps given above. However, if your liability payments are not showing up, follow the details given in this section.
Reasons Why Your Payroll Liabilities are Not Showing Up in QuickBooks
The following are the reasons that can cause this liability issue in QB application –
- Instead of tracking the other current liability account, you are tracking some other accounts.
- An inactive liability account is in use.
- The incorrect date range is used during payment setup.
- You are using an outdated version of the QuickBooks Desktop application. (To ensure you have the latest version, download and install the recent QuickBooks updates).
- Your QuickBooks payroll tax tables are outdated, or the subscription is inactive.
- There are inconsistencies in your QuickBooks payroll lists, and they aren’t sorted properly.
- Deleted or voided paycheck that created the liability.
- Corrupt company file data.
You can follow the steps below in the given order to rectify the QB payroll liability issues –
IMPORTANT: Before delving directly into the troubleshooting, run the QuickBooks Verify and Rebuild Data Utility to repair any possible data damage. To use the Verify/Rebuild Tool, first select Verify Data from the Utilities tab of the File menu. Then, run the Rebuild Data tool to fix the identified data damage in QB.
Check the liability account status:
You must check the liability account status and activate the inactive accounts as follows –
- Click Lists under Chart of Accounts.
- Make sure the Include Inactive checkbox is marked at the bottom of the list.
- Click any account that has an X mark on it and set it to active by selecting Make Account Active
- Now, exit the Chart of Accounts.
Fix date range issue in custom liability payment:
Sometimes, issues while creating custom liability payments can arise due to incorrect date ranges. Thus, you must pick the correct date range while creating the payment in the following manner –
- Go to the QuickBooks Home page, click Payroll Center, and select the Transactions tab.
- Click Liability Checks, then double-click the payment you want to review and check the date range.
- Set the proper date range, then save the payment and exit.
Check payment schedule:
You must check the payment schedule before creating the custom liability payments in the following manner –
- Under the Employees tab, click Payroll Taxes and Liabilities and then select Edit Payment Due Dates.
- Now follow the on-screen instructions to set up the payroll and create custom liability payments in QuickBooks.
Check if the payroll liabilities are missing or lost:
Check the liability payments to see any missing liabilities. If the liabilities are missing, you must repair the data damage. Follow the steps given below to repair the missing liabilities –
- Under the Employees tab, click Payroll Taxes and Liabilities and then select Create Customer Liabilities and Payments.
- Now select the correct liability period and hit the OK
- Now, a new window will emerge, displaying all the liabilities you need to pay. If you see any missing liabilities, then run the QuickBooks Verify and Rebuild Data tool to repair any damage.
Check Paid through Dates:
If you have selected any future paid-through dates while creating the liability payment, it can create issues. Thus, you must run a liability check and remove the future paid-through dates as follows –
- Click Payroll Center under Employees
- Now, under the Transactions tab, click Liability Checks.
- Now, click the drop-down menu beside the Date option and select This Calendar Year.
- Check and remove any Paid Through Dates that are in the future.
QuickBooks Payroll Tax Table is Not Updated:
You might face liability payment issues if your QuickBooks payroll tax tables are not updated to the latest release. To download the recent tax table updates in QuickBooks payroll, use the following steps –
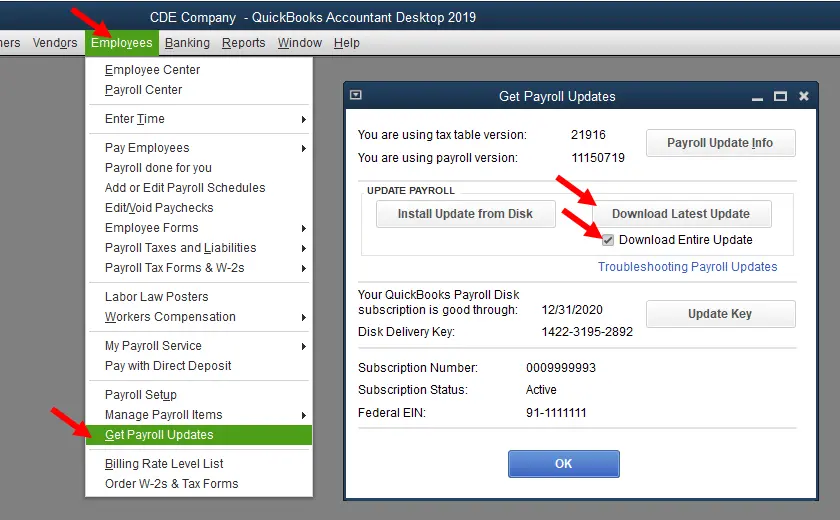
- Select Get Payroll Updates from the Employees tab and select the Download Entire Update option.
- Further, click Update, and once the download is successful, you will see an informational window confirming the same.
Payroll Item is Set to Another Liability:
If your payroll item is set to another liability, the liability payment issue is bound to occur. To fix this, you must change the account for the said liability in the following manner –
- Go to the List menu, select the Payroll Item List option, choose the item added, and then right-click on it.
- Hit the Edit Payroll Item icon, click Next, change the account for the liability, and click Next and Finish.
After resolving these specific issues, you can check the liability payments to ensure they are correctly made.
Conclusion
We hope this detailed guide helped you create custom liability payments and fix the liability issues in QuickBooks payroll. However, if these steps didn’t help and you aren’t able to create custom liability payments in QuickBooks, you might need expert assistance. You can contact our Accounting Helpline’s professional team at 1.855.738.2784 to get immediate help with this payroll issue. Our experts will help you navigate through the problem and create liability payments successfully.
FAQs
How many types of payroll liabilities are there?
Payroll liabilities can be broadly categorized into the following three types:
– Employee compensation, including perquisites and remuneration as job payments.
– Withheld amounts that have not yet been sent to the IRS.
– Payroll expenses, like social security and Medicare taxes.
Can I change the payment method for liabilities in QuickBooks Desktop?
Yes, you can change the payment method for liabilities in QBDT by using the following steps:
– Select Payroll Center from the Employees menu and move to the Pay Liabilities tab.
– Now, select Change Payment Method from the Other Activities list and choose your desired payment mode.
How can I pay off my liabilities in QuickBooks?
You can easily pay off your liabilities in QuickBooks by selecting Pay Liabilities from the QuickBooks Home page. Then, to pay scheduled liabilities, select the items you want to pay and click View/Pay. Once done, follow the on-screen prompts to make the payment and finish the process.
What are the steps to create a current liability account in QuickBooks?
You can set up a liability account in QuickBooks by using the following steps:
– Go to the Lists menu, select Chart of Accounts, and click the + icon to add a new account.
– From the Type field, select the account for your loan and enter the name and number of the account.
– Finally, leave the opening balance at zero and select OK.

Edward Martin is a Technical Content Writer for our leading Accounting firm. He has over 10 years of experience in QuickBooks and Xero. He has also worked with Sage, FreshBooks, and many other software platforms. Edward’s passion for clarity, accuracy, and innovation is evident in his writing. He is well versed in how to simplify complex technical concepts and turn them into easy-to-understand content for our readers.