Last Updated on February 7, 2025
For the comprehensive management of QuickBooks, dealing with invoices is crucial. One common scenario that might arise during invoice management is the need to void or cancel a transaction due to certain errors or mistakes, among other possible reasons. In this detailed article detailing how to void an invoice in QuickBooks, you will learn how this typical feature actually operates. Keep reading this guide to learn how to void an invoice in QuickBooks, from understanding the implications of voiding an invoice to exploring the precise steps involved.
You can easily learn to cancel, void, and unvoid your QuickBooks transactions using the extensive steps in this guide. However, if you aren’t tech-savvy enough to understand the technicalities and need extra help in invoice management, you can contact our team. Reach out to our specialists at 1.855.738.2784 to learn how to void the QB invoices seamlessly.
What Exactly Does Voiding an Invoice in QuickBooks Entail?
In QuickBooks, voiding an invoice means canceling an invoice that was wrongly issued and negating the effects it may have had on the financial transaction and the previous transaction that was done due to some mistake or some other reason.
It is vital for the proper financial books to be kept and the company’s accounts to show the right transactions. There are scenarios that require the invoice to be void, such as billing error, amount of value set wrongly, or the invoice needs to be put back into the system with new details. Voiding an invoice also ensures that any payment that should have been affected by that invoice or any possible dispute that might occur due to that invoice is avoided.
The Main Difference Between Voiding and Deleting an Invoice in QuickBooks
Are you confused as to the difference between voiding and deleting an invoice in QuickBooks? The below distinction will help you understand these terms better, and then you can choose whether to delete or void an invoice in QuickBooks accordingly –
- When you void a transaction or invoice in QB, its record remains in the application. This record doesn’t affect your books and helps in bookkeeping. On the other hand, if you delete a transaction or invoice in QuickBooks, it won’t appear in reports or documents, which means it will be entirely deleted from the books.
Thus, to promote good bookkeeping practices, it is better to void a transaction than to delete it in QuickBooks. The only time it is advised to delete a transaction is when you are sure you don’t want its record in QuickBooks.
You can delete all your transactions and invoices in QuickBooks, but the following list of transactions cannot be voided –
- Estimates
- Deposits
- Vendor credits
- Purchase orders
- Delayed charges
- Bills (bill payments can be voided)
Learn the Steps on How to Void an Invoice in QuickBooks
If you want to void an invoice in your QuickBooks Desktop and Online versions, you must implement the following steps –
- Start the QB Desktop app, navigate to the Sales option, go to Invoice, and finally, go to the Invoice list.
- Now, look for the invoice you want to void, go to the Action column drop-down menu, click Void, and select Yes to confirm.
Steps to Cancel an Invoice in Another Fiscal Year in QB Desktop
If you want to cancel an invoice created in a previous fiscal year, the following instructions will help –
- Locate the customer, right-click on this customer in the Customers menu in QuickBooks Desktop, and select ‘Customer Center.’
- Look for the invoice, double-click the transaction to access it, and click the Delete drop-down box beside the Save button.
- Finally, click Delete or Void and select OK to confirm the invoice cancellation.
Learn How to Find Voided Invoices in QuickBooks
To locate an invoice or transaction you have recently voided in QuickBooks, use the following detailed steps –

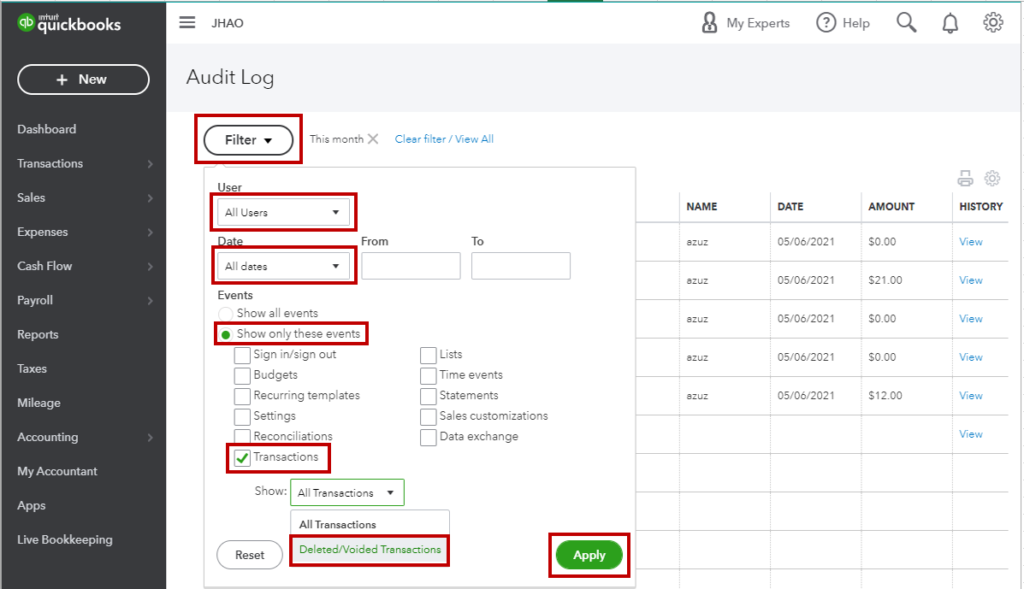
- In QBO, click the Gear icon, then go to the Tools menu and select Audit Log.
- Now, choose Filter, select the appropriate User, Date, and Event, and click Apply to search.
- Finally, find the voided invoice and click View from the History column to check its details.
What is the Possible Reason for Avoiding an Invoice in QuickBooks?
The circumstances that may warrant avoiding an invoice in QuickBooks occur when an issuer has to restore an invoice that was previously voided because of an error, a mistake, or a change of circumstances that led to the voiding of the invoice in the first instance. This is very important so that records of accounts of any business organization can be done effectively and any problems that may have arisen can be solved. In simple terms, avoiding an invoice gives the business the ability to present a correct figure, whether it be a billing mistake, entry mistake, or change of situation to a transaction.
Detailed Steps to Unvoid an Invoice in QuickBooks Application
As a QuickBooks user, there might be scenarios when you need to unvoid an invoice or transaction, which can be done as follows –
- Log in to your QB account, go to the Sales or Invoicing section, then find the Voided Invoice and select More.
- Now, click Unvoid, confirm the action, and review the restored invoice to check for accuracy.
On the other hand, if you want to undo a voided transaction, you must enter it manually using the procedure below –
- Find and open the voided transaction, then select More at the bottom of the page, and choose Audit History.
- Further, click Show All to see the original transaction details and note all the information required to re-enter the transaction.
- Finally, select the back button on your browser and proceed to re-enter the voided transaction.
We hope this comprehensive guide helps you learn how to void an invoice in QuickBooks, along with how to cancel and unvoid the voided transactions. However, if the steps don’t help and you aren’t able to void your QB transactions and invoices, you must reach out to our QB experts at 1.855.738.2784 to get the best guidance in promptly fixing the invoice issues.
FAQs
What happens when you void an invoice or transaction in QuickBooks Desktop or Online?
If you void an invoice, you are effectively canceling the invoice, but the document remains in your database. The value entered there generally becomes zero, but it still stays in the reports. It alters the accounts receivable statement and balance sheet, but the merit is that it produces a record of the transaction.
What are some tips to avoid voiding an invoice in your QuickBooks application?
Given below are certain steps and practices that can be followed to reduce the number of voided invoices in QuickBooks as much as possible –
– It is important to verify the transaction details together with the supporting documents before voiding an invoice to reduce situations where one needs to void transactions in the QuickBooks account.
– Setting up user access in QuickBooks also enables administrators to limit voiding capabilities and, therefore, offers a second level of security to prevent invoices from being voided by mistake.
– Optionally, users can choose to use the delete feature in QuickBooks to clear detailed records, and this gives another solution to editing accounts without voiding invoices.
What are the steps to void a transaction in the QuickBooks Payments interface?
You can void or delete a transaction in QuickBooks Payment by implementing the steps below –
– Log in to the QuickBooks Payments account, go to the Activity & Reports section, and select Transactions from the drop-down list.
– Next, enter the appropriate date range to search for the transaction and click Search to proceed.
– Select the Transaction ID or pick the transaction you want to reverse, click Reverse, then mark the checkbox for the desired transaction and hit the Submit button.

Edward Martin is a Technical Content Writer for our leading Accounting firm. He has over 10 years of experience in QuickBooks and Xero. He has also worked with Sage, FreshBooks, and many other software platforms. Edward’s passion for clarity, accuracy, and innovation is evident in his writing. He is well versed in how to simplify complex technical concepts and turn them into easy-to-understand content for our readers.

