Last Updated on March 26, 2025
How does it feel when QuickBooks instantly crashes after your Windows update? Yes, some users have complained regarding ‘QuickBooks not working after Windows update.’ This might happen due to corrupted or damaged company files during the installation process. Not only will you find the issues with QuickBooks crashing, but also in multi-user mode with different versions of QuickBooks. You might also experience printer errors after updating your Windows in QuickBooks. In this blog, you will learn about the methods to fix QuickBooks update issues.
Are you unable to fix QuickBooks not working after Windows update? You can speak to our dedicated experts by dialing our toll-free number 1.855.738.2784. These Accounting Helpline Experts are all well-trained to understand your concerns and help you fix the software update issues instantly.

QuickBooks Not Working After Windows Update
QuickBooks Desktop for Windows is the most popular small business accounting tool, which maintains all finances, taxes, bills, and sales reports. It also swiftly manages all the required invoices and receipts with its invoicing and expense management solution. The most useful point is that it is fully compatible with Windows 7, 8.1, and all the later released OS.
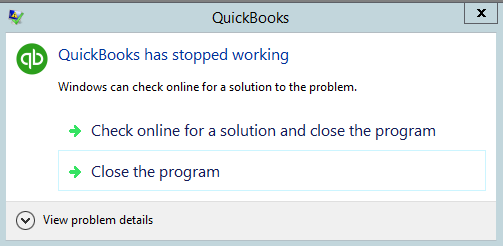
You might have a problem opening your QuickBooks application once you have updated Windows. This is a familiar problem that some QB users are having, keeping them from opening their QuickBooks Company file (QBW). Before you call an expert or Intuit support to resolve it, there are some troubleshooting steps that could resolve the problem for you. But first, let us know why this problem happens in the first place.
Common Causes of QuickBooks Not Working After Windows Update Error
Several customers have complained of problems with their QuickBooks not working after a Windows update error. There could be many reasons behind this error. Some of the common causes for the error may be:
- The installation of Windows updates when QuickBooks is active can be one of the causes.
- The other reason can be not powering off the system correctly or keeping the computer ON for a few days.
- Having an outdated version of QuickBooks can also be a reason.
- You might have downloaded a duplicate Windows version.
- There might have been an error during the installation of the recent Windows version.
These are some of the common causes of QuickBooks not working after a Windows update.
Steps to Fix QuickBooks Not Working After Windows 10 Update
Now that you know about the causes of the error, you might know about the ways to resolve it. There are several ways to get rid of this error. Some of the common steps to troubleshoot this error are mentioned below:
- Restoring Windows to the Previous Version
- Fixing the Compatibility Settings in Windows
- Restricting QuickBooks from Accessing the Internet
- Using the QuickBooks Install Diagnostics Tool
- Changing the UAC Settings
These are some troubleshooting methods that you need to know regarding resolving the QuickBooks update error. Let’s have a look at them in brief.
Solution 1: Restoring Windows to the Previous Version
Some users have suggested that they were able to use QuickBooks error-free once they restored their Windows 10 to a previous version. It will delete any app or drivers installed since downloading updates that could have prevented QB from opening. To restore to a previous version of Windows 10, follow the steps mentioned below:
- Press the Windows Start button, click Settings.
- On the Settings page, click Update & Security.
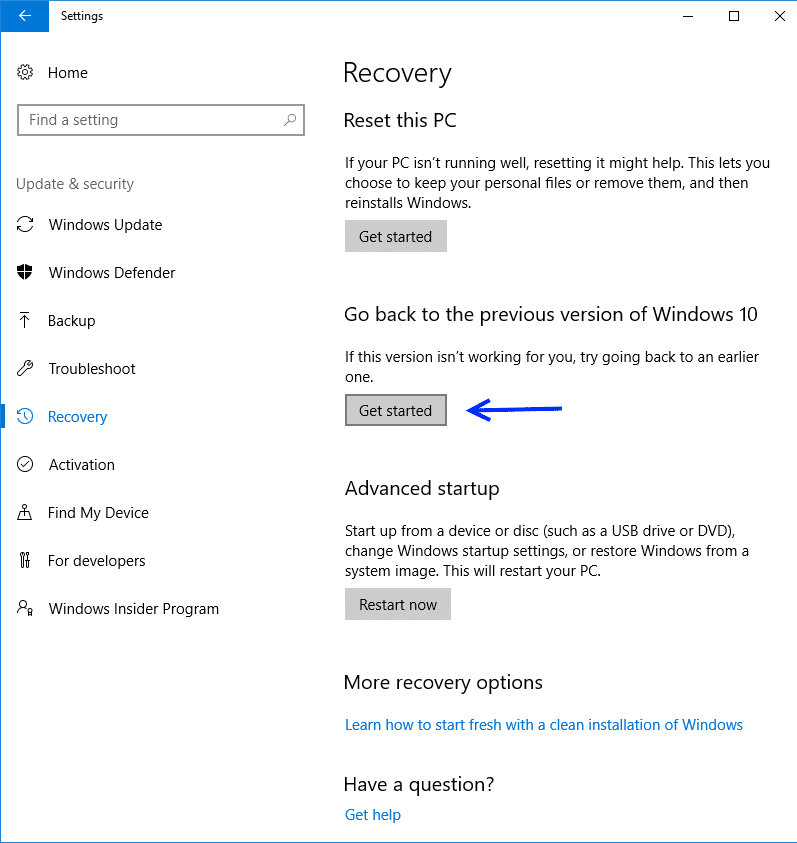
- Click on the Recovery tab from the left panel, and search for the Go back to an earlier build section.
- Click on the Get Started button and go through the window instructions.

- Once you’ve rolled back Windows 10 to a previous build, reinstall QuickBooks and check if that fixes the issue.
This is a temporary measure and not a permanent solution. Also, you will not be able to use apps released with the new Windows 10 update. If this solution does not help you fix the error, you can move to the next one.
Solution 2: Fixing the Compatibility Settings in Windows
At times, the compatibility of the new version of Windows and QuickBooks Desktop could be a problem. In this situation, you may need to adjust or configure the compatibility settings in Windows. The following steps are to repair the compatibility settings:
- In the Windows search bar, enter \enquote{QuickBooks}. After changing to the QuickBooks application, right-click on it, and then choose ‘Open File Location.’
- Right-click on the QB file, click Properties.
- In the Properties dialog box, click the Compatibility tab, click the Run the program in compatibility mode from the drop-down box, and choose Windows OS.
- Proceed to change Windows compatibility mode.
- Now, you need to click on Apply, then click the OK button.
- Try opening QuickBooks now.
You need to keep in mind that operating in compatibility mode using an older Windows 8.1/8/7 version might not allow you to use features supported by the current Windows 10 update. You can proceed to the next solution if this does not help.
Solution 3: Restricting QuickBooks from Accessing the Internet
Restricting the QuickBooks executable file (QBW32.EXE) to use the Internet might help you resolve the ‘QuickBooks not working after Windows update’ error. Turning off this QB feature can corrupt the QB installation and its data. So, please make sure to save your data beforehand before attempting this fix.
You need to add a firewall rule to prevent the QuickBooks executable file (QBW32.EXE) from using the Internet, and you should be able to open QB with no problem. The steps to help you restrict internet access for QB files are as follows:
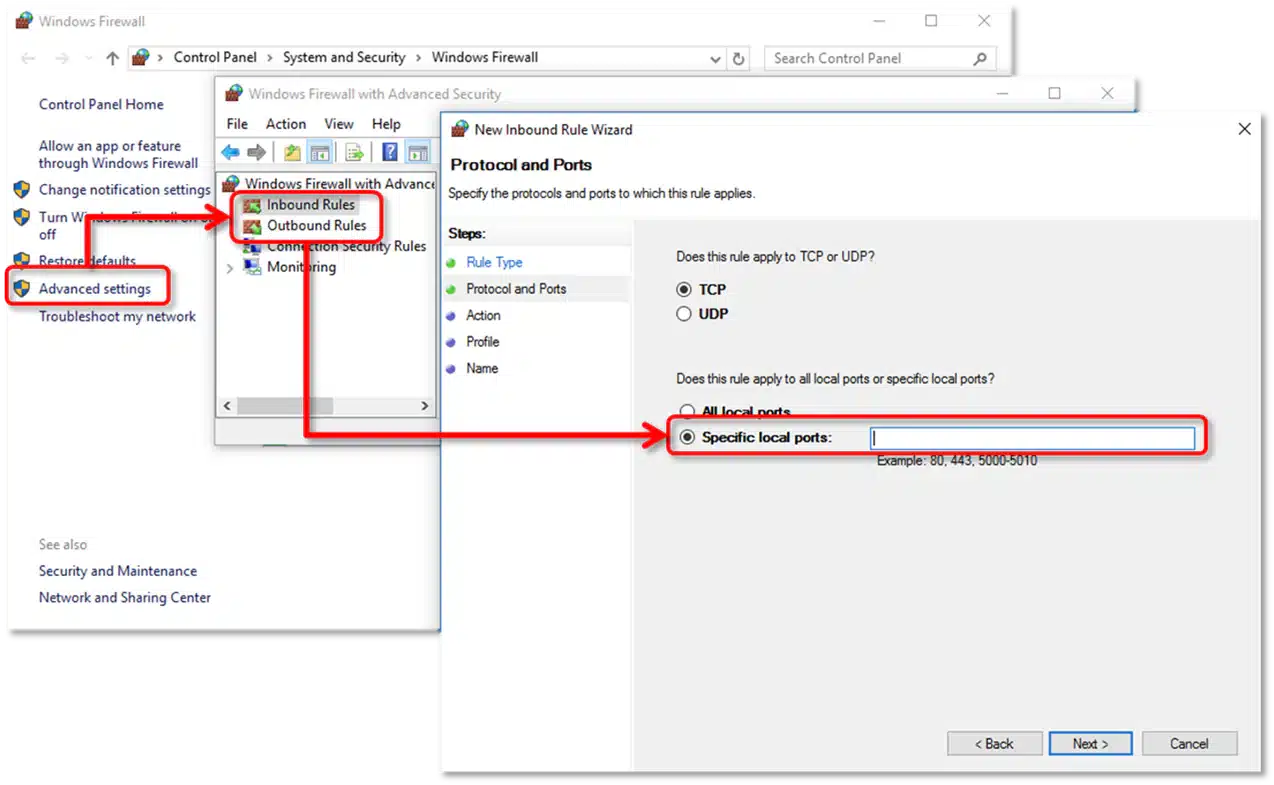
- On the system where you’re facing the QuickBooks not opening problem, go to Control Panel, and then choose Windows Firewall.
- On the Windows Firewall window, go to Advanced Settings in the left navigation pane.
- When the Windows Firewall with Advanced Security window pops up, click Outbound Rules.
- Then, from the Actions pane on the right, click the New Rule option. The Windows Firewall with Advanced Security window pops up, and click Outbound Rules.

- On the Rule Type window, select the Program radio button, and then click the Next button.
- On the Program window, select the This Program Path radio button, and then enter the following path in the program path box.
- For 64-bit Windows installations: C:\\Program Files (x86)\\Intuit\\QuickBooks 2010\\QBW32.EXE.
- For 32-bit Windows installations: C:\\Program Files\\Intuit\\QuickBooks 2010\\QBW32.EXE.
- Click the Next button.
- On the Action window, select the Block the connection option, and then click Next.
- On the Profile window, select the Domain, Private, and Public options and click the Next button.
- On the Name windows, enter a proper name for the newly created firewall rule (for example, Block QB Internet Connection) and then click Finish.
- Close the Windows Firewall window.
Blocking QuickBooks from accessing the internet might help you resolve the QuickBooks update error in Windows 10. You can also proceed to the next solution if this does not work out.
Solution 4: Using the QuickBooks Install Diagnostics Tool
If none of the workarounds work for you, using QuickBooks’ built-in tools like the QB Install Diagnostic Tool might help resolve the problem. The detailed steps are listed below:
- Launch QuickBooks Tool Hub.
- On the QB tool hub window, you need to click the Installation Issues tab.
- Here, you need to click on the QB Install Diagnostic Tool option to install the tool.

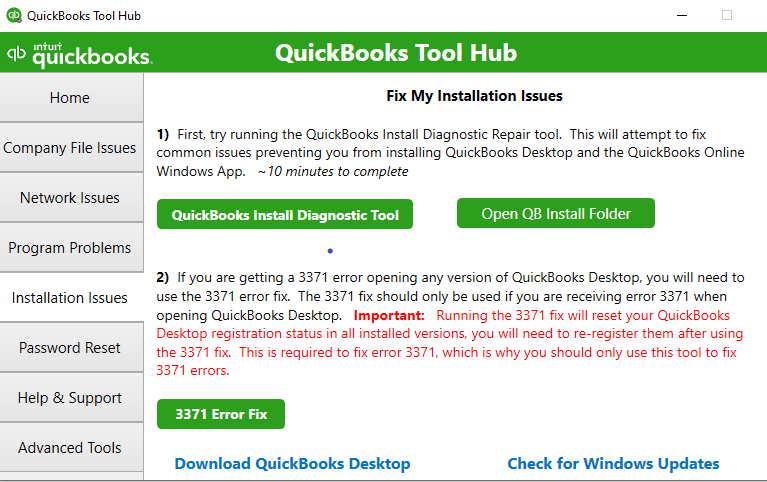
It may take more than 20 minutes for the tool to detect and fix errors that prevent the QB from opening after a Windows update. So, you need to wait patiently and allow the tool to go through its process.
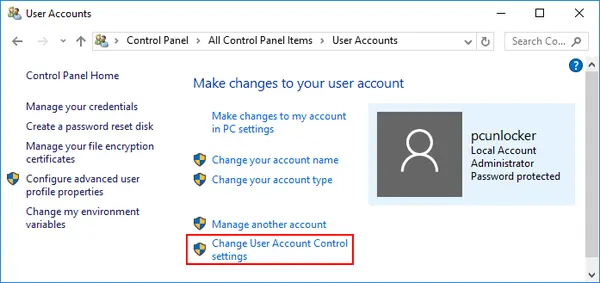
Solution 5: Changing the UAC Settings
The User Account Control (UAC) settings safeguard your computer against internet threats that might emerge after downloading files from the internet while downloading the OS update. Therefore, these settings can cause the ‘QuickBooks Not Working After Windows Update’ error. We will help you disable the UAC to resolve this error with the following steps:
- Go to the Windows icon, use the search box, and type Control Panel.
- Press the Enter button, which will open a window in front of you.
- Click on User Accounts.
- Choose the User Accounts (Classic View) option.
- Head to the “Change user account control settings” part and acknowledge with a Yes.

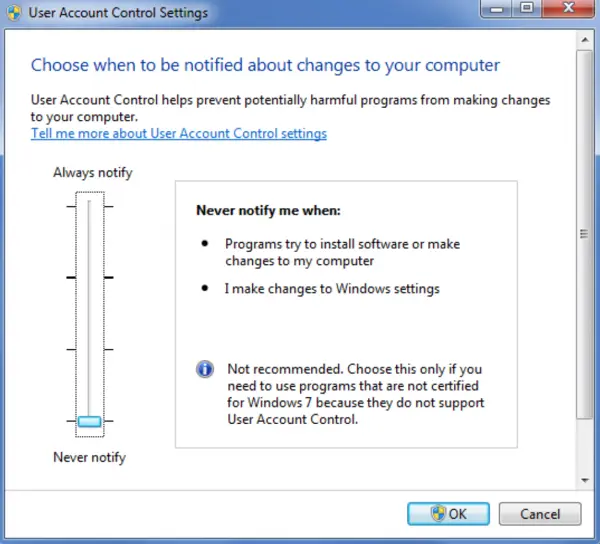
- Using a slider on your screen, you can go through two choices.
- Using the slider, choose Never Notify, which will turn off the UAC.

- Click the Yes button and restart the computer to make the changes effective.
Disabling the UAC settings can help you resolve the update error in QuickBooks. Now, we will have a look at the errors with different QuickBooks versions.
QuickBooks Versions Not Working After Windows Update
After updating your Windows, you might experience certain errors in your QuickBooks versions. There can be several error codes associated with this issue. Here are some of the common versions of QuickBooks that are facing the error:
QuickBooks 2014 Not Working After Windows Update
When updating Windows, QuickBooks 2014 will mostly experience an update failure. This kind of failure is mostly known as error code 3317 and status code 11103. The error that you experienced shows that your operating system is not supported by QuickBooks. To fix this, you will be required to update to the recent version.
- Click on the Windows logo.
- Choose All Programs and click Windows Update.
- Install the updates, then install QuickBooks.
Following these steps might help you resolve the ‘QuickBooks not working after Windows update error.’ Let’s now look at the other options
QuickBooks 2016 Not Working on Windows 7 After Updates
Now, you can also experience the same problem on the 2016 QuickBooks version after the Windows 7 update. Here are the steps to fix the QuickBooks 2016 error:
- Close QuickBooks.
- Open the folder that has the reboot.bat file:
- Windows 8, 7, and Vista: Right-click the QuickBooks icon on your desktop and then select Open file location.
- Double-click the reboot.bat file.
- Restart your computer, then reopen QuickBooks.
To fix a current QuickBooks installation, ensure QuickBooks isn’t open and then do the following steps for your operating system:
- On your computer keyboard, press Windows + E to open the Computer window.
- In Windows 8, click on the Computer tab.
- Click Uninstall or change a program.
- Choose QuickBooks.
- After QuickBooks is chosen, click Uninstall/Change.
- In the QuickBooks Installation window, click Next, choose the Repair radio button, click Next, and click Repair.
- Click Finish.
Your QuickBooks installation should now be repaired. Let’s look for some more error type in the sections below.
Quickbooks 2017 Not Working After Windows Update
Having errors with QuickBooks 2017 will undoubtedly disturb your work progress. So, we are here to deal with the issue with the ‘QuickBooks 2017 Not Working After Windows Update’ error. Here are the steps that will help you resolve the error:
If your QuickBooks Pro 2017 is freezing, you can verify its compatibility to maintain a smooth performance, since the use of older versions may have unforeseen problems. The following are the supported operating systems (OS):
- Windows 10, all versions, including 64-bit, natively installed
- Windows 8.1 (Update 1), all versions, including 64-bit, natively installed
- Windows 7 SP1, all versions including 64-bit, natively installed
- Windows Server 2012 R2, Windows Server 2008 R2
Also, if you have issues with the features in QuickBooks 2017, you can also try applying the solution given to resolve issues when QuickBooks will not work on your computer. Here are the solutions to resolve the error:
- Using Quick Fix My Program from the QB Tool Hub
- Running the QuickBooks Install Diagnostic Tool from the QB Tool Hub
- Renaming the QBWUSER.INI File
Solution 1: Using Quick Fix My Program from the QB Tool Hub
You need to install the Quick Fix My program from the QuickBooks tool hub to resolve the errors in QuickBooks 2017. You can follow the steps outlined below for assistance:
- You need to download and install the QuickBooks Tool Hub.
- After it has been installed, you have to find and run the Quick Fix My program from the gallery.

- Then, you need to start QuickBooks Desktop and run your file.
If this doesn’t resolve the ABS PDF driver issues in QuickBooks, you can proceed to the second solution.
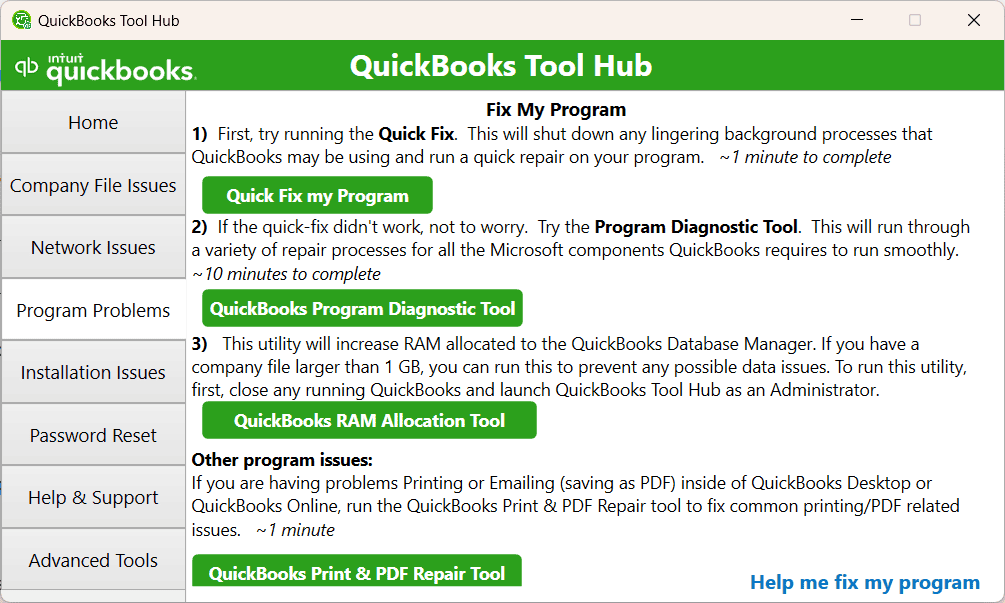
Solution 2: Running the QuickBooks Install Diagnostic Tool
The QuickBooks Install Diagnostic Tool diagnoses and resolves problems with Microsoft components that the QuickBooks application uses automatically. It can help you fix the errors in QuickBooks 2017. The steps to run the QB install diagnostics tool are:
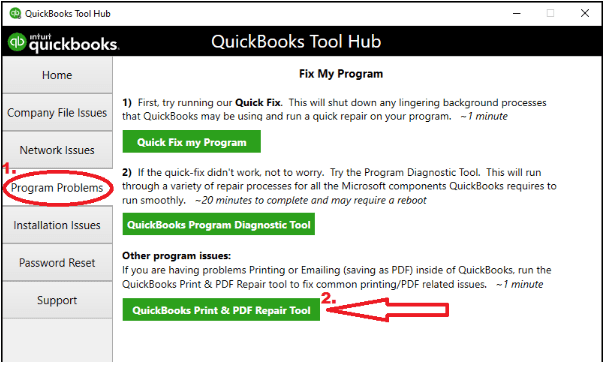
- Open the QuickBooks Tool Hub if it is not already open.
- In the Tool Hub, choose Program Problems.
- Choose the QuickBooks Program Diagnostic Tool. Allow the tool to run. It will take up to 20 minutes.

- Once the tool completes, restart your computer and launch QuickBooks.
These steps will help you run the QB install diagnostics tool to detect and fix the errors with QuickBooks 2017 version. You can proceed to the next solution if this does not work.
Solution 3: Renaming the QBWUSER.INI File
The error can easily be fixed if you rename the corrupted QBWUSER.INI files. When you rename the QBWUSER.INI file, it deletes the list of your earlier opened company files. You will have to reopen your company file manually. You can follow the steps below to rename the file:
- Open the folder where the QBWUSER.ini file is stored.
- If you cannot see the folder, you may have to turn hidden folders and files visible.
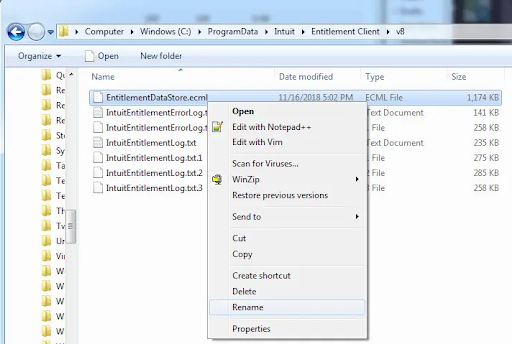
- Right-click the QBWUSER.ini file and click on Rename.

- Include .old after the end of the file name (for example, QBWUSER.ini.old).
- Rename the EntitlementDataStore.ecml file.
- Restore QuickBooks Desktop.
- If it opens once you rename either the QBWUSER.ini or the EntitlementDataStore.ecml file, attempt to open a sample company file.
If you are able to open a sample company but not yours, copy your file to another folder. Open it from there. (We suggest a local folder and not a network folder.) If you can open your file, the issue could be a corrupted folder or folder permissions. Let’s now have a look at the multi-user mode errors after the QuickBooks update.
Multi-User Mode Issues in QuickBooks After Windows Update
Multi-mode issues can generally arise after updating Windows 10 to the latest version. You can easily resolve these issues. These issues can generally arise due to several reasons. The following causes can be the root cause of QuickBooks multi-mode issues happening frequently:
- The system hosting settings are disturbed or not correctly configured.
- The blockage of communication by a firewall or any other software.
- QuickBooks data servers are unable to open the required company file.
- Issues in Windows file permissions or User Account Control settings.
- Data exchange blockage by browser extensions and ad-blockers.
These are the general causes of the QuickBooks multi-mode issues the users face after the Windows update. They can be fixed easily, with some important steps taken into consideration. Let’s look at some ways to fix the issue ‘QuickBooks multi-user mode not working after Windows 10 update’.
Troubleshooting the QuickBooks Multi-mode Issues
To solve the QB multi-mode issues after Windows update, the users can perform the following troubleshooting methods:
Step 1: Checking the Folder Permissions
The users must check the folder permissions on their server computer. It will make sure that the folder holding the company files has the required permission to be on the network.
Step 2: Installing the QuickBooks Server Manager
Then, the user needs to make sure that the QuickBooks Database Server Manager is installed on their server computer. This will enable the sharing of company files with other computers over the network.
Step 3: Check the Windows Admin Rights
Now, you need to review the Windows admin rights for any necessary file permissions. You also need to cross-check the firewall settings for communication blockage.
Step 4: Scanning the Folder Using QBDSM
In this step, you need to scan the folders using the QuickBooks Database Server Manager. This will enable sharing of the files on the network.
Step 5: Turning On the Hosting
Here, you need to turn on the hosting on your server computers. The process of turning on the hosting is mentioned below:
- Visit the File menu and click on the Utilities button.
- Now, you need to select Host Multi-User Access and click Yes to confirm.
These are the five steps that will help you troubleshoot the QuickBooks multi-user issues after the Windows update. Let’s now look at another error associated with the ‘QuickBooks Not Working After Windows Update’ issue.
QuickBooks Printer Not Working After Windows 10 Updates? Know How to Fix It!
You can counter printer issues after updating your Windows operating system. To resolve this, you need to follow the steps outlined in this section to fix the printer errors in QuickBooks. Here are the troubleshooting steps that you need to follow:
- Using Print & Repair Tool
- Restarting/Resetting Temp for Permissions Folder
- Updating the Print Spooler Services
These are some of the solutions to fix the QuickBooks printer issues after Windows update. Let’s look at the ways to resolve the printer error.
Solution 1: Using the Print and Repair Tool from QB Tool Hub
The first one starts with the installation of the Print & Repair tool from the QuickBooks tool hub. The process entails the following steps:
- You must download the installer for the QuickBooks print & print repair tool and run it.
- You must ensure you have the latest version of the QuickBooks Tool Hub.
- Once you have installed, you should run the QuickBooks PDF & print repair tool. This may take a few minutes to identify the error and correct it.

In case running the print and repair tool does not work, you can attempt the second step by restarting/resetting the temp for the permissions folder to fix the printer issues.
Solution 2: Restarting/Resetting Temp for Permissions Folder
In some cases, clearing the temp permissions folder or rebooting the desktop actually works. Here is how you do it:
- You will need to reboot your desktop/computer so that the error is resolved. If the error persists, you will have to reset the temp folder permissions.
- Resetting the temp folder permissions should resolve the error. Open the RUN command, type %TEMP%, and hit Enter.
- Then, you need to right-click on an empty space, choose properties, and then security.
- You need to ensure all the persons/groups listed there have full control. Now you can save it as a PDF again.
- Now, you must check whether you are able to print your XPS document with your writer.
Resetting the temp for folder permissions may eliminate the chance of any accidental damage being done and cure the printer issues in QuickBooks.
Solution 3: Updating the Print Spooler Services
Think of verifying print spooler settings, as there could be a mistake that would prevent PDFs from sharing, printing, or even emailing. The steps to update the print spooler services to fix printer errors in QuickBooks after Windows update are:
- Open the RUN command, type services.msc, and press Enter. Search for the print spooler service there.
- Right-click on spooler service name and click on properties. Go to StartupType, choose Automatic, and apply settings.
- Right-click on the name of the spooler and choose Start to launch its services.
These were some of the possible solutions and fix the printer issues with QuickBooks Desktop. You can also look for the professional help to get the error fixed.
Wrapping It Up!
We just had a look at the ‘QuickBooks Not Working After Windows Update’ issue. We had a look at the solutions to fix this problem in Windows 10 & 8. We also learnt about the multi-user mode issues in QuickBooks after Windows update, their causes, and the solutions to rectify them. Sometimes, the users also experience printer issues in QuickBooks after the Windows update, so we are here with the methods to fix the printer issues in QuickBooks as well. After trying all the solutions, if you are still unable to fix the concern, you can also look for professional help at the toll-free number.
FAQs
How do I fix QuickBooks not opening?
To fix QuickBooks not opening, you need to hold down the Control key and double-click the QuickBooks Desktop icon. Do not release the Ctrl key until you notice the No Company Open window, QuickBooks freezes, or provides you with an error. Choose a company file, then select Open.
What version of QuickBooks is compatible with Windows 10?
QuickBooks Version 1809 fits well with Windows 10. Desktop 2017-2020 works completely on Windows 10 version 1803. QuickBooks Desktop 2017-2020 works completely with Windows 10 version 1709.
Why is QuickBooks not opening on Windows 11?
The primary causes that can lead to QuickBooks not opening or not responding due to errors are installation files that are corrupted, operating system compatibility issues, and the inability to resolve the Windows 11 minimum requirements.
How do I stop Windows Firewall from blocking QuickBooks?
You can disable some particular settings in the Windows Firewall that is blocking QuickBooks from running well. You can also set QuickBooks as an exception to the firewall so that it does not block QuickBooks from running well.
Related Posts-
QuickBooks Payroll not Working? Here’s How to Fix It
QuickBooks File Doctor Not Working! Here’s What to Do
QuickBooks Email Invoices Not Working- Experts’ Guide for Resolution
How to Fix QuickBooks Payroll Update Not Working Error? Experts Solutions
QuickBooks Direct Deposit Not Working! Here’re the Solutions
QuickBooks Export to Excel not Working! Here’s How to Fix It

Edward Martin is a Technical Content Writer for our leading Accounting firm. He has over 10 years of experience in QuickBooks and Xero. He has also worked with Sage, FreshBooks, and many other software platforms. Edward’s passion for clarity, accuracy, and innovation is evident in his writing. He is well versed in how to simplify complex technical concepts and turn them into easy-to-understand content for our readers.