
Last Updated on July 17, 2025
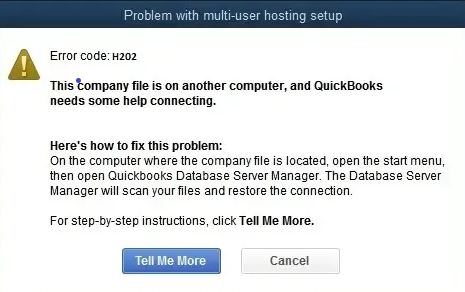
Did the text ‘The company file is on another computer, and QuickBooks needs some time connecting’ ever appear on your screen? This is the QuickBooks Error Code H202 warning message. QuickBooks users commonly get the error code H202 while toggling between multi-user mode. In the majority of situations, this error arises if the multi-user connection on your server computer holding QuickBooks Company files has been turned off. Also, the fact that you cannot communicate with the server computer will not allow you to access the QuickBooks company file. QuickBooks Error Code H202 occurs when QuickBooks Desktop is trying to access a company file on another computer but cannot connect because of a problem with the multi-user hosting setup.
Are you unable to fix the QuickBooks Error Code H202? You can speak to our dedicated experts by dialling our toll-free number. These Accounting Helpline experts are all well-trained to understand your concerns and help you fix the software update issues instantly.

What is QuickBooks Error Code H202?
QuickBooks Error Code H202 basically falls under the H series error category, which is primarily related to multi-user mode. QB users have reported this error often when either switching from single-user mode to multi-user mode or when opening a company file in multi-user mode. As mentioned earlier, you can experience this issue when trying to access a company file stored on another system.
Fixing QuickBooks error code H202 becomes easy once you understand what factors can lead to this issue. This post will help you understand the causes, signs, and symptoms, as well as the effective ways that can be implemented to fix the issue.
Causes of QuickBooks Errors H202
Understanding the causes will help you in the process of resolving the error. There can be many triggering points of the QuickBooks error. Some of the popular causes of the H202 error in QuickBooks include:
- The hosting configuration option is wrong. If that is so, then you can face this error.
- Or in case the QB file setting option prevents access to the company file. So, it prevents incoming or outgoing communication.
- In case there is any damage or improper ND files configuration that enables the database file through QuickBooks, then you can observe this error.
- If the QuickBooks application is not able to search the host system’s main IP address, or by means of some other IP address.
- The company data file is not communicating smoothly with the server.
- If the DNS setting is incorrect or incomplete.
- The QuickBooks service such as QuickBooksDBXX/QBCF, is not running.
- Firewall or security software is blocking the communication with the company file, in this case, error H202 is likely to happen.
These are some of the common causes of the error H202 in QuickBooks Desktop. Now, let’s have a look at the common symptoms of the error.
Symptoms of QuickBooks H202 Error
You can identify the QuickBooks Error Code H202 simply by looking out for the following indications and symptoms, which are as follows:
- Cannot switch to multi-user mode in QuickBooks.
- If after numerous attempts, you cannot open a company file that is on a different computer.
- If the system or the QuickBooks program freezes repeatedly for a few seconds.
- QuickBooks is slow or has crashed.
- Another indication is if the error message is on the screen.
- Windows is accepting inputs slowly or is very slow.
After you have identified the error, it is high time for you to know about the methods to resolve the error H202 in QuickBooks Desktop.
How to Fix H202 Error in QuickBooks Desktop
Before you proceed to the methods to resolve QuickBooks Error Code H202, ensure that you log in to QuickBooks as an admin. You may carry out a few methods to eliminate QuickBooks Error Code H202. Here are the solutions to fix the error H202 in QuickBooks:
- Running QuickBooks Tool Hub on the Server
- Pinging the Host Computer from a Workstation
- Checking the Hosting Configurations on Workstation and Server
- Renaming the CPS Folder in QuickBooks
- Disabling the UAC Settings in QuickBooks
These are some of the common ways to fix the QuickBooks Error Code H202, which deals with the multi-user switching issue in the QB application. Let’s have a look at these solutions in detail.
Solution 1: Running QuickBooks Tool Hub on the Server
As the first step, you need to run the QB tool hub on the server to fix the ‘quickbooks multi-user mode not working h202’ error. This solution can be further broken down into three steps, which are as follows:
- Running QuickBooks File Doctor from QB Tool Hub
- Installing and Running QuickBooks Database Server Manager
- Using the QuickBooks Install Diagnostics Tool
These are the three steps under the first solution that will help you move ahead with running QuickBooks Tool Hub to resolve the error H202 in QuickBooks Desktop. Let’s have a look at the three steps in brief in the sections below.
Step 1: Running QuickBooks File Doctor from QB Tool Hub
QuickBooks File Doctor Tool is a tool with which you will be able to diagnose and correct various errors. If you wish to utilize this tool, then firstly you have to download QBFD from the authentic Intuit web page; otherwise, you will not be able to use QuickBooks Tool Hub with the help of the following steps:
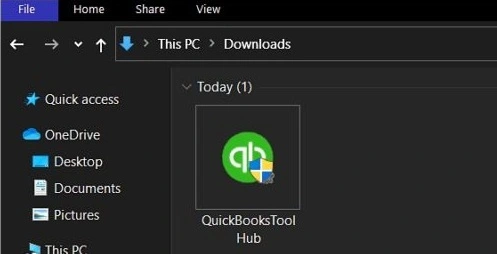
- Firstly, start downloading QuickBooks Tool Hub onto your computer system.
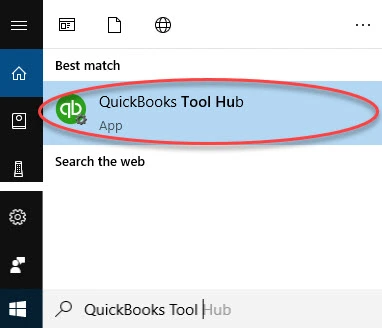
- Now, install and run the QuickBooks tool hub application following the onscreen instructions.

- The next step is to open the QuickBooks Tool Hub and proceed to the company file issues tab.

- Also, click the Run QuickBooks File Doctor option.

- Now, in QuickBooks file doctor, you need to select Company file from the dropdown menu. If you could not find the file, then click on browse and search to find the file.
- After that, you need to click on Check your file and the Network checkbox, and then click on the Continue tab.
- Towards the end, you need to enter your QuickBooks Admin Password and then click on the next tab.
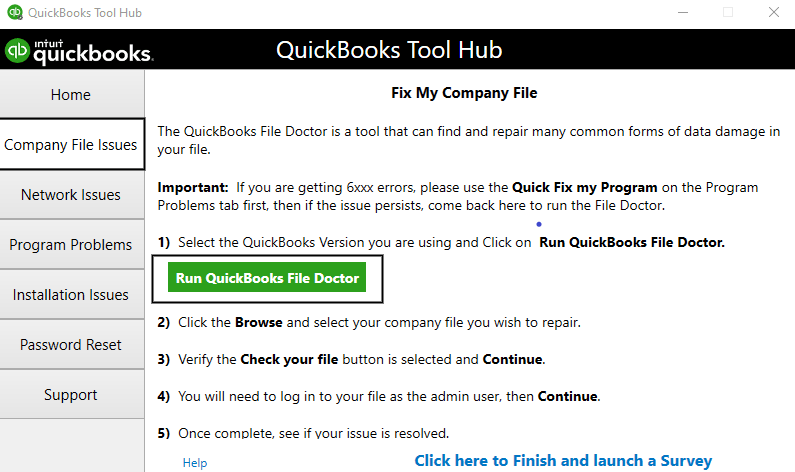
Te scan time usually depends on the file size, and in most cases, it usually takes around 5 minutes. After the scan ends, you need to open the QuickBooks software and the company file.
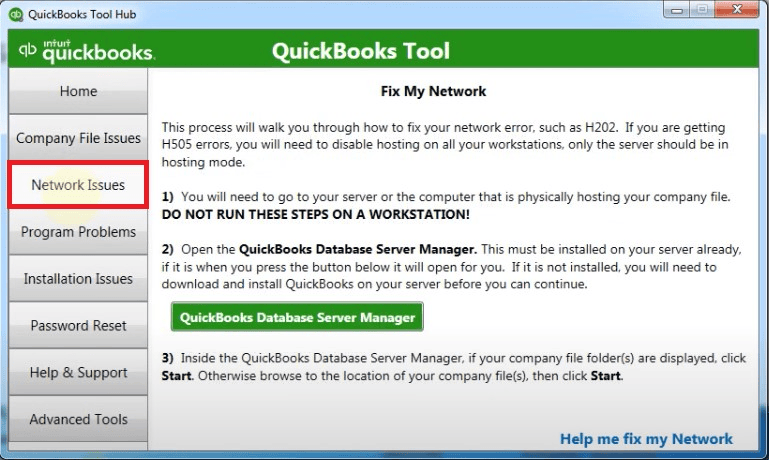
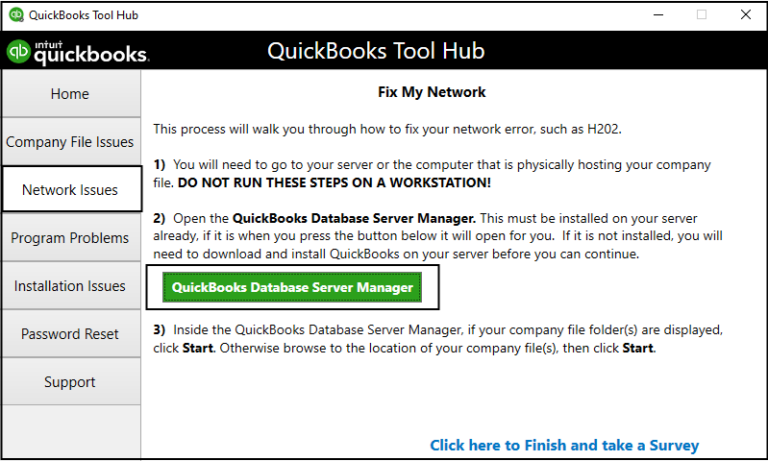
Step 2: Installing and Running QuickBooks Database Server Manager
After you have installed the QB tool hub, you need to install and run the QB Database Server Manager. This can be done with the help of the following steps:
- First, you have to launch QuickBooks Tool Hub and tap on the network issues tab.

- Next, once done with that, tap on QuickBooks database server manager. It will launch the database server manager on your machine.

- After getting done within QuickBooks database server manager, find the folder in which company files are saved. You can additionally utilize the Browse option to identify this folder.
- The user will then need to click on the Start Scan tab.
- QBDBSM will then fix your firewall permissions automatically.
- Once the scanning process is complete, you are to click on the close tab.
- On every one of the workstations on which the error appears, you should launch QuickBooks.
- Additionally, click on the File menu.
- And then go to Switch to multi user mode.
If you currently use QuickBooks in multi-user mode, the error will not appear. If the error persists, then go to the third step of this solution.
Step 3: Using the QuickBooks Install Diagnostics Tool
This step is for the users who have encountered the H202 error in single-user mode. With the help of the following steps, you can fix the QB error H202:
- You should first open the QuickBooks tool hub on the server machine.
- Next, proceed to the Installation Issues tab from the tool hub.

- And then choose the QuickBooks Install Diagnostic Tool from the list.

- Allow the tool to run for a couple of minutes and this can last up to 20 minutes.
- Once the tool has opened, you should scan the folder that contains the data file.
- Note down the IP address and network interface number
- If the firewall status section has an Open Ports tab, then just enable the ports for QuickBooks.
- Go to the test the data file connectivity.
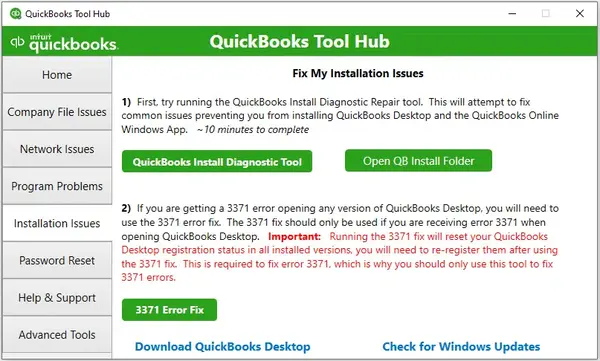
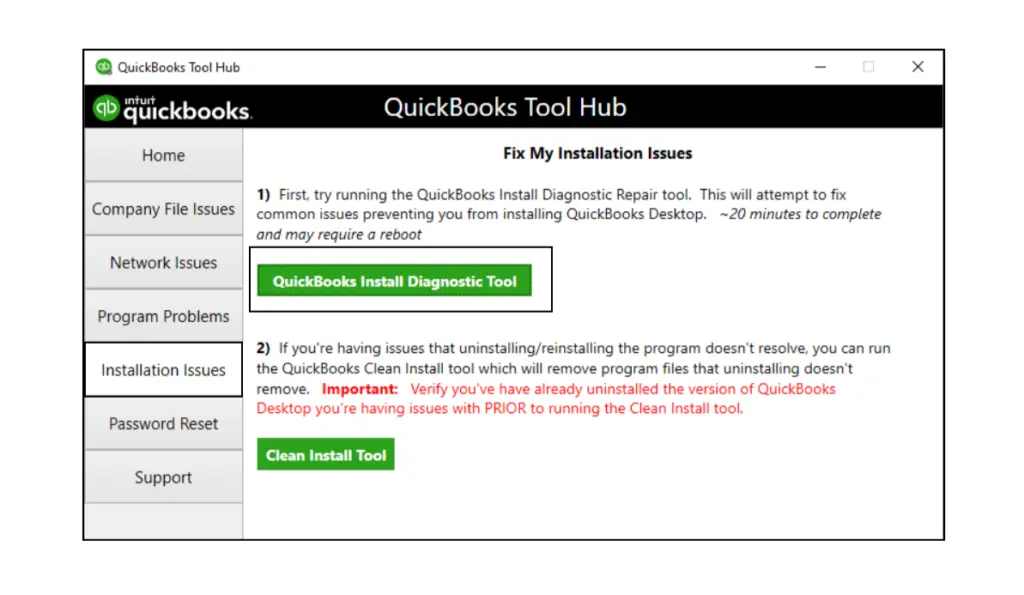
Finally, try to open the company data file and see if the problem is still there. You can also move to the next solution if this does not work out.
Solution 2: Pinging the Host Computer from a Workstation
The network must be fine in order to access the company file on the server computer. If not, you will realize that QuickBooks will not be able to talk to the company file. So let us attempt to ping the host computer from the workstation and determine if there exists a fine network that links both of them together.
First of all, enable Network Discovery on your workstations and server computer, and the places where you are encountering QuickBooks error code H202. For that purpose, just go through the following steps.
- Open the Start menu on the workstations and the host computer.
- Enter Network into the search field and select Network and Sharing Center.
- Proceed to change advanced sharing settings.
- In the File and Printer Sharing and Network Discovery sections, click and ensure Turn on Network Discovery is selected.
Now, you need to obtain the server name from your host machine.
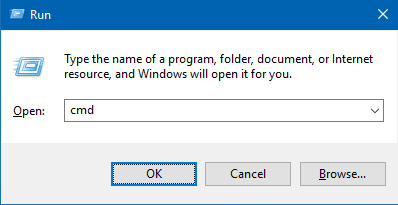
- Press the Windows + R keys on your keyboard to open the Run window.
- In the Run window, type cmd and press Enter.
- Now, in the CMD window, type ipconfig/all and press Enter.
- You will be able to view the Host Name in the Windows IP Configuration section. The server name is on the right.
- Write down the hostname, or copy and paste it into an MS Word document.
Finally, ping your workstations from the server computer to verify the connection.
- Press the Windows + R keys on your keyboard to open the Run window.
- Type cmd in the Run window, and press Enter.

- Type in ping [your server name] (without the brackets) and then press Enter.
- Do the same at all the workstations.
If you receive a response for a ping at all the workstations without any packet loss, then the network is fine. You may proceed to the next solution.
Solution 3: Check the Hosting Configurations on Workstation & Server
In multi-user mode, just one computer will need to contain the company file and serve as the server. This is the computer you designate as the host computer.
The remaining computers are workstations, and we should not enable them to host the company file. We need to verify two things here. First, we need to turn off hosting on all the workstations but not the host computer. Next, we will verify and enable hosting on the host computer.
Step 1: Turn Off Hosting on Workstations
Proceed to a workstation and do the following.
- Open QuickBooks Desktop on the workstation where you receive error codes such as H101, H303, or H505.
- Do not log in to the company file. Navigate to File, then Utilities.
- You may now see the Host Multi-User Access option or the Stop Hosting Multi-User Access option.
- If you find the Host Multi-User Access option, don’t press it. It implies that hosting isn’t enabled for this workstation, and this workstation isn’t causing the problem. You may proceed to the next workstation.
If you see the Stop Hosting Multi-User Access option, click it. It will suspend the workstation.
Now, do the steps as mentioned above for all the workstations. Once you’ve completed them, proceed to the next step.
Step 2: Turning on Hosting on the Server Computer
Proceed to the server computer on which QuickBooks must be hosted and ensure the hosting is activated there.
- Open QuickBooks on the host computer (server).
- Proceed to File, then Utilities.
- You may now see the Host Multi-User Access option or the Stop Hosting Multi-User Access option.
- If you notice the Stop Hosting Multi-User Access option, do not click it. This indicates that the hosting is already activated on this computer.
- If Host Multi-User Access is available, select it. This will start hosting on the server computer.
Now return to the workstation from which you want to access the company file in multi-user mode. There, open QuickBooks and move to multi-user mode. But if the issue still exists, proceed to the next step.
Solution 4: Renaming the CPS QuickBooks Folder
The QuickBooks damaged CPS Folder plays a crucial role in QuickBooks Error Code H202 while switching to the multi-user mode. By renaming the folder, a fresh version of the folder is made, which will undo the bug created by the previous one. This is how you can rename the QuickBooks CPS folder.
- After closing down the QuickBooks application, open the Start menu.
- Press the Windows key & E key to open the File Explorer window.
- Click on This PC.
- Double-click the C: Drive option.
- Look for the Program Files (x86) folder or the Program Files folder.
- Open the files.
- You now need to proceed to the Intuit folder and open the QB folder for the version of QuickBooks that you are using.
- Open the Components folder and choose the Payroll folder.
- Upon viewing the CPS folder, right-click on the folder and select the Rename option.

- Add OLD as the suffix to the name of the folder. It will look like CPSOLD.
- Now, create a new CPS folder on your desktop.
- Paste and copy CPSOLD into this newly created folder.
- Finally, update payroll successfully.

Following these steps will help you effortlessly rename the CPS folder in QuickBooks to rule out the possibility of a QuickBooks Error Code H202.
Solution 5: Disabling the UAC Settings
The User Account Control (UAC) settings safeguard your computer against internet threats that might emerge after downloading files from the internet while downloading the OS update. Therefore, these settings can cause the H202 error in QuickBooks. We will help you disable the UAC to resolve this error with the following steps:
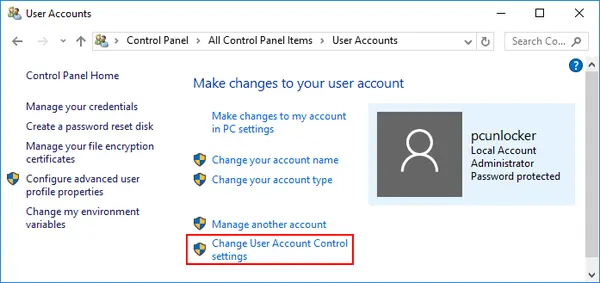
- Go to the Windows icon, use the search box, and type Control Panel.
- Press the Enter button, which will open a window in front of you.
- Click on User Accounts.
- Choose the User Accounts (Classic View) option.
- Head to the “Change user account control settings” part and acknowledge with a Yes.

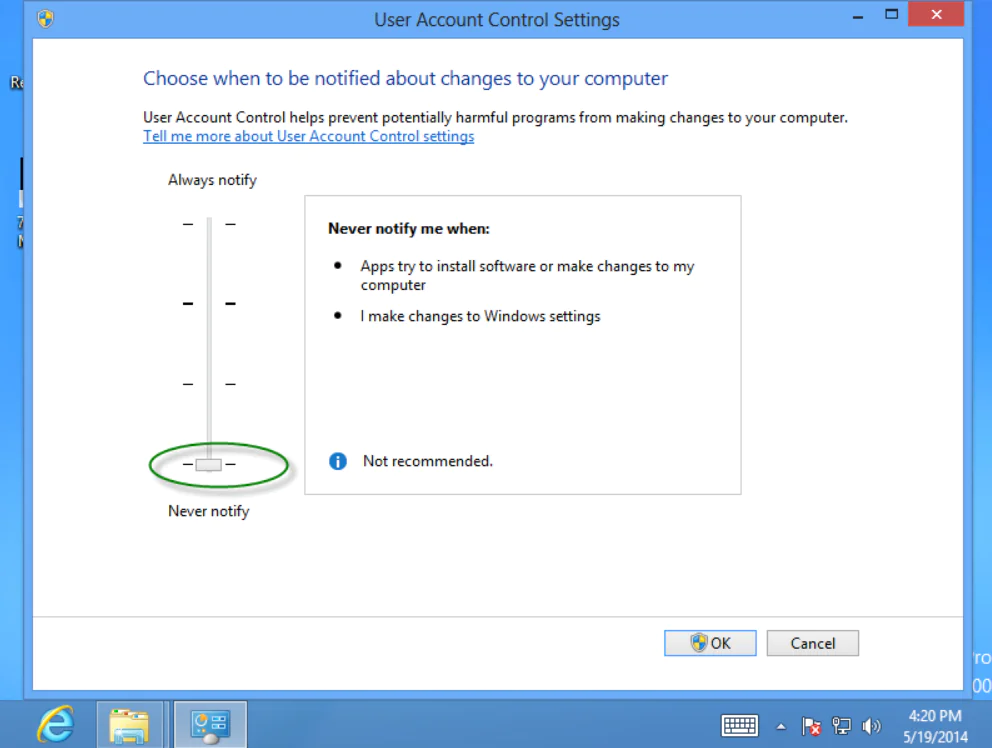
- Using a slider on your screen, you can go through two choices.
- Using the slider, choose Never Notify, which will turn off the UAC.

- Click the OK button and restart the computer to make the changes effective.
Disabling the UAC settings can help you resolve the H202 error in QuickBooks Desktop.
Concluding the Post!
Error code H202 in QuickBooks is associated with the H series errors that deal with the issues in multi-user mode in QuickBooks Desktop. The QB error H202 is generally caused by incorrect hosting configurations, damaged or corrupted ND files, or a firewall/antivirus issue. You can easily resolve QuickBooks Desktop error H202 with the help of the solutions mentioned in the blog. You can also reach us at the toll-free number to get professional assistance.
FAQs
What is QuickBooks Error Code H202 while switching to the multi-user mode?
QuickBooks Error Code H202, occurring when attempting to switch to multi-user mode, indicates an issue with connecting the workstations and the server where the company file is stored. It is usually triggered by improper hosting settings, firewalls, or network issues.
What are the causes of the H202 QuickBooks Error?
The QuickBooks H202 error is frequently reported when enabling the multi-user mode. It most commonly refers to an issue related to server connectivity or hosting configuration, such as firewall, DNS, or QuickBooks service issues.
How to fix the error H202 in QuickBooks?
If you want to fix the H202 error in QuickBooks, you need to open the Start menu on your server computer and enter run and press Enter. Here, you need to type services.msc and find QuickBooksDBXX and select the automatic startup type.
How does Error H202 impact the QuickBooks application?
QuickBooks Error Code H202, which denotes a multi-user connection issue, stops users from accessing a company file located on another computer, resulting in restricted access to QuickBooks in multi-user mode.
Related Posts-
Configure and Use QuickBooks Messenger in Multi-user Mode
QuickBooks Error H303 – Pro-Recommendations to Fix the Error
How to Fix QuickBooks Crash Com Error with Experts Tips
How to Fix ‘QuickBooks Not Working After Windows Update’ Issue
Understanding QuickBooks Error 30159: Causes, Symptoms, and Solutions
Decoding the QuickBooks Error PS034: Definition, Causes, and Solutions of the Error

Edward Martin is a Technical Content Writer for our leading Accounting firm. He has over 10 years of experience in QuickBooks and Xero. He has also worked with Sage, FreshBooks, and many other software platforms. Edward’s passion for clarity, accuracy, and innovation is evident in his writing. He is well versed in how to simplify complex technical concepts and turn them into easy-to-understand content for our readers.