
Last Updated on April 7, 2025
Have you ever seen that the QuickBooks auto-update option is often greyed out in the automatic updates section? If you answer yes, you might have experienced the ‘QuickBooks Automatic Update Greyed out’ issue. The phrase greyed out means disabled or unclickable. The option for automatic updates is disabled or unclickable. You will no longer be able to use the option. You must be wondering how to turn off QuickBooks’ automatic update. In this blog, we will talk about the ways to fix the QuickBooks automatic update greyed-out error in some simple and quick methods.
Are you unable to fix the QuickBooks Automatic Update Greyed Out error? You can speak to our dedicated experts by dialling our toll-free number. Our Accounting Helpline experts are all well-trained to understand your concerns and help you fix the software update issues instantly.

What is the QuickBooks Automatic Update Greyed Out Issue?
The ‘QuickBooks Automatic Updates Greyed Out’ is an issue when you want to take control of the application’s updating feature. There is no doubt that the auto-update feature is highly advantageous for the users, but there comes a time when you want to disable the QuickBooks automatic update feature. When you try to disable this, you find that no option in the QuickBooks automatic update is greyed out.
Well the automatic update option is greyed out, QuickBooks can’t turn off automatic updates on its own. Now, you must be thinking what will happen if the option is greyed out, right? Well, you won’t be able to use the feature. If anything is greyed out, you can easily consider it as disabled or not for your use. Let’s know about the solutions to get rid of this error.
Solutions to Resolve QuickBooks Automatic Update Greyed Out Issue
In this part of the blog, we will provide an overview of the steps to fix the error. You will then learn about the steps that we will implement. These solutions can also fix the ‘QuickBooks Desktop Enterprise not working correctly’ issue. Here are the possible solutions to fix the ‘QuickBooks Disable Automatic Updates Greyed Out’ error:
- Updating the QuickBooks Desktop to the Recent Version
- Updating QuickBooks Within the Application
- Updating QuickBooks Outside the Application
- Disabling Write Permissions to the Download Location
- Signing Into a Samplay Company
- Rebuilding the Data Tool
- Verifying and Fixing Internet Connectivity Issues
- Clearing the Browser’s Cookies and Cache
- Modifying Compatibility View Settings
- Changing Internet Connection Settings in QuickBooks
These are the steps to fix the ‘QuickBooks Automatic Update Greyed out’ issue. Let’s take a brief look at them.
Solution 1: Updating the QuickBooks Desktop
The first and foremost step is to update the QuickBooks Desktop application. You can update QuickBooks to resolve the greyed-out automatic updates issue. You can update QuickBooks in two ways, which are as follows:
- Updating QuickBooks Within the Application
- Updating QuickBooks Outside the Application
Let’s have a brief look at these two steps in detail now.
Step 1: Updating QuickBooks Within the Application
Here are the steps that you need to know regarding updating QuickBooks within the application:
- Open QuickBooks and from under the File tab, click Close Company/Logoff.
- Then choose Exit under the File tab.
- Right-click the QuickBooks icon on your Desktop and under Run as Administrator, choose Run as Administrator.
- After opening, QuickBooks says No Company Open, You need to click the Help tab, and under it, choose Update QuickBooks.
- Click the Mark All link under the Options menu and choose Save.
- From under the Update Now menu, check the Reset Update checkbox.
- Click Get Updates, and as soon as QuickBooks shows Update Now, close the application.

- Open QuickBooks again and click Yes on the Install Updates pop-up.

After all the updates are installed, restart your system. Now, check the option again to see if it is greyed out yet or not.
Step 2: Updating QuickBooks Outside the Application
Here are the steps to update QuickBooks outside the software:
- You have to go to the QuickBooks Downloads and Updates web page.
- First, select the country, product, and product specifications and click on the Search button.
- Then, click the Get the Latest Updates link on the page.
- After downloading the updates, open the downloads folder and double-click the update file to start the installation process.
- Hee, you should then follow the prompts on the screen to install the updates.
Once the QuickBooks updates have been installed, you should restart your computer and look for the greyed-out option again. If the option is still greyed out, you should move to the next solution.
Solution 2: Disabling Write Permissions to the Download Location
QuickBooks cannot download updates if you turn off the write permissions to the download location. To fix this, you will need to find the download location. The steps to find the disabled write permissions to the download location are mentioned below:
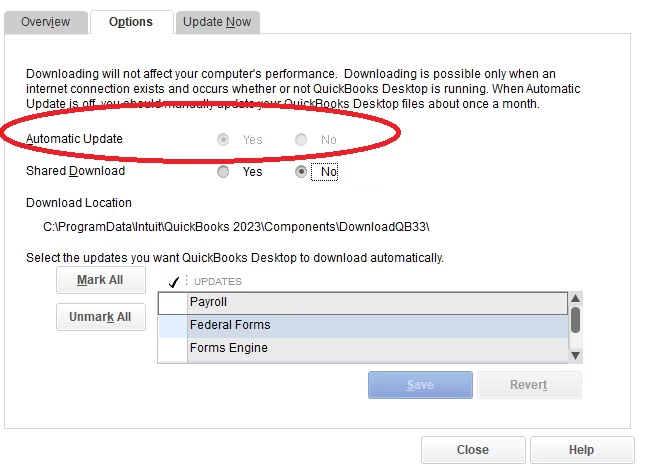
- Open QuickBooks Desktop and proceed to the Update QuickBooks Desktop window.
- Select the Options tab, and then you can view the Download location.
- Now, go to the download location and right-click on the folder in which QuickBooks downloads the updates.
- Select Properties, then Security, and subsequently Edit.
- Change the permissions, unchecking the write permissions for QuickBooks to this folder.
- When finished, select Apply to save the changes.
Now, restart QuickBooks Desktop and check whether the QuickBooks automatic update greyed-out is fixed. If you still can’t, try the next solution.
Solution 3: Signing Into a Sample Company
Let’s log out of the current company file and log in to a sample company to determine if the problem has something to do with data damage. Here are the steps to open a sample company file in the QB Desktop for your reference:
- First, you should press the Windows key or open the Desktop and look for the QuickBooks icon.
- Double-click the QuickBooks icon to open it while holding the Ctrl key. Don’t take your finger off the Ctrl key until QuickBooks has opened.
- Don’t open the company file. Instead, release the Ctrl key and tap on the Open a Sample File.
- After opening the sample company file, click on the Updates and go to the Options tab.
Now, is the ‘no option in QuickBooks automatic update greyed out or not? If not, opening it in a sample company file, there could be corruption or damage to your company data. Fix and rebuild your company file to correct it.
Solution 4: Rebuilding the Data Tool
You can easily use the Verify and Rebuild Data Tool as a user to identify any damaged company files or parts. The following steps can be used to accomplish this:
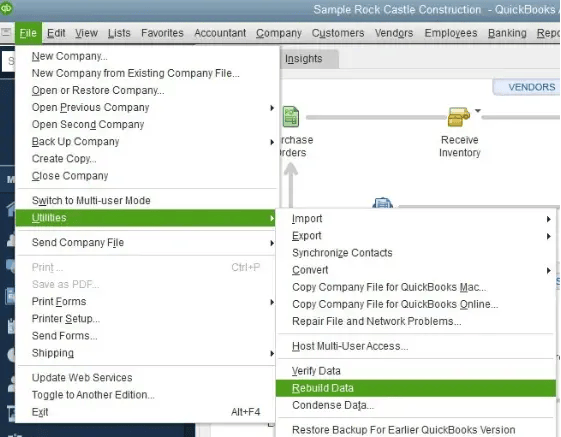
- You have to open your QBDT and press the File button.
- You have to proceed to the Utilities tab from the Settings list.
- Here, you will need to locate the option Verify Data Utility and click on it.
- Now, you need to allow the tool to perform the scan for data errors.
- The next step is to initiate the Rebuild Data tool from the Utilities tab to repair the errors found in the files.

- Later, you can look at the QBWIN.LOG to scan for any remaining errors.
- If you find them, you will have to fix these mistakes manually and save the changes.
Rebuilding the data tool can help you fix the ‘QuickBooks Automatic Update Greyed out’ issue. If the error is still there, you can move to the next solution.
Solution 5: Verifying and Fixing Internet Connectivity Issues
Sometimes, a bad internet connection can also cause the QBUpdate.exe quickbooks automatic update error in QuickBooks. So, in this case, checking and verifying the internet connection becomes important. We will verify and fix the network issue in three steps:
- Clearing the Browser’s Cookies and Cache
- Modifying Compatibility View Settings
- Changing Internet Connection Settings in QuickBooks
Let’s have a look at these steps in brief.
Step 1: Clearing the Browser’s Cookies and Cache
QuickBooks has web browsers in the background to access online services. Frequent website visits fill up the cookies and cache, which sometimes obstruct internet access for QuickBooks. Below are the methods to clear them and eliminate this internet problem:
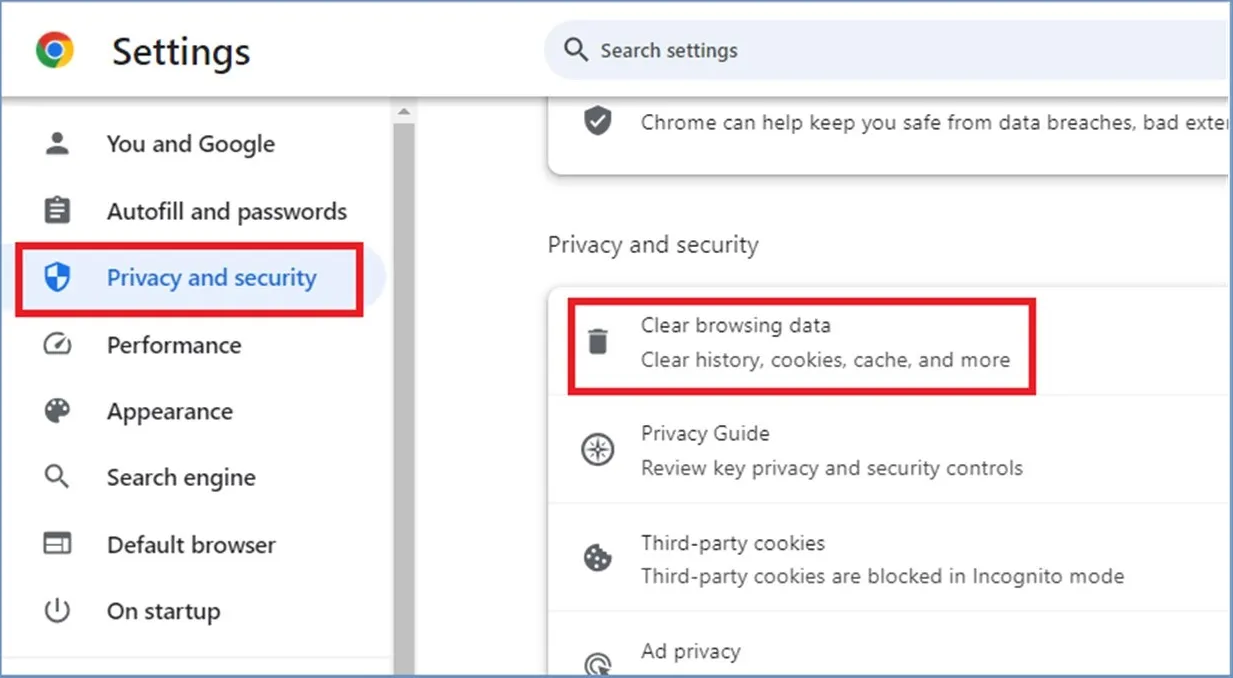
- Open the default browser on your system.
- Go to settings or the menu bar that has the three vertical dots, and attempt to clear the browsing data from there.

- To clear temporary internet files, cookies, website data, history, and passwords, you must select them.
- Then you have to go to the delete option.
- You have to shut down your web browser and start it again.
If this fails to help, you can go on to the next option.
Step 2: Modifying Compatibility View Settings
You need to make sure the compatibility view settings are properly configured. They assist in displaying web pages properly. Below are steps to check and modify them within your browser:
- Open your default browser and move to the tools/settings menu.
- Look for Compatibility View settings and click on it.
- In the Add this website column, insert ‘https://*intuit.com‘ and click the Add button.
- Now you must do the same for both “https://*.intuit.net” and “https://*.quickbooks.com.”
- Close the browser and reopen QuickBooks to verify the error.
You must verify whether the problem persists. If not fixed yet, you may move to the third step.
Step 3: Changing Internet Connection Settings in QuickBooks
You can also make the same modifications in your default web browser, but it is advisable to modify the settings in QuickBooks. This makes the new settings operational at the earliest. This can be an attempt to fix the QuickBooks automatic update option greyed out issue. Below are the steps to modify internet connection settings in QuickBooks:
- You must open QuickBooks Desktop on your system.
- Go to the Help section and select Internet Connection Setup.
- You must select Use my Computer’s Internet Settings and then click Next.
- Now you must select Advanced Connection Settings. This will launch your default web browser, where you can modify the settings below:
- Add Intuit as a trusted site
- Modify cookie settings
- Modify ActiveX Control settings
- Update Trusted Site Settings
- Modify pop-up blocker settings
- Restart your device
These are some effective changes to implement to fix your internet connection issue. If it was the network connection causing the greyed-out issue, it will be resolved now.
Turning Off the Automatic Cost and Price Updates in QuickBooks Desktop Enterprise
You can disable the Automatic Cost & Price Updates via the Company Preferences. But you won’t be able to find this option on the Premier 2019. But for your reference, we have mentioned the steps to disable the automatic cost and price updates in QuickBooks. These steps are as follows:
- From the QuickBooks Edit menu, click on Preferences.
- Select Sales & Customers in the left-hand panel. Then click on the Company Preferences tab.
- From the Custom Pricing section, select No Custom Pricing.
- Click OK.
Also, even if you update your Premier to the 2022 version, you will not be able to utilize the Automatic Cost & Price Updates. That functionality is only in Enterprise.
Summing It Up!
If the QuickBooks Automatic Update option is greyed out, there might be some issues with Windows permissions, settings, or the QuickBooks installation process. You might have to update the QuickBooks application to fix the error. If updating does not help, you can rebuild the data tool, sign into a company file, or even verify the internet connectivity settings there. You can also reach out to the experts for professional guidance to resolve the error.
FAQs
Does QuickBooks Online automatically update sales tax rates?
Yes, QuickBooks Online automatically updates sales tax rates. With QuickBooks automated sales tax, you have QuickBooks calculate sales tax for you on what you’re selling, where you’re selling, and where you’re shipping. If you change something in your state, such as a sales tax rate, QuickBooks updates your tax rates for you automatically.
Does QuickBooks Online update automatically?
Yes, being a cloud-based service, QuickBooks Online updates automatically in the background. It is capable of downloading the automatic update or patches for the product.
Does QuickBooks Desktop update automatically?
Yes, QuickBooks Desktop is capable of downloading and installing updates automatically. Or, you can also choose the manual update. You can always activate automatic updating in QuickBooks Desktop to have the latest version.
How to turn off automatic updates in QuickBooks Desktop?
You can turn off the auto-update in QuickBooks Desktop by visiting the Help menu, choosing Update QuickBooks Desktop, clicking on the options tab, and choosing No against the automatic update.
Related Posts-
Solving QuickBooks Won’t Open After Windows Update Issue
How to Fix QuickBooks Won’t Open After Update Issue
How to Fix ‘QuickBooks Not Working After Windows Update’ Issue
Understanding QuickBooks Error 30159: Causes, Symptoms, and Solutions
Decoding the QuickBooks Error PS034: Definition, Causes, and Solutions of the Error
Complete Guide on QuickBooks Payroll Update: Errors & Solutions

Edward Martin is a Technical Content Writer for our leading Accounting firm. He has over 10 years of experience in QuickBooks and Xero. He has also worked with Sage, FreshBooks, and many other software platforms. Edward’s passion for clarity, accuracy, and innovation is evident in his writing. He is well versed in how to simplify complex technical concepts and turn them into easy-to-understand content for our readers.