Last Updated on February 7, 2025
One of the most crucial tasks for a new QuickBooks user is to set up a proper chart of accounts. If you already have a chart of accounts set up for your company, then you can avoid recreating the chart of accounts for the new company by importing it into QuickBooks. A chart of accounts is basically the list of critical financial data like equity, liability, income, assets, and expenses that can be moved from the desktop version of QuickBooks to the Online version and from one computer to another.
Sometimes QuickBooks throws errors while Import QuickBooks Chart of Accounts, and in this article, we will show you how you can get rid of them with a few basic troubleshooting steps. Follow the complete article for detailed instructions.
Importing the chart of accounts into QuickBooks Desktop and Online can be a tricky process if not handled correctly. This guide will help you with the import and fix any errors that might occur in the process. However, if you don’t want to undertake the import steps on your own, you can reach out to our QB support team at 1.855.738.2784 to get the best assistance with the CoA issues.
What Causes Errors Importing Chart of Accounts?
Once you encounter this type of error, an error message “Error while reading the file. Format may be incorrect” might appear on your screen. Some of the primary reasons that cause QuickBooks to encounter errors while importing a chart of accounts are listed below:

- You have entered the same email id more than once in the same column in the chart of accounts.
- In case you try to import an existing service or product in the chart of accounts,
- The same phone numbers are present in the same column.
- The account that you are trying to import data from is not present.
- You have exceeded the limit of accounts that can be imported in the chart of accounts.
- In case you are trying to import a sub-account.
Steps to Import QuickBooks Chart of Accounts in Desktop
- Open QuickBooks and click Utilities under the File tab.
- Click Import and then select Excel Files.
- Now, from under the Lists section, Add / Edit Multiple List Entries.
- Choose the appropriate file and import it into QuickBooks.
Important Points to Consider Before Following the Troubleshooting Steps
- Make sure that the file that you are trying to import should be compatible with QuickBooks.
- The file must not be more than 2 Megabytes in size, and it must not contain more than 2000 rows in it.
- Make sure that the file that you are importing does not contain any decimal values, and the account number field should not be empty.
- The application must be installed with the latest released updates.
Steps to Resolve Chart of Accounts Importing Error in QuickBooks
Follow the steps mentioned below in the given sequence to resolve the import QuickBooks chart of accounts error in the shortest time:
- Open the file in Microsoft Excel and verify that each column has only one email address, as QuickBooks only supports files that have one email address in one column. If you want to import more than one email address, first add a single email address, edit the file, and import it again in QuickBooks.
- It is not suggested that services and products be imported if importing gives any error; you can manually add these items after the import is complete.
- If you are getting the error in the fields that contain the phone number, then first verify that each column has only one phone number. Usually, this error appears when there is more than one number present in one column.
- Check if the accounts you are trying to import from are sub-accounts; if yes, then change them to the parent accounts, and after the import, you can change them back to subaccounts.
- Verify the availability of the accounts before importing, as you might also experience an error in the chart of accounts import in the case of non-existing accounts.
Learn the Steps to Import a Chart of Accounts in QuickBooks Online
Here’s how to import the chart of accounts into QuickBooks Online so that you have the complete data in the app –
- Start by formatting your spreadsheet, as you can import CoA using an Excel CSV file. Open the existing or new spreadsheet and ensure you have all the columns (Account Name, Type, Detail Type, and Number) in it.
- If you have a subaccount, add it to the Account Name column and save the spreadsheet in CSV format.
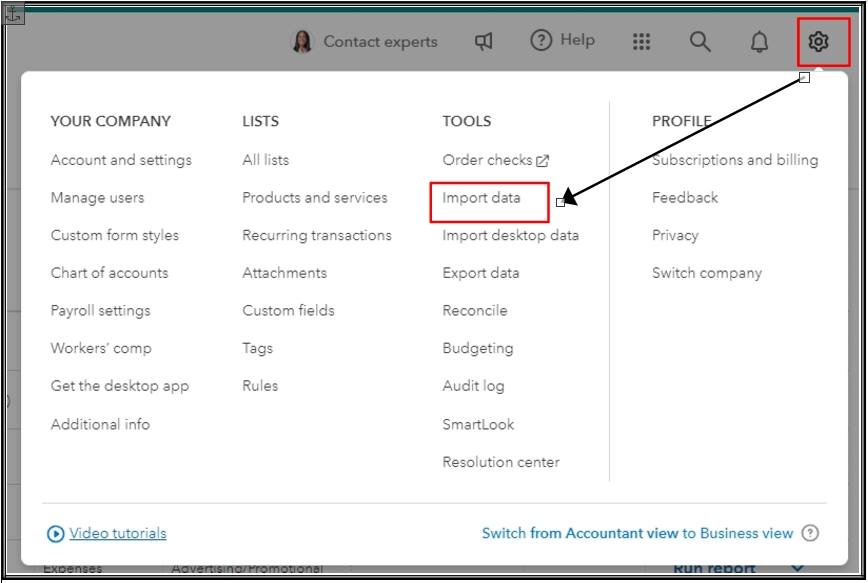
- The next step is to sign into QBO and upload your spreadsheet. Go to Settings, select Import Data, then click Chart of Accounts and upload the file.
- Click Open after choosing the file and click Next to continue with the upload.
- Further, map your accounts by selecting the Your Field dropdown and matching the name with QBO fields.
- If a field doesn’t have a matching column, select No Match (except for the Account Name field) and click Next.
- Now, check everything before importing CoA to ensure everything is correct. Check the add account types and detailed types, and look for any field highlighted in red to correct it.
- Once everything looks good, click Import, and once all the accounts are in QuickBooks, proceed with entering the opening balances.
- For the CoA opening balance, go to Settings, click Chart of Accounts, and find the bank/ credit card account.
- Select Action, click Edit, and choose when to start tracking the finances.
- Move to the Balance field, enter the amount and As Of date, then click Save and Close and complete the process.
Once all these steps are performed, you will have the Chart of Accounts in QuickBooks Online, and you will be able to see the data successfully.
Solutions to Resolve Chart of Accounts Error in QuickBooks Online
If you have followed the steps given in the section above but are encountering a CoA error while importing the data, implement the following solutions in QBO –
Solution – Access QuickBooks Online in Incognito Mode
As a general troubleshooting step, when users are unable to run QBO and are facing issues with certain actions, we advise running the app in a private mode. This can help determine if the issue is due to the browser cache and cookies, and then you can delete them accordingly. The following shortcut keys will help you run QBO on your selected web browser in incognito mode –
Google Chrome: Ctrl + Shift + N
Mozilla Firefox: Ctrl + Shift + P
Microsoft Edge: Ctrl + Shift + P
Safari: Command + Shift +N
If QuickBooks Online is running in private browser mode, move to Solution 2 and clear the cache using the given instructions. If QBO is not running in private mode, you can fix the CoA issues by using Solution 3 instead.
Solution 2 – Clear the Browser Cache and Cookies Before Using QBO
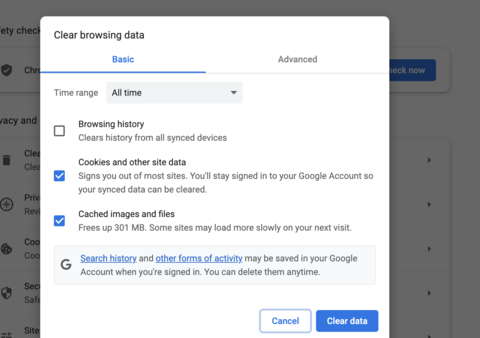
Browser cache and cookies can interfere with normal functioning and can be the reason why you face CoA import issues in QBO. Thus, you must delete the browser cache and cookies on your selected web browser by going through the detailed instructions below –

Google Chrome
- Click More from the top-right corner of the Google Chrome homepage, then move to Settings and select Privacy and Security.
- Click Site Settings, then proceed by selecting Cookies and Site Data, and then click See all Cookies and Site Data.
- Finally, enter “Intuit” in the search window, locate the Intuit cookies, then hit Remove all shown or the trash can icon and restart your browser.
Mozilla Firefox
- Select Settings from the top-right in your Mozilla Firefox browser, then move to Preferences and click Privacy and Security.
- Click Manage Data from the Cookies and Site Data section and insert “Intuit” in the search bar to find the cookies.
- Hit Enter, click Remove All Shown, then save the changes and restart your browser to run QBO.
Safari
- Open the Safari browser, select Safari next to the Apple icon, then navigate to the Preferences tab and click Privacy.
- Now, select Manage Website Data, type “Intuit” in the search bar, and click Remove All to delete the cookies.
- Finally, select Remove Now, click Done, then restart Safari and run QBO without issues.
Microsoft Edge
- Begin by opening the Microsoft Edge browser, then click on the Setting option and click Privacy.
- Now, select Clear Browsing Data, press the Ctrl + Shift + Del keys to remove the browser cache, and end the process.
Once the cookies are removed, you can run QuickBooks Online and perform the CoA import process again. If you still face a QuickBooks Online Chart of Accounts error, proceed to the next troubleshooting solution to address it effectively.
Solution 3 – Manually Update Your Bank Accounts
Updating your bank account can help refresh the connection between the banking website and QuickBooks Online as follows –
- Go to the left pane on the homepage, select Banking, and open the Bank and Credit Cards drop-down menu.
- Select the Credit Card account, then tap the Update button, and run the update around 3-5 times to build a reliable connection with QB.
Once done, you must try importing the CoA in QuickBooks Online to ensure the error is resolved. However, if you can’t Import QuickBooks chart of accounts, move to the next solution and implement the steps to rectify the error.
Solution 4 – Connect Your Bank Accounts on the CoA
If none of the above solutions are helpful, then as the last resolution alternative, you can connect your bank account on the Import QuickBooks Chart of Accounts, following the detailed instructions given below:
- Login into your QuickBooks online, navigate to the homepage, click the Gear icon, and click on the Chart of Account.
- Now, locate the account you want to connect, then move to the Action column and select the View register drop-down menu.
- Select Connect Bank, follow the on-screen steps to complete the process, and try importing the CoA in QBO again.
Once done, check if the import process is successful and if the QuickBooks chart of account import error is successfully rectified.
We hope this detailed guide helps you successfully Import QuickBooks Chart of Accounts. However, if the import process doesn’t work and our solutions aren’t helping, you must seek expert assistance. For this, you can contact our QuickBooks experts at 1.855.738.2784 and speak to our specialists to get prompt resolutions for your CoA issues in the app.
Common User Questions
What does the chart of accounts in QuickBooks Desktop and Online entail?
The CoA in QuickBooks lists all the company’s accounts and balances, which is used by the app to track funds and debts for the financial and accounting operations.
How and where can users enable account numbers for an existing chart of accounts in the QuickBooks Online app?
If you want to enable the account numbers for an existing CoA in the QBO application, you must implement the following steps:
– Go to Settings, select Account and Settings, then move to the Advanced tab and go to Chart of Accounts.
– Click Edit in the Chart of Accounts section, then turn on Enable account numbers, and if you want account numbers to show in reports and transactions, select Show account numbers.
– Once the settings are changed, select Save and then Done to complete the CoA process.
What are the steps to set up or add an account to the chart of accounts as a QuickBooks user?
You can add a new account to set up the chart of accounts in QuickBooks by using the instructions below:
– From the Settings menu, select Chart of Accounts and click the New button.
– Enter the Account Name, then select an Account Type and choose the Detail Type from the dropdown menu.
– Further, select Make this a subaccount if the concerned account is a sub, and choose the Parent Account for the Under field.
– If you opt for a bank, asset, liability, credit card, or equity account, you must enter the opening balance and the starting date.
– Add a description to the field as required, then click Save and exit the process.

Edward Martin is a Technical Content Writer for our leading Accounting firm. He has over 10 years of experience in QuickBooks and Xero. He has also worked with Sage, FreshBooks, and many other software platforms. Edward’s passion for clarity, accuracy, and innovation is evident in his writing. He is well versed in how to simplify complex technical concepts and turn them into easy-to-understand content for our readers.

