Last Updated on March 10, 2025
An employer needs to file Form 940 in QuickBooks with the federal and state tax authorities to pay unemployment taxes under the Federal Unemployment Tax Act (FUTA). It is an annual tax form, which only businesses are liable to pay, whereas there are no tax deductions made from employees’ wages. The current tax rate is set to 6% of the first $7000 paid to the employee, and this tax amount is used to compensate workers who have lost their jobs. The due dates to file 940 are January 31 by mail and February 10 for e-filing. In this detailed article, we will learn how to prepare Form 940 for printing and filing.
This guide will help you file and print form 940 in QuickBooks Desktop and Online versions. However, if you don’t want to prepare and file the form yourself or have queries regarding the same, you can contact our Accounting Helpline’s support experts at 1.855.738.2784 for quick assistance.

Important Points to Consider Before Filing Form 940
- Ensure that all of your State Unemployment Insurance Taxes are documented, as you cannot file form 940 without SUI.
- You must have an active internet connection.
- Ensure your QuickBooks Desktop is updated to the latest release and the payroll tax tables are up-to-date.
- You must be registered with the IRS e-file program.
- You will need the 10-digit PIN provided by the IRS.
- Ensure your QB data is backed up to prevent losing crucial info accidentally.
Steps to Print and File Form 940 in QuickBooks Desktop
If you want to prepare form 940 and file and print it in QuickBooks Desktop, perform the following detailed steps –
- Open the QuickBooks Desktop application and click Payroll Tax Forms & W-2s under the Employees tab.
- Now choose Process Payroll Forms, and from the Select Form Type page, then click Federal Forms and hit OK.
- From the list of Payroll forms, click Annual Form 940 and choose the year for which you are filing the form.
- Now, fill out the form with the correct information about your company, and once it is completed, click Next.
- Verify the information entered in the form and make sure that all the entries of the amount and calculations are accurate. You must review all entries for accuracy, including EIN, total wages paid, taxable wages, and any adjustments/credits.
Note: Make any necessary adjustments for discrepancies in your payroll records before generating the form. - Now, mark the box and select whether you want any overpayment to be reimbursed or settled down with your next tax payment.
- Hit the Next button for 940 form-filling guidelines.
- Now, you can select between saving the completed document in PDF format or getting a print directly from the printer.
- Click Save as PDF if you want to save the form in PDF format for printing later.
- Click Print for Your Records to get a print directly from the printer. You can select Print Preview to check how the form looks before printing.
- Now, click Check for Errors to check the form for any errors and mistakes.
- If your e-filing service is active, then click Submit; this will e-file your tax form 940 directly to the IRS and will provide you with an option to get a print of the form for records. However, if you are filing the form on paper, sign the printed form and mail it to the appropriate address listed in the form instructions.
- Now for the final step hit Save and Close option to save a copy of the form and to exit the window. Ensure that copies of the file forms are made for recordkeeping and in case of future audits and inquiries.
Steps to Print and File Form 940 in QuickBooks Online
You can file Form 940 in QuickBooks Online by performing the following detailed steps –
- Open QBO, select the Payroll tab from the left menu and select Reports from the Payroll section.
- Scroll to the Payroll Tax Reports section, then select Form 940 and choose the correct tax year for which you want to file the form.
- Now, QBO will auto-fill the form based on your payroll data, and you can check the entries for EIN, total wages paid, taxable wages, and any adjustments.
- Correct the discrepancies, if any, then choose the option to e-file directly from the Form 940 screen.
- Go through the e-filing process by following the given prompts, and you’ll receive a confirmation after submission.
- Save the confirmation and keep copies of the form for records.
Once you have completed this, you will have successfully filed Form 940 in QuickBooks Online. Further, if you want to print a copy of Form 940, follow these steps –
- Click on Taxes from the left panel, select Payroll Tax, and go to the Forms section.
- Select Annual Forms, choose Form 940, and select the year you want to print the form for.
- Finally, select View or Print and print the copy for Form 940.
Troubleshooting Issues While Filing or Printing Form 940 in QuickBooks
If you are facing issues while filing or printing Form 940, perform the following troubleshooting solutions –
Note: Before troubleshooting the form filing problems, ensure QuickBooks Desktop and the tax tables are successfully updated. If you are using QBO, ensure your web browser doesn’t have excessive cache and cookies.
Case 1: You aren’t able to print Form 940 in QBO due to pending dues
QuickBooks Online doesn’t allow you to print the 940 tax form if we have pending dues for that certain tax. To fix this, check if you have pending dues, then manually record your tax payment in the following manner –
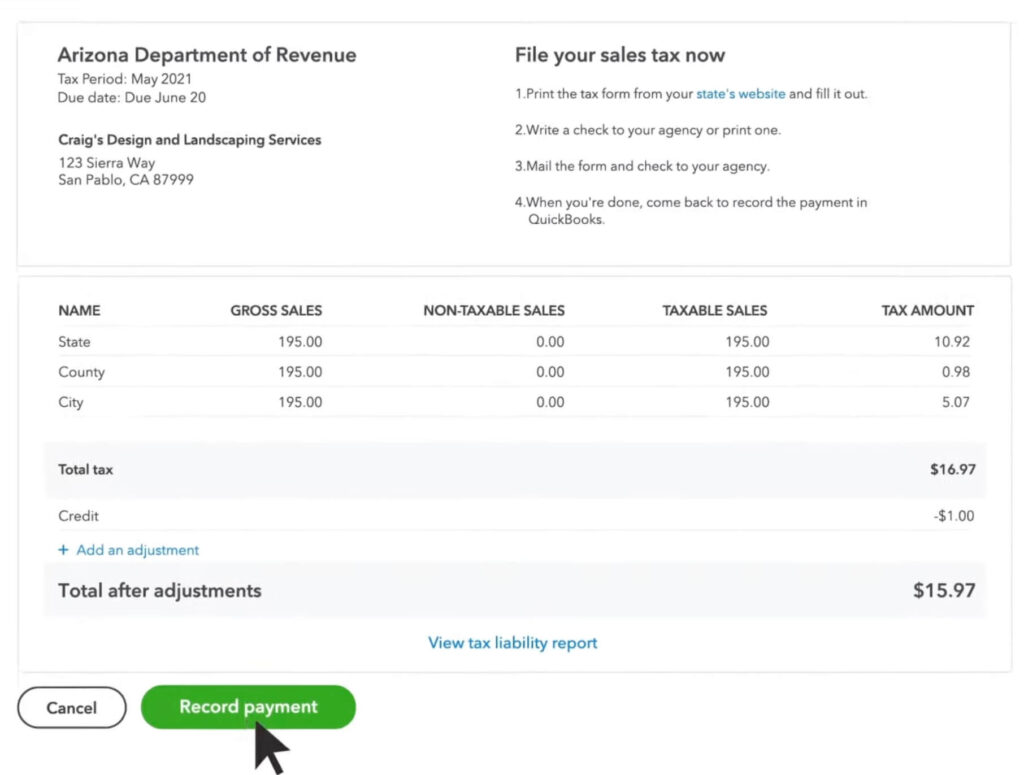
- Select Taxes from the sidebar menu, click the Payroll Tax tab, and move to the Taxes section.
- Click the Pay Taxes button, then next to the payment that you want to pay, select Record Payment.
After recording the payment, print your 940 tax form in the following manner –
- Select Taxes, click the Payroll Tax tab, and move to the Forms section.
- Select Annual Tax Forms and click the 940 (Employer’s Annual Federal Unemployment Tax Return) link.
- Finally, hit View, go to the ViewPdfForm page, and click the Print icon.
Case 2: You are getting a Form 940 overdue alert in QuickBooks Desktop
There’s a chance your Form 940 is not scheduled to be yearly; thus, you are getting the overdue alert. To fix this, ensure the 940 pay schedule in QBDT is set to Annually in the following manner –
- Go to the Employees menu, select Payroll Center, and go to the Pay Liabilities tab.
- Open the Other Activities list and select the Change Payment Method to open the QuickBooks Payroll Setup.
- Select a scheduled tax payment Federal 940, click Edit, ensure the Payment (deposit) frequency field is set to Annually, and click Finish.
Once done, the overdue alert will be removed, and you can successfully file Form 940.
Case 3: There is an amount difference in Form 940 in QB Desktop
If there is an amount different in Form 940, you might be facing a problem with the FUTA tax before adjustments. To fix this, correct the payroll tax tracking type and employee wages as follows –
Step 1 – There are certain payroll items that are exempt from federal unemployment benefits, but QuickBooks might have been configured to compute them. This can create an amount difference in 940, which can be fixed by checking the following payroll items and ensuring they are exempt –
- Group Term Life Insurance (GTLI)
- Retirement Plans
- Dependency Care
- Fringe Benefits
Step 2 – Next, you must correct the tax tracking type on the payroll item that should not be subjected to FUTA as follows –
- Choose Lists, select Payroll Item List, and click Edit Payroll Item by right-clicking the payroll item.
- When you reach Tax Tracking Type, choose Next, and verify that the payroll item used and the tax tracking type specified are the same.
- Adjust the tax tracking type if necessary, then select Next twice, and click Complete.
- Further, choose Next and review the Federal Unemployment Tax in the Taxation window.
- Check Federal Unemployment if it is not selected and uncheck Federal Unemployment if it’s selected, then select Finish.
Step 3 – The FUTA wages for each employee with the incorrect payroll item in the paychecks will be fixed in this step. Once done, create a company file backup and run a payroll checkup.
If the payroll checkup shows issues, manually make wage-based adjustments for each employee with the incorrect payroll item.
However, if you still face issues while e-filing the form, you can opt to file it in paper form.
Conclusion
This tax form needs to be filled with precision to avoid IRS penalties. You can follow the detailed steps in this article to successfully fill out and file Form 940 in QuickBooks Desktop and Online. However, if the steps aren’t helping and you are unable to prepare QuickBooks form 940 for printing and filing, you might need assistance. You can contact our Accounting Helpline’s professional team at 1.855.738.2784 to get immediate guidance in filing the tax form.
FAQs
How can I file Form 940 for prior years in QuickBooks Online?
You can file form 940 for prior years in QuickBooks Online by following the steps below:
– Go to the Taxes menu, select Payroll Tax, and click Annual Forms.
– Select the 940 tax form, then choose the last year’s period and click View.
– Click the Print icon to print the form, and then you can manually submit it to the IRS.
Can I override Form 940 in QuickBooks Desktop and Online versions?
Yes, you can override Form 940 in QuickBooks Desktop and file an amended return. However, you can’t directly override the form in QBO; you will have to make adjustments or correct the underlying transactions to ensure the form is correct.
How can I make changes to Form 940 in QuickBooks Online?
If you want to edit Form 940 in QBO, implement the following steps:
– Sign in to QBO, move to the Payroll tab, select Reports, and go to the Payroll Tax Reports section.
– Select Form 940 and choose the appropriate year to edit or review.
– Now, check the entries and review all sections, then go to the Employees section if you need to edit the employee info.
– On the other hand, if you want to adjust a particular payroll transaction, select the employee from the Employees menu and click Paycheck List to make the correction.
– Once the changes are made, click Save and return to the Reports section to regenerate the form.
How can I change the form filing method for Form 940 in QuickBooks?
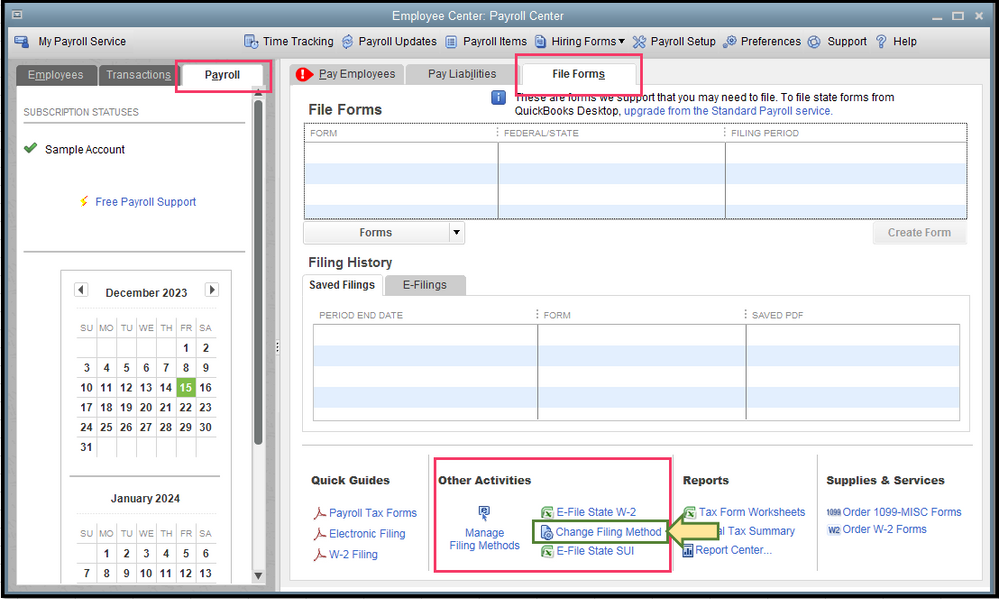
If you do not wish to E-file your 940 and the form is currently set for E-filing, change the filing method by following these steps:
– Go to the Employees menu, select Payroll Center, and select the Payroll tab.
– Select File Forms and choose Change Filing Method from the bottom of the Other Activities section.
– Select Federal Form 940 from the list, click Edit, then click E-file and select Finish.

Edward Martin is a Technical Content Writer for our leading Accounting firm. He has over 10 years of experience in QuickBooks and Xero. He has also worked with Sage, FreshBooks, and many other software platforms. Edward’s passion for clarity, accuracy, and innovation is evident in his writing. He is well versed in how to simplify complex technical concepts and turn them into easy-to-understand content for our readers.