Last Updated on September 9, 2025
The QuickBooks application helps manage your business’s finances, including payroll creation, tax table creation, and employee payouts. It also enables you to prepare and electronically file federal and state 1099-MISC and 1099-NEC. According to the IRS, the form should be completed with all the essential information, including name, details, contact information, and email. The QuickBooks 1099 e-file print is necessary for both the employee and the employer to maintain the payout. This blog serves as a detailed guide to help you understand the 1099 form in all the different QB platforms.
If you need further assistance with filing the 1099 form in QuickBooks, please don’t hesitate to contact our Accounting Helpline’s experts at 1.855.738.2784!

Who Must File the 1099 Forms in QB Online and Desktop?
The forms 1099 MISC and 1099 NEC are different and are available for various types of businesses. Here are the key factors you should check before choosing which form is best for you.
Who Needs to File 1099-MISC?
- When your business incurs annual expenses of at least $600 for rent, legal settlements, or prize money, you may be eligible for this form.
- It is used when you want to report miscellaneous income.
- If the maximum payments are made for attorneys or legal activities.
- When the services are opted for by someone who is not an employee.
Who Needs to File 1099-NEC?
- When your business hires any contractor and pays them more than $600 in a year.
- 1099 NEC requires an IRS form and a copy to be sent to the contractor, as well.
- Cash payments should be included.
- The 1099 NEC should be made for every person to whom you are withholding any federal income tax.
The above-mentioned key pointers will help you understand which form you need for your filing.
What are the Prerequisites to Make Tax Forms for 1099 in QuickBooks?
Before proceeding with any other steps, ensure that the following steps are completed to get accuracy in the 1099 e-file printing.
- Verify the vendor information in the QB database and ensure that it is up to date.
- Check and verify if the following fields are correct:
- Name
- Address
- Tax identification number
- Social Security Number
- Verify that payments to vendors are recorded in QB, including:
- Interest
- Income
- Dividends
- Other types of payments
- Check the vendors who are eligible for a 1099, depending on the amount and the type of payment.
- Usually, the vendors who receive $600 or more in non-employee compensation will get a 1099-MISC form.
- Ensure the “Track payments for 1099” option is enabled for eligible vendors in the vendor list.
- Check for the deadlines for distributing 1099 forms to recipients and submitting the 1099 copies to the IRS.
These key pointers should be maintained before starting the process of printing Form 1099 in QuickBooks.
Learn How to Set Up Contractors for the 1099 Form in QuickBooks
The steps to set up contractors for the 1099 form differ depending on the QB platform and payroll you use. So let’s cover them one at a time, starting with the steps for those who use QB Online and Contractor Payments.
Set Up Contractors for 1099 With QB Online and QB Contractor Payments
- Click on Add a contractor.
- Enter the name and email address of your contractor:
- Now, tick the Email this contractor box if you want the contractor to fill in their own information.
- If you wish to enter the info yourself, keep it unchecked.
- Lastly, select Add contractor.
Now, let us see the steps for those who use QB Contractor Payments without QBO.
Set Up Contractors for 1099 With Just QuickBooks Contractor Payments
- Go to Contractors.
- Then, click on Contractors.
- Select the Add a contractor option.
- Now, enter the contractor’s name and email:
- Now, tick the Email this contractor box if you want the contractor to fill in their own information.
- If you wish to enter the info yourself, keep it unchecked.
- Finally, press Add contractor.
Now, let us take a look at the steps for QBDT for Windows.
Set Up Contractors for 1099 Form With QBDT for Windows
To set up contractors for the 1099 form in QBDT for Windows, check out the detailed steps given below:
Step 1: Turn on the 1099-MISC Form
- Navigate to the Edit menu.
- Click on Preferences.
- Select the Tax: 1099 menu.
- Go to the Company Preferences tab.

- Navigate to the Do you file 1099-MISC forms? Section.
- Click Yes.
- Select OK when you’re done to save the changes.

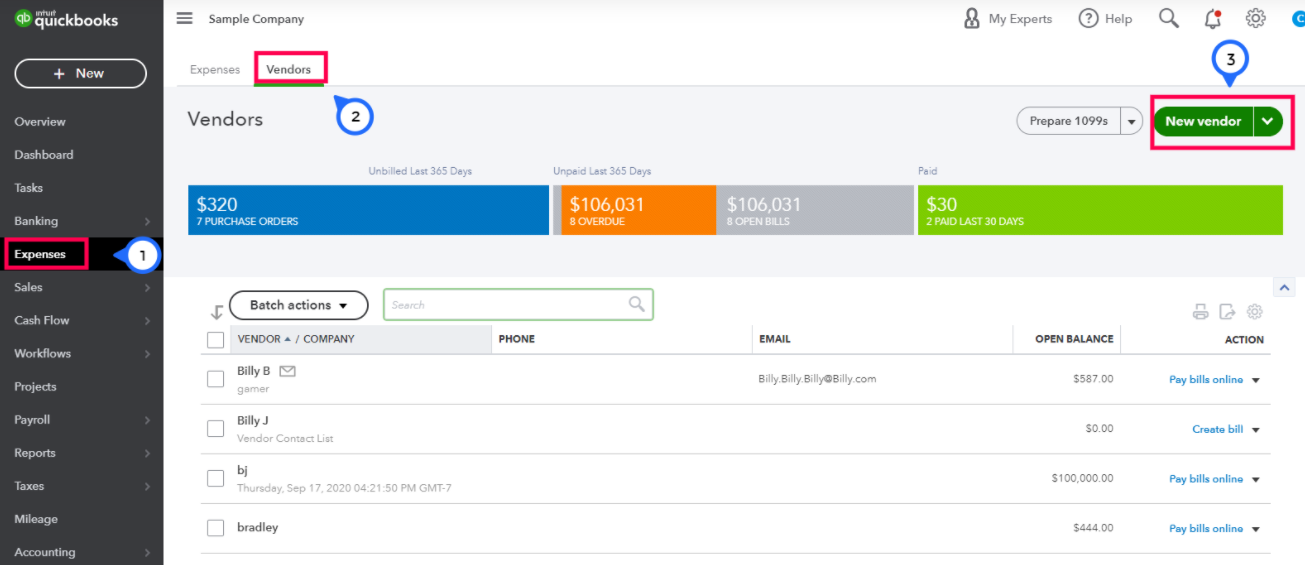
Step 2: Add Your Contractor as a Vendor
- Open the Vendors menu.
- Click on the Vendor Center option.
- Choose the New Vendor dropdown menu.

- Select New Vendor.
- Fill the fields on each tab.
- Select OK when you’re done.
Step 3: Track the Contractor Payments for 1099 Forms
- Open the Vendors menu.
- Click on the Vendor Center.
- Choose a vendor’s name.
- Click on Edit.
- Press the Address Info tab and review the following:

- The two-letter state abbreviation is correct.
- The ZIP code is correct.
- If the vendor is a person:
- Vendor’s name should appear in the First Name, M.I., and Last Name fields.
- Leave the Company Name field empty if you have the company name but not the person’s name.
- Now, navigate to the Tax Settings tab.
- Check and select the Vendor eligible for 1099.
- In the Vendor Tax ID field:
- Enter the vendor’s tax identification number.
- When done, press OK.
The steps to do so for Mac are given below.
Set Up Contractors for 1099 Form With QBDT for Mac
To set up contractors in QB Mac, turn on the 1099-MISC form and track contractor payments with the following steps:
Step 1: Turn on the 1099-MISC Form in QB Mac
- Go to the QuickBooks menu and select Settings.
- Click on the 1099s section.
- Check the 1099-MISC forms are filed box.
- Now, select accounts for each 1099 category that applies to your business for the purpose of reporting and taxation:
- Go to the Account column.
- Choose an account from the dropdown menu.
- If needed to choose more than one account:
- Click on Selected Accounts from the dropdown menu.
- Select the desired accounts in the:
- Select Accounts window.
- Click on OK when the accounts have been selected.
- Enter a new amount in the Threshold column if you want to change the threshold amount (optional).
Step 2: Track the Payments of Contractors for the 1990 Forms
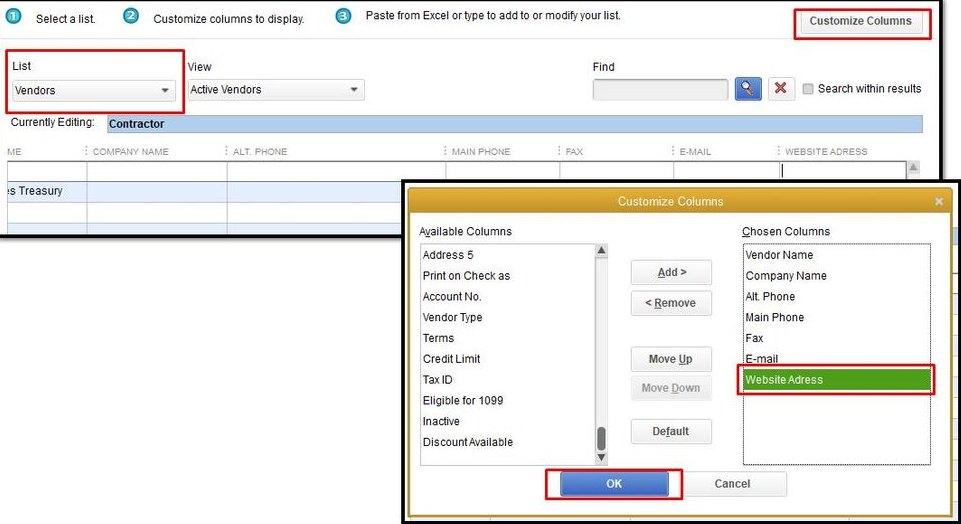
- Go to the Lists menu.
- Click on Vendors.
- Go to the Vendor List window.
- Click on the Edit Vendor option.
- Go to the Address Info tab.
- Ensure the following things:
- The two-letter state abbreviation is correct.
- The ZIP code is correct.
- If the vendor is a person:
- Vendor’s name should appear in the First Name, M.I., and Last Name fields.
- Leave the Company Name field empty if you have the company name but not the person’s name.
- Click on the Additional Info tab.
- Mark the Vendor eligible for 1099 checkbox.
- Enter the vendor’s tax ID number in the:
- Tax ID field.
- Press OK.
Now, just create and file your 1099 form electronically. The steps for that have been given in the next section.
Create and File the 1099 Form Electronically With QuickBooks Desktop
The in-depth steps to create and e-file the 1099 form in QuickBooks Desktop are given below.
Step 1: Update Your QuickBooks Desktop Application
The first step you need to take before filing the QuickBooks 1099 e-file form electronically is to update the application to its latest release. This applies to both the Windows and the Mac versions.
Step 2: Create the 1099 Forms in QB Desktop
The steps to do so are different for the Windows and Mac versions, so let us take a look at how you can create the 1099 form for both.
QuickBooks Desktop for Windows
- First, you would need to go to the Vendors menu.
- Then, select 1099 Forms.
- Now, click on Print/E-file 1099 Forms.
- Create a backup.
- Click on Get Started for the 1099 form you wish to create:
- If needed to create both 1099-NEC and 1099-MISC, repeat the steps for each one.
- Most businesses choose the Nonemployee Compensation, Box 1 on the 1099-NEC:
- However, check with your accountant to confirm if you have made other types of payments.
- 1099 form, for boxes 16 and 17, has different rules for the states of Wisconsin and New Jersey.
- Now, select:
- The vendors that need a 1099 form.
- Click on Continue.
- Then, check if the vendor information is correct:
- If not, you can edit any section by double-clicking on it.
- Press Continue.
- Now, map the vendor payment accounts:
- Navigate to the dropdown menu in the Apply payments to this 1099 box.
- Choose the account you wish to link the payment to.
- If you see any gray boxes, they are already mapped to the 1099 form.
- You only map accounts to one 1099 form.
- Click on Continue when the process is complete.
Important: You might see a red colored message stating that you do not match the current IRS thresholds. Click on Show IRS 1099-MISC filing thresholds and press Reset to IRS Thresholds to fix it.
- Review the payment information for exclusions:
- Click on View Included Payments or View Excluded Payments to check the detailed reports.
- Click on Continue.
- Now, check and verify the vendors and amounts you will be reporting.
- Press the Continue option:
- Click on View Summary Report to see the vendors who don’t meet the IRS threshold.
- Now, select if you want to print or e-file the 1099 forms.
Now, before proceeding to the next step, let us take a look at the steps to create the 1099 form for QB Mac.
QuickBooks Desktop for Mac
- Create a backup.
- Now, go to the Vendors section.
- Click on 1099 forms.
- Choose the Print or E-file 1099/1066.
- Click on one of the following:
- Get Started on 1099-NECs.
- Get Started on 1099-MISCs.
- If you need to create both, you would need to repeat the steps for each.
- Now, select the vendors that need a 1099 form.
- Verify if the vendor information is correct:
- You can edit the info by double-clicking on it.
- Press the Next option.
- Now, map the vendor payment accounts:
- Navigate to the dropdown menu under Accounts.
- Choose the account you wish to link the payments to.
- Any gray boxes represent the account being mapped to a 1099 form.
- You are only allowed to map accounts to a single 1099 form.
- Hit Next after completing.
- Review the payments you excluded:
- To view detailed reports, you can click on View Excluded Payments or View Included Payments.
- Select Next.
- Now, verify the amount and vendors you are going to report.
- Click on Next.
- Now, select if you want to print or e-file the 1099 form.
Now, look at the steps in the next section if you chose to e-file the 1099 form.
Step 3: Import the Data Into Tax1099
After you press the e-file button in the previous step, you will be provided with the steps on your screen to import the data into your Tax1099 account. After doing this, move ahead to the next step.
Step 4: In Tax1099, E-File the 1099 Forms
When you import your data into the Tax1099 account, your dashboard will display a list of the following:
- Vendors
- Amounts
- Boxes
Now, you would need to follow these steps:
- Select the vendor’s name:
- Or click the Edit button to edit the vendor or box information.
- Then, select Update.
- Any changes you make in Tax1099:
- It won’t be reflected in your company file.
- Enter the information in the dedicated state boxes if you need to file the 1099 form with your state.
- Check the boxes to select the vendors you want to upload to e-file.
- Click on Next.
- Any errors would appear as a pop-up message.
- After correcting them, set up vendors again.
- Hit Next.
- Now, mark the box next to the Date column to select the vendors.
- Check the box under USPS Mail or Email Recipient to:
- Choose how you want to send copies:
- To the recipient/vendors.
- For USPS Mail, there is an extra fee charged.
- Choose how you want to send copies:
- You can also choose the Download Multiple PDFs option to send vendors the copies yourself.
- If you need to file with your state, choose it here.
- Then, select Next or Calculate Tax1099.com Fee:
- To see the total filing fee.
- You are directed to the Payment page after you are finished with the Select Forms page.
- Click on Pay & Submit to e-file.
- Repeat the steps if you need to create both 1099-NEC and 1099-MISC forms.
Now, you can check your filing status after submitting the form by going back to the accounts.
Steps to Create and File the 1099 Forms in QuickBooks Online
You would need to follow the guided steps given below to create and file the 1099 form in QuickBooks Online.
Step 1: Create the 1099 Forms in QB Online
You have two options to create the 1099 forms in QuickBooks Online. So let us cover both one by one.
Option 1: Let QuickBooks Prep the Form for You
- Navigate to Payroll, followed by Contractors.
- Click on Prepare 1099s.
- Choose the option stating Let QuickBooks do it.
- Then, select the Get Started option.
- Now, ensure the following are correct and match what’s given in the tax notices from the IRS:
- Company Name
- Address
- Tax ID
- You can make any changes:
- By clicking on the Edit option.
- Choose the View results option.
- Review your 1990s.
Let us now see the second option.
Option 2: Prep the 1099 Form With QuickBooks Help
- Go to Payroll.
- Select Contractors.
- Then, click on Prepare 1099s.
- Now, choose the I’ll do it myself option.
- Select Get Started.
- Now, ensure the following matches the info on tax notices from the IRS:
- Company Name
- Address
- Tax ID
- You can click on Edit to make any needed changes.
- Then, press Confirm info and get started.
- Click on Select Accounts.
- Choose the accounts used for your 1099 expenses or payments.
- Select Add.
- Now, next to each employee, I added:
- Choose 1099-NEC or 1099-MSIC boxes, which represent the type of payments made to your contractors this year.
- Click on Next.
- Go to the Tracked for 1099 tab.
- Place a check mark for each contractor who should receive a 1099 form.
- Ensure the contractors’ personal info and email addresses are correct:
- Hit Edit to make any changes.
- Go to the Not tracked for 1099 tab if any contractor is missing.
- Click on Add to tracked list:
- To add the contractor to the:
- Tracked for 1099 tab.
- Hit Back.
- To add the contractor to the:
- Check and verify:
- The Reportable total amount for each contractor you selected.
- Click on Next.
- Select Preview.
- To view every 1099 from and review the amount in each box.
- Then, click on Continue to 1099-MISCs.
- View your 1099-MISC forms.
- Click on Next.
- Then, choose:
- Continue to the E-File option to e-file your 1099 forms.
Now, continue the process by looking at step 2 given below.
Step 2: E-File the 1099 Forms in QB Online
- After preparing the 1099s:
- Select the e-file option and verify the forms.
- Follow the guide on your screen to complete your federal e-file:
- And, if available, state e-file.
- You can review each contractor’s 1099 forms.
- If prompted, you can choose a delivery option for the contractor’s copies:
- Extra charges may apply if you need to mail the copies to the contractors.
- If you don’t see this option, it means you have already given your contractors online access to their 1990s when you added them in QuickBooks.
- If the email address is wrong, update it in QB Online.
- Now, enter your billing information if you are asked to.
Now, you would be able to check your filing status.
Step 3: Check the Status of Your 1099 E-File
- Go to Taxes.
- Click on 1099 filings.
- View the status of the e-filing:
- Present under the Filing status.
- Click on View 1099:
- To view a PDF copy.
This would complete the process of QuickBooks 1099 e-file on the Online platform.
Conclusion
This blog explains the 1099 form in QuickBooks, which is used for payout calculations and payroll management for employees. This form contains all the essential information, like the Name, Contact details, ID, and email to verify and confirm. Moreover, we have discussed and listed the steps on how you can get QuickBooks 1099 e-file print in different versions of QB, like online and desktop. If you need help with the QuickBooks 1099 e-file, you can contact our Accounting Helpline’s experts today at 1.855.738.2784!
FAQs
How do I e-file 1099 in QuickBooks Desktop?
When you want to e-file a 1099 in QuickBooks Desktop, follow the steps to do it effortlessly:
– Select the vendor name.
– Tap on the Edit button to make changes.
– Write down the essential information in the boxes that need to be filled.
– Click on the vendors you want to utilize for e-filing.
– Then click Next.
– Verify the box next to the Date column.
– Select the 1099 form you wish to complete.
– Then, tap on Next.
– Now, you’ll be redirected to the payments page.
– To input the payment details, you are required to choose the Pay & Submit option.
How to Print 1099 in QuickBooks Mac?
The process for printing the 1099 e-file in your QuickBooks Mac is different from Windows. You can follow the steps:
– Open the File Menu.
– Select ‘Print Form 1099’.
– When you notice the 1099 wizard pops up, click on ‘Get Started’.
– Select vendors who are applicable for the 1099 form.
– Double-click on the vendor’s name to edit.
– Click on ‘Next’ when done.
– Next, click on the ‘Print 1099’ option.
– First, print on the blank paper to check the alignment.
– Modify the alignment settings if it doesn’t line up perfectly.
– After perfect alignment, select all the vendors you want to print. Then click on the ‘Print 1099’ option.
– Confirm the printer settings and start printing.
Explain the changes that can be made in the 1099 form after submission
There are only limited things you can change or correct in your 1099 form after it has been submitted.
– The address.
– Amount is entered incorrectly.
– If you forgot to tick any box.
– Incorrect box number reporting.
– Did not file the 1099 beneficiary.
– Name.
– Wrong Tax ID.
– Incorrect Recipient Name.
Related Posts-
8 Easy Methods to Patch the QuickBooks Error 15102
How to Download and Install QuickBooks Desktop and Activate It
QuickBooks Migration Failed Unexpectedly: Here’s What to Do Now
QuickBooks Error 6123, 0- Fix with Expert Guide
Fix QuickBooks Error 1722 With Expert Tips and Solutions
How to Fix QuickBooks Error 12031- Answered by Experts

Edward Martin is a Technical Content Writer for our leading Accounting firm. He has over 10 years of experience in QuickBooks and Xero. He has also worked with Sage, FreshBooks, and many other software platforms. Edward’s passion for clarity, accuracy, and innovation is evident in his writing. He is well versed in how to simplify complex technical concepts and turn them into easy-to-understand content for our readers.