Last Updated on April 23, 2026
QuickBooks multi-user setup is a helpful feature that you can set up if you manage a growing team and intend to increase productivity in your accounting tasks. You can switch from single-user mode to multi-user setup in QB Desktop, as it enables many users to work on the same company file altogether without interfering with one another. Your version of the application, such as QuickBooks Enterprise, Desktop, Premier, or any other version, will work the same way.
It provides security, cooperative access to vital financial data, along with efficiency. Everything you need to know about QuickBooks multi-user setup is covered in this article, including system requirements, precautions, the process to download and install, benefits, and more. We will help you with everything from QuickBooks networking and multi-user setup to server configuration.
Our specialists are just a call away to provide professional assistance with the QuickBooks multi-user setup. Reach out at 1.855.738.2784, and our Accounting Helpline’s experts will guide you.
What is Multi-User Setup in QuickBooks Desktop?
Intuit developed the well-known accounting program QuickBooks for payroll, business management, and other associated tasks. It has many features and tools that make accounting easier, automate payroll, and guarantee excellent security. QuickBooks multi-user mode is a feature that enables more than one user to access and work on the same company file over a shared network.
This feature is available across various editions, including QuickBooks Premier, Desktop, and Enterprise. You can assign each user different accounting tasks, like entering transactions, running reports, and reconciling accounts simultaneously, without any interference with each other.
Basic Requirements to Set Up Multi-User in QuickBooks Desktop
The following requirements are to be met by both the QB program and your system before you set up the QuickBooks multi-user setup.
- Ensure that a licensed copy of QuickBooks is installed on each workstation.
- Have a properly networked environment (LAN or dedicated server).
- Make sure that you have installed the QuickBooks Database Server Manager on the host system.
- Verify the right user permissions through Windows.
- Make sure that the company file is stored on a shared folder or server.
- Ensure that the computer you are using has a compatible operating system like Windows 10, 11, Server 2016 or later.
- One user license per concurrent user.
Note: Multi-User Mode is not supported in QuickBooks Simple Start or QuickBooks Desktop Mac versions. You have to use a 2022 or newer version for the best compatibility with the latest QuickBooks Database Server Manager (QuickBooksDB32 and up).
After meeting these system requirements, you can move ahead to the following section to learn about the QuickBooks Enterprise license for multi-user mode access across different versions.
License Access Level for QuickBooks Multi-User Setup Across Different Versions
The QuickBooks multi-user network setup has certain user limitations for the number of users that can access it simultaneously across different versions. Check out the table below to learn how your version of the QB program impacts the number of licensed users on a company file.
| QuickBooks Versions | Number of Licensed Users |
| QuickBooks Pro | Up to 3 users. |
| QuickBooks Premier | Up to 5 users. |
| QuickBooks Enterprise | Up to 30 users. |
- The company files need to be stored on a central host.
- Each user should have a different QuickBooks login ID and password.
- The host computer storing the company file must always be turned on to allow users access.
In the next segment, we have listed out the precautions that you should consider before you switch from single mode to QuickBooks multi-user setup.
Precautions to Take Before Switching from Single to Multi-User Mode in QuickBooks Enterprise
Listed below are some factors to consider before you switch to the QuickBooks multi-user setup from the single-user setup.
- Ensure that you are using the latest released version of QuickBooks Enterprise, Desktop, Premier, or other software installed on your computer.
- Also, verify that all the workstations are compatible with the same version and update as your software.
- Store your company file in a shared location on a host computer or server.
- Download and install a licensed copy of the QuickBooks program on every local workstation to prevent conflicts in the network.
- Modify and add Windows Firewall exceptions for QuickBooks to prevent any connectivity issues.
- Ensure that the QuickBooks service users have the required administrator permissions on Windows.
- Create a local backup of your QuickBooks company file and set automatic backup as well.
If you fail to follow these steps or do not take any precaution, then it might lead to corruption or damage to the company file or create access issues in the QuickBooks multi-user network setup.
Hosting Modes for Multi-User Setup in QuickBooks Desktop
There are three modes of hosting to choose from in QB Desktop while setting up the multi-user mode. We will discuss the differences across each, as well as which one is suitable for you.
Dedicated Hosting
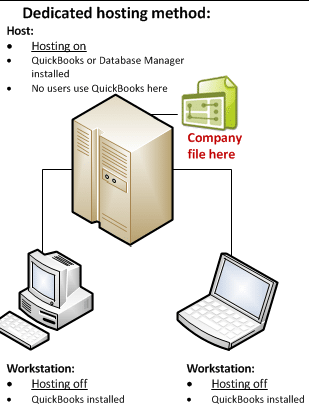
With the dedicated hosting method, a physical server system stores the company’s files that can be shared via the network. The physical server system will solely be the dedicated host of the network; therefore, you will not use QuickBooks on it. You can connect workstations to the host server and use it. This is ideally suited for large businesses that have a high demand for resources and customization needs.
Peer to Peer Hosting
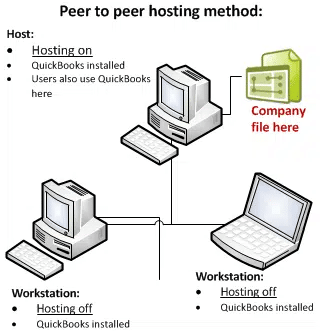
In the peer-to-peer hosting method, one workstation acts as the host system, storing the company file to share over the network and also providing access to QuickBooks Enterprise. This method is preferable for small businesses that ideally wish to manage the data and company files on their own setup.
Alternate Hosting
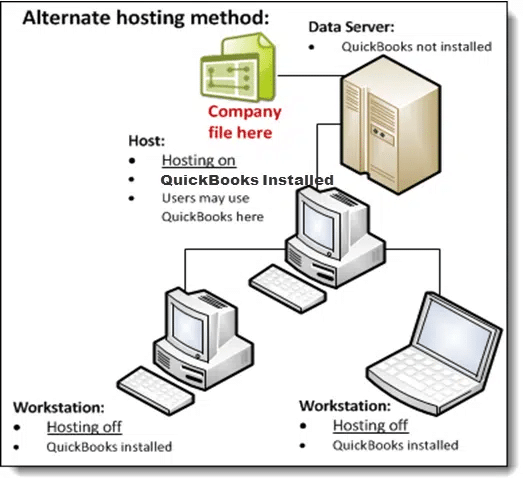
The alternate hosting method is a hybrid of the other two methods. It may sound complex to understand, but we will help you understand it simply. Picture this: there is a physical server system, just as we discussed in dedicated hosting, and then a workstation is used to access the host system.
After that, the primary workstation that is connected to the host is used by additional workstations in a similar way to peer-to-peer hosting. It lets multiple users access company files, but they do not have a direct connection or access to the host system.
Now, let’s delve into how you can set up multi-user in QuickBooks Enterprise and switch from single-user mode, so that more than one user can access the company file.
Simple Steps for Switching to QuickBooks Multi-User Setup from Single-User Mode
In order to enhance collaboration across different teams, you can switch from single-user mode to a multi-user setup in QuickBooks Desktop. With this, more than one user can perform business tasks on the same company file via a secure shared network. To enable the QB multi-user mode setup, you can go through the steps outlined below.
Download and Install QuickBooks Desktop
First of all, you have to download and install the latest version of QuickBooks Enterprise, Desktop, or any other versions on both the server (host) computer and all the workstations (user systems) for accessing the company file.
- Head to the Intuit website and download your preferred QB version.
- Hit the Windows key + E to open the File Explorer and locate the downloaded setup file.
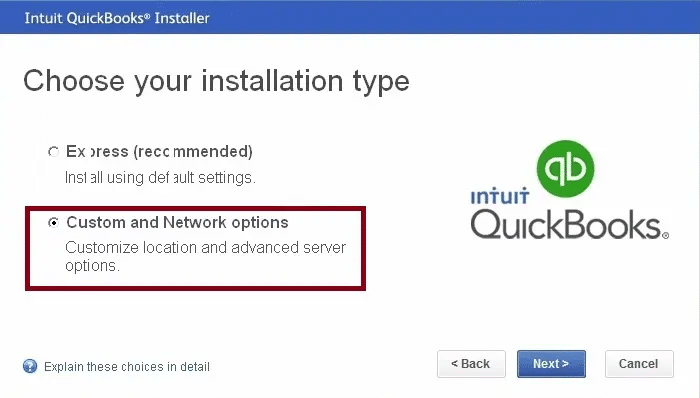
- Click on the setup file and choose “Custom and Network Install” instead of the default install.
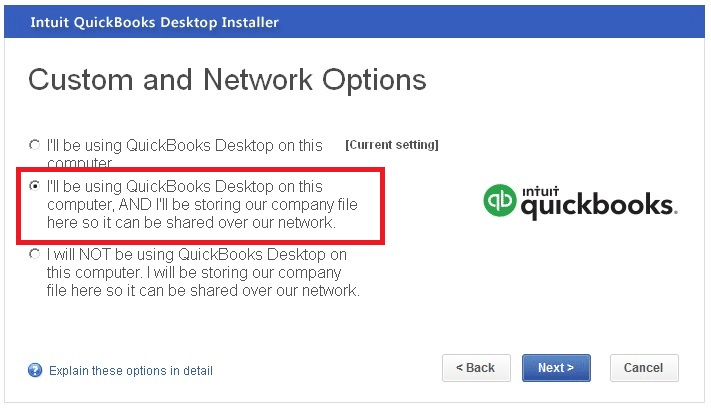
- Further, select one of the following hosting options:
- If you will use this system to host QuickBooks as well as run it, then choose “I’ll be using QuickBooks Desktop on this computer, AND I’ll be storing our company file here so it can be shared over our network.”
- If this system will only be used to host QuickBooks, then choose “I will NOT be using QuickBooks Desktop on this computer. I will be storing our company file here so it can be shared over our network.”
- Then, you can follow the given instructions to complete the installation.
- Be sure to select Multi-User Host Installation in the prompt tab.
Once you are done installing QB on the host system, along with the user systems, with the appropriate installation type, move on to the following step to configure the QuickBooks multi-user setup.
Turn on the QuickBooks Multi-User Host Access
Now that you have installed the QB application, you have to enable the multi-user hosting on the server computer that you have chosen to store the company file for access. You can take the following steps to do this and allow multiple user access simultaneously.
- On the host system, kick off QuickBooks Desktop.
- Expand the File menu and select Utilities.

- Select the Host Multi-User Access option from the expanded column.
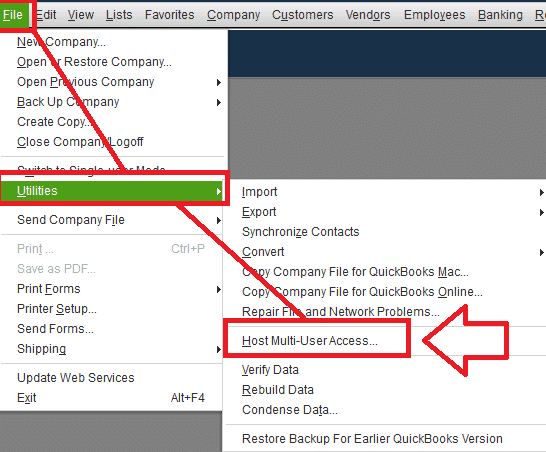
In case you see the Stop Hosting Multi-User Access then skip this step as the hosting is already enabled. Once done, move on to the next step to scan your company file by using the QuickBooks Database Server Manager to ensure that it’s properly registered and accessible via the network.
Run Company Files Scan via QuickBooks Database Server Manager
After you have successfully enabled the hosting, you will have to scan the folder that contains your company file. This tool ensures that the company file can communicate over the network in the QuickBooks multi-user setup.
- Hit the Windows key to open the Programs list.
- Locate and choose the QuickBooks application, and then tap on it to open the QuickBooks Database Server Manager.
- Once it opens, navigate to the Scan Folders section.
- Click the Add Folder button, then locate the folder containing your company file.
- Select the said folder and then click OK to add it to the scan list.
- Hit the Start Scan button, and the scanning process will begin.
- The utility will scan, detect, and list the files in the scanned folder.
- Once the scanning procedure is over, tick the folder with a checkmark and hit Close to exit the tool.
Your system is now prepared to set up user accounts and permissions for a secure QuickBooks multi-user network setup, as the folders have been registered for network access. We have addressed how you can prepare the company file to set up multi-user mode in QB Enterprise in the following section.
Prepare the Company File for QuickBooks Multi-User Setup
Before users can start accessing the company file, it’s required to assign user roles, create logins, and configure passwords to limit access and maintain data integrity across your QuickBooks system. To do so, take the steps below and QuickBooks Multi-User Setup.
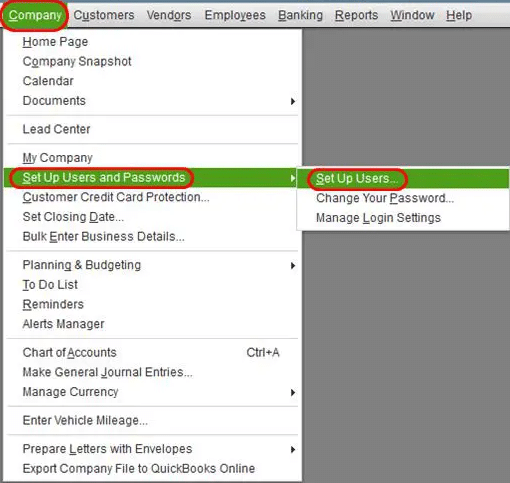
- On the server system, launch QuickBooks Desktop.
- Open the Company menu and click on Set Up Users and Passwords.
- Choose the Set Up Users, then in the user management window, tap Add User.
- Type a distinct username and password for each user to access the company file.
- Assign the user roles and permissions, depending on the tasks such as sales, accounting, admin, and more.
You will have to repeat this process to add each user and give them access. By assigning users with unique credentials and permissions, you can protect sensitive financial data and be assured that only authorized users can carry out certain tasks. Now that user accounts have been set up in the QuickBooks multi-user server, the next step is to initiate and verify multi-user access from different workstations.
Log In to the Company File from Additional Workstations
After you are done completing all the previously listed steps, you can now proceed to log in to the shared company file from user workstations on the network. Verify and confirm when you can seamlessly access the QuickBooks multi-user setup, and it’s working smoothly.
- Turn on the host computer and ensure that it’s linked to the network.
- Open QuickBooks Desktop on each workstation.
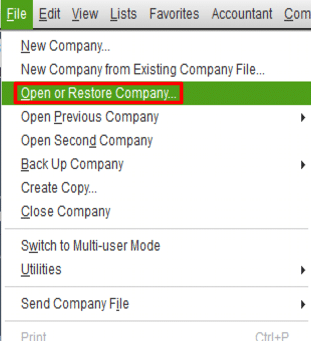
- From the expanded File menu, choose the option to Open or Restore Company, followed by Open a company file.

- Browse to the network location of the shared company file and select it.
- If asked, then enter your username and password.
- Once the file opens, open the File menu and click on Switch to Multi-User Mode.
- Click Yes on the confirmation window to activate the multi-user mode in the workstation.
You have now finished configuring the multi-user setup in QuickBooks Desktop and completed login from different workstations. Your company file can now be worked on by several users simultaneously with team-based access, which will improve accounting efficiency and increase productivity.
What are the Benefits of Using the QuickBooks Multi-User Setup?
There are several advantages that you can get with the QuickBooks networking and multi-user setup. You can go through some of the key benefits listed below:
Improved Collaboration
- Multiple users can be authorized to work together on the same company file and enter data, reconcile accounts, and generate reports.
- You will notice increased output and productivity with seamless teamwork across various departments by using the QuickBooks Multi-User Setup.
Concurrent Updates
- All the users who are added to the company file will be able to view changes made by other users.
- Multi-user setup in QuickBooks Enterprise ensures that the financial data is accurate and will help in preventing any data conflicts or repeated work.
Centralized Data Storage
- Since the company files are stored on a centralized host server, they can be accessed by all the authorized users with limitations based on their roles and permissions.
- Through this, QuickBooks Desktop multi-user setup helps build an organized workflow and eliminates the need to transfer files manually.
Enhanced Security
- The company files will only be accessible to authorized users; anyone else will not be able to see or alter critical financial data.
- The company files are also protected with a password and offer enhanced data security, so that you can ensure that data is secure by customizing user roles and permissions.
Scalability
- QuickBooks multi-user mode setup can be beneficial for businesses of all sizes, as they can add more users as per their needs.
- This feature ensures expansion without the need for any additional software updates or interruption in current processes.
Reduced Downtime
- Each user can complete their tasks by themselves on the individual workstations without having to wait for others to finish working.
- This helps reduce time wastage for teams and ensures that business processes can run smoothly without any disruption to the workflow.
The multi-user setup in QuickBooks Desktop ensures improved collaboration across teams and departments, helps in maintaining secure and centralized data, and expands operations efficiently. It also helps in reducing the downtime faced by companies due to interrupted workflow.
How To Manage QuickBooks Multi-User Setup Efficiently?
If you want to ensure a seamless QuickBooks Enterprise multi-user setup, then confirm that you follow and comply with the following procedures.
- Be sure to regularly back up your company files to safeguard them from corruption or data loss. Moreover, schedule regular backups, as they guarantee data integrity and enable speedy recovery in case of any issues.
- In order to reduce the data conflicts that might occur, prioritize training the users about the multi-user setup. If your team members are educated about the setup, then it will not only improve teamwork but also prevent simultaneous changes to the same transactions on the company file.
- You should only assign roles to authorized employees and limit the users’ access to sensitive data. By setting strict user permissions, you can improve data security and avoid any operational confusion from arising.
- Ensure that you keep an eye on system and network performance, particularly during periods of high usage. To keep performance at its best in a QuickBooks multi-user setup, you should keep the network and hardware components up to date with the latest technologies.
- Ensure that your version of QuickBooks Enterprise is the latest version, which was released recently. Moreover, regularly updating to the newest version gives you access to the latest features, resolved bugs, and enhanced security for efficient operation.
If you follow these practices and precautions, you will be able to manage the QuickBooks multi-user mode setup in a secure, efficient, and collaborative manner.
Detailed Procedure for QuickBooks Multi-User Network Setup – Step by Step
Let’s delve into this section to the steps you need to perform for QuickBooks multi-user setup in the Desktop version, and ensure that the network, hosting configuration, and user permissions meet the required standards to support access in a secure and reliable manner. Do remember that you have the company files stored on the local hard drive of your host system to ensure better performance while you access files in a multi-user setup in QuickBooks Desktop.
Download and Install QuickBooks
Take the steps outlined to download and install your preferred version of the QB application to set up multi-user in QuickBooks Enterprise. Multiple licenses can be bought, or you can use the same license of QB Desktop across numerous computer systems, but remember that only one user will be able to access the company file at once.
- Visit the Intuit website and download the preferred QuickBooks version.
- Open the downloaded installation file in your File Explorer.
- Now, install the application by selecting “Custom and Network Install” as the installation type and hitting Next.

- Then select the “I’ll be using QuickBooks Desktop on this computer, AND I’ll be storing our company file here so it can be shared over our network” to get the full version on the host system.
- Or, choose “I will NOT be using QuickBooks Desktop on this computer. I will be storing our company file here so it can be shared over our network.” option to use the server system only for hosting files.

- Now, install the application by selecting “Custom and Network Install” as the installation type and hitting Next.
- Then, take the steps as you are instructed to finish the installation process.
- Lastly, you need to choose the multi-user host installation.
After you have installed the latest release version of QB Enterprise or the Desktop application, you can move on to the next step for switching on the QuickBooks multi-user setup for hosting.
Enable Multi-User Mode for Hosting
With the multi-user setup in QuickBooks Desktop, more than one user can work on the same company file. Follow the steps outlined below to set up multi-user hosting, allowing users on the network to access the host server.
- Open QuickBooks Enterprise on the server computer.
Note: You might be asked to ‘Update the Company File’ to ensure compatibility. - Open the File menu, as shown below, and click on Utilities.
- Then, select the Host Multi-User Access option.
- Lastly, follow the displayed instructions to finish QuickBooks multi-user setup hosting.
By following the process above, you will prepare the server computer to share access to the company file with other users on the network. Now, before we proceed with QuickBooks Enterprise multi-user setup, take the method as outlined to modify firewall and security settings to prevent any error from occurring.
Update the Firewall and Security Settings for Desktop
By configuring the firewall and security settings, you can prevent any issues from arising while you attempt QuickBooks multi-user setup. You can take the steps outlined below to add Firewall exception rules for QB Enterprise.
- Hit the Windows key and type “Windows Defender Firewall” in the search box.

- Open and select Advanced settings from the left tab.
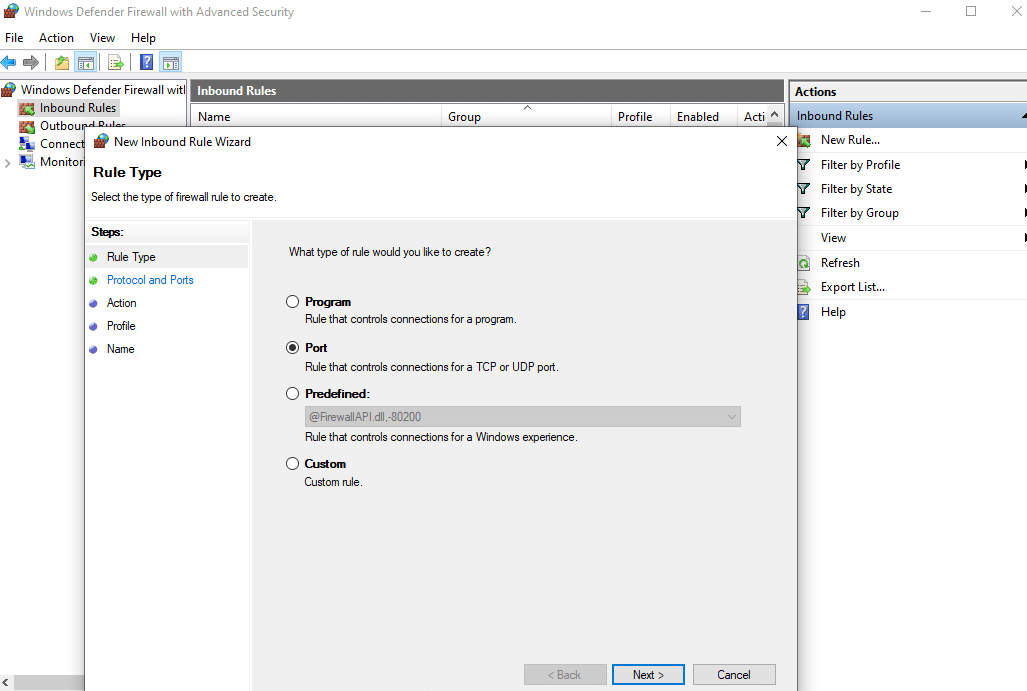
- Next, select Inbound Rules and hit the New Rule button.
- As shown in the image below, select Port, then Next.

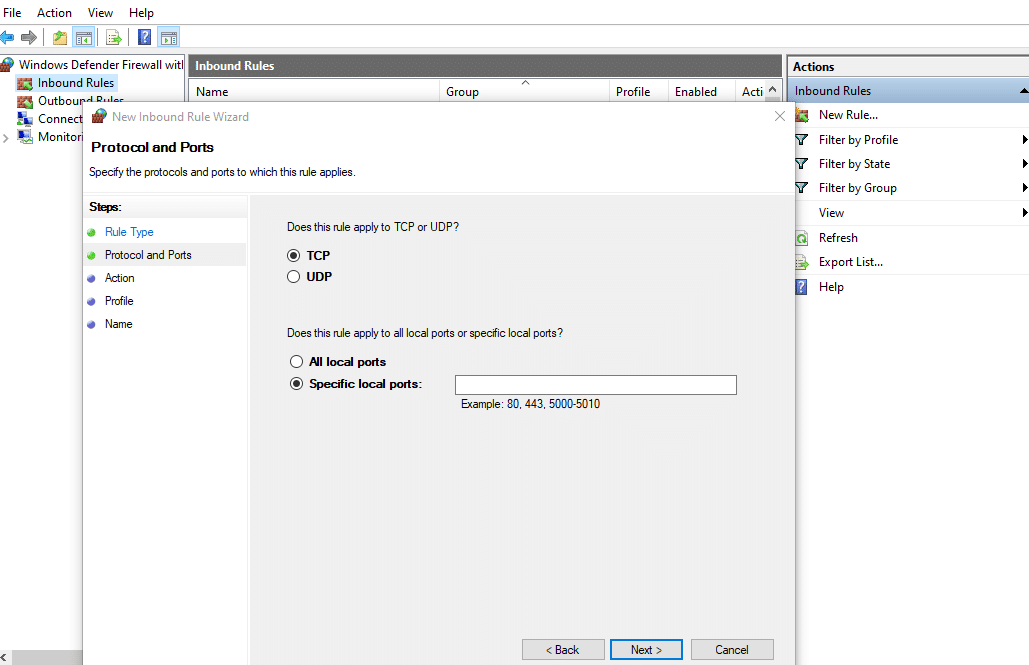
- Next, choose the TCP option, as shown in the above image, and enter the necessary ports for your version of QuickBooks in the box next to ‘Specified local ports:’.

- You must add ports for each year’s version, as listed below, if you have several versions.
- QuickBooks Desktop 2020
- and later: 8019, XXXXX. (XXXXX is the assigned port number found in QuickBooks Database Server Manager)
- QuickBooks Desktop 2019: 8019, XXXXX.
- QuickBooks Desktop 2018: 8019, 56728, 55378-55382
- QuickBooks Desktop 2017: 8019, 56727, 55373-55377
- QuickBooks Desktop 2016: 8019, 56726, 55368-55372
- QuickBooks Desktop 2015: 8019, 56725, 55363-55367
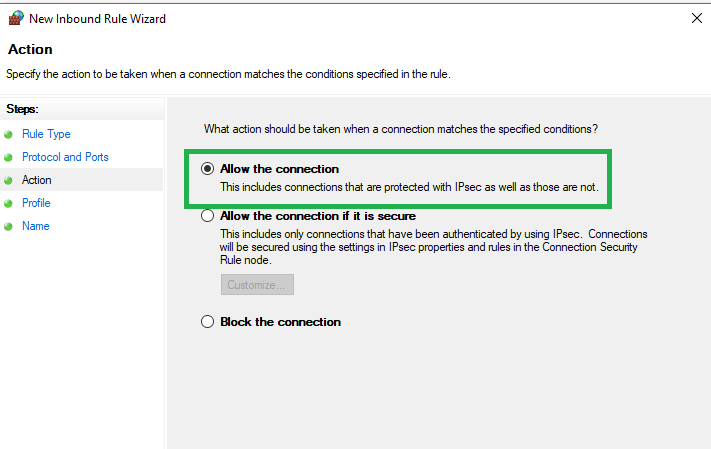
- After you are done, hit Next, then select the Allow the Connection option, as shown below.

- After making sure that every profile’s checkbox is marked, click Next.
- Give the new rule you created a name, such as “QBPorts(Year),” and press Finish.
- To create Outbound Rules, simply follow the same steps from Advanced Settings.
Once you’ve finished this procedure, you can go ahead and open the QuickBooks Desktop multi-user setup. To share the company files, follow the process outlined below to configure the folder and Windows access permissions.
Modify the Folder Permissions To Share Company Files
Follow this method for configuring the folder and Windows access permissions so that you can share the company files for the QuickBooks multi-user network setup.
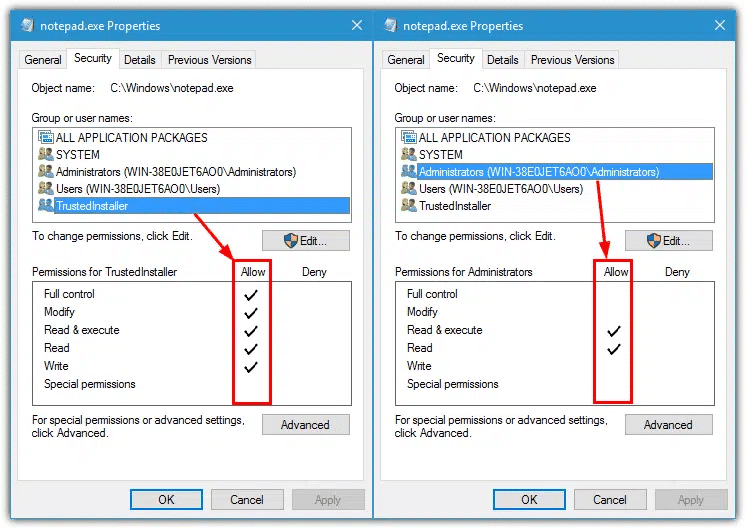
Verify the Default Folder Permissions
You can follow the steps below to verify whether the folder permissions are set correctly to support the multi-user setup in QuickBooks Enterprise.
- Open the Windows File Explorer on your system.
- Navigate to the folder containing the QB company files.
- Select the said folder and select the Properties option from the menu.
- Click on the Security tab in the Properties window.
- Next, locate and hit the Advanced option from the Security tab.
- Now, find and select QBDataServiceUserXX for your QB version.
- Then, hit Edit to make changes.
- Now, configure the settings to permit the following:
- Traverse folder/Execute file
- List folder/Read data
- Read attributes
- Read extended attributes
- Create files/Write data
- Create folders/Append aata
- Write attributes
- Write extended attributes
- Read permissions
If the folder permissions are not set correctly, then you can take the steps outlined below on your version of the Windows operating system for the QuickBooks Premier multi-user setup.
Set the Folder Permissions Correctly
If you want to set up QuickBooks for multi-user access, then you will have to configure the folder permissions correctly. In order to do that, follow the procedures listed below for your version of the Windows operating system.
For Windows 11:
Take these steps to change the folder permissions for sharing the company files, for QuickBooks multi-user setup on Windows 11.
- Select the folder that contains the Company File.
- Next, tap on the Properties option and click on Security.
- After opening Security, select the Edit option.
- Locate and click QBDataServicesUserXX, then choose Allow and tick Full Control.

- Once done, hit Apply followed by OK.
- Finally, configure Windows access permissions so that you can share company files.
For Windows 10, 8, 7
In order to share the company files, you can take the following steps and modify the folder permissions for QuickBooks multi-user setup on Windows 10, 8, and 7.
- Press Win + E to launch File Explorer.
- Locate the folder that contains the company files.
- Once you have discovered it, select it.
- Tap Properties and sharing, then select the share option.
- Find and click on QBDataServiceUserXX.
- Finally, tick the Full Control checkbox and hit Share.
Once this procedure is complete, you will be able to share the company files without any issues for the QB multi-user mode setup. Go to the following method to scan the company file with the QuickBooks database server manager utility.
Scan File with QB Database Server Manager
You can run a scan of the QB company file by using the QuickBooks database server manager Utility. Take the steps listed below in the same manner to do so, without any hassle.
- Open the Start menu and enter Services in the search box.
- Navigate to Services and locate the QuickBooksDBXX (XX is the QB version number).
- Head to the General section and find the Service status.
- If the Service status is labeled as Started or Running, then hit Stop next to it.
- Now, in the Startup type, click on Automatic.
- Open the Logon section and choose Local System account.
- Go to the Recovery section, then click on Restart the Service for the following:
- First Failure
- Second Failure
- Subsequent Failures
- Head back to the General section and then choose ‘Start’ to reboot the QB database server manager.
Any network issues will be resolved after you have completed this process, and the company file will be seamlessly accessible over the network. After completing the scan, you should update the Windows administrator permissions for the QuickBooks multi-user setup.
Update Windows Admin Permissions to Configure QB Multi-User Setup
In order to fully configure the multi-user setup in QuickBooks Enterprise, you must update the administrator permissions, as they are a key factor. Follow the steps below based on your Windows version to change the admin permissions for a new user.
For Windows 10
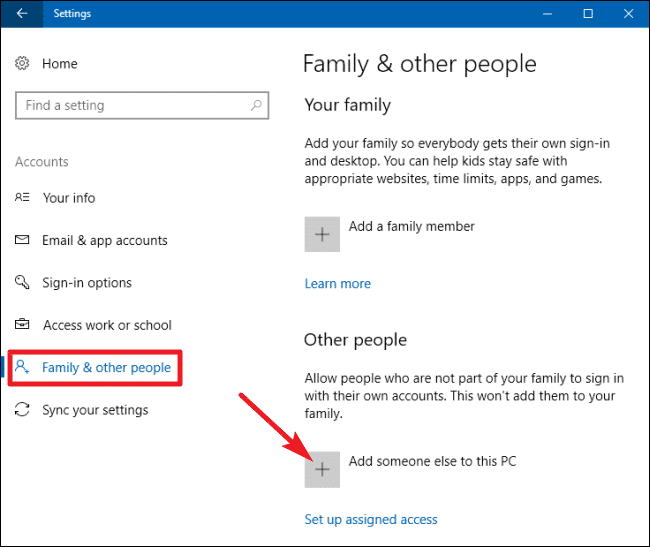
In order to make sure that QuickBooks Enterprise works smoothly in multi-user mode, you will have to create a new Windows user with admin permissions by following the steps below.
- Expand the Start menu and head to Settings.
- Then click on Accounts and navigate to Family & other users.
- Click on the Add someone else to this PC option.

- Proceed with the I don’t have this person’s sign-in information
- Then choose the Add a user without a Microsoft account option.
- Now, create a username and password for the new user, then click Finish.
- Select the created account, click on Change account type, select Administrator, and click OK to confirm.
For Windows 8 and 7
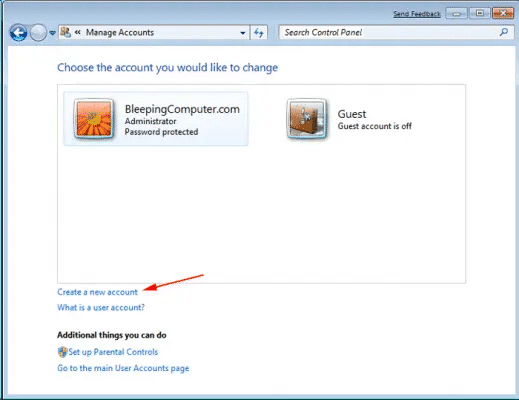
You can create a new Windows user on operating systems like Windows 8 and 7 with admin permissions by following the steps below to configure the QuickBooks Enterprise multi-user setup and ensure smooth access.
- Press Ctrl + R to open the Run dialog box
- Type in the Control Panel in the dialog box, and press Enter.
- Next, click on the Manage another account option under the User Accounts section.
- Now, choose the QBDataServiceUserXX from the dropdown, for the version of QuickBooks Desktop you are using, such as:
- QuickBooks Desktop 2024 – QuickBooksDB34
- QuickBooks Desktop 2023 – QuickBooksDB33
- QuickBooks Desktop 2022 – QuickBooksDB32
- QuickBooks Desktop 2021 – QBDataServiceUser31
- QuickBooks Desktop 2020 – QBDataServiceUser30
- QuickBooks Desktop 2019 – QBDataServiceUser29
- QuickBooks Desktop 2018 – QBDataServiceUser28
- Then, tap on the Create a new account option.

- Enter a name for the new user, select Administrator, then click Create Account.
Once the new Windows administrator account is created, you can proceed with setting folder permissions for the QuickBooks multi-user server setup. Move on to the following procedure to access the company file that is stored on a remote computer.
Accessing Company File Stored on a Remote Computer
In order to start working on a QuickBooks company file that is stored on a remote computer, you can follow the steps outlined below to ensure proper multi-user access and setup.
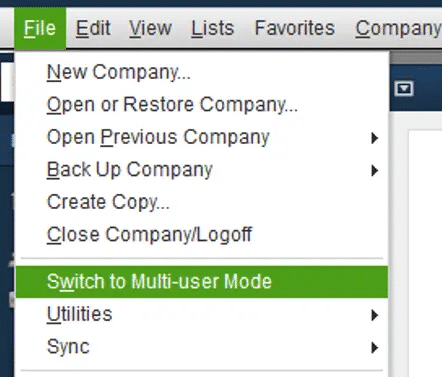
- Head to QuickBooks and navigate to the File menu.
- From the menu, select the Switch to Multi-User Mode option.

- You will be displayed the Multi-User Setup Hosting window, click Yes.
- Then, tap OK in the Multi-User Setup Information tab to proceed.
- Now, go to Company and navigate to Set Up Users and Passwords.

- There, click on Set Up Users and hit Add User to include the expected users.
Once you have completed this procedure, the remote company file will be ready for access through the QuickBooks multi-user network setup, so that multiple team members can work collectively on it seamlessly.
Different Features Across Single-User and Multi-User Setup in QuickBooks Desktop
Although with single user mode, only one person can access and work on a company file at a time, it has certain tasks and features that you may not be able to use in the QuickBooks Premier multi-user setup. The primary benefit of the multi-user mode in QB Desktop is that it allows for several users to access a shared company file and work on it simultaneously.
Company File Operations
| Tasks/Features | Single-user mode | Multi-user mode |
| Create a local backup | Yes | Yes |
| Set up/activate online backup | Yes | Yes |
| Create a portable company file | Yes | No |
| Convert the company file | Yes | Yes |
| Repair file and network problems | Yes | Yes |
| Stop hosting multi-user access | Yes | Yes |
| Disable QuickBooks Manager | No | Yes |
| Verify data | Yes | Yes* |
| Rebuild data | Yes | No |
| Condense data (US only) | Yes | No |
| Update Web Services | Yes | Yes |
| Copy the company file for QuickBooks Online | Yes | No |
Entries with * indicate that only you can run a specific task or a feature in QuickBooks multi-user setup, but other users will not be able to do the same.
Managing Lists
| Tasks/Features | Single-user mode | Multi-user mode |
| Chart of Accounts | Yes | Yes/No* |
| Items list | Yes | Yes/No* |
| Other Names list | Yes | Yes |
| Customer and Vendor Type list | Yes | Yes |
| Price Levels/Price Rules | Yes | Yes |
| Templates | Yes | Yes |
| To Do | Yes | Yes |
| Add/edit multiple list entries | Yes | Yes |
* You will be able to add, edit, and remove list data, but QuickBooks Desktop multi-user setup prohibits you from merging.
Importing/Exporting Data
| Tasks/Features | Single-user mode | Multi-user mode |
| Import Excel files | Yes | Yes |
| Advanced import | Yes | No |
| Import IIF | Yes | Yes* |
| Import WebConnect files | Yes | Yes |
| Import timer activities | Yes | No |
| Import general journal entries | Yes | Yes |
| Export lists to IIF files | Yes | No |
| Export addresses to a text file | Yes | Yes |
| Export timer lists | Yes | No |
* IIF files can only be imported in QuickBooks Pro/Premier/Enterprise 2019 and newer.
Business Process/Workflow
| Tasks/Features | Single-user mode | Multi-user mode |
| Custom reporting | Yes | Yes |
| Set closing date | Yes | No |
| Set up a budget | Yes | Yes |
| Set up a forecast | Yes | Yes |
| Cash flow projector | Yes | Yes |
| Use the Business Plan tool | Yes | Yes |
| Manage fixed assets (US only) | Yes | No |
| Enter vehicle mileage | Yes | Yes |
| Prepare letters with envelopes | Yes | Yes |
| Enter customer transactions | Yes | Yes |
| Enter statement charges | Yes | Yes |
| Create statements | Yes | Yes |
| Assess finance charges | Yes | No* |
| Enter time | Yes | Yes |
| Income tracker | Yes | Yes |
| Lead Center | Yes | Yes |
| Change Item price | Yes | Yes |
| Vendor center | Yes | Yes |
| Enter vendor transactions | Yes | Yes |
| 1099 Wizard (US only) | Yes | No |
| 1099 Report (US only) | Yes | Yes |
| Create Checks/checks | Yes | Yes |
| Order Checks/checks | Yes | Yes |
| Reconciliation | Yes | Yes |
| Set up bank feeds | Yes | Yes |
| Change bank feeds mode (US only) | Yes | No |
| Reports center | Yes | Yes |
| Memorized reports | Yes | Yes |
| Scheduled reports | Yes | No |
| Commented reports | Yes | Yes |
| Advanced reporting (US only) | No | Yes |
| Process multiple reports | Yes | Yes |
| QuickBooks Statement Writer | Yes | Yes |
| Combined reports | Yes | Yes |
* Multi-user mode in QuickBooks Enterprise does not allow for first-time setup of finance charges.
Accountant-related Tasks
| Tasks/Features | Single-user mode | Multi-user mode |
| Create Accountant’s Copy | Yes | No |
| Save Accountant’s Copy | Yes | No |
| Send Accountant’s Copy to accountants | Yes | No |
| Send the company file, create a portable file | Yes | No |
| Accounting tools | Yes | Yes |
| Batch delete/void transactions | Yes | No |
| Batch enter transactions | Yes | Yes |
Employee and Payroll Activities
| Tasks/Features | Single-user mode | Multi-user mode |
| Employee Center | Yes | Yes |
| Payroll setup (Manual payroll) | Yes | No |
| Pay with direct deposit (US only) | Yes | Yes |
Preferences
| Tasks/Features | Single-user mode | Multi-user mode |
| Accounting | Yes | Yes/No* |
| Bills | Yes | Yes/No* |
| Calendar | Yes | Yes/No* |
| Checking/checking | Yes | Yes/No* |
| Desktop view | Yes | Yes/No* |
| Finance charge | Yes | Yes/No* |
| General | Yes | Yes/No* |
| Integrated applications | Yes | Yes/No* |
| Items and inventory | Yes | Yes/No* |
| Jobs and estimates | Yes | Yes/No* |
| Multiple currencies | Yes | Yes/No* |
| Payments | Yes | Yes/No* |
| Payroll and expenses | Yes | Yes/No* |
| Reminders | Yes | Yes/No* |
| Reports and graphs | Yes | Yes/No* |
| Sales and customers | Yes | Yes/No* |
| Sales tax | Yes | Yes/No* |
| Search | Yes | Yes/No* |
| Send forms | Yes | Yes/No* |
| Service connection | Yes | Yes/No* |
| Spelling | Yes | Yes/No* |
| Tax: 1099 (US only) | Yes | Yes/No* |
| Time and expenses | Yes | Yes/No* |
* Although with QuickBooks Desktop multi-user setup, you can make modifications on the My Preferences tab, the Company Preferences cannot be changed.
Print/Email Tasks
| Tasks/Features | Single-user mode | Multi-user mode |
| Printer setup | Yes | Yes |
| Print forms | Yes | Yes |
| Send forms | Yes | Yes |
| Shipping label (US only) | Yes | Yes |
Others
| Tasks/Features | Single-user mode | Multi-user mode |
| Synchronize contacts | Yes | Yes |
| Set up QuickBooks ODBC | Yes | Yes |
| Use Register | Yes | Yes |
| Use Calculator | Yes | Yes |
| Find | Yes | Yes |
| Search | Yes | Yes |
| Customize Favorites | Yes | Yes |
| Bulk enter company business details | Yes | Yes |
| Reminders | Yes | Yes |
| Alerts Manager | Yes | Yes |
| QuickBooks Messenger | Yes | Yes |
Wrapping Up
QuickBooks multi-user setup allows for multiple users to access and work on the same company file simultaneously, which boosts your accounting processes and enhances teamwork across departments. It is critical for businesses to set up multi-user mode in QuickBooks to improve team collaboration, accuracy in data, and overall efficiency in a secure manner. Through this guide, you will get an in-depth understanding of multi-user mode, along with how to set it up, its benefits, requirements, precautions to take, and limitations. QuickBooks Mac multi-user setup can be done easily as well for other versions like Premier, Enterprise, and Pro.
Encountered any issues during multi-user setup in QuickBooks? Contact our specialists by dialing 1.855.738.2784, and get expert help from Accounting Helpline’s experts.
Wanna know the best way to host QuickBooks in the cloud? Read through the referred guide to find out.
Frequently Asked Questions (FAQs)
How to set up QuickBooks multi-user mode?
If you want to switch to QuickBooks Multi-User Setup, then start by downloading the application on both the host computer and workstations. Then turn on the multi-user host access on the server computer. You may also run a scan of company files by using the QuickBooks database server manager. Now, start preparing your company file to store on the host computer to set up QuickBooks multi-user mode. Once done, use the additional workstations to log in to the company file.
How to set up QuickBooks server to host multi-user access?
If you want to turn on the host multi-user access to set up the QuickBooks multi-user server, then take the following steps.
– Launch QuickBooks Desktop on the server computer containing the company file.
– Locate and tap on the File menu, then place your cursor over Utilities.
– From the expanded column on the right, choose the Host Multi-User Access option.
You may see the ‘Stop Hosting Multi-User Access’ option indicating that the hosting is already enabled; therefore, you don’t need to repeat this process.
How to set up QuickBooks for multiple users?
If you want to switch to QuickBooks networking and multi-user setup, then you will need to install the QBDT application on a host computer and store your company file on it. Then, set up user permissions on different workstations for accessing and working on the company file simultaneously. You will be required to download and install the QuickBooks Database Server Manager to configure the server computer for managing access.
Related Posts-
Here’s How to Download QuickBooks Direct Deposit Form
QuickBooks Error 80029c4a: Here’s a Quick Method to Fix
Fix QuickBooks Error 3371 status code 11118/11104/1 With Hustle Free
Understanding QuickBooks Error 30159: Causes, Symptoms, and Solutions
How to Update QuickBooks Desktop to the Latest Released Version
QuickBooks Error H202 in Multi-User & Solutions to Fix it

Edward Martin is a Technical Content Writer for our leading Accounting firm. He has over 10 years of experience in QuickBooks and Xero. He has also worked with Sage, FreshBooks, and many other software platforms. Edward’s passion for clarity, accuracy, and innovation is evident in his writing. He is well versed in how to simplify complex technical concepts and turn them into easy-to-understand content for our readers.