
Last Updated on April 17, 2026
Do you get QuickBooks error 6106 when you try to open a new company file in the program? If so, then this comprehensive guide contains solutions to fix this error. Also, you will get to know the reasons that trigger this company file error in QB.
The 6106 error is a part of the 6000-series codes and can emerge in local and network setups. The numerous causes behind this error include corrupt configuration files, firewall restrictions, insufficient folder permissions, hosting problems, etc. If this glitch is interrupting your smooth operations, we recommend you follow the step-wise solutions mentioned below.
Under QuickBooks error 6106, users can’t open their company files. If you wish to get an expert onboard to resolve the QB company file error, we suggest you reach out to our Accounting Helpline’s experts. Our proficient team will be on your case right away.
Causes of QuickBooks Error 6106 193
Do you want to know why you see QuickBooks error 6106 193? Here is the list of causes prompting this error:
- Corrupted configuration files, including Network Descriptor (.nd) and Transaction Log (.tlg) files, may cause this error.
- When the firewall causes restrictions in access to QuickBooks and the app’s proper functionality, this error may arise.
- Using an old and outdated QuickBooks Desktop version can trigger the error 6106.
- A corrupt QB company file can cause this 6000-series error.
- Misconfigured hosting settings can lead to this error.
- Incorrect or insufficient folder permissions may initiate this error.
- A faulty QuickBooks installation can also be a source of this error code.
- Damage to the location where your company file is stored can result in QuickBooks error 6106.
- Third-party applications and other background interferences may be responsible for triggering this error on your system.
- The file path surpasses the limitations set by QB, leading to this error.
Case 1: General Troubleshooting Approaches for QuickBooks Desktop Error 6106
We’ll look into the troubleshooting tricks for QuickBooks Desktop error 6106 in three cases.
- First would be general solutions to try when you get this error.
- When you launch the file locally, the second set of solutions will apply to this error code.
- The third set of solutions will cater to your needs when you face this code in a network setup.
Let’s proceed with the general solutions to follow when QuickBooks error 6106 appears on the screen:
Fix 1: Get The Latest QuickBooks Update
The first solution we recommend you try is to update QuickBooks Desktop so you have access to latest features and improvements in the application. Every QuickBooks update brings with it a number of enhancements like security patches, common bug fixes, new features, etc. Therefore, when you get this error, the first thing you should check is if you have the latest release as follows:
- Exit any currently active company files and the QuickBooks Desktop program.
- Press the Windows logo to launch the Start menu.
- Type “QuickBooks Desktop,” right-click on the application’s icon in the result field.
- Choose “Run as administrator“ from the list of options after right-clicking on QB.
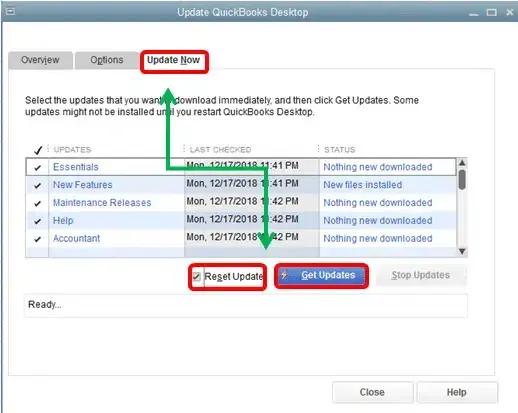
- Upon reaching the No Company Open screen, go to the Help menu.
- Select “Update QuickBooks Desktop.”
- Choose the Options button and click “Mark All.”
- Click Save to secure your selections and switch to the Update Now tab.
- Tap the checkbox labeled “Reset Update.”
- Click “Get Updates” when you are ready.
- After updating QuickBooks Desktop, close and then reopen the application.
- Select “Yes” to implement QB updates.
- Once the installation of the QuickBooks update is over, restart your system.
Fix 2: Let QuickBooks File Doctor Help
If updating QuickBooks Desktop doesn’t work, the next solution to try for the 6106 error in QB is the File Doctor tool. This excellent tool is available in QuickBooks Tool Hub to help you resolve problems with your company file. So, when you are unable to launch your company file, try using this tool as follows:
Section 1: Download and Install QuickBooks Tool Hub (If You Haven’t Already)
- Exit QuickBooks and any company files currently displayed on-screen, then open your web browser.
- Download QuickBooks Tool Hub on your system from the official Intuit website before proceeding.
- Click the download link and store the QuickBooks Tool Hub installation files in a location that is conveniently accessible, like the desktop or downloads folder.
- Once the download ends, navigate to the saved location, extract the files, and double-click QuickBooksToolHub.exe to start the installation.
- Follow the on-screen InstallShield instructions, which include accepting the License Agreement, to finish the installation smoothly.
- After installation, you can start to use QuickBooks Tool Hub.
Section 2: Use QuickBooks File Doctor

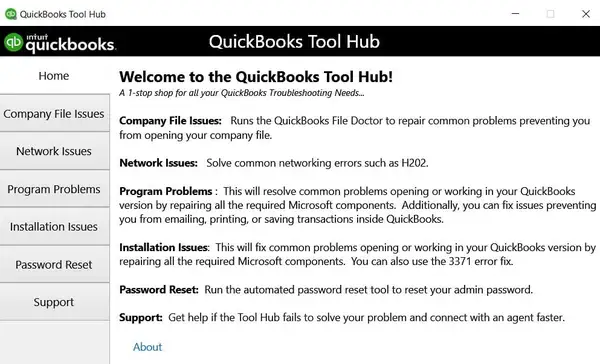
- Initiate the QuickBooks Tool Hub once the installation is over.
- Hit Company File Issues within the QuickBooks Tool Hub sections.
- Tap “Run QuickBooks File Doctor.”
- Upon launching, identify and select the company file you wish to scan and repair. If it doesn’t appear in the drop-down list, use the Browse option to look for it manually.
- Choose ‘Check your file,’ then hit the Continue option.
- Enter your QuickBooks admin password when requested by QuickBooks, and then tap Next.
Case 2: QB Error 6106 When You Launch The File Locally
If you come across the QuickBooks 6106 error on the computer where QuickBooks is installed (local access), you should implement the following troubleshooting measures:
Technique 1: Change the Name of Network Data & Transaction Log Files
If your configuration files are corrupt, QuickBooks error 6106 may appear. The Network Descriptor (.ND) and Transaction Log (.TLG) files play a key role in configuration, facilitating access to company files across a network. Consequently, renaming these files is a standard procedure for addressing and resolving the 6106 error:
- Launch the folder where you have stored the company files.
- Identify files with .ND and .TLG extensions matching your company file name (e.g., MNOCompany.qbw.nd and MNOCompany.qbw.tlg).
- Right-click each ND and TLG file, hit “Rename,” and add .OLD at the end (e.g., MNOCompany.qbw.nd.old and MNOCompany.qbw.tlg.old).
- Re-launch QuickBooks and make another attempt to access your company file. If the QuickBooks error 6106 persists, proceed to the next technique.
Technique 2: Open a Sample QuickBooks Company File
To resolve the QB 6106 error, it is crucial to ascertain whether the issue is related to QuickBooks or the company file. Performing an examination by accessing a sample company file serves as a valuable diagnostic step. If the 6106 error code takes place during this procedure, it indicates a potential issue with the QuickBooks installation. So, follow these steps to open the sample company file and check for any glitches on the screen:
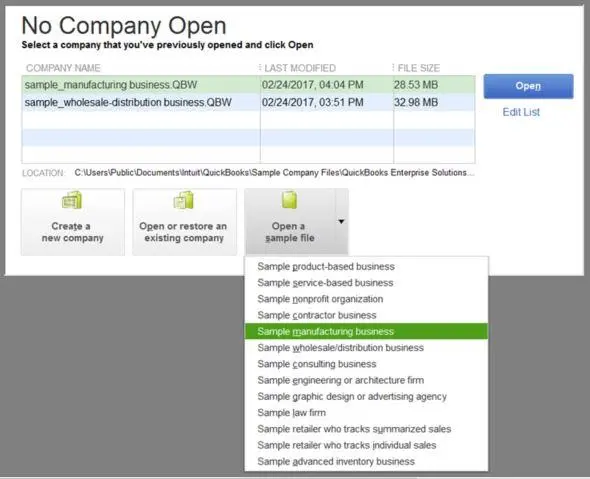
- When you land on the No Company Open window, select the “Open a Sample File” option and choose any sample file from the provided list.
- If the sample file opens without encountering errors, proceed to the subsequent solution for QuickBooks error code 6106.
- In case issues arise with the sample files, repair your installation files using the Quick Fix My Program and the QuickBooks Install Diagnostic Tool available in the QB Tool Hub.
Technique 3: Copy QuickBooks Company Files to The Desktop
In this troubleshooting step, we will understand whether QB error 6106 is linked to the damaged location of the company file. Assessing this requires us to create a copy of the company file and paste it on the desktop. Then, attempt to open it from there. This evaluation will provide the following insights:
| When the file opens successfully | = | The original company file location is corrupt. |
| File not opening | = | It might be stored within many folders, surpassing the file path limitations. |
| Still get errors | = | Your company file has underlying damage and needs repair or backup recovery. |
To conduct this test, follow these instructions for copying and pasting your company file to the desktop:
- Locate and launch the folder storing your company files.
- Right-click the .QBW company file and choose the Copy option.
- Return to the desktop, right-click on any blank area of the screen, and choose the Paste option.
- Next, access QuickBooks while pressing the Ctrl key to launch the No Company Open window.
- Hit “Open or restore an existing company.“
- Navigate to your desktop, identify your company file, and open it.
- If the error 6106 persists, proceed to Technique 4. However, if the file opens in the new location, appoint it as a permanent place and ensure you always open it from here.
Technique 4: Undertake QuickBooks Company File Restoration from the Backup
The existing company file might be corrupt, leading to QuickBooks error message 6106 on the screen. In such cases, try restoring the backup and using it as your primary company file:
- Open the QuickBooks program and then the File menu.
- Proceed with Open or Restore Company from the File drop-down list.
- Tap Restore a backup copy, then hit Next.
- Choose the Local Backup button, then click Next.
- Click Browse on your PC to look for the backup company file, usually named MNOCompany.qbb.
- Select a folder to keep the restored company file and click Open. Note: Exercise caution to not face data overwrite risks if the backup is in the same folder as your existing company file.
- Also, to avoid overwriting, look to rename either the existing company file or the backup, ensuring unique names. Alternatively, you can save the backup in a completely new folder.
- Once the backup file is ready for use, click Save. If prompted about potential data overwriting, choose the option that you deem suitable, ensuring careful avoidance of unintended overwrites.
- The newly restored company file is now available for your use.
Technique 5: Get Help of Auto Data Recovery
When encountering the challenge of restoring a backup due to damage in your company file, you can rely on Auto Data Recovery to recover your company file and resolve the QuickBooks error code 6106. Here are the steps to recover all of the recent transactions using the original .TLG file and .QBW.adr file mentioned below:
- Right-click on the desktop, choose New > New Folder, and create a new folder named QBTest.
- Open the folder where your company file is saved, the location of which can be found on the Product Information screen (press F2 or Ctrl+1 on your keyboard), and the No Company Open screen.
- Locate the .tlg file in your company file’s folder (having the same name as your company file).
- If unable to locate the .tlg file, follow these steps to show file extensions:
- Open File Explorer with Windows+E.
- Select Organize, then move forward with the Folder and Search options.
- Delete the tick for “Hide extensions for known file types.”
- Select Apply, then OK.
- Right-click and choose copy for the corresponding .tlg file of your company file and paste it into the QBTest folder on the desktop.
- Access the QuickBooksAutoDataRecovery folder, which you’ll locate in the same place as your company file.
- Right-click and tap copy on the .QBW.adr file and paste it into the QBTest folder, resulting in having both .QBW.adr and .tlg files in the QBTest folder.
- Right-click the .QBW.adr file in the QBTest folder, select Rename, and erase .adr at the end of the file name.
- Open QuickBooks.
- Open the company file stored in the QBTest folder and use your account register to verify all transactions.
- Select File, then Utilities, and then hit Verify Data to scan the data integrity of the recovered file.
- If this copy of the company file is satisfactory, relocate the damaged company file to a different location and transfer the copy from QBTest to the original location.
Recover recent transactions, excluding the last 12 hours, by using the ADR versions of the .QBW and .TLG files:
- Right-click on the desktop, choose New > New Folder, and create a new folder named QBTest.
- Open the folder where you stored the company file and locate the QuickBooksAutoDataRecovery folder.
- Access the .TLG.adr and .QBW.adr files with the exact name of your company file.
- If you’re unable to identify the .TLG.adr and .QBW.adr files, follow the steps to show file extensions (given above in the 4th point).
- Now, right-click and click the copy option for the .TLG.adr and .QBW.adr files, and paste them into the QBTest folder.
- In your QBTest folder, erase the .adr from the end of the file names, resulting in having .qbw and .tlg files in your QBTest folder.
- Open QuickBooks.
- Launch the company file saved in your QBTest folder, and use your account register to verify all transactions.
- To check the data integrity of the recovered file, select File, click Utilities, and then Verify Data in the top left.
- If this copy of the company file is satisfactory, start to relocate the damaged company file to a different location and transfer the copy from QBTest to the original location.
Case 3: When You Access the Company File over a Network and Get Error 6106
Here are the troubleshooting procedures for resolving QB error code 6106 when accessing the company file stored on the server or another system:
Measure 1: Confirm Hosting Settings for Workstations
To begin addressing and resolving error 6106, assess the hosting settings on all workstations to ensure that multi-user access is not turned on anywhere except on your server system:
- Open QuickBooks on the workstation and press the keyboard’s F2 key.
- When the Product Information screen comes up, scroll down to the Local Server Information area.
- Verify that hosting is turned OFF.
Measure 2: Rename Configuration Files And Use QuickBooks Database Server Manager
After ending the renaming process of Network Descriptor (ND) and Transaction Log Files (TLG) as outlined in Technique 1, we will take the help of the QuickBooks Database Server Manager on the network. The QuickBooks Database Server Manager (QBDBSM) is the host for your QuickBooks company files. You can reboot it and scan the QuickBooks files after changing the name of the .ND and .TLG files
This process starts by launching the QuickBooks Database Server Manager through the QuickBooks Tool Hub, which runs through the steps below:
- Open the Tool Hub, navigate to Network Issues, then tap QuickBooks Database Server Manager.
- If QuickBooks is not yet installed on your server, ensure to install it.
- Upon reaching the QuickBooks Database Server Manager, select Start Scan, especially if your company file(s) are visible. If not, manually access your company file and click Start Scan.
- Subsequently, reopen QuickBooks and try again to open your company file.
- If QB error 6106 persists, proceed to Measure 3. You can also access the QuickBooks Database Server Manager directly from the Start tab. Simply search for it in the Start menu and launch the tool.
Measure 3: Try Launching A Sample Company File
Resolve the error 6106 by experimenting with opening a sample company file with the steps mentioned in Technique 2.
Measure 4: Copy QuickBooks Company File to Desktop
If you receive QB error 6106, right-click and copy it to the desktop with detailed steps and explanations in Technique 3.
Measure 5: End All QuickBooks Tasks
This solution for QuickBooks error 6106 focuses on terminating all active QuickBooks processes through the Task Manager to manage potential background clashes:
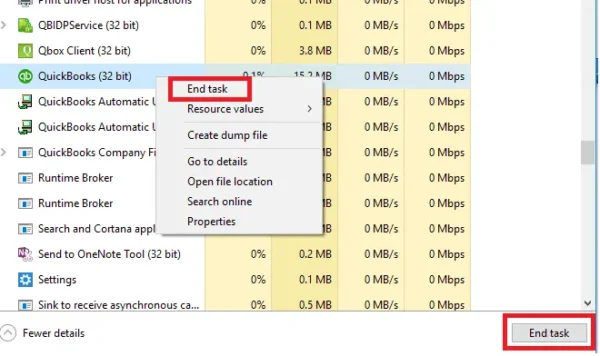
- Enter into your server PC with Administrator usernames and passwords.
- Launch the Task Manager with keyboard keys- Ctrl+Shift+Esc.
- Attempt to display Processes for all users and click on Users.
- Now, terminate all the QuickBooks processes (QBW32.EXE, qbupdate.exe, and QBDBMgr.exe) by right-clicking on them and hitting the End Task option.
- You will now be able to access the QuickBooks company file in multi-user mode.
- If the error 6106 persists, proceed to Measure 6.
Measure 6: Look into the Folder Permissions
Ensure the directory where you save the company file has all the permissions it needs. If it doesn’t have these rights, you’ll face the error 6106 in QuickBooks. When you can’t open the company file, the following procedure will help:
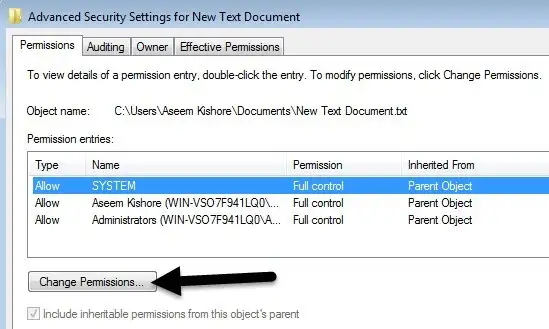
- Open File Explorer by clicking the Windows logo and accessing the Windows Start menu.
- Right-click the folder where you keep the company files and hit Properties.
- Choose Security, then hit Advanced.
- Move forward with QBDataServiceUserXX and click the Edit button.
- Click Allow and provide the following permissions:
- List Folder/Read Data
- Create Folders/Append Data
- Write Extended Attributes
- Read Attributes
- Create Files/Write Data
- Write Attributes
- Read Permissions
- Read Extended Attributes
- Traverse Folder/Execute File
- If the configuration of your permissions is incorrect:
- Right-click the Company File Folder and proceed to Properties.
- Access Security, then select the Edit
- Select QBDataServiceUserXX, click Full Control, and proceed with the Allow
- Click Apply and OK.
- Attempt to open your file and check if QuickBooks error 6106 persists.
Measure 7: Lift The Firewall & Antivirus Restrictions
Encountering errors like 6106 while opening the company file may be attributed to firewall and antivirus software restrictions on specific QuickBooks programs or files. We suggest you adjust your firewall ports and establish exceptions in your antivirus software in this case. Keep in mind that since Intuit does not develop antivirus programs, the specific instructions for configuring these exceptions will be provided by the antivirus software vendor. Therefore, seek guidance from them for accurate instructions.
Follow the steps below to modify your firewall ports and create exceptions for QuickBooks:
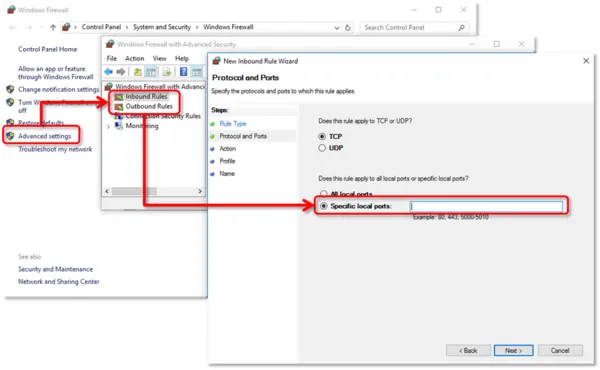
- Open the Start menu with the help of the Windows logo on your keyboard.
- Access “Windows Firewall” via the search area in the Start menu.
- Click Advanced Settings.
- Right-click Inbound Rules and select New Rule to create a new rule.
- Click on Port and proceed to the next step by clicking Next.
- Choose TCP.
- Enter the required ports for your specific QuickBooks Desktop version in the Specific local ports area.
- After entering the port number in the field, click Next.
- Click the Allow the Connection button, then hit Next.
- Mark all profiles as required, then select the Next button.
- Create a rule and assign a name.
- Click Finish.
- Repeat the same process for Outbound Rules, replacing Inbound with Outbound in Step 4.
Additionally, ensure there are Windows Firewall exceptions for QuickBooks programs:
- Open the Start menu with the help of the Windows logo on your keyboard.
- Access “Windows Firewall” via the search area in the Start menu.
- Click Advanced Settings.
- Right-click Inbound Rules and create a New Rule by selecting this option.
- Choose Program, then proceed to the next step by selecting Next.
- Click This Program Path and tap Browse.
- Go with any executable file, then proceed with Next.
- Click the Allow the Connection button, then choose Next.
- If requested, select all profiles, then click Next.
- Create and assign a name for the rule.
- Repeat the same steps to add exceptions for QB programs in Outbound Rules.
| Executable files | Location |
| AutoBackupExe.exe | C:\Program Files\Intuit\QUICKBOOKS YEAR |
| QBW32.exe | C:\Program Files\Intuit\QUICKBOOKS YEAR |
| Dbmlsync.exe | C:\Program Files\Intuit\QUICKBOOKS YEAR |
| FileManagement.exe | C:\Program Files\Intuit\QUICKBOOKS YEAR |
| DBManagerExe.exe | C:\Program Files\Intuit\QUICKBOOKS YEAR |
| QuickBooksMessaging.exe | C:\Program Files\Intuit\QUICKBOOKS YEAR |
| FileMovementExe.exe | C:\Program Files\Intuit\QUICKBOOKS YEAR |
| QBDBMgrN.exe | C:\Program Files\Intuit\QUICKBOOKS YEAR |
| QBServerUtilityMgr.exe | C:\Program Files\Common Files\Intuit\QuickBooks |
| IntuitSyncManager.exe | C:\Program Files\Common Files\Intuit\Sync |
| QBLaunch.exe | C:\Program Files\Common Files\Intuit\QuickBooks |
| QBUpdate.exe | C:\Program Files\Common Files\Intuit\QuickBooks\QBUpdate |
| QBCFMonitorService.exe | C:\Program Files\Common Files\Intuit\QuickBooks |
| OnlineBackup.exe | C:\Program Files\QuickBooks Online Backup |
Summing Up
In conclusion, we conclude our comprehensive guide addressing and fixing QuickBooks error 6106 with an inclusive array of troubleshooting methods. We believe that the outlined steps are straightforward and user-friendly, facilitating the resolution of the issue. If you encounter any difficulties during the troubleshooting process or seek expert guidance, feel free to contact us. Our Accounting Helpline’s experienced professionals are readily available via phone at 1.855.738.2784. Do not hesitate to share your inquiries, and we will promptly attend to and resolve any challenges you may be experiencing.
FAQs
Which QuickBooks versions face the error 6106?
The following QB version users might complain of the error 6106 in QB:
QB Desktop Pro 2018
QB 2019
What are the scenarios with regard to QuickBooks error 6106?
The various scenarios of QuickBooks error 6106 include the following:
As soon as the user tries opening a new company in QB Desktop, they get the error 6106.
Another area where the error appears is when you upgrade your QB application and access your company file but fail to open it.
How do I manage the errors appearing while restoring the backup?
If challenges emerge while following the steps for restoring the backup, perform the following actions:
Ensure that your PC is not configured to host through the steps below:
Open your company file.
Click on the File menu, then select the Utilities option.
If you access the “Stop Hosting Multi-User Access” button on the screen:
Choose “Stop Hosting Multi-User Access.”
When the “Stop hosting multi-user access” wizard flashes, click Yes.
Move ahead with Yes in the “Company file must be closed” wizard.
Additionally, verify that the path to your company file does not exceed 210 characters.
Navigate to your company file location.
Right-click > Copy or (press Ctrl + C) the path from the address bar.
Right-click > Paste or (press Ctrl + V) the path into Notepad or any document and count the characters and spaces. For instance, C: Documents and Settings All Users Documents Intuit QuickBooks Sample Company Files QuickBooks 2024 Sample_company_file.qbw is 125 characters.
Make another attempt so you can recover the QuickBooks company file.
How do I repair installation files and fix error 6106?
Here’s how you fix the installation files that may cause the error 6106 on the screen:
The Quick Fix My Program tool and QuickBooks Install Diagnostic Tool, available in the QuickBooks Tool Hub, serve as valuable utilities for effectively repairing QuickBooks Desktop installation and performance issues:
Quick Fix My Program:
Open the QuickBooks Tool Hub by either double-clicking the app icon or accessing it through the Start menu > Programs.
Select “Program Problems.”
Tap “Quick Fix My Program.”
After the tool completes the QuickBooks repair process, open QuickBooks Desktop and access your data file.
QuickBooks Install Diagnostic Tool:
Launch the QuickBooks Tool Hub.
Choose “Installation Issues.”
Hit “QuickBooks Install Diagnostic Tool.”
Allow the diagnostic tool to address installation problems, then restart your PC.
Access QB Desktop and launch your data file to verify the 6106 error status.
How do I resolve QuickBooks error 6106?
Here’s how QuickBooks error 6106 can be resolved:
Update QB
Use QB File Doctor, QB Install Diagnostic Tool, QB Database Server Manager, and Quick Fix My Program
Rename configuration files (ND and TLG)
Access a sample company file in QB
Copy your QB file and paste it on the desktop
Terminate QuickBooks processes
Verify folder permissions manually
Firewall and antivirus port exceptions
Restore the company file backup
Get the help of Auto Data Recovery
Look into QB hosting settings on workstations

Edward Martin is a Technical Content Writer for our leading Accounting firm. He has over 10 years of experience in QuickBooks and Xero. He has also worked with Sage, FreshBooks, and many other software platforms. Edward’s passion for clarity, accuracy, and innovation is evident in his writing. He is well versed in how to simplify complex technical concepts and turn them into easy-to-understand content for our readers.