
Last Updated on April 23, 2026
Have you ever encountered problems while working with different currencies in QuickBooks? If yes, you are not the only person who is dealing with such QuickBooks multi currency problems. The error usually occurs when there is no match between the customer’s and vendor’s transactional currencies. These currency issues can also be triggered by missing data, inactive currency features, obsolete exchange rates, unlinked bank accounts, and a damaged company file. In this blog, we will help you with the best proven methods to fix the multi-currency issues in QuickBooks.
Are you tired of the QuickBooks multi currency issues? Speak to our dedicated Accounting Helpline experts by dialling our toll-free number 1.855.738.2784. They are eager to understand your concerns and help you fix the tax centre issues instantly in simple and quick methods.
What are QuickBooks Multi Currency Problems?
QuickBooks multi-currency problems arise when the customers’ and vendors’ transactions fail to be recorded in the home currency assigned to that customer or vendor. If the home and the allotted currency do not match, you might encounter multi-currency problems. Error statements like ‘Something’s not quite right: You can only use home currency balance sheet accounts with home currency A/R and A/P accounts’ might get triggered.
You must ensure that when creating a journal entry in QuickBooks, accounts receivable (A/R) and accounts payable (A/P), all currency must match. This will help you prevent any QuickBooks multi-user problems.
Causes of Multi-Currency Errors in QuickBooks Desktop
There can be several instances where you can unknowingly trigger the multi-currency issues in QuickBooks Desktop. Before knowing about the steps to fix the error, you need to know about the scenarios that are causing the issue. Here are some of the common causes of multi-currency issues in QuickBooks Desktop:
- There may be an inactive or disabled multi-currency feature in QuickBooks Desktop.
- Vendors’ and customers’ data might be missing from the application.
- You may not have set the home currency in QuickBooks.
- There may be outdated exchange rates in QuickBooks.
- You may not have linked bank accounts for foreign currency transactions.
- You may be working with a damaged or corrupted company file.
There are some common currency issues in QuickBooks Online and Desktop that may arise due to a home currency mismatch. Do you still want to record payments with the multi-currency issue in QuickBooks? If yes, we have something for you in the sections below.
Recording Payments with QuickBooks Multi-Currency Error
Journal Entry Error Message is displayed as: Something’s not quite right: You can only use home currency balance sheet accounts with home currency A/R and A/P accounts. Due to the mixing up of the currencies, QuickBooks Online blocks journal entries, which might later result in incorrect opening balances or incorrect exchange gains or losses. To record payments with the QuickBooks Multi Currency error, follow the options given below:
- The transition currency, A/R or A/P currencies, and customer or vendor currencies must be the same. For this, you have to manually convert one currency to another.
- From the original journal entry, you need to create a duplicate of the customer or vendor and assign the second currency to it.
- You need to use a different Display Name for the Duplicate.
- You need to void any open transactions for the original customer or vendors that are present in the first currency, but it must be in the second currency.
- With the duplicate customer or vendor, try performing these transactions again.
These are the steps that will help you in recording the payments with the multi-currency issues in QuickBooks. Now, we will have a look at resolving these issues with the help of the best solutions present.
Best Methods to Get Rid of QuickBooks Multi-Currency Problems
Now comes the section you have been waiting to read – the solutions to fix the multi-currency problems in QuickBooks Desktop. We know that you are a normal QuickBooks user and not a technical expert. So, we will provide you with some basic solutions to resolve the multi-currency problems in QuickBooks Desktop.
First, we will have an overview of the steps we are going to implement to resolve the issue, and then we will move to the detailed process. The overview of the methods to fix the multi-currency issue in QuickBooks is as follows:
- Activating the Multi-Currency Feature on Your Device
- Adding Foreign Currency Customers and Vendors
- Downloading and Entering Exchange Rates
- Adding or Deleting Currencies
- Creating an Account Using the Foreign Currency
- Linking the Bank Account to the Foreign Currency Transactions
- Verifying and Rebuilding Company File Data
These are the best proven methods to help you resolve the QB multi-currency problems. Let’s have a look at each of the above-mentioned steps in detail.
Method 1: Activating the Multi-Currency Feature on Your Device
This problem may arise in QuickBooks if your multi-currency feature is disabled on your device. So, you need to enable this option to fix the error. In this solution, we will be learning about the ways to enable the multi-currency feature on QuickBooks Desktop and Online platforms.
Enabling the Multi-Currency Option in QuickBooks Online
The steps to enable the option in QBO are as follows:
- You need to visit the Settings section, followed by the Accounts and Settings option.
- Here, you need to select the Advanced tab option.
- Now, you need to click Edit under the Currency section.
- In this step, you will have to choose your currency from the Home Currency drop-down list.
- Now, you have to tick the Multi-Currency checkbox and click on the Save option.
Following this solution will help you to enable the multi-currency feature in QuickBooks Online mode.
Enabling the Multi-Currency Option in QuickBooks Desktop
The steps to enable the multi-currency feature in QBDT are as follows:
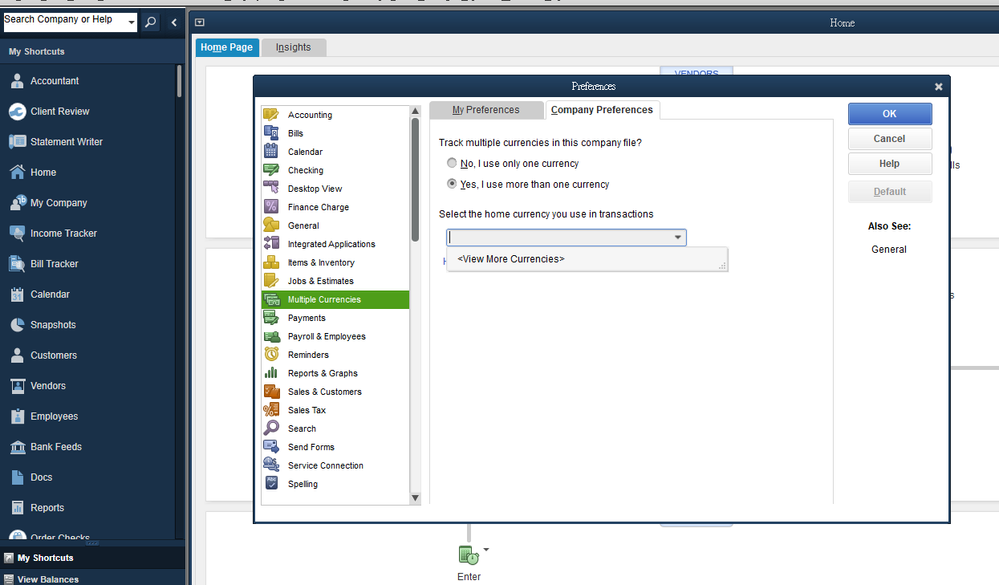
- You need to proceed to the Edit menu and then click on the Preferences tab.
- Here, you need to look for the Multiple Currencies option and select it.
- Now, you need to click on the Company Preferences tab and select the option ‘Yes, I use more than one currency.’
- The final step is to choose your home currency from the drop-down menu.
These are the steps to enable the multi-currency feature in QB Desktop and Online versions. If this method fails to resolve your query, you can move to the next option.
Method 2: Adding Foreign Currency Customers and Vendors
You can also consider adding foreign currency customers and vendors for making transactions in QuickBooks. The steps to add foreign currency customers and vendors to fix the issue are as follows:
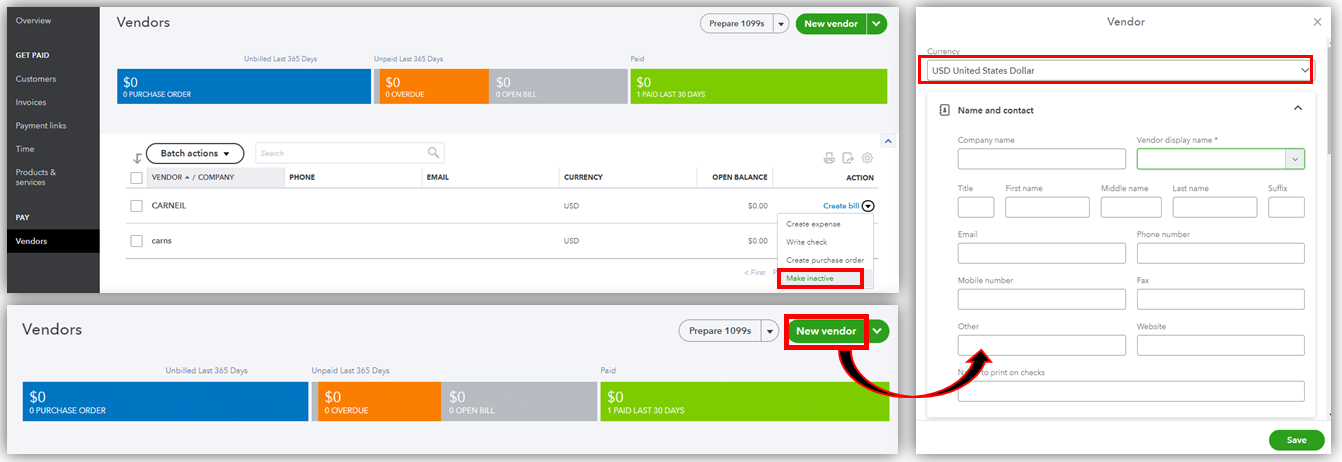
- You need to hover over the Customers/Vendors menu and select the Customer/Vendor Centre.
- There, you need to choose the New Customer Job or the New Vendor drop-down from here.

- The next step is to assign the Customer’s/Vendor’s Name and Currency.
- Once all the steps are done, you need to click the OK option.
These steps will help you add foreign currency customers and vendors to help you resolve the QuickBooks multi currency problems. If this does not help, you need to move to the next solution.
Method 3: Downloading and Entering Exchange Rates
If you have outdated currency exchange rates on your system, you can face multi-currency issues in QuickBooks. So, you need to download the exchange rates, or you can choose to enter them manually.
Downloading the Exchange Rates
- You need to visit the Lists menu and select Currency List in QuickBooks.
- Here, you need to click on the Activities button and click on downloading the latest exchange rates.
Now, you have downloaded the currency exchange rates in your QuickBooks application. You can also enter the exchange rates manually.
Entering the Exchange Rates Manually
- You need to proceed to the Lists menu and select Currency List.
- Here, you need to click twice on the Currency option.
- You need to choose Update the Currency Exchange Rates for specific dates under the Edit currency window.
These are the steps that will help you download and enter the updated currency exchange rates to resolve the multiple currency issues in QuickBooks. You can move to the next solution if this does not help.
Method 4: Adding or Deleting Currencies
Adding or deleting currencies can help you fix the multiple currency issues in QuickBooks Desktop. Here are the steps that you need to know regarding adding or deleting currencies in QuickBooks:
Adding Currencies in QuickBooks
- You need to visit the Settings option and then click on Currencies. (This option will be only available after you turn on the multi-currency feature.)
- Here, you need to click on the Add Currency option.
- From the drop-down list there, you need to choose the New Currency option.
- Finally, you need to click on the Add option.
Deleting Existing Currencies in QuickBooks
- You need to proceed to the Settings option and then choose Currencies.
- Here, you need to click on the small arrow icon under the Action column and click on the Delete option.
- Finally, you need to press Yes to confirm the process and delete the selected currency.
Note: The user can only delete a currency when there are no transactions attached to it.
These are the steps that you need to follow to add or delete currencies in QuickBooks to fix the multi-currency problems. If the error is still there, you can move to the next solution.
Method 5: Creating an Account Using the Foreign Currency
You can try creating an account using the foreign currency if the existing accounts are available in the home currency. An attempt to fix the multi-currency issue in QuickBooks can be this step. The step-by-step methods to create an account using a foreign currency are:
- You need to move to the Settings icon and then choose the option Chart of Accounts.
- Here, you need to select the New option.
- In the Account Dialog section, you need to choose the appropriate Account Type and Detail Type option.
- After the third step, you need to choose a name for the new account and write a description for it (optional).
- Now, you need to choose the currency from the Currency drop-down list for the newly created account.
- Finally, you need to click on Save and close the application.
These are the steps that will help you create an account using the foreign currency as an attempt to resolve the QuickBooks multicurrency problems.
Method 6: Linking the Bank Account to the Foreign Currency Transactions
In the previous method, you just learnt the ways to create an account using the foreign currency. Now, you need to link the bank account for the same. Maybe an unlinked bank account can be the root cause of the multi-currency issues in QuickBooks. The steps to link a bank account to the foreign transactions are as follows:
- You need to move to the Bookkeeping and Transactions and then choose the option Bank Transactions.
- There, you need to open the transaction details and click Add on the For Review tab.
- Now, under the currency fields, you need to enter the foreign amount or the updated exchange rates offered by your partner bank.
Please note that the total and final amount is calculated by QuickBooks Online after adjusting and adhering to the updated currency exchange rates.
Method 7: Verifying and Rebuilding Company File Data
You can also verify and rebuild your Company file data in QuickBooks Desktop to fix the multi-currency problems in QuickBooks. The steps that you need to know to verify and rebuild the company data file are as follows:
- Click on Windows and select Close All.
- To verify the data of your company file, choose File.
- Open Utilities and select Verify Data. Take the necessary action depending on the message that appears:
- “QuickBooks detected no problems with your data.” No further action is needed.
- If you see a specific error message, search for a solution.
- The message “Your Data has lost integrity” indicates that the company file is damaged, and you need to continue with the steps to rebuild the Company File data.
You need to follow the Steps mentioned below to Rebuild Data and resolve QuickBooks multi currency issues:
- Click on File.
- Press Rebuild Data from Utilities.
- Once the message appears asking for the company file, click OK and choose the location of your backup.
Either of the messages can pop up on the screen:
- If the option to replace the file appears, select NO, and with the new File Name, save it.
- If the backup fails, click on Cancel and look for professional help.
- Once the backup finishes, the Rebuild Data will start soon.
- Click on OK when the “Rebuild has completed” message is displayed.
Till now, we have discussed the seven best proven methods to resolve the QuickBooks multi-currency problems. We have something for you in the coming section. Stay tuned and continue reading.
Summing It Up!
This was all we had to convey to you regarding the QuickBooks multi-currency issues in QuickBooks Desktop and Online. You can implement these best-proven troubleshooting steps to fix your issue. You just need to follow the above-mentioned steps chronologically to troubleshoot the error. You can also dial the toll-free number and look for experts’ guidance.
FAQs
Can you turn off multi-currency in QuickBooks?
No, once you have turned on the multi-currency feature in QuickBooks, it cannot be turned off again. By default, the multi-currency feature in QuickBooks is disabled. So, you need to think carefully before turning on the multi-currently feature in QuickBooks.
Can QuickBooks handle multiple currencies?
Yes, QuickBooks Online has the tendency to handle multiple currencies at once. QuickBooks handles multiple currencies through the multicurrency feature. This allows the users to record and manage transactions in different currencies.
Why is accounting so difficult when multiple currencies are involved in QuickBooks?
This is because all the currencies have different exchange rates. Having multiple currencies involved in a transaction makes it difficult for the accounting software to calculate the final amount because of fluctuating exchange rate conversions.
How do I turn off MFA in QuickBooks Online?
You need to log in using your QuickBooks login ID and password and navigate to the 2-step verification section. There, you need to choose the option to turn off MFA. In this way, you can successfully disable the MFA in QuickBooks Online.
Related Posts-
How to Use the QuickBooks Password Reset Tool
Resolving QuickBooks Error H505: Causes and Troubleshooting Solutions
Is Your QuickBooks Update Stuck? Know How to Fix It!
QuickBooks 941 Form: Filing, Due Dates, Errors, & Solutions
QuickBooks Check Alignment Problems – Troubleshoot Guide
QuickBooks Sales Tax Center Not Working? Know How to Fix in Simple and Quick Steps

Edward Martin is a Technical Content Writer for our leading Accounting firm. He has over 10 years of experience in QuickBooks and Xero. He has also worked with Sage, FreshBooks, and many other software platforms. Edward’s passion for clarity, accuracy, and innovation is evident in his writing. He is well versed in how to simplify complex technical concepts and turn them into easy-to-understand content for our readers.