Last Updated on April 15, 2026
The QuickBooks Migration Tool is for you if you are a QuickBooks user and want to switch from QB Desktop to the Online version or vice versa. It helps you seamlessly transfer your data between different QB versions without having to repeat the entire process of setting up. You can use the QuickBooks migrator tool to transfer data from one computer to another computer system.
However, the method to use the QuickBooks migration tool for data transfer may be difficult for many users due to its complicated process and potential technical difficulties. There is a risk that you might lose or fail to transfer data properly, which can be stressful. Therefore, this guide will tell you all that you need to know about the QuickBooks migration tool, along with how to use it for data transfer between different versions and computer systems.
Data migration can be tricky. Need support with Data Transfer using the QuickBooks Migration Tool? Our specialists are just a call away. Reach out at 1.855.738.2784 and let our Accounting Helpline’s Experts guide you.
Understanding How the QuickBooks Migration Tool Works
If you are not confident about moving your company data, you can always check out the QuickBooks migrator tool services.
Now, we will go through the following points to get a basic understanding of how the QuickBooks migrator tool works and helps to transfer data:

- Create a complex password to decrypt the data you have copied into your new system. This password will be required for the QuickBooks migrator tool.
- The tool copies up to the last three company files opened and all supporting files onto a USB flash drive.
- The QuickBooks migrator tool utilizes a USB flash drive to transfer all files technically.
- QuickBooks migration tool also sets up the files from your old computer to the new one.
- If there are any other files in the drive, then they won’t be reformatted or erased.
- The QuickBooks migration tool will download the latest and correct version of QB Desktop onto your new computer.
Note: If you try to move files from a 64-bit QuickBooks Desktop 2022 or 2023 into a 32-bit Windows system with a USB flash drive, the QuickBooks migration tool may fail unexpectedly. You can transfer QuickBooks files from a 64-bit computer to only another 64-bit computer system.
What Do You Need to Use the QuickBooks Migration Tool?
The following specifications are necessary for transferring data using the QuickBooks migrator tool:
- An internet connection on your computer.
- A USB flash drive to backup your QuickBooks files.
- At least 150 to 250 MB of storage on the USB.
These specifications are necessary for you to perform the QuickBooks Migration Tool download and to use it efficiently for data transfer. To understand how you can move data from QuickBooks Desktop to Online, read the following guide.
Section A: Transferring the Files Using QuickBooks Migration Tool Desktop to Online
By following the given process, you can transfer data from QuickBooks Desktop to QuickBooks Online (QBO).
For QuickBooks Desktop Pro, Premier, and Enterprise
Step 1: QuickBooks Online Subscription
- Get a subscription for QBO to transfer data there from QuickBooks Desktop
Note: Once you have created your account in QBO, you’ll have 90 days to move your data.
Step 2: Preparing QuickBooks Desktop File
- Update to the latest version of QuickBooks Desktop.

- If there are any customers, vendors, or accounts that you do not use, then mark them as inactive to clean up data and move to QBO.
- If there are any unbilled charges and unbilled time that are related to inactive accounts, customers, vendors, or employees, then either delete or void them.
- Head to Vendors and click on Bills to delete unbilled charges.
- Ensure that the company file for exporting is not too big:
- The file has links or targets to related entries of each transaction. For instance, there is a target customer, as well as each item, account, estimate, sales tax, and payment associated with an invoice.
- The tool has a limit of 1,500,000 targets to transfer data from QuickBooks Desktop to QuickBooks Online. To check the total number of targets, press Ctrl + 1 or F2, and condense your QuickBooks data if there are more than 1,5000,000 targets. Customer opening balances can be added in the new QB Online file.
- Know what features and how data is transferred from one QuickBooks version to another in the tables below.
- Take a printout of your sales tax liability report by following the process below, since it will be required to enter adjustments after data transfer:
- Head to Reports and choose Vendors & Payables.
- Click on Sales Tax Liability.
- Select all under the Dates dropdown.
- Open the Print dropdown and choose Save as PDF.
- Select the saving location.
- Enter a name and tap on Save.
- In case of online banking or import bank transactions:
- The statements/transactions are to be categorized and reconciled to bank accounts in QuickBooks.
- Head to Banking and choose Bank Feeds.
- Then, click on the Bank Feeds Center.
- For QuickBooks Desktop Payroll:
- If there are unpaid employees in the current year, then terminate or deactivate them.
- Update employee profile information, including the first and last name of the employee, SSN, date of birth, hire date, and address.
- Once the payroll has been run, wait for 2 to 3 days before transferring the data.
- It will transfer all your paycheck information to QuickBooks Online before the next payroll.
Note: Transfer the data a few days before the next payroll run so that you have time to set up for Online Payroll.
- For QuickBooks Desktop Payments:
- The QuickBooks Online account admin email will need to have admin-level permissions on the QuickBooks Desktop Intuit account in order to transfer the QuickBooks Payments subscription.
For QuickBooks Time, you’ll have to contact a specialist to get assistance with setting up your account in QuickBooks Online.
Step 3: Transfer your QuickBooks Desktop files to QuickBooks Online
Two options will be available for you to move your data to QBO from the Desktop version. You can either use the built-in or web-based QuickBooks migration tool on the Desktop version.
Inbuilt QuickBooks Desktop Data Migration Tool
- Open QuickBooks Desktop as an admin.
- Start exporting your QuickBooks Desktop company:
- QuickBooks Desktop Pro and Premier: head to Company, and click on Export Your Company File to QuickBooks Online.

- QuickBooks Desktop Enterprise: Open the Product information window via Ctrl + 1, followed by Ctrl + B + Q, and click on OK
- QuickBooks Desktop Pro and Premier: head to Company, and click on Export Your Company File to QuickBooks Online.
- Choose Get started.
- The “Let’s bring your data to QuickBooks Online” screen will then appear. Now, you must select the process for transferring your data.
- Transfer all of your company data.
- Move only lists and balances (in case of a large file, where every individual transaction is not necessary).
- For inventory:
- Click ‘Yes,’ then track inventory using the First-In, First-Out (FIFO) method and select a starting date.
- Select ‘No‘ to avoid moving inventory, as it can be moved manually later.
- For multi-currency in QuickBooks Desktop, choose a home currency.
- Confirm whether you already have a QuickBooks Online account:
- If yes, then tap on Yes, followed by Sign me in, and click on Continue.
Note: Sign in with the account you created by purchasing a QuickBooks Online Subscription in step. - In case you did not sign up for QBO, then click on ‘No, I need to create one,’ which will then create a QuickBooks Online Advanced trial company.
- If yes, then tap on Yes, followed by Sign me in, and click on Continue.
- Use the credentials you set up for your QuickBooks Online subscription to sign in.
- A list of QuickBooks Online company names and subscriptions will be visible on your screen.
- Choose the company to transfer your data.
- Click on Continue, followed by Export. A progress bar that indicates data being transferred to QuickBooks Online will appear on your screen.
Note: If data is already available in the QuickBooks Online account, then you can choose to replace the existing data, and to do so:- Click on Agree, followed by Replace.
- Tap on Yes, and proceed to replace the data, then choose Replace.

If you want to transfer the data with the web-based QuickBooks migration tool, then follow the next step.
QuickBooks Web-Based Migration Tool
For QuickBooks Desktop 2021 or older, or if you don’t have access to QuickBooks Desktop.
- Open the online QuickBooks migration tool for your application:
- QuickBooks Pro/Premier
- QuickBooks Enterprise
- Click on Get Started, and sign in with your Intuit Account
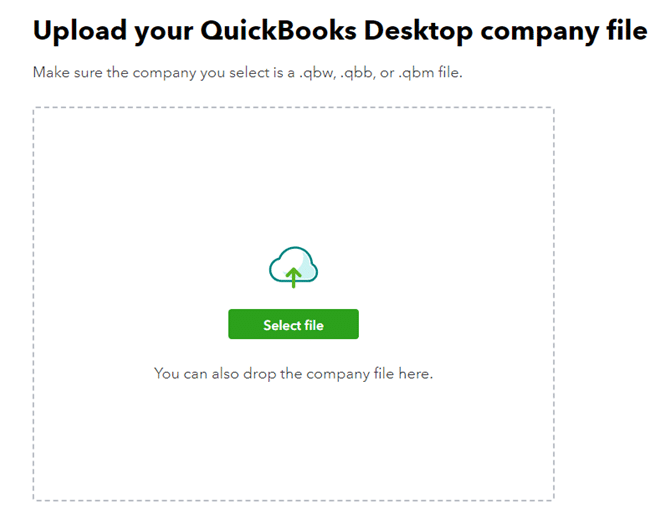
- Now, upload your company file:

- Click on Select File and locate the QuickBooks Desktop file to move.
- Click on Select File to upload your QuickBooks Desktop file.
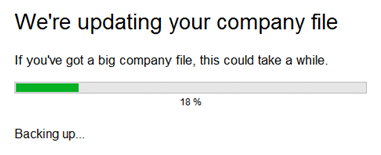
- After uploading, the QuickBooks Desktop file will be updated to the latest version.

- Now, select Move to QuickBooks Online.
- Follow the instructions visible on screen to complete the file transfer to QBO.
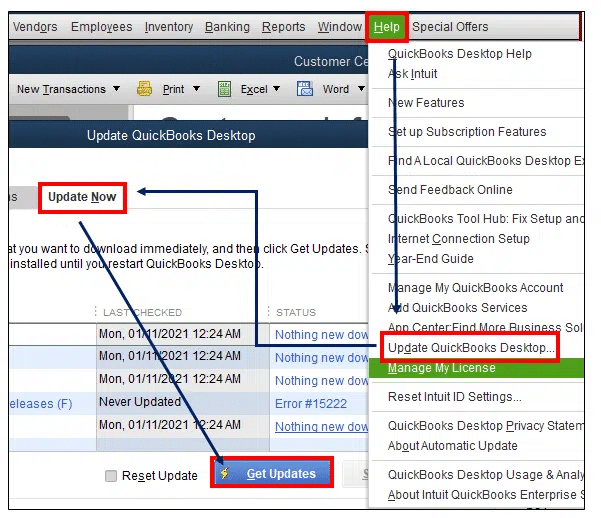
If QuickBooks won’t update automatically or shows an error when you try to update it, then go through this article.
Step 4: Now, Set up the QuickBooks Online
Follow these instructions for how to set up your new QuickBooks Online company:
- First, you have to connect your credit card or bank account.
- Then, you can start generating and sending out invoices to your customers.
Note: Enable location-based sales tax first if you are tracking sales tax in QuickBooks. - Now start monitoring your bills and know how to pay bills in QuickBooks.
- Set up your payroll in QuickBooks Online to use payroll services.
- Now you can start using QBO.
This process is only for QuickBooks Desktop Pro, Premier, and Enterprise versions. To move files from a QuickBooks Desktop for Mac to the Online version, follow the process below.
Section B: Transfer Data from QuickBooks Desktop for Mac to Online
You can only move your data from QB Desktop for Mac to the US version of QuickBooks Online. The file should not have more than 1,500,000 targets; if it does, then it must be condensed. Procedures for Desktop version 2022 and later, as well as for Desktop version 2021 or older, are listed below.
For QuickBooks Desktop version 2022 and later:
- Open the QuickBooks Desktop file as an admin.
- Now choose File and Export by selecting To QuickBooks Online.
- Click on Get started.
- You can select whether to export all your company file data or specific data.
- Also, you can decide whether to move the inventory or not.
- Sign in to your QuickBooks Online account using your credentials or create a new account.
- Choose the QuickBooks Online company to transfer your data to.
- Click on Continue to start migrating.
Any pre-existing data on QB Online will be replaced by the transferred QuickBooks Desktop data. Once the data has been moved successfully, an email confirmation will be sent within 12 hours.
For QuickBooks Desktop version 2021 or older:
- You will first have to move your QuickBooks Mac file to QuickBooks Desktop for Windows.
- And then move your file using the QuickBooks Online migration tool to QBO.
You will get confirmation through email within 24 hours after the data has been transferred to QuickBooks Online. If you need to move data from one system to another using the QuickBooks migration tool, then go through the following method.
Know How to Move the QuickBooks for Mac File to QuickBooks for Windows
The process below will help you convert your company file from QuickBooks for Mac to QuickBooks for Windows.
Step 1: Updating QuickBooks for Mac
- Select Check for QuickBooks Updates under the QuickBooks dropdown.
- If a newer version is available, then click on Install Update.
- Choose Install and Relaunch upon request.
- Once the update has been completed, QuickBooks for Mac will launch by itself.
Step 2: Prepare your QuickBooks for Mac company file
If there are any memos containing more than 50 characters or any special characters such as !@#$%^&*, then remove those.
Locating Memos Containing Special Characters
- Choose Reports menu, and go to Custom Transaction Detail Report.
- Select All Dates under the Dates dropdown.
- Open a transaction with a memo.
- Now, remove the special characters in the memo field and save.
- Close the transaction.
- Do the same with all other transactions.
- Re-sort your lists.
- Head to File and click on Utilities, followed by Verify Data.
Step 3: Moving your company file to QuickBooks for Windows
- Log in as an admin in QuickBooks Mac.
- Head to the File menu and click on Export.
- Choose the To QuickBooks for Windows option.
- Upon request to verify before backing up, click on Verify.
- Enter a name for the file and save it to your preferred location.
- There must not be any special characters in the file name.
- Click on Save.
- Now, enter and confirm your password, and click on OK.
- Select OK again.
- Use a USB flash drive, an online storage service, or email the QuickBooks file to your Windows computer.
- Then, go to QuickBooks for Windows and restore the file.
Once you complete the above steps, you can restore the file in QuickBooks for Windows. Go through the steps below for moving your QB data from online to desktop via the QuickBooks migration tool.
Section C: Moving Data from QuickBooks Online to QuickBooks Desktop (Complete Process)
By the process below, you can transfer all your data and transactions with the QuickBooks Online migration tool and move it to the QB Desktop version.
Step 1: Downloading the QuickBooks Online Migration Tool
- Open and log in to QuickBooks Online.
- Head to the Export Overview section.
- Click on Get Started.
- Choose to download the QuickBooks migrator tool.
- Once downloaded, install the QuickBooks migration tool.
- Then select Next, then read and accept the license agreement terms.
- Click on Next, then choose Install, followed by Finish.
Step 2: Exporting your QuickBooks Online Data
- You’ll see the Step 1: Prepare to export page, click on Continue.
- Now, choose the QuickBooks Online data for exporting and select Continue.
Note: You will get the option to export all financial data with or without transactions. However, you cannot export the on-hand quantity for products and services. - Once you get to Step 3: Request your data page, click on Continue.
- Now, enter your Name and Email Address.
- Then, choose Continue, followed by Close.
Note: You will receive an email confirmation after the data has been migrated, which may take some time depending on the volume of data. You will get updates on the QuickBooks Online home page. - Head to the Export Overview page.
- The Step 1: Prepare to export page will give you further instructions for online migration.
- Then, click on Continue.
- Choose Continue to Download and select Download QBXML file on the Exporting from QuickBooks Online page.
- Keep the file saved on your desktop and select Continue.
Step 3: Running the QuickBooks Desktop Migration Tool
- Open the QuickBooks Desktop migration tool and select Browse.
- Choose and open your QBXML file, then Head to QuickBooks Desktop.
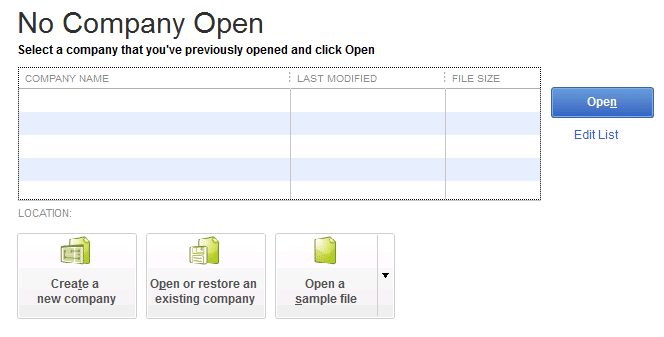
- Choose Create a new company, on the “No Company Open” page.

- Now, on the “What does creating a company file require?” screen, click on For myself, followed by Start Setup.
- Now, on the sign-in screen, click on the Sign in Later dropdown and select in 2 days, then tap Ok.
- Choose Import on the QB migration tool and select the file’s name and location, then click on Save.
- Choose Yes, always allow access even if QuickBooks is not running in the application certificate.
- Again, click on Yes, then Continue, followed by Done.
- Now fill in the asked details on the Update Business Info screen and click on Save.
- Choose Sign in now, and select Start Working.
- Select Admin in the Intuit Account menu, enter your email, and tap on Continue.
- Choose in 2 Days in the Sign In Later dropdown and click on Ok.
- Select Done once the importing is finished.
Step 4: Checking Whether the Exported Data Matches
Once you have successfully exported your data, follow the process below to run a profit and loss report in both QuickBooks Online and QuickBooks Desktop and compare your books to match it.
Steps for Running a Profit and Loss Comparison Report
- Head to Reports and choose Profit and Loss Comparison under the Find report by name dropdown
- Now, enter a date range in the Report period dropdown.
Note: It displays the current year-to-date and the same period from the previous year by default. - Choose the Accrual method or the Cash method in the Accounting method dropdown.
- Now click on Comprare. Multiple items can be viewed here, such as:
- To view the same period and dates last year, choose the ‘Previous year (PY)’.
- To view the previous period for your preferred dates, click on ‘Previous Period (PP)’.
- You can select the Calculations dropdown to choose $ change or % change.
Note: To match and compare reports in QuickBooks Online and QuickBooks Desktop, opt for the accrual method, then run reports. However, export limitations or a QuickBooks Online unsupported browser error may result in reports that do not match. Then, take these steps:
In Case The Reports Don’t Match
- Open QuickBooks Desktop and choose File. Then, click on Close company.
- Now, import your file once again by following Step 3.
- In most cases, repeating the file exportation resolves this issue.
- Now, run the profit and loss comparison report again.
Your data will be successfully moved from QuickBooks Online to QuickBooks Desktop after completing all the above-listed steps.
Know What Data Moves from QuickBooks Online to QuickBooks Desktop
Many of the terms and data vary between QuickBooks Desktop and QB Online due to their distinct features. See the tables below to know what moves and what does not move by the QuickBooks Migration Tool.
Features
| Moves to QuickBooks Desktop | Don’t move to QuickBooks Desktop |
| Multi-Currency Note: Multi-currency transactions are not copied into QuickBooks Desktop. Any non-United States Dollars (USD) transaction from QuickBooks Online is turned into USD on QuickBooks Desktop. | |
| Payroll Note: To create paychecks, sign up for QuickBooks Desktop Payroll or set up manual payroll in QuickBooks. | |
| Reconcile 1. A bold check mark is visible in the cleared column of all reconciled transactions. 2. A light check mark is present in the cleared column of all cleared transactions. | |
| Sales Tax 1. Sales tax items and rates move as service items. 2. Sales tax is listed as a line item on invoices. | Note: Sales tax payments and adjustments are not moved. |
| Projects Moved to QuickBooks Desktop as Customer Jobs. |
Lists
There are list and field limits, along with character limitations, which get shortened as they exceed the limits on QuickBooks Desktop.
| Moves to QuickBooks Desktop | Doesn’t move to QuickBooks Desktop |
| Chart of Accounts 1. Account detail types are not moved to QuickBooks Desktop. 2. Account numbers only appear if you turn on the account number preference. 3. Deleted accounts are moved as inactive accounts without account numbers. | Note: The Inventory Shrinkage account will not be moved to QuickBooks Desktop. |
| Class List Note: Deleted classes are moved as inactive classes in QuickBooks Desktop. | |
| Customers Note: Deleted customers are moved to QuickBooks Desktop as inactive customers. | Note: Customer info listed below will not be moved to QuickBooks Desktop: 1. Customers’ credit card info is not moved due to PCI compliance. 2. Customer notes 3. Preferred delivery method 4. Mobile and/or pager number 5. Is Taxable |
| Vendors Note: Before moving your books, you have to edit and remove the 1099 vendor status in QuickBooks Online. Deleted vendors are moved to the inactive vendor list in QuickBooks Desktop. | Note: Vendor info listed below will not be moved to QuickBooks Desktop: 1. Vendor notes 2. Mobile and/or pager number |
| Employees Deleted employees are moved to the inactive employee status in QuickBooks Desktop. | Note: Employee notes will not be moved to QuickBooks Desktop. |
| Other lists The following lists don’t exist in QuickBooks Online. These show as general items in QuickBooks Desktop: 1. Customer type 2. Vendor type 3. Job type 4. Memorized reports 5. Other names 6. Payroll item 7. Price level 8. Sales rep 9. Ship via 10. Templates 11. To do | |
| Payment Method List | |
| Terms Note: The payment terms that you had set for your customers or vendors will not be moved to QuickBooks Desktop. |
Products and Services
| Moves to QuickBooks Desktop | Doesn’t move to QuickBooks Desktop |
| Bundles Note: Your product and service bundles in QuickBooks Online will not be moved to QuickBooks Desktop. | |
| Inventory 1. Inventory Asset account 2. Cost of goods sold account 3. Purchase account 4. Sales account 5. Quantity on hand 6. Asset values Important: There are different calculation methods in both QuickBooks Online and QuickBooks Desktop. Ensure to check the Cost of Goods Sold and Inventory asset accounts after you convert. | |
| Categories 1. Categories move to QuickBooks Desktop as Parent items. 2. In QuickBooks Online, Categories are set as the same item type as the Products and Services, which are listed under them. |
Preferences
| Moves to QuickBooks Desktop | Doesn’t move to QuickBooks Desktop |
| Company info | |
| Users | |
| Location list |
Reports
The cash basis reports may not match; however, the accrual method reports in QB Online will match the reports in QB Desktop.
| Moves to QuickBooks Desktop | Doesn’t Move |
| Audit log | |
| Reconciliation | |
| Memorized reports |
Transactions
| Moves to QuickBooks Desktop | Doesn’t move to QuickBooks Desktop |
| Cash purchases Note: Moved in QuickBooks Desktop as checks. | 1. Estimates 2. Purchase orders 3. Recurring transactions |
| Time tracking Note: All time activities will remain the same, except for locations. QuickBooks Desktop doesn’t track locations. | Physical timesheets won’t be imported into QuickBooks Desktop. |
| Checks Note: QuickBooks Desktop automatically assigns numbers to your checks when you move them, even if your checks did not have numbers in QuickBooks Online. | |
| Bill payments | |
| Invoices | |
| Refund receipts | |
| Bills | |
| Received payments | |
| Credit memos | |
| Sales receipts | |
| General journal entries Note: Transactions with multiple accounts receivable or accounts payable lines move to multiple journal entries. | |
| Deposits | Note: The billable status on deposits in QuickBooks Online does not appear in QuickBooks Desktop. |
| Transfer funds Note: Moved in QuickBooks Desktop as journal entries. | |
| Paychecks Note: Moved in QuickBooks Desktop as checks. | |
| Liability adjustments | |
| Inventory adjustments | |
| Credit card payments |
The table above shows you what features and data are moved using the QuickBooks Migration Tool, and those that aren’t, so that you can decide which QuickBooks version is more suitable for your business. If you want to transfer QuickBooks data to a new computer, then see the following method.
Section D: Transferring QuickBooks Desktop from One Computer to Another
Go through this process to understand how you can use the QuickBooks migrator tool to transfer QB Desktop files from one computer to another. It is advised that you rename the file(s) on the old computer to make it easily recognizable, so that you don’t end up using the wrong file.
Steps to Take on the Old Computer
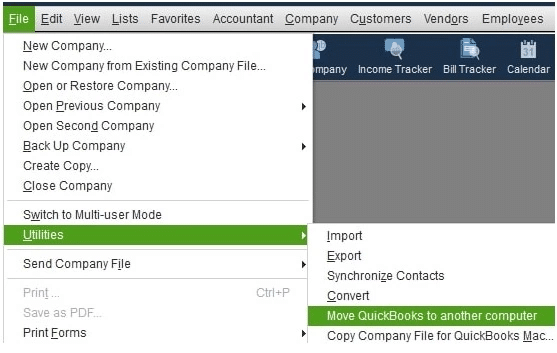
- Launch QuickBooks and head to the File menu.
- Click on Utilities and choose Move QuickBooks to another computer.

- Then select ‘I’m ready’ and set a one-time password.
- Do as the instructions tell you to and select the USB flash drive to store files.
- Now wait until the files are copied.
Steps to Take on the New Computer
- Insert the USB flash drive.
- Check the files on the USB flash drive.
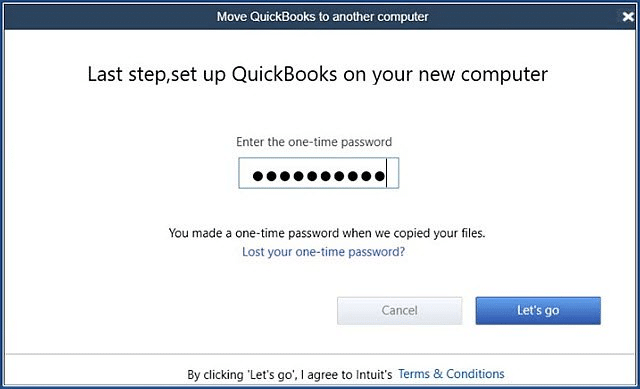
- Now, to start the migrator tool, click on the file Move_QuickBooks.bat.

- Put in your password and click on Let’s go.
- At last, let the Migrator Tool finish the task.
Note: The process will take time based on your computer’s speed and internet, as well as your company file’s size. If your QuickBooks migration tool fails to launch after you select and run your file, then your Windows might be outdated. Follow this guide to update your computer’s Windows.
Do note that once the file transfer is done, the migrator tool will automatically remove your QB files from the USB flash drive. However, you will still have your QuickBooks files on your old computer.
Precautions to Take after Transferring QuickBooks Data to Another Computer
Take the following steps after transferring QuickBooks from one computer to another, as the QuickBooks migration tool may miss some information and leave critical data on your old computer.
- First, sign in to your payroll and payment services.
- Then log in to Intuit Data Protect and schedule an auto-backup for every day.
- If there are any additional company files on your old computer, then move those over to the new computer.
- Now, on your new computer, create a backup of your company to keep your data safe.
If you are facing any Intuit Data Protect errors that cause it to fail backing up data, then read through the referenced article.
Copied and Uncopied Files When You Transfer QuickBooks Data to a New Computer
Here are lists of files that get copied and files that are left uncopied during the data transfer via the QuickBooks migration tool from the old computer to a new computer. Only the necessary files that are needed to ensure proper operation of QuickBooks Desktop are copied to your new computer. However, all the data remains intact on your old computer as well.
Files that are copied by the QuickBooks Migration Tool:
- Recent company files: only the last three company files that you had opened recently on the old computer, including sample files.
- QuickBooks Desktop details, such as its version and additional information, are required for QuickBooks Desktop installation on your new computer.
- Advanced reports (for QuickBooks Enterprise)
- Related files, custom templates & forms
- Business Planner (.bpw)
- Cash Flow Projector (.cfp)
- Financial Statement Designer (FSD clients)
- Financial Statement Designer (FSD data)
- Local attachments
- Loan Manager (LMR)
- QuickBooks letters and templates
- Scheduled and memorized reports
- Printer Setting (PrintEng.ini, wpr.ini, and QBPrint.qbp)
- Statement writer (for QuickBooks Accountant)
- Spell Checker (spell.ini and UserDictionary.tlx)
Files that are not copied by the QuickBooks migration tool:
- Multi-user Setup: It will not be copied to QuickBooks Desktop on your new computer.
- Payroll & Payment Setup: You will be required to sign in on a new computer and complete the setup process again, as it involves sensitive data.
- Intuit Data Protect: You must uninstall it from the old computer, then reinstall it on the new computer, complete the setup process, and sign in again. You’ll still have all the previous backup files.
- Older Company Files: Only the recently opened three company files will be copied. If you have other, older company files, you are required to transfer them manually or restore them from Intuit Data Protect.
- Backup files: If you had created any manual backup files, then they won’t be copied as well.
To update Intuit Data Protect, go through this article. For reinstalling or manually moving QuickBooks from one computer to another without the QuickBooks migration tool, see the method below.
Moving or Reinstalling QuickBooks on a New Computer without the QuickBooks Migration Tool
Here’s how you can manually reinstall or move your QB Desktop installation on a new computer without the QuickBooks data transfer utility.
- Get your product and license information.
- Uninstall the QB application before trying to reinstall it.
- Now, on your new computer, download the installation files or insert the CD for QuickBooks Desktop.
Once done, you can perform a QB Desktop installation on your new computer.
Quickview Table for QuickBooks Migration Tool
Tabulated below is a summary of the blog that provides a concise overview of essential information about the QuickBooks migration tool:
| What is QuickBooks Migration Tool? | It is a tool that allows for data transfer between different versions of QuickBooks, as well as migrating data from one computer to another. |
| Basic Needs for QuickBooks Migration Tool? | A USB flash drive with 150 to 250 MB of storage, along with a stable internet connection. |
| How to Download the QuickBooks Migration Tool? | Launch QuickBooks Online, head to the Export Overview section, click on Get Started, and select ‘Download the QuickBooks migration tool’. After downloading, open the tool, click on Next, read and accept the license agreement terms, then choose Next, and click on Install. |
Conclusion
The QuickBooks Migration Tool is used for transferring data from one QuickBooks version to another, eliminating the need for manual data migration. You can transfer data from the QB Online version to the Desktop version, or the other way around. You can also use the QuickBooks migrator tool to transfer data from one computer to another computer system. Although it is a valuable tool, a few errors may occur that can cause stress and lead to a fear of data loss.
Call our 1.855.738.2784 to speak with Accounting Helpline’s specialist team if you face any technical difficulties with the QuickBooks migration tool for transferring data. Our experts will provide you with complete assistance and comprehensive guidance throughout the process.
Frequently Asked Questions (FAQs)
How to Migrate QuickBooks from One Computer to Another?
If you want to migrate QuickBooks from one computer to another then firstly open QB in your old computer and head to File menu, now tap on Utilities and choose Move QuickBooks to another computer, after that select ‘I’m ready’ and create a one-time password, then follow the instructions and select the USB flash drive to store files, and wait until the files are copied. Once done, insert that USB flash drive into the new computer, and view the files. Now, you can use the QuickBooks migration tool for data transfer. Click on the file ‘Move_QuickBooks.bat’, enter your password, and then click ‘Let’s go’. The migration tool will complete the data transfer from one computer to another.
What is the Migration Utility in QuickBooks?
The QuickBooks migration utility is used to transfer data from QB Desktop to QuickBooks Online version or the other way around, so that you don’t need to repeat the entire setup process between different QB versions or transfer data manually. It can also be used for transferring data from one computer system to another.
Where Do I Find the QuickBooks Migration Tool?
If you want to download the QuickBooks Online migration tool, then firstly open the QBO and go to the Export Overview section, now select Get Started, and click on download the QuickBooks migration tool. The download will start. Once downloaded, click on Next, then read and accept the license agreement terms, tap on Next, and select Install.
How to Migrate QuickBooks from Desktop to Online?
You can transfer data from QuickBooks from Desktop to Online by heading to the QuickBooks Desktop file as an admin, clicking on File and Export by selecting To QuickBooks Online, then you have to click on Get started, you can decide whether to export all your company file data or specific data and whether to move your inventory. Log in to your QuickBooks Online account and choose the QBO company to transfer your data, and select Continue to start transferring.
Related Posts-
How to Troubleshoot: Error Initializing QBPOS Application Log
How to Void Deposit Payments in QuickBooks Desktop
An Expert’s Guide on QuickBooks Write Check Columns Missing
QuickBooks Print and PDF Repair Tool: How to Fix Print Problems
07 Solutions to Fix QuickBooks Not Sending Emails Issues
Decoding the Mystery of the QuickBooks Desktop Invoice Missing Message at the Top

Edward Martin is a Technical Content Writer for our leading Accounting firm. He has over 10 years of experience in QuickBooks and Xero. He has also worked with Sage, FreshBooks, and many other software platforms. Edward’s passion for clarity, accuracy, and innovation is evident in his writing. He is well versed in how to simplify complex technical concepts and turn them into easy-to-understand content for our readers.