
Last Updated on April 15, 2026
If you find the QuickBooks Write Check columns missing, you will not be able to enter all the payment information. As a result, you will incur a delay in making accurate records of your payments.
Usually, by using the Write Checks feature, you can promptly record check payments and keep precise financial records. However, customers occasionally experience problems with columns in the Write Check screen disappearing. These absent columns may cause confusion when entering transactions, interfere with workflows, and slow down bookkeeping procedures.
Therefore, we have thought it important to investigate the reasons why QuickBooks Write Check Columns are missing and figure out practical ways to rectify the situation.
Are you facing the issue with missing columns in your QuickBooks Write Check? If so, feel free to contact our Accounting Helpline’s expert at 1.855.738.2784 for prompt assistance! We are available 24/7 to assist you and return everything to normal.
An Overview of QuickBooks’ Write Check Feature
You can manually record checks to register payments associated with invoices, payroll, or direct payments using the QuickBooks Write Check feature. This helps you track expenses and maintain your books. Date, Payee, Account, Amount, Memo, and perhaps more columns are displayed in the window; each is necessary to record transaction facts accurately, for instance.
Fortunately, these columns make it easier to track and categorize your spending clearly, which is then reflected in your accounting reports and registers. However, data entry becomes incomplete, and there is a risk of erroneous financial statements when certain columns are missing or not displayed.
Thus, it is essential to understand the causes of this disappearance to restore complete functionality and maintain efficient accounting activities promptly.
Possible Reasons Why Write Check Columns Are Missing in QuickBooks
There are several contributing aspects to this issue. We will go through a summary of the most common causes of the missing columns in the QuickBooks Write Check function in this section.
- Customization of form columns is possible with QuickBooks. In some cases, columns may stay invisible if they are manually hidden or rearranged.
- Panels and columns may not appear correctly due to file loss, data corruption, or mistakes in the user profile or corporate file.
- Incomplete or malfunctioning software Updates to QuickBooks may cause issues with the user interface, leading to the disappearance of columns.
- Columns can be visually hidden without being removed because of incorrect window size or resolution settings.
- Occasionally, integrations or add-ons change layouts or result in interface issues.
- Based on available options or requirements, columns may be hidden due to your permissions, geographical setups, or specific data preferences.
You will now be better equipped to troubleshoot the QuickBooks Write Check columns missing problem, now that you have a better idea of why they are missing.
How to Fix and Restore the QuickBooks Write Check Columns Missing
To resolve the QuickBooks Write Check columns missing problem, go through the following solutions mentioned below, and carry out the instructions given.
Solution 1: Restore the Default Layout of the Write Check Form
Specific columns might get inadvertently concealed because QuickBooks allows you to personalize the Write Check interface. You can fix this by returning the form to its initial configuration:
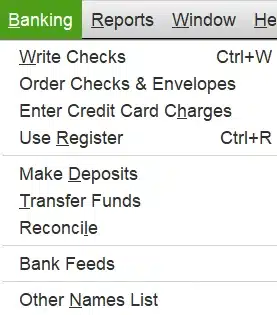
- After launching QuickBooks, select Banking > Write Check.

- Then, find the Customize menu option or button, which is usually located on the toolbar of the form or close to the top.
- After that, select Customize Columns or an analogous option.
- Moreover, choose Reset to Default, check or re-enable the missing columns in the window.
- Now, verify and implement the modifications. Similarly, verify whether the columns have returned.
After following this process, if the problem of missing QuickBooks Write Check columns persists, please proceed to the following step.
Solution 2: Modify the Display Resolution
Due to visual display limitations, some columns may get clipped or concealed. This happens if you happen to lower the resolution from a minimum resolution that the software, say QuickBooks, requires. The content on the screen will then morph to adjust. Follow the steps below to correct the display resolution.
- Firstly, to see the clipped columns, either manually stretch the QuickBooks window horizontally or maximize it.
- Then, ensure the scaling is 100% and adjust your computer’s display resolution to the suggested native settings, such as 1920×1080.
- After making changes, restart QuickBooks.
If you have tried the above steps, but are still experiencing the issue of QuickBooks Write Check Columns Missing, you can move to the next step.
Solution 3: Find Issues with the Company File and Fix Them
To address issues in your company file, use the verify and rebuild utility. Verify utility first finds the problem in the company data, and then rebuild utility resolves it.
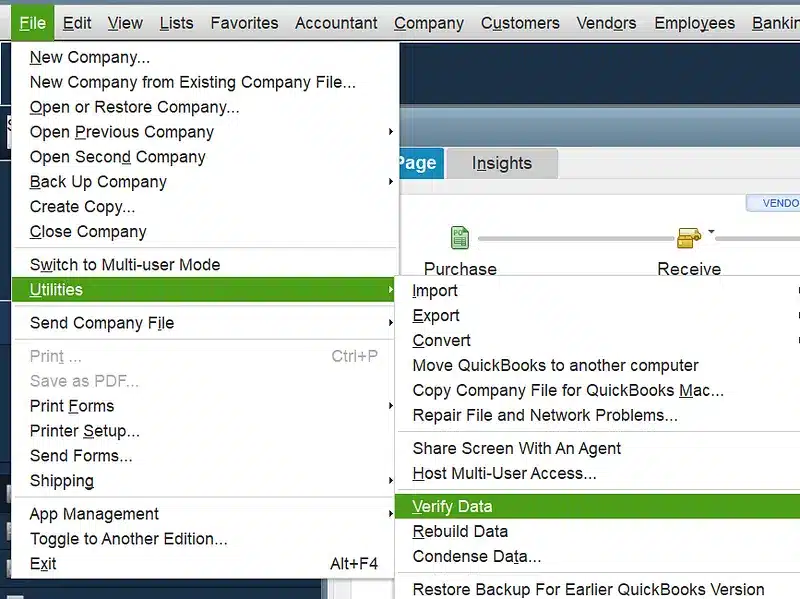
- First, verify the integrity of your company’s files by selecting File > Utilities > Verify Data.

After selecting the Verify data option, you will receive a message showing that:- QuickBooks detected no problems with your data, which means your data is clean and you don’t need to perform any of the steps.
- For information on how to resolve an error message, visit the QuickBooks Desktop help website.
- Data damage was discovered in the file, causing your data to lose its integrity. To repair it, you need to rebuild your data.
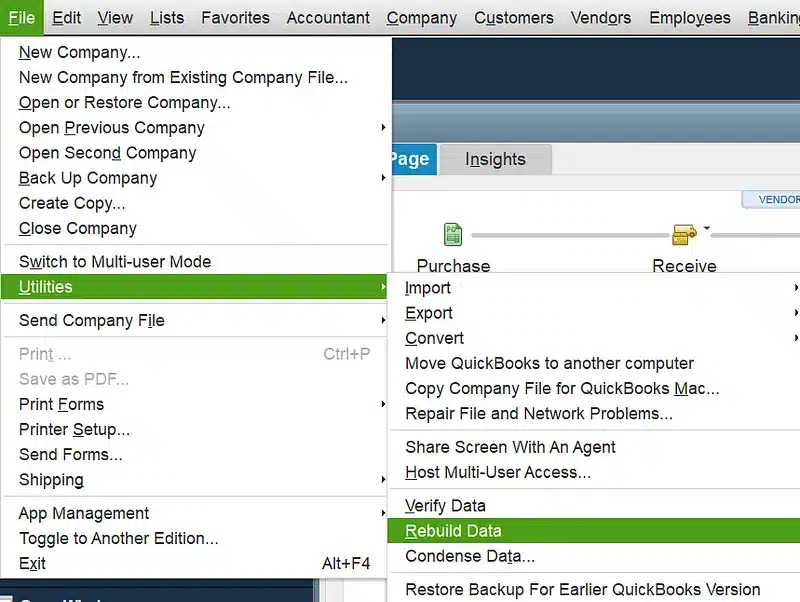
- Next, to address the issues with the company file, choose File > Utilities > Rebuild Data.

- Then, QuickBooks will ask you to create a backup before it reconstructs the company file.
- Click OK. Without initially backing up, rebuilding is impossible. Click OK after selecting the backup destination. Avoid letting this take the place of another backup file. After entering a new name in the File name field, click Save.
- Click OK when you get the notification that the rebuild is complete.
- Now, check if the columns are restored when you reopen QuickBooks.
If you are still experiencing the QuickBooks Write Check columns missing issue after completing this procedure, proceed to the next step.
Solution 4: Get the Latest Release of QBDT
Using an outdated version of your application can cause interface issues. To avoid these problems, you should update your application to the latest version by following the instructions below:
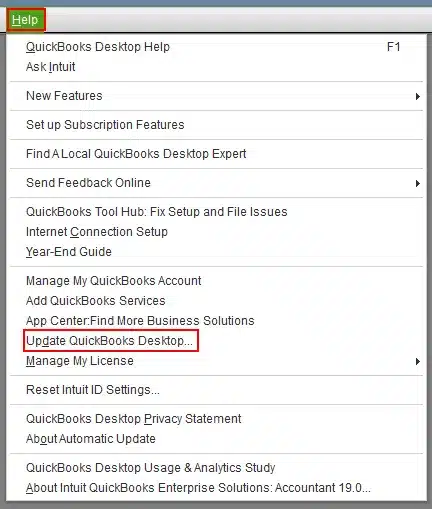
- Firstly, select the Update QuickBooks Desktop option from the Help menu.

- Secondly, to download all pending updates, click Update Now.
- Lastly, restart QuickBooks after finishing it.
If you’ve completed this process but are still experiencing issues with missing QuickBooks Write Check columns, we can proceed to find a solution while moving forward to the next stage.
Solution 5: Try Using a Different User
To isolate the issue and find out if the problem originates from the program/Windows, or the user profile, try creating a new user. You can also log in with another user profile instead of creating a new one if you already have one.
- First, log in with a new QuickBooks user and go to the Write Check window.
- If you continue to have a problem with the new profile, there might be an issue with the QuickBooks program or installation.
Now, try logging into QuickBooks on another workstation and try accessing the Write checks feature there.
Proceed to the next step for resolving the QuickBooks Write Check columns missing issue.
Solution 6: Temporarily Disable Third-party Add-ons
Installing third-party templates or plugins in QB will enhance your experience by connecting with other programs or introducing new functionality. This could result in security flaws or compatibility problems. For that, you must take the following actions to halt that:
- First, turn off these add-ons for the time being.
- After disabling the integrations, see if the missing columns resurface.
- Also, if the add-ons are the source of the problem, contact the suppliers for updates or compatibility solutions.
After disabling your third-party add-ons, you can now resume your QB operations.
Wrapping Up
Although many issues can often interfere with your bookkeeping tasks, the QuickBooks write check columns missing problem is one of a kind. However, it is usually easy to fix using simple techniques. First, ensure the display settings are optimized and begin by resetting the form layout. Next, update QuickBooks to the most recent fix releases, then confirm and restore the integrity of company data, and single out the issue by checking different user profiles or systems. Additionally, to avoid conflicts, ensure that third-party add-ons are disabled.
A systematic method to resolve problems will ultimately ensure that your Write Check feature remains fully operational when problems arise, maintaining accuracy and efficiency in the management of your financial operations. If you still experience issues, please contact our Accounting Helpline’s specialist at 1.855.738.2784 for personalized and professional advice tailored to your situation.
Frequently Asked Questions (FAQs)
Why are my QuickBooks Write Check Columns missing in the window?
There are a number of reasons why you might find your QuickBooks Write Check columns missing, including a software bug, modifications to your display settings, or an unfinished update. Verifying your settings and making sure QuickBooks is up to date are some vital things to do to address this situation.
How does one go about adding columns in QuickBooks?
You can add columns to invoices, sales receipts, and reports using QuickBooks. Click the Gear icon for Settings, go to Account and Settings, and then choose the Sales option to allow Custom fields for invoices. To add the desired columns to a report, tap on Customize after opening the report and modifying the Rows/Columns settings.
In QuickBooks Write Check, how can I restore the missing columns?
The first thing you can do to recover QuickBooks Write Check Columns Missing is to restart the program, which often fixes technical glitches. You will need to make some changes if you find that the columns are still missing. For that, go to the Write Check window’s column choices. Moreover, you can try resetting the display settings as well.
Related Posts-
QuickBooks Check Alignment Problems – Troubleshoot Guide
QuickBooks Sales Tax Center Not Working? Know How to Fix in Simple and Quick Steps
Resolving QuickBooks Payroll Not Deducting Taxes Issue With Causes & Solutions to Fix
QuickBooks Print and PDF Repair Tool: How to Fix Print Problems
07 Solutions to Fix QuickBooks Not Sending Emails Issues
Ultimate Hacks to Remove QuickBooks Error 30114

Edward Martin is a Technical Content Writer for our leading Accounting firm. He has over 10 years of experience in QuickBooks and Xero. He has also worked with Sage, FreshBooks, and many other software platforms. Edward’s passion for clarity, accuracy, and innovation is evident in his writing. He is well versed in how to simplify complex technical concepts and turn them into easy-to-understand content for our readers.