Last Updated on March 10, 2025
Is your QBDBMgrN not running on this computer? This issue can cause significant trouble, especially when users try hosting multi-user mode. Switching to multi-user mode on workstations may be difficult, and errors like H202, 6175, etc., can accompany this situation. Several other instances may also encounter this issue. QuickBooks Database Server Manager is a crucial utility that lets users share company files over the network. Thus, when it doesn’t run correctly, you can’t use multi-user mode properly, and QuickBooks faces extreme problems. Let’s discuss the reasons why QBDBMgrN is not running on this computer and what are the professional ways to solve it.
Does the QBDBMgrN not running on this computer issue affect your operations? Let us help you fix the issue with this blog and our expert team, who are a call away. Our toll-free number, 1.855.738.2784, offers dedicated support.
Causes Behind QBDBMgrN not Running on this Computer Issue
Here’s why you encounter the QuickBooks database server manager stopped problem:
- Damaged configuration files, aka Network Descriptor (ND) and Transaction Log (TLG) files, can cause the error running Database Server Manager.
- The configuration file size may be greater than your company file, triggering the error with the database server manager.
- Not having admin permissions on your Windows and QB can cause you to have errors running the QB Database Server Manager.
- Data damage in your file is one reason QBDBMgrN is not running on this system.
- You might not close your QB company file properly, which is leading to this error.
- Misconfigured hosting settings can trigger the problem of QuickBooks QBDBMgrN not running on this computer.
- Using an old or discontinued QB Desktop version can cause database server manager errors.
- If you have disabled QuickBooks Database Server Manager on your PC, you will receive the error that it’s not running on the PC.
- Security firewall restrictions are commonly known to interfere with QuickBooks Database Server Manager operations.
- A missing or damaged QBCFMonitorService.exe file in your service can cause this issue.
- When you receive the QuickBooks database server manager, no files are connected message, an outdated QBDBMgrN can be the cause.
- If your Windows Firewall is not updated, you’ll encounter the QBDBMgrN problem.
Quick Fixes to Resolve the QBDBMgrN not Running on this Computer Issue
If QuickBooks database server manager is not available, the following solutions can help you regain access and run it without issues:
Fix 1: Change Configuration File Names
Changing the name of your configuration files, namely Network Descriptor and Transaction Log, can help resolve the server manager issue. If these files are corrupt, you can’t run the multi-user mode and your QB app correctly. So, let’s look into the renaming process to fix your configuration files:
- Access your QuickBooks Desktop company file.
- Navigate to the Home page.
- Press the keyboard’s F2 key.
- In the FILE INFORMATION section, check for the Location segment.
- Usually, it is the same folder as your QB company file.
- After you access the folder, find files with .nd and .tlg extensions. They look like XYZcompanyfile.qbw.nd and XYZcompanyfile.qbw.tlg.
- Right-clicking these files and hitting the Rename option will help you resolve the error.
- Add OLD once you click rename and change the file names to XYZcompanyfile.qbw.nd.old and XYZcompanyfile.qbw.tlg.old.
- Tap OK or Save and change the file names.
- Re-run QB and see if your issue goes away.
Fix 2: Look into the Configuration Files Size
While you rename the Network Data and Transaction Log files, also consider their size and ensure they are smaller than the company file. For instance, if your company file is 1.04 GB and the TLG file is 1.9 GB, you will get errors like QuickBooks database server manager not running.
Fix 3: Open a Sample Company File
You can troubleshoot issues concerning the QuickBooks server manager not running on your system by opening a sample or dummy company file. This helps identify the root cause, whether it’s related to your company file, QuickBooks installation, or its location. Here are the steps to follow:
- If you’re using Windows, access the Start menu.
- Press and hold the keyboard’s Ctrl key while you launch QuickBooks.
- Click on “Open a sample file.”
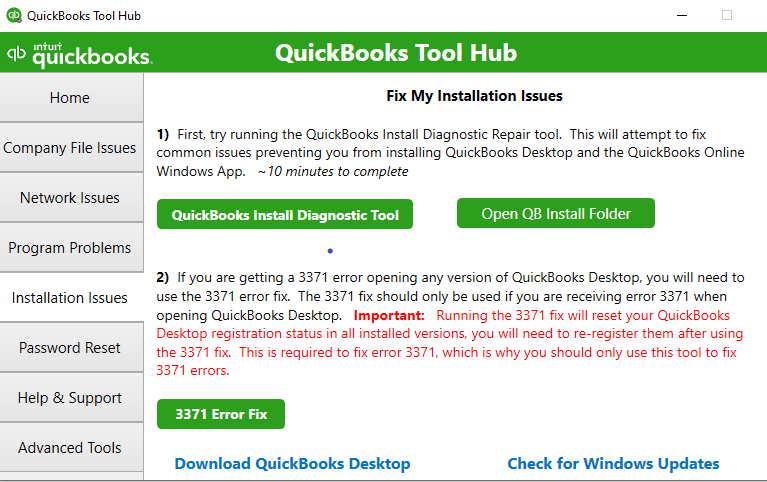
If QuickBooks or the sample file fails to open and displays an error, the program has a problem. In such cases, use the Install Diagnostic Tool within the QB Tool Hub to resolve the issue. On the other hand, if it launches successfully, your data file might be damaged.
Fix 4: Get a Third-Party File Repair Service
When resolving the QBDBMgrN not running on this computer server, consider acquiring a third-party file repair service.
Fix 5: Open or Close the Company File in Multi-User Mode Properly
When you don’t close your company file correctly on the server PC, it catches errors when you reopen it. So, try the following steps to ensure it closes properly:
- Launch QuickBooks Desktop on your server system.
- Navigate to File, then hit Open or Restore Company.
- Tap Open a company file. Locate and launch your company file, then click Next.
- Mark the Open file in multi-user mode checkbox and click Open.
- Sign in to your company file.
- Access File and choose Close Company/Log off. This action closes your company file on the server.
Fix 6: Enter Windows and QuickBooks as Admin
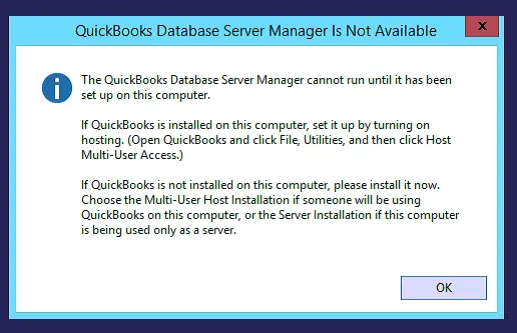
Suppose you face the message that the QuickBooks database server manager cannot run until it has been set up. In such cases, obtaining administrator privileges for both QuickBooks Desktop and the Windows operating system is essential. Follow these steps to create a local user account and subsequently elevate it to an administrator account in Windows 11/10:
- Navigate to Start, access Settings, and then select Accounts. In some Windows versions, you might find it under Other users.
- Check the box next to the Add other user option and select Add account.
- Hit the “I don’t have this person’s sign-in information” option, then navigate to the next page and proceed to tap “Add a user without a Microsoft account.”
- Provide details such as a username, password, or password hint—or answer security questions—and then tap Next.
- Modify the local user account into an administrator account by selecting Start, navigating to Settings, and choosing Accounts.
- Under Family & Other Users, hit the account owner’s name (look for “Local account” beneath the name), and hit Change account type.
Note: If you choose an account indicating an email address or not specifying “Local account,” you are assigning administrator permissions to a Microsoft account, not a local account. - Hit Administrator under Account type and then tap OK.
- Log in to Windows using the new administrator account.
- As you enter Windows as an administrator, launch QuickBooks with administrator privileges by right-clicking the QuickBooks icon and selecting the Run as administrator option.
Fix 7: Verify the Hosting Settings
If you are getting the QBDB server unreachable error, ensure to resolve the hosting settings. This means that only your server computer should allow Hosting multi-user access and not workstations. Your workstations can be in multi-user mode but shall not host multi-user access. Here are the hosting configuration steps to check on workstations:
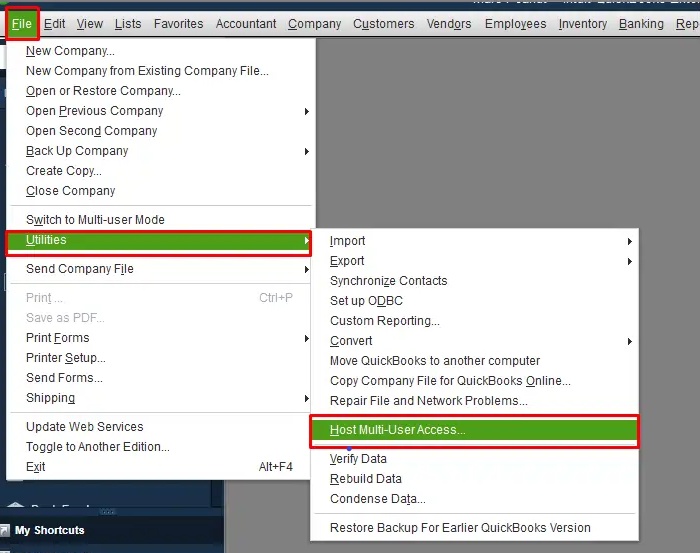
- Launch QuickBooks on any workstations displaying the database server manager errors.
- Move to the File menu.
- Choose Utilities.
- If the option “Host Multi-User Access” is visible, avoid selecting it. Proceed to the next workstation, as this one is not the source of the issue.
- If “Stop Hosting Multi-User Access” flashes on the screen, tap it.
Now, verify the server’s settings and ensure they are hosting multi-user access. If you have the complete QB Desktop version installed on your server, try the following steps:
- Launch QuickBooks on your server system.
- Access the File menu and choose Utilities.
- If the option to Host Multi-User Access is available, choose it. Repeat this step, but this time, select Stop Hosting Multi-User Access. This action resets the multi-user mode.
- Once again, perform the process by selecting Host Multi-User Access.
Fix 8: Install a Trial Version of a New QB Desktop or Upgrade
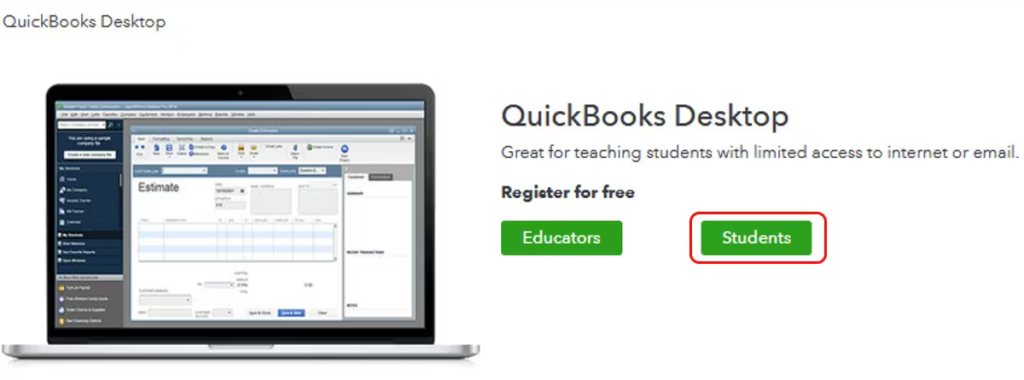
As established earlier, the QBDBMgrN not running on this computer issue can occur because of an old or discontinued QuickBooks version. In such cases, either upgrade or use the trial version of the latest QB Desktop.
Fix 9: Ensure to Install QB Database Server Manager
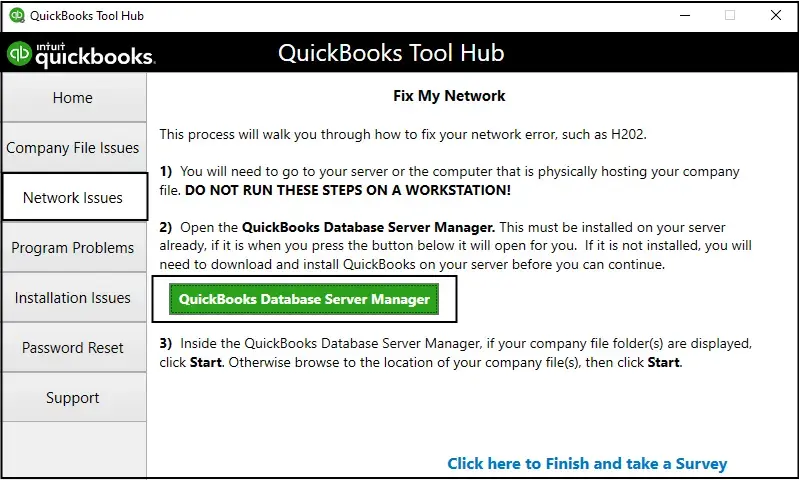
QuickBooks Server Manager is an essential component of QuickBooks and must be installed on your system if you intend to share your company files with others over the network. Follow these steps in this scenario:
- Close all currently open programs on your server PC, including QuickBooks.
- Launch the installation file Setup_QuickBooks.exe that you downloaded.
- Follow the onscreen instructions provided.
- When QuickBooks prompts you to choose an installation type, tap Custom or Network Options. Then proceed by clicking Next; refrain from choosing Express.
- Choose the most suitable option for your network configuration and click Next. Both options will help you install the Database Server Manager. So, if QuickBooks Desktop is already on your server system, it won’t overwrite any existing company data.
- If you need both Database Server Manager and QuickBooks Desktop on your server computer, select the strongly recommended option, “I’ll be using QuickBooks Desktop on this computer, AND I’ll be storing…”
- If you are keen on installing only Database Server Manager on your server, choose “I will NOT be using QuickBooks Desktop.”
- Follow the remaining onscreen commands and tap Install. Be prepared for Windows to request permission during the procedure.
Fix 10: Use Quick Fix My File
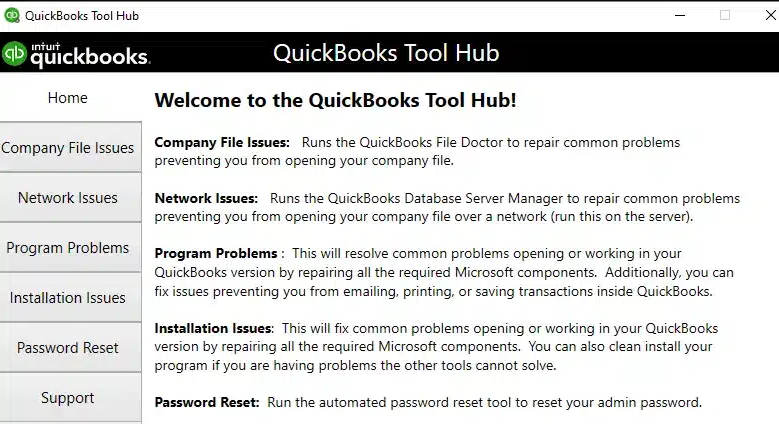
QuickBooks Tool Hub boasts several utilities that help users resolve various errors. This time, when you get the QBDBMgrN not operating problem, try the Quick Fix My File tool from the hub. It will diagnose and resolve data damage within your company file as follows:
- Exit your company file and QB.
- Access the Intuit website.
- Locate the QuickBooks Tool Hub download link.
- Download and save everything where it’s easily accessible.
- Begin installation by double-clicking QuickBooksToolHub.exe.
- Run the InstallShield instructions on the screen and accept the License Agreement.
- Now, finish installing QuickBooks Tool Hub and open it.
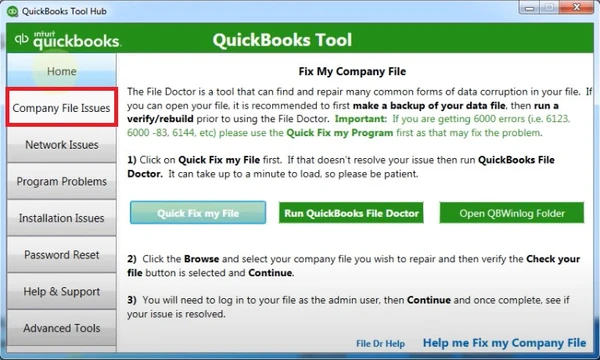
- Access the Company File Issues section.
- Choose Quick Fix My File.

- Finish resolving it by clicking OK and launching QB.
Fix 11: Refresh Connection by Reinstalling the Database Server Manager
Has your QuickBooks database server stopped? Consider uninstalling and reinstalling the Database Server Manager (DSM) properly to refresh the connection. Follow these steps:
- Press the Windows key + R to open the Run dialogue wizard.
- Write appwiz. Cpl in the search and click OK.
- Look for QuickBooks Database Server Manager in the list.
- Select Uninstall/Change and follow the onscreen instructions to remove the database server manager.
- Subsequently, rename its installation folders. If you cannot find the Application Data or Program Data folder, view the hidden files and folders or use Windows search. You can only uninstall or rename the QuickBooks version folder in the Intuit folder (C:\Program Data\Intuit) if you have other Intuit apps installed on your computer. Here’s the process:
- Navigate to the installation folders.
- Access the run command by pressing the Windows key + R on your keyboard.
- Enter (or copy and paste) the folder’s location, then press Enter.
- Right-click the DSM installation folder, then select Rename.
- Rename the folder with.OLD at the end.
- After fulfilling these steps, move forward with the reinstallation of QuickBooks Database Server Manager.
Fix 12: Update Windows Firewall
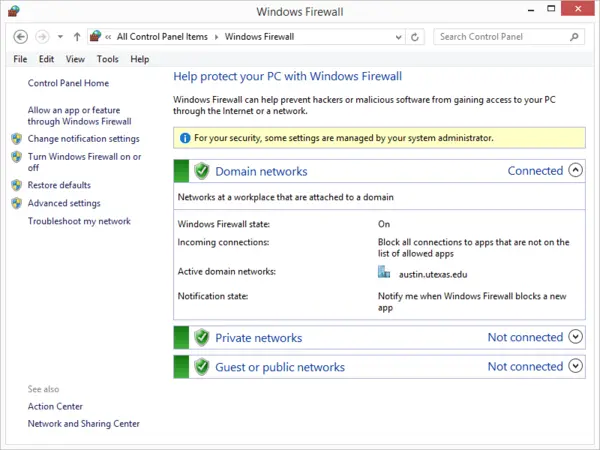
As mentioned in the causes section, an outdated Windows firewall can prevent QuickBooks Server from running. Here’s how you can update your Windows Firewall to resolve this issue:
- Close the QuickBooks application.
- Press Windows + R on your keyboard, enter Control firewall.cpl in the provided area, and press Enter to access Windows Firewall.
- Access the “Update your Firewall Settings” section and tap the “Check for Updates” option.
- Choose “Update Now,” then select “Use Recommended Settings,” and verify if an update is accessible.
- Restart your computer and subsequently open QuickBooks.
Fix 13: Restart QuickBooks Database Server Manager Service
If you’re still bothered by the QuickBooks database manager not running, try the following steps to restart the service:
- Enter Windows + R, then input services. msc in the Run box and press Enter.
- Scroll down and locate the service identified as one of the following: QuickBooksDB27, QuickBooksDB26, QuickBooksDB29, or QuickBooksDB28.
- Right-click on the specific service and select the Restart option.
Fix 14: Update QuickBooks Tool Hub and Run QB File Doctor
Ensure your QuickBooks Tool Hub is updated to its latest release so you can avail yourself of up-to-date utilities and fix the QuickBooks 2023 server’s not-running problem. Using the QuickBooks File Doctor tool efficiently resolves typical file and network problems in QuickBooks Desktop (QBDT). Let us guide you through the File Doctor process:
- Close your QuickBooks Desktop (QBDT) software.
- Access the Start menu on your Windows PC.
- Find and open the QuickBooks Tool Hub.
- Within the tool hub, tap the Company File Issues tab.
- Select Run QuickBooks, File Doctor.
- Hit your company file from the drop-down list in QuickBooks File Doctor.
- Select the Check your file (middle option only) option and then Continue.
- Input your QuickBooks admin password, then click Next.
Fix 15: Clean Install QuickBooks
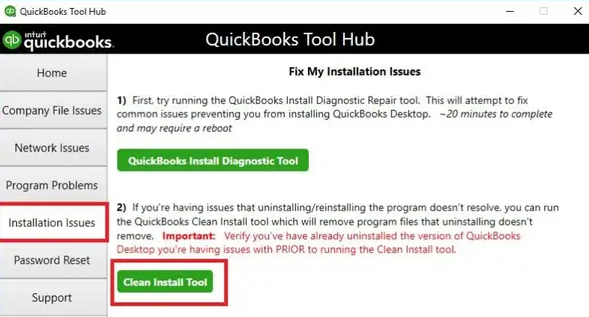
Going through a clean uninstallation and reinstallation of QuickBooks can prove useful for the problems associated with QuickBooks database server manager 2021. It involves deleting your QB app, renaming the installation folders, and installing QuickBooks Desktop again. The steps for the QB clean install process are as follows:
Prior Considerations
- Get the installer version of QuickBooks beforehand from official sources.
- Keep the license, product, and other crucial numbers in hand from the original package or purchase confirmation email if you bought it online.
Uninstall QuickBooks Desktop
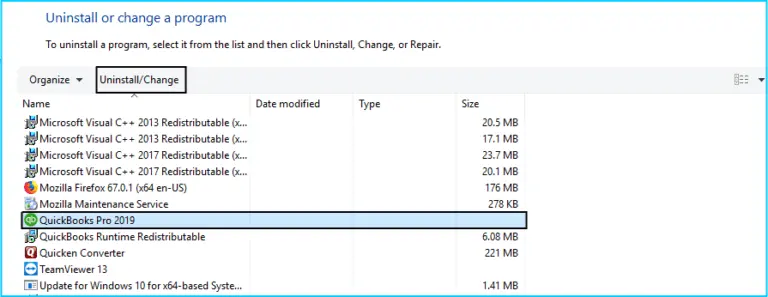
- Open the Start menu.
- Type Control Panel and launch it.
- Access Uninstall a program, which should be beneath the Programs and Features section.
- Tap the QuickBooks Desktop version to remove from this list.
- Choose Uninstall/ Change, then click Remove and Next.
- Delete QB properly from your PC.
Rename Installation Folders
- Display hidden folders and files.
- Access the Start menu, search for File Explorer, and launch it.
- Access the folder with your QuickBooks company files.
- This QB folder might be in any of the following locations:
- C:\Program Files\Intuit\QuickBooks (year)
- C:\ProgramData\Intuit\QuickBooks (year)
- 64-bit version C:\Program Files (x86)\Intuit\QuickBooks (year)
- C:\Users\(current user)\AppData\Local\Intuit\QuickBooks (year)
- Right-click and click Rename on the folder.
- Add OLD to your installation folder name and click OK to save it. QB will not open these files when you reinstall them.
- Reinstall QB.
Errors during Renaming
If encountering an access error message during an attempt to rename the folder, follow these steps:
- Right-click the Windows Task Bar, then choose the Task Manager option.
- Tap the Processes tab.
- Hit the Name column header to sort the list.
- Choose the following processes and conclude each by selecting End Process: QBDBMgrN.exe, QBDBMgr.exe, QBCFMonitorService.exe, and Qbw32.exe.
- Confirm with a Yes when you get the message, “WARNING: Terminating a process can cause undesired results…”
Fix 16: Check Firewall and Antivirus Permissions
If the QuickBooks db33 service on the local computer started and then stopped, you must look into your firewall and antivirus permissions. They might be causing interferences in establishing connections in the multi-user network. Here are the things to look out for when configuring the firewall and antivirus for the QuickBooks Database Server Manager:
Add Windows Firewall Port Exceptions for the QB Program
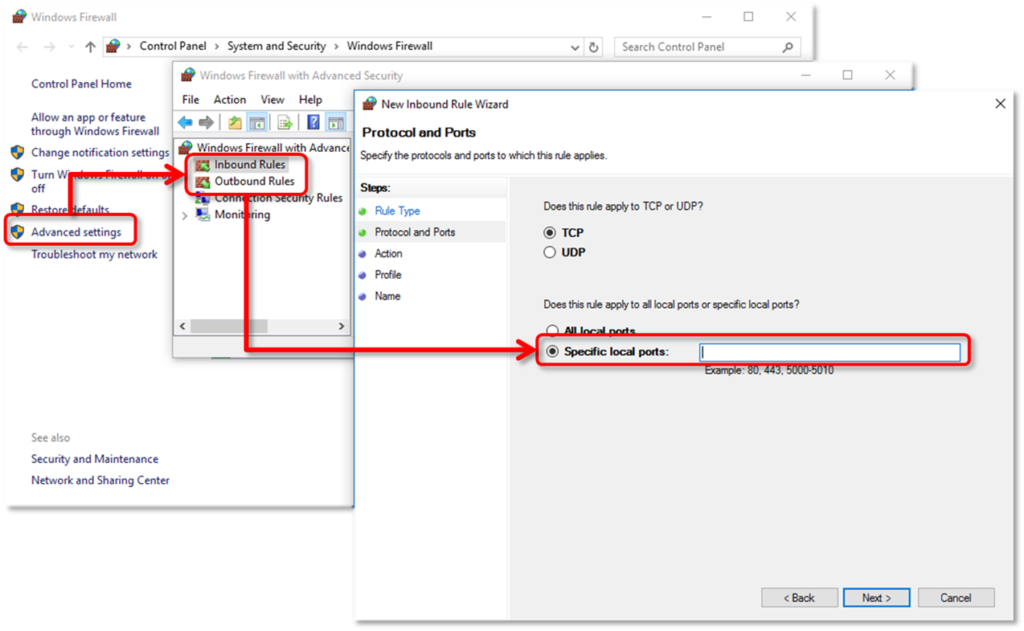
- Tap the Windows key to open the Windows Start menu.
- Search for Windows Firewall and open it from the results.
- Click Advanced Settings.
- Right-click Inbound Rules first and later Outbound Rules. Then, choose New Rule.
- Choose Port, then click the Next option.
- Ensure to select TCP.
- Now, you’ll reach the Specific Local ports field, where you can input the ports specific to your QB version.
- Click Next once you finish entering the port number.
- Tap Allow the Connection and move forward with the Next option.
- Mark all profiles when you are requested and tap Next.
- Create and name the rule, then click Finish to end the process.
- Repeat everything for Outbound Rules in Step 4.
Create Windows Firewall Exceptions for QuickBooks Database Server Manager
- Tap the Windows key to open the Windows Start menu.
- Search for Windows Firewall and open it from the results.
- Click Advanced Settings.
- Right-click Inbound Rules first and then Outbound Rules. Then, choose New Rule.
- Choose Program and Next.
- Click This Program Path, and now hit Browse.
- Find and choose the below-mentioned executable files, then tap Next:
- exe = C:\Program Files\Intuit\QUICKBOOKS YEAR
- exe = C:\Program Files\Intuit\QUICKBOOKS YEAR
- exe = C:\Program Files\Common Files\Intuit\QuickBooks
- Tap Allow the Connection > Next.
- Mark all profiles > Next.
- Create and name the rule.
- Repeat everything for Outbound Rules in Step 4.
Fix 17: Ensure QuickBooks Database Server Manager Affects Local
An option to set QuickBooks Database Server Manager to affect either the local or system configuration is available. Usually, upon inspection, it is set for the system. However, it would help to switch to local when the QuickBooks database manager service fails to start. This modification often ensures the uninterrupted functioning of DBSM, enabling users to log in without any issues.
Fix 18: Ensure Full Control of QuickBooks db33.
When your QuickBooks db33 won’t start, you’ll have to grant full control to address the issue effectively. Follow the steps below:
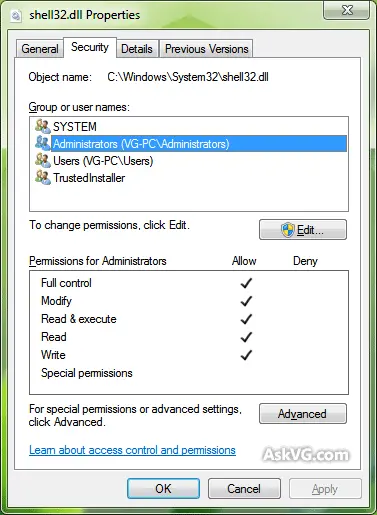
- Open the folder storing your company file.
- Right-click and select Properties.
- Find the Database under the Security segment.
- Click Edit.
- Give users full control from this point on.
Fix 19: Click the Log On Tab
When you get the message, “server manager.exe this application could not be started,” the following steps can help you fix the issue:
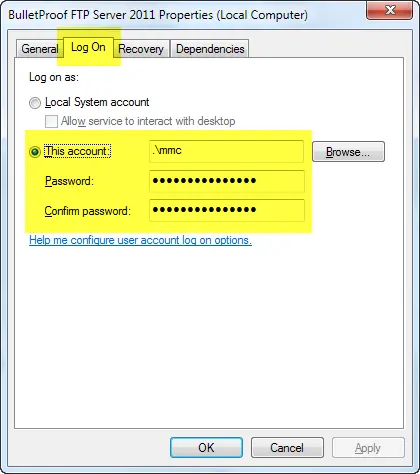
- Open services.msc using the Run (Windows + R) command.
- Locate the service named QuickBooksDBXX (where XX corresponds to the number assigned by Intuit for your installation).
- Access the service and tap the Log On tab.
- If it is configured to connect as the QuickBooksDBXX user, switch it to the Local System account using the radio button.
- Click OK.
- Right-click on the QuickBooksDBXX service and hit Start.
Fix 20: Run Verify/ Rebuild Data
When your QuickBooks database service doesn’t start, you’ll have to check for data damage in the QB company file. These utilities simplify the task and minimize any hassle when it comes to scanning company files for corruption. So, run them as follows:
- Follow the trail of opening File in QuickBooks, then choosing Utilities, followed by Rebuild Data.
- Click OK on the QuickBooks Information window. Follow the onscreen instructions to create a backup and safeguard your file.
- Allow the Rebuild tool to scan and repair your file; this process may take some time. Even if QuickBooks seems unresponsive, the tool is actively functioning as long as mouse movement is possible.
- Once the Rebuild tool finishes the repair, click OK.
- Now, access the File menu, choose Utilities, and hit Verify Data.
- Let the tool scrutinize your file for potential data issues.
- If QuickBooks detects no errors, click OK, and you can continue using your company file without any data loss. However, if an issue is identified, click Rebuild Now.
If you prefer to manually address errors, identify them in the Verify Results window. Before proceeding, ensure you back up your company file. To manually fix data errors:
- Navigate to the File menu, hit Utilities, and click the Verify Data option
- Enable the tool to scan your file for data problems.
- Look into the Verify Results screen and click Expand All to view the errors.
- Refer to online articles for steps to fix each error. If there’s no article about the error you are facing, contact support for assistance in repairing your company file.
Fix 21: Verify Accurate Permissions and Scan through the Database Server Manager
Ensure you have set accurate folder permissions on the server so users can share the files over the network. It can help run the QuickBooks database server manager in multi-user mode without hassle.
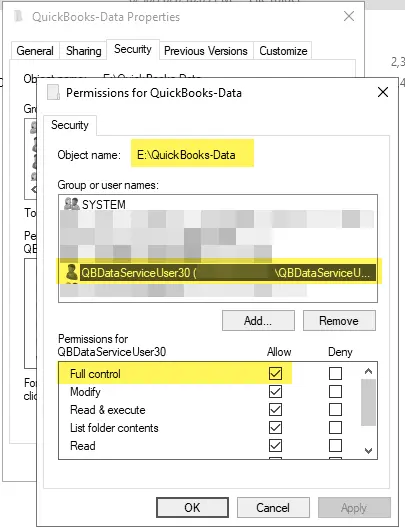
For Windows 10:
- Tap the Windows icon to launch the Start menu and access File Explorer.
- Locate and right-click the folder where you have stored your company files.
- Choose Properties, then Sharing, and then tap Share Add.
- Hit the corresponding QBDataServiceUserXX based on your version.
- Set both users’ permission levels to Full Control and click Share.
For Windows Server 2012:
Before proceeding, make sure you have the File and Storage Services installed.
- Open the Windows Start menu, input “Run” in the search, and launch the Run Command.
- Enter ServerManager and hit OK.
- Choose the File and Storage Services option, then Shares.
- From the Task drop-down, select New Share. You will notice a list of File Share Profiles. You can learn about the differences between the profiles by clicking each profile and reading the description.
- Select SMB Share – Quick. Note: SMB Share – Quick is the default profile, and this choice may vary.
- In the Share location section, choose Type a custom path, then Browse to choose the folder you want to share.
- Hit the appropriate folder and click Select a folder, then Next. Note: You can leave the default selections under the Configure Share settings window and click Next again.
After you have set permissions for file sharing, you can easily start scanning files through QuickBooks Database Server Manager as follows:
- Navigate to the Network Issues section.
- Choose QuickBooks Database Server Manager. If QuickBooks is not installed on your server, you will receive a prompt to install it.
- When you open the QuickBooks Database Server Manager, hit Start Scan if your company file folder(s) are visible. If they are not, browse to the location of your company file and then move forward with Start Scan.
- The QuickBooks Database Server Manager works to fix your firewall permissions automatically.
- Once the scan is complete, click Close.
After scanning, ensure there’s an ND file in the folder. If not, you’ll have to scan it again.
Fix 22: Ping the Server from the Workstation
If you are unable to retrieve connected files and the logged-in user list, conduct a ping test to check the connection. Do so by pinging your server from each workstation experiencing the Database Server Manager errors.
First, we will enable Network Discovery on your server and workstations with the following steps:
- Tap the keyboard’s Windows icon to access the Start menu on the server and workstations.
- Enter “Network” in the search and launch Network and Sharing Center.
- Hit Change advanced sharing settings.
- Ensure Turn on network discovery is chosen in the Network Discovery and File and Printer sharing sections.
Now, we will retrieve your server name from the server as follows:
- Tap the keyboard’s Windows icon to access the Start menu on the server.
- Put “Run” in the search and open Run.
- Enter “CMD” in the Run window and press the Enter key.
- Use the keyboard to type “ipconfig/all” in the CMD window and press Enter.
- Access the Host Name in the Windows IP Configuration section, located on the right. From here, note down or copy the server name.
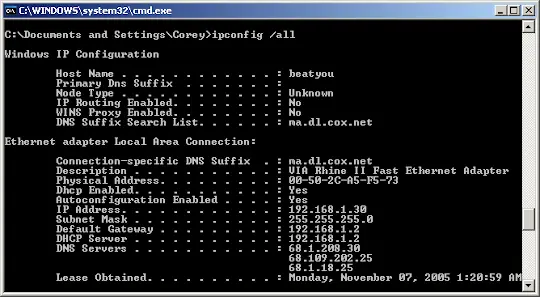
Finally, you should return to your workstation to test the server:
- Tap the keyboard’s Windows icon to access the Start menu on the workstation.
- Put “Run” in the search and open Run.
- Enter “CMD” in the Run window and press the Enter key.
- Input “ping [your server name]” and press Enter (without brackets around your server name).
- Repeat these steps for each workstation encountering the server manager has stopped working message.
Your server will function correctly if you receive a reply for each packet with no loss. In case of packet loss or slow reply, look for assistance from an IT professional to address network issues.
Summing Up
We hope the details we offer to resolve the QBDBMgrN not running on this computer problem help regain access to the tool. However, some issues can be technical and may require the supervision of an expert. We recommend you call our Accounting Helpline experts team at 1.855.738.2784 so they can take over the problem and resolve it for you effectively.
FAQs
What are the various instances where the ‘QBDBMgrN not running on this computer’ issue arises?
Server manager the application was unable to start correctly appears in the following instances:
– You may be facing errors hosting multi-user mode, including the error H202. So, when you run QB File Doctor, it throws the QBDBMgrN that is not running on this computer.
– Hosting a company file becomes problematic as you get error 6175 repeatedly. When you start hosting, the error 6175 arises with a message that the server job is not running.
– When you run the File Doctor for error 6175, it throws the QBDBMgrN not running on this PC error. When you verify the services, it says they’re stopped. You may try to start it manually, but it stops immediately.
– You may be unable to enable QB Database Server Manager services on your PC.
– When using QB Database Server Manager on the server, the message QBDBMgrN not running on this computer arises.
– Your workflow gets disrupted with the notification QBDBMgrN not running on this computer and error H202.
– On the dedicated host, QuickBooks Database Server Manager consistently displays a “STOPPED” status on the “Database Server Tab.” The issue reoccurs, causing everyone to be disconnected, and the status returns to “STOPPED.”
– Your PC crashes, and when you try opening the backup, the error Hosting Mode is OFF, and QBDBMgrN not running on the computer arises.
What QuickBooks versions face the ‘QBDBMgrN not running on this computer’ error?
The following QB and Windows versions may be where the server manager cannot run because of an error:
– QB Enterprise 2018
– Server 2012
– QuickBooks 2019
– Windows 10
– QB Desktop Pro 2022
– Windows Server 2019
– QuickBooks 2016 Premier
– QB Pro 2021
– QuickBooks Enterprise 19.0 R12P
– Windows 7
– Windows Essentials 2016
– QB 2022 Premier/ Accountant
What steps should you follow if I don’t have the complete QB Desktop version installed on your server?
If you don’t have the complete QB Desktop on your server, you will only have the Database Server Manager. So, following the steps to scan the folder holding your company file will help:
– Initiate the Windows Start menu on the server responsible for hosting your company files.
– Enter Database in the search bar to launch QuickBooks Database Server Manager.
– Tap the Scan Folders tab.
– Click on Browse. Then, hit the folders containing your company files (QBW).
– Click OK upon completing the process of choosing your folders.
– This displays the active window after selecting Browse. Locate the company file folders.
– When ready, hit Start Scan.
– After the scan is over, the folders will be visible in the QuickBooks company files found section. Consequently, you can access these company files from other computers connected to your network.
Should I consider something before updating the firewall for the ‘QBDBMgrN not running on this PC’ issue?
You should create data backups before you update the firewall when your server 2019 server manager won’t open. It helps ensure no data loss occurs:
– Open QuickBooks, navigate to the File menu and choose Switch to Single-user Mode.
– Go back to the File menu, click your mouse on Back up Company, and then choose Create Local Backup.
– Within the window, choose Local Backup and proceed to the Next button.
– Access the Local Backup Only section, click on Browse, and choose the location where you wish to save your backup company file.
– You have the option to specify the number of backups you want to retain, though this is your choice.
– This starts a test to ensure the integrity of your backup file before saving.
– When you’re prepared, hit OK.
– Choose the Save it Now option and proceed to Next.
What should be done when the QuickBooks Database Server Manager encounters issues in a peer-to-peer network?
Suppose the server manager cannot run because of an error in a user settings file in a peer-to-peer network. In such cases, make sure you have installed QuickBooks on the computer designated as the file host and set up the program for hosting. Then, you can open each file on the host, switch them to multi-user mode, and then close them. When users access these files, they should operate as usual.

Edward Martin is a Technical Content Writer for our leading Accounting firm. He has over 10 years of experience in QuickBooks and Xero. He has also worked with Sage, FreshBooks, and many other software platforms. Edward’s passion for clarity, accuracy, and innovation is evident in his writing. He is well versed in how to simplify complex technical concepts and turn them into easy-to-understand content for our readers.


