Last Updated on March 10, 2025
QuickBooks restore failed error can cause panic among users attempting to restore the backup of the QB data file. If you are among those who have encountered this error and are clueless about the next actions to take, we offer you this in-depth guide with practical solutions to resolve the frustrating error.
QuickBooks Desktop often encounters errors that can easily be fixed by restoring the backup, but what if you discover an error while you restore QuickBooks backup? This article will discuss one such error that causes QuickBooks to display an Error: Failed or QuickBooks Restore failed error while restoring the backup of the QuickBooks data file. Restore failed errors can appear with different error messages in QuickBooks, and numerous reasons trigger this type of error. Further in this article, we have discussed every reason that triggers this error in QuickBooks, along with some easy steps that you can take to resolve the QuickBooks restore failed can’t remove log file. Follow the complete article for detailed information.
Has your QuickBooks restore failed and is causing you significant annoyance and frustration? Ring Accounting Helpline specialists and experts at 1.855.738.2784 for Instant Help from professionals regarding the error
What is QuickBooks Restore Failed Error?
Restore failed error occurs when a user tries to restore a QuickBooks company file backup. The error while restoring QuickBooks from backup displays four error messages to the user.
Restore Failed. This is an Invalid Format of a Post QuickBooks 2007 Backup File
Error: Failed
Error: Restore failed. Can’t remove log file
This file is set to read-only. Try again with a different name
You might also get the error message displaying the file’s name that you are trying to restore with the .qbw extension. The QuickBooks restore failed can’t remove logfile error can cause trouble restoring the backup of company files when needed. It can lead to significant troubles, considering backups are there for a reason: to protect the data from damage. Various reasons that caused the restore failed error are listed below in detail.
What Causes QuickBooks Restore Failed Error?
The many reasons why QuickBooks won’t restore backup are mentioned below:
- QuickBooks does not allow special characters to be in the company file name, and if your company file has any distinctive character, it will trigger the restore of backup failed error.
- You might encounter the QuickBooks restore backup failed error if you try to save the backup file over a company file that already exists in QuickBooks.
- In case you are trying to restore the backup of QuickBooks data from a USB drive to a network drive. (In such circumstances, Error 6189, 816 is displayed to the user)
- When you try to restore the QuickBooks backup file name created by a newer version of QuickBooks to an older version, in case you have made the backup file using QuickBooks 2017, you can only restore it in 2017 or a later version of QuickBooks.
- If the backup file you are trying to restore is less than 6000 KB. (QuickBooks backup files are always more than 6MB in size, and most probably, the file you are trying to restore is not an actual backup file)
- There is damage in the company file that you are trying to restore, causing restore failed QuickBooks is unable to restore this backup.
- QuickBooks company file that you are trying to restore is a read-only file.
- The user trying to initiate the restoration of the backup file might not have adequate rights and privileges to do so.
- QuickBooks won’t restore backup when there’s a mismatch in Windows firewall settings, internet security, or network settings.
Step to Resolve QuickBooks Restore Failed Error
We suggest you follow each troubleshooting step in the given order for a quick resolution.
Step 1: Rename QuickBooks Backup Company File
QuickBooks can only read a company or backup file when no special characters, spaces, or symbols are used in it. If you have any, remove them following the instructions below.
- Open Windows File Manager and locate the company file that you will find in C:\ Users\ Public\ Documents\ Intuit\ QuickBooks\ folder with .qbb extension.
- Right-click the file and select Rename.
- Remove any special characters from the file name like % # @ ! ^ & * ( ) _ + and save the file. Check if you can successfully restore backup QuickBooks.
Step 2: Save the Backup File Without Replacing the Existing Company File
When you get to the window that asks where you wish to save the file, browse to the standard location where you usually save the file. If you see a message while saving the file, ‘The file name exists. Would you like to Overwrite this file?’ Then, hit No and save the file with a different name at the exact location. This message usually appears when you have a file saved with the same name in the folder. Check if restoring a QuickBooks backup file becomes simpler now.
Step 3: Verify the Version of Your QuickBooks Desktop Application
Make sure to use an updated version of QuickBooks Desktop to create the backup file. For example, the backup file you created in the 2019 version cannot be restored in QuickBooks 2018. However, you can restore a backup in the QuickBooks Desktop 2019 version from the file created in QB Desktop 2018.
Further, QuickBooks File Manager is helpful for you in importing clients’ QB files, upgrading from one version to another, and determining the current QuickBooks version.
Step 4: Move the Company File to the Local Storage of the Computer
If you have your company file stored on a network drive or an external storage device, then first copy the company file to your computer’s local storage and try restoring it in QuickBooks from this new location. When accessing the data file from an external source, general connectivity issues can affect the backup and restore operation. Verify if QuickBooks restore failed invalid format error message is terminated.
Step 5: Repair the Damaged Company Data File
Repairing damage in the company file is simple if you know how QuickBooks File Doctor works. File Doctor tool can be launched using QuickBooks Tool Hub, which you can download by visiting its official download page.
- Launch QuickBooks Tool Hub and go to the Company File Issues tab.
- Select QuickBooks File Doctor and browse to select the company file you are trying to restore.
- Select the option to repair the company file damage, and File Doctor will automatically identify and fix the damage in the company file. After running it, check if you can restore a QuickBooks backup file.
For more detailed instructions on repairing damage in QuickBooks Company File, follow the troubleshooting Step 1 Download and Run QuickBooks File Doctor from our article on QuickBooks Error 6175.
Step 6: Create a New Folder to Save the Backup of the Company File
QuickBooks can’t restore the backup of a company file if the folder holding the backup file is damaged. With the instructions below, we will create a new folder and restore the backup QuickBooks desktop from there.
- Create a new folder and copy the company file into it.
- Try restoring the company file from this new folder. If the error arises because of a damaged folder, it will be fixed by following this step.
- Right-click the backup file and select Properties. If you see the file size is less than 6MB, then delete the file and create a new backup file.
Step 7: Change the Properties of the Backup File
If the backup company file is read-only, QuickBooks can’t modify it to restore the backup. Follow the instructions below and change the QuickBooks backup company file properties.
- If you get an error that says the file is a Read-only file while restoring the backup, then right-click the file and select Properties.
- Unmark the Read-only checkbox from the bottom of the Properties window.
- Click Apply and then OK. Check if you can now restore QuickBooks.
Step 8: Restore a Different Copy of Your Company File
Before beginning with this method, if your company and backup company files are on an external device like a USB or hosting service, move them to the local hard drive.
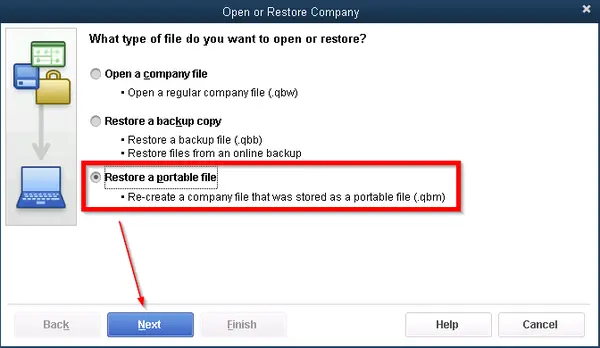
- Go to the File menu in QuickBooks and select the option Open or Restore Company.
- Choose the Restore a backup copy option. Select Next.
- Further, hit the Local Backup option and choose Next.
- Search your computer for a backup company file. The file would look like yourcompanyname.qbb.
- Select a folder where you would like to save the QuickBooks backup restore. Next, choose the Open option.
- Note that if you open the backup in the same folder as your company file, it might overwrite your data. Avoid overwriting by renaming the existing file to make the names unique or save the file in another folder altogether.
- After finishing everything, hit the Save button. Now, you will have a new company file to proceed further.
Step 9: Reset Password and Restore Missing Payroll Data
If your QuickBooks restore failed and the error messages indicate things about the password or payroll-assisted data, you can finish the restoration as follows:
Reset your Password
If an error message stating, “Your data has NOT been restored because you failed to enter the correct admin password,” emerges on your screen, it’s time to reset your password to initiate restoring QuickBooks backup files successfully. You can use the automated Reset password tool to change the password and successfully restore your backup. Restore the backup file again after resetting your password.
Restore Missing Payroll Data
If at any point of restoration, you encounter this message, “This QuickBooks file may be missing some of the payroll data that you have already sent to the Payroll Service. Before creating any new transactions, you need to restore the missing data by clicking Send Payroll Data from the Employees menu and then clicking the Send button,” you need to follow the steps mentioned below.
- Choose the Send Payroll Data option in the Employee menu in QB Desktop.
- Select the field that says Items to send. Select Send if you have 0 paychecks for $0.0. However, if any transactions are listed, don’t hit Send yet. It might create duplicate transactions by accident.
See if you can restore the company file’s backup without any errors.
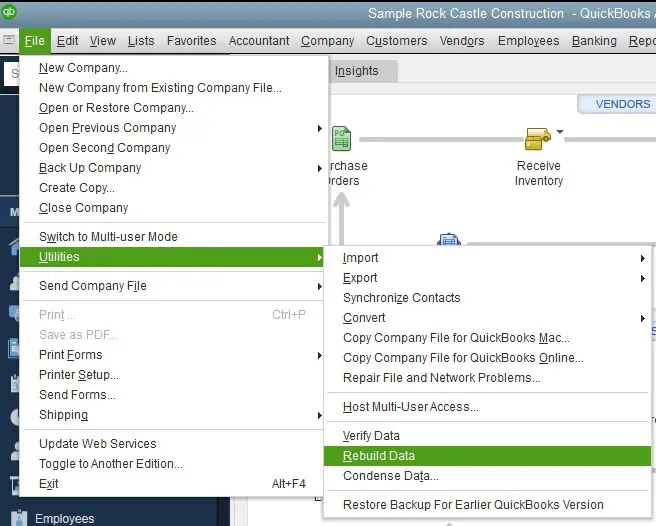
Step 10: Run the Verify and Rebuild Data Utility
If the integrity of your company file is compromised, running the verify and rebuild data utility from QuickBooks Desktop itself can help resolve QuickBooks failed to restore. Do so as follows:

- Access the QB Desktop and move to the File menu.
- Choose the Utilities option from the drop-down menu.
- Select Verify Data from the drop-down list.
- Let the Verify data tool run and look for errors in the company file. If it finds something causing problems, it will show and suggest you run the rebuild utility.
- To do so, you need to go to the Utilities section in the File menu.
- This time, choose the Rebuild Data utility option.
- Let the scanning and repairing process finish.
Step 11: Create a Portable Company File

If the invalid format is causing QuickBooks not to restore the backup file, create a portable file on two distinct computers. Even see if you can use email as an attachment instead of external drives like a USB. Check if you can restore the QuickBooks portable company file.
Step 12: Run Windows as an Administrator
Not having admin privileges can lead to trouble restoring the backup file. So, run the Windows as an admin as follows:

- Go to the Windows Start menu.
- Right-click and choose to Run as an administrator.
- See if you can now restore the backup of the company file.
Hopefully, the steps mentioned in the article will help you restore the backup of your company file. We understand that QuickBooks is widely used by businesspersons and not by Windows technicians, and it might be difficult for you to follow all the troubleshooting steps. However, if QuickBooks restore failed even after the troubleshooting, and you want a quick resolution, then dial Accounting Helpline Error Support Number 1.855.738.2784, and one of our experts will help you resolve the error on an immediate basis.
FAQs
How do I restore a QuickBooks backup file from a flash drive?
Answering how to restore a QuickBooks backup file, users can follow the steps mentioned below:
1. Go to the File menu and choose open or restore a company option, especially if the local drive doesn’t have the backup file.
2. Restore a backup copy (.qbb) and choose Next.
3. After choosing Local Backup, select Next. An Open Backup copy wizard appears.
4. Look for the backup file and click Open.
5. Select Next.
6. Select Save from the drop-down arrow to save the restored backup file to the desired location.
7. Select the backup file, hit Save, and address the notifications sent by QB.
Hopefully, this satisfies how to restore QuickBooks file from flash drive.
What are the accepted special characters that can prevent QuickBooks restore failed error?
Acceptable special characters in the file name that won’t cause QuickBooks restore failed error:
The list of acceptable characters is as follows:
1. Alpha-numeric (A-Z, a-z, 0-9)
2. The comma (,)
3. Dot or period (.)
4. Plus sign (+)
5. Question mark (?)
6. At symbol (@)
7. Ampersand (&)
8. Exclamation point (!)
9. Number/pound sign (#)
10. Tilde (~)
11. Asterisk (*)
12. Space ( )
13. Underscore (_)
14. Single quote (‘)
15. Minus sign/hyphen (-)
16. Semi-colon ( ‘ )

Edward Martin is a Technical Content Writer for our leading Accounting firm. He has over 10 years of experience in QuickBooks and Xero. He has also worked with Sage, FreshBooks, and many other software platforms. Edward’s passion for clarity, accuracy, and innovation is evident in his writing. He is well versed in how to simplify complex technical concepts and turn them into easy-to-understand content for our readers.

