
Last Updated on April 17, 2026
The QuickBooks clean install tool is an excellent utility for removing residual files and folders while uninstalling and reinstalling the application. It cleanses your system and ensures a hassle-free and seamless reinstallation. Running this tool becomes critical if you’re in a pickle and trying to get rid of certain issues. This is a blog to help you clean install your QuickBooks Desktop application with guided steps.
Reinstalling QuickBooks Desktop using the QuickBooks clean install procedure is necessary when damage becomes an obstacle to utilizing QuickBooks. Reinstalling without the QuickBooks clean install tool does not get rid of residual files and folders that can prompt the same errors again. In this article, we cover the step-by-step process to download and run the QuickBooks Removal tool to get a fresh copy of QuickBooks installed on your system.
When you apply it during reinstallation, the QuickBooks clean install tool may benefit you in several aspects. If you’re struggling to fix your system after removing the QB app and preparing your device for a fresh installation, we suggest you contact our Accounting Helpline team straight away. Our support team is available at the toll-free number 1.855.738.2784 to aid you with everything related to this tool and its application.
What is the QuickBooks Clean Install Tool?
QuickBooks Clean Install is a procedure undertaken when you wish to remove certain issues in the QuickBooks Desktop application arising as a result of issues deep in the QuickBooks installation. It fixes problems with QuickBooks operations and numerous errors you may encounter while operating QB. A clean installation is done by the QuickBooks Clean Install Tool, which removes the previous installation folders to make space for fresh files, renames your QB folders, and fixes company file issues.
Things to do Before You Clean-Install QuickBooks Desktop
Before you head over to Clean Install QuickBooks Desktop, a few crucial tasks need to be performed to avoid any file or data loss.
Back up the Company File
It is recommended that QuickBooks data be backed up to a flash drive. It will ensure that the data is not lost in untimely situations.
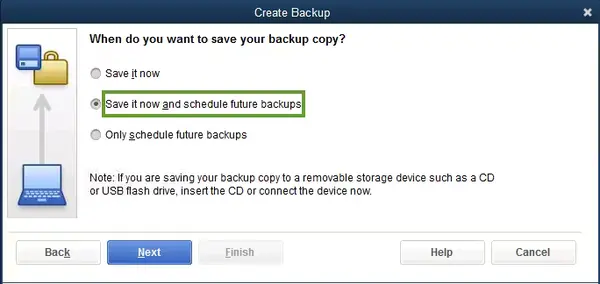
- Double-click the QuickBooks Desktop icon to open the application.
- Go to the File menu and create a local backup using the Back Up Company option.
- You can choose either Online Backup or Local Backup, depending on your preference.
- Hit Next and follow the instructions on the screen to complete the backup.
You would now need to keep your product and license info in hand before clean installing the QuickBooks application.
Keep the License and Product Number Handy
After you are done with uninstalling the QuickBooks desktop application with or without the QuickBooks Uninstall Tool, reinstallation will require you to have the license and product number handy.
NOTE: If you can still open the application, press F2 or Ctrl + 1 keys to open the Product Information window, where you can see the product registration information.
This information would come in handy to activate the application later on.
Download Your Installer’s Version
Ensure you have your QB version installed. Then, let’s proceed to take a look at the steps to clean install the QuickBooks application.
How to Use QuickBooks Clean Install on Windows?
The proper method to use the QuickBooks Clean Install tool requires the following steps:
Step 1: Uninstall the QuickBooks Desktop application
Undertake the following steps to remove QuickBooks from your device as a first step to a clean install:
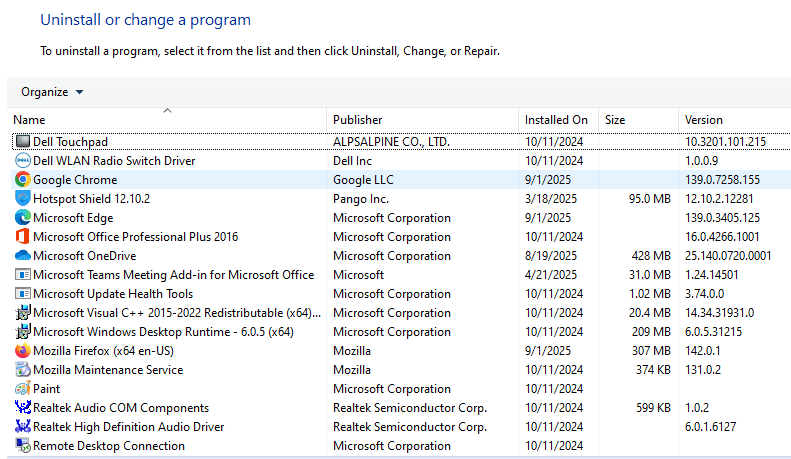
- Using Windows + R on the keyboard, open the Run command window.
- Type Control Panel in the Run box and press Enter or click OK.
- Choose Programs and Features and click Uninstall a Program.

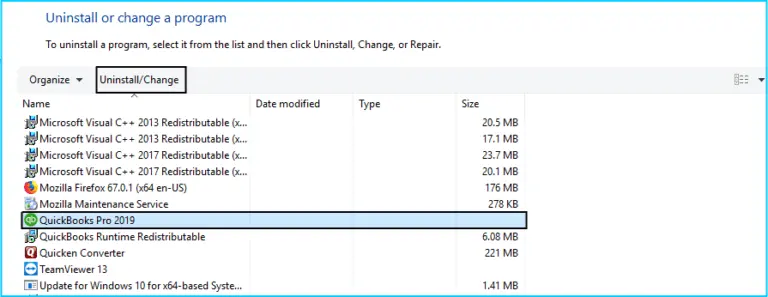
- Locate and select QuickBooks from the list of installed programs.
- Select the Uninstall/Change option and choose Uninstall to continue with the uninstallation.

- Follow the prompts on the screen to remove QuickBooks Desktop from Windows altogether.
- Click “Next.” If you don’t see this option, log out and then sign back into the server as an Administrator.
- To delete the QBDB service, open Command Prompt as an Administrator and type the command: sc delete quickbooksdb## (where ## corresponds to the version, such as 28 for 2018, etc.)
- Delete the QBDataServiceUser## within Computer Management by navigating to System Tools > Local Users and Groups > Users.
- Reboot the server.
Note: If an error occurs during uninstallation, you can contact Support by dialing the toll-free number +1.855.738.2784.
Now, rename the QB installation folders with the steps given in the next method.
Step 2: Rename QB Installation Folders to Completely Uninstall QuickBooks
Undertake complete deletion of QB from the system through the following steps:
- First, make sure that your Windows is set to Display Hidden Files and Folders.
- Open Windows File Manager by pressing Windows + E on your keyboard.
- Navigate to the QuickBooks installation folder that is usually located at:
- C:\ ProgramData\ Intuit\ QuickBooks
- 64-bit version C:\Program Files (x86)\Intuit\QuickBooks
- C:\Users\(current user)\AppData\Local\Intuit\QuickBooks
- C:\Program Files\Intuit\QuickBooks
- Right-click the QuickBooks folder and select Rename.
- Type OLD after the folder name and try to reinstall QuickBooks.
If you receive any errors, look at the next section.
To Tackle the Error while Renaming the Folder
- Right-click the Windows Taskbar or press Ctrl + Alt + Delete keys together on your keyboard and choose Task Manager.
- Under the Process tab, select the Image Name column header to sort processes alphabetically.
- Right-click QBDBMgrN.exe, QBDBMgr.exe, QBCFMonitorService.exe, and Qbw32.exe files, then select End Process.
- Click Yes on the message that shows the ‘Warning: Terminating a process can cause undesirable results…‘
- Try renaming the QuickBooks folder once again.
Next, proceed to reinstall QuickBooks Desktop with the steps given in the following section.
Step 4: Reinstall QuickBooks Desktop
If you have the CD, insert it into the computer and follow the steps on the screen to complete the installation process.
If QuickBooks was purchased from the Intuit website, download your QuickBooks version from the QuickBooks Product Download Page.
Once the setup is downloaded, run it. That is when you will be asked to enter the license and product number, which can be found on:
- CD box
- Online order email
The wizard then helps you complete the remaining steps
- Click Next.
- Accept the terms of the license agreements and click Next.
- The screen asks for the License Number and Product Number.
- Enter your License and Product Number and Hit Next.
- Now, choose your Installation type and go with the Recommended.
- Click Next and select Install.
- Now, QuickBooks will start installing on your computer.
- Once your QuickBooks desktop has been successfully installed, click Open QuickBooks.
This would reinstall QuickBooks on your system.
Detailed Procedure to Install QuickBooks Desktop on Windows
After you uninstall and reinstall QuickBooks through the clean install method, implement the following procedure to install the app correctly.
Downloading and Installing QuickBooks Desktop
After you’ve successfully downloaded the QuickBooks Desktop package, follow these steps for installation.
Action 1: Hosting QuickBooks on a Network
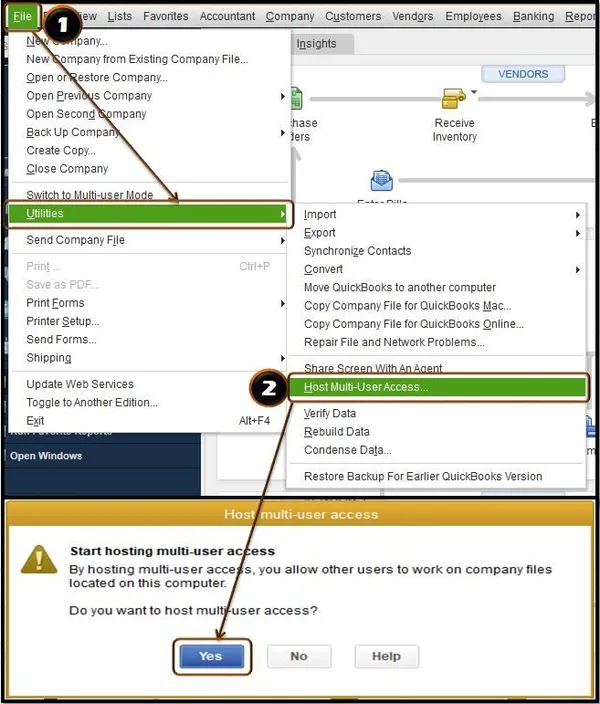
If you’re setting up QuickBooks on a network for the first time, you’ll need to establish a multi-user network setup and install QuickBooks Database Server Manager before proceeding.
Action 2: Preparing for Installation
- Meeting the vital system requirements for compatibility and complete functionality is the first prerequisite for the clean install tool for QuickBooks.
- Next, you must download the appropriate version of QuickBooks Desktop on your device beforehand and save the file in an easily reachable location, such as your Windows desktop.
- The product and license numbers should be noted or written for future needs.
Now, find your product and license numbers from the steps in the next section.
Action 3: Locating Product and License Numbers
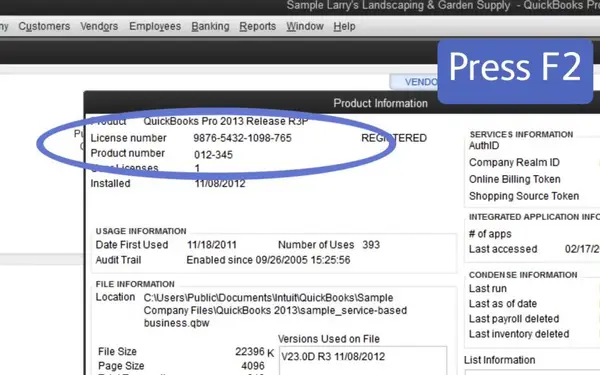
Retrieve your product and license numbers for QuickBooks via the F2 or Ctrl + 1 keys in QB Desktop that extend the Product Information window on the screen. Then, install the QB Desktop app.
Action 4: Installing QuickBooks Desktop
- Launch the exe file from the fresh download package after you uninstall and reinstall QuickBooks Desktop.
- The on-screen commands, including the software license agreement for uninterrupted and legal operations, will be accepted.
- Then, tap “Next.”
- Input your product and license numbers, then pick “Next.”
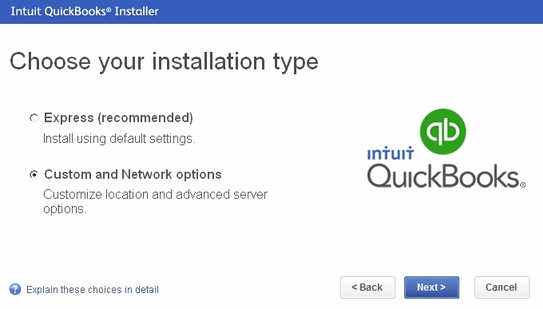
Now you will be asked to choose how you want to install QuickBooks Desktop.
Action 5: Choosing the Installation Option
Intuit QuickBooks Desktop offers two installation options for QuickBooks: Express or Custom and Network.
- Using Express Install:
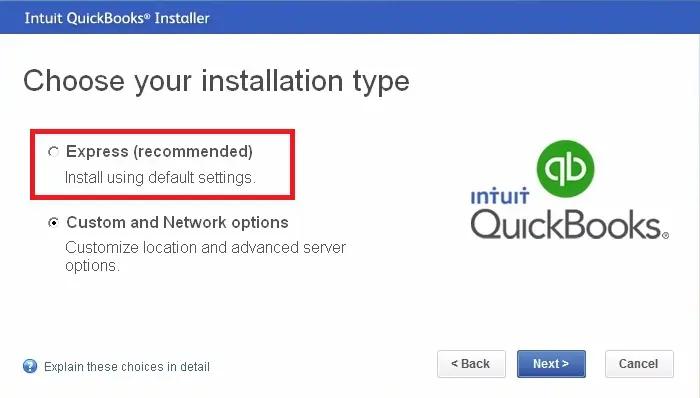
We recommend this option if you are:
- A first-time user.
- Reinstalling QuickBooks.
- Installing QuickBooks on a single computer (not part of a network).
Now, to install it using this method, follow these steps:- Click “Express.”
- Then, tap “Next.”
- Choose “Install.”
- After completion, hit “Open QuickBooks.”
- Under Custom and Network Install.

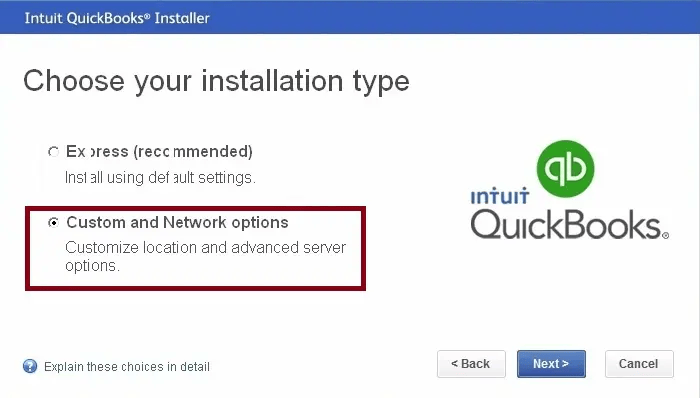
We recommend a custom installation if you:
- Open QuickBooks in a location different than the default one (e.g., on a server).
- Host your company files on a server.
- Have a multi-user network setup.
The steps for a custom installation are given below:
- Tap “Custom and Network Options.”
- Select “Next.”
- Show your intention to run QuickBooks.
- Reach the next window.
- Pick “Change the install location.”
- Use the “Browse” option to define the location for your QuickBooks folder (typically placed in the Programs folder).
- Hover over “Next” to initiate the installation.
- After it’s done, click “Open QuickBooks.”
Action 6: Activation and Updates
The finished installation of QuickBooks will nudge you to activate and update the software. If you require assistance with activation, here are the instructions:
- Open QuickBooks Desktop.
- Go to the Help
- Click Activate QuickBooks Desktop.
- Manage your information through the steps on the screen.
- Add QBDataServiceUser## to the server’s Administrators group through Computer Management by going to System Tools >> Local Users and Groups >> Users.
- Open “msc” and perform the following actions:
- Change the startup type of QuickBooksDB## to “Automatic.”
- Stop the QBIDPService service.
- Delete the following file: “C:\ProgramData\Microsoft\Windows\Start Menu\Programs\StartUp\Intuit Data Protect.”
- Grant the “All Users” group Full Control access to the following three folders:
- C:\Program Files (x86)\Common Files\Intuit\QuickBooks
- C:\Program Files (x86)\Intuit
- C:\ProgramData\Intuit
- Reboot the server and verify that the QuickBooksDB## service and QBIDPService are still set to “Automatic” and running.
Now, we’ll list the steps to perform a QuickBooks clean install for Mac.
How to QuickBooks Clean Install for Mac
The steps below will guide you on how to clean install QuickBooks Desktop for Mac.
Step 1: Uninstall QuickBooks for Mac
The uninstall procedure goes as follows:
- Close QuickBooks for Mac.
- Go to the Finder menu on your Mac desktop and choose “Go.”
- Select “Applications.”
- Locate the QuickBooks for Mac icon and drag it to the Trash.
Then, you should remove the user and system PLIST QB files.
Step 2: Remove User and System PLIST QuickBooks files
To reset preferences to their default settings, remove both User and System PLIST files. It will unregister your QuickBooks for Mac products upon reinstallation. Follow these steps for each folder.
User PLIST
- While on your desktop, access the Finder menu and choose “Go.”
- Hold the Option key, then select “Library.”
- Open the “Preferences” folder.
- Find PLIST files with “QuickBooks” and your version in the name, then move them to the Trash. Ensure you delete ALL files containing “intuit.QuickBooks20XX” (where XX represents the year of your version).
- Empty the Trash.
This would remove the user and system PLIST files.
System PLIST
- In a new Finder window or from the desktop icon, open “Macintosh HD.”
- Navigate to “Library,” then the “Preferences” folder.
- Locate PLIST files with “QuickBooks” and your version in the name, then move them to the Trash. Make sure to delete ALL files containing “intuit.QuickBooks20XX” (where XX represents the year of your version).
- Empty the Trash.
This would remove the user and system PLIST files.
Step 3: Install QuickBooks Desktop on Mac
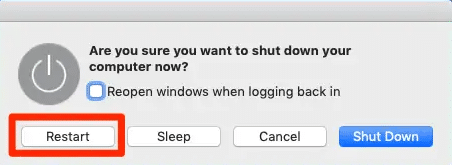
Next, restart your Mac computer.
Once done, you need to install QB Desktop again.
- Close all currently running applications.
- Double-click the downloaded installer from where you obtained your QuickBooks for Mac license. The QuickBooks installer will open automatically.
- Drag the QuickBooks icon into the Applications folder, and the Applications folder will open automatically.
- After the installation, double-click the QuickBooks for Mac icon to launch the application.
This was about the clean installation procedure of QuickBooks on Mac.
With a detailed insight into the process of using the QuickBooks Clean Install Tool and the clean installation process, we hope the QuickBooks desktop application works well. Clean installation operations in QuickBooks are needed to remove all problematic files and folders before you prepare your device for a fresh installation. Although we’ve tried our best to clarify the complete procedure with exceptional details in a step-by-step manner, we recommend you reach out to our professional team for queries and doubts. If the errors persist or any of the above steps cannot be followed for any reason, you can call the Accounting Helpline’s certified support team at 1.855.738.2784.
FAQs
What are the prerequisites for using the Clean Install Tool?
Prerequisites for the QB clean install tool may include:
– Creating backups of your company data.
– Have your product key and installation files ready.
– Confirming administrative access on your gadget.
– Get the installer version of your preferred QuickBooks on your device.
Is using the Clean Install Tool safe for my data?
Yes, when used correctly, the Clean Install Tool should preserve your data by creating backups and then restoring them in the new installation. However, it’s essential to follow instructions carefully and back up your data separately as a precaution. In case of any mishappening, backups can prevent losing critical data.
Does the Clean Install Tool work for both Windows and Mac versions of QuickBooks?
Yes, you can avail of the QuickBooks Clean Install procedure for both Windows and Mac operating systems. Our complete blog has highlighted how you can utilize the clean install process for QuickBooks on Windows and Mac. It essentially involves renaming or deleting the installation folders.
Is the Clean Install Tool a one-time-use utility?
The clean install utility can be used whenever you want. If you encounter data damage, installation, or corruption problems, a clean installation can fix your files. So, resolve QuickBooks malfunction by reinstalling QB, renaming the folders, and installing a fresh QuickBooks version.
When should I use QuickBooks Clean Install?
You can use QuickBooks clean install in the following instances:
– When your company file is damaged
– When your QuickBooks is corrupt
– When your program and data files are damaged
– When you encounter installation issues, including damaged installation folders
Many error messages and codes may recommend a QuickBooks clean reinstall for a fresh restart.
Related Posts-
How to Resolve QuickBooks Error 15263 Like a Pro?
QuickBooks File Repair With Verify Solutions Like A Pro
Learn Effective Ways to Convert QuickBooks Desktop to Online
QuickBooks Error 30134 – What Do I Do Next?
QuickBooks Error 6210, 0 | Detailed Troubleshooting Steps
Practical Troubleshooting Ways to Fix QuickBooks Error 6000 95

Edward Martin is a Technical Content Writer for our leading Accounting firm. He has over 10 years of experience in QuickBooks and Xero. He has also worked with Sage, FreshBooks, and many other software platforms. Edward’s passion for clarity, accuracy, and innovation is evident in his writing. He is well versed in how to simplify complex technical concepts and turn them into easy-to-understand content for our readers.