Last Updated on July 7, 2025
Hey folks! How have you been? Let me guess, umm, frustrated by the data loss in QuickBooks? Well, we know what brought you here. You are looking for ways to backup QuickBooks to flash drive. Many users come in search of the steps to back up QB data to a flash drive. This helps you avoid any data loss that happens mistakenly or due to any external error. The best part about storing your data in a flash drive is that it is safe even when the hard disk crashes unexpectedly. In this blog, we will talk about the ways in which you can back up QuickBooks data on a flash drive.
We have tried our best to inform you about the ways to back up QuickBooks to a flash drive. If you are still not able to determine the cause of the data loss issues in QuickBooks and are finding it hard to fix, you can contact the Accounting Helpline experts at the toll-free number 1.855.738.2784 and get your issues resolved within minutes.

What is the Process to Back up QuickBooks to Flash Drive?
When you are trying to create a backup file in QuickBooks, the application creates a (.dmg) file for Mac users and a (.qbb) file for Windows users. This action does not allow you to make any further changes to the file. Also, these data files can not be edited, so they are safe to deal with. If a user unintentionally deletes data by mistake, you may face data loss issues if you have not backed up your files.
Now, you must be thinking about the role of a flash drive in backup. What will you do if your hard disk crashes unexpectedly? Well, you might have heard people saying to back up QuickBooks to a flash drive. When you back up your data to the flash drive, it is safe even in the case when the hard disk crashes. You just need to copy the backup locally and paste it on the flash drive.
Things to Know Before Importing the QB Data to a Flash Drive
Before knowing about the process of backing up the QuickBooks data to the flash drive, there are certain things that you need to keep in mind. This will help you in being extra careful to avoid committing errors in the process. The things that you need to keep in mind before importing the QB data to a flash drive are as follows:

- You need to ensure that you have enabled the auto-backup option in QuickBooks.
- The recommended frequency of the backup should be at least once a day.
- The user must allow QuickBooks to back up every time the company file is closed.
- You must encrypt your backup data file and create a password for it.
- Apart from the company files, you may also need to back up your personal files.
These are some of the common points that you should be familiar with before importing the QuickBooks data.
Convenient Steps for Backing up QuickBooks to Flash Drive
To back up the QuickBooks Company file to a flash drive, you must first create a backup file. Creating the backup of the file compresses it and creates a zipped file that can be restored when needed.
Backup QuickBooks to Flash Drive on the Desktop
Following the steps mentioned below, you will be able to create a backup of the company file. The backup file can be later moved to an external storage like a memory stick or an external hard drive.
- Click the File tab and select Save Copy or Backup.
- Once the Backup Wizard appears on the screen, click Backup Copy.
- Click Next on the Save Copy or Backup.
- If this is the first time you are taking a backup of your company file, then first, you need to select the backup location and frequency of the automatic backups.
- Click Options and browse the location where you want to save the backup of your company file and the frequency of the automatic backups.
- Click OK and then Next.
- Hit Save it Now and Next.
- Click Save once again to finally save the backup file to the selected location.
NOTE: Currently, the feature to export a backup copy of the company file is only available in QuickBooks Desktop.
If you are a QuickBooks Online user, then you can back up your data by exporting it using the QBO Backup Wizard. Once the QBO backup file is created using the backup wizard, you can move it to your external storage device.
Backup QuickBooks to Flash Drive (QB Online)
In the previous section, we just saw the steps to back up QB Desktop to the flash drive. QB Online users have a different set of procedures. You can back up the QuickBooks Online data to the flash drive with the help of the following steps:
- You need to open the Settings menu and choose the option Export data.
- There, you need to click on the Reports tab, and then you need to select the date range.
- Now, you need to select the toggle switch option to activate and deactivate the items in the Reports and Lists tab according to your preference.
- Lastly, you need to click on the Export to Excel option available there.
Now, you need to follow the instructions on the screen to export and back up QuickBooks Online data. Here, you can also choose your flash drive as the location option to back up the files.
Using Third-Party Apps to Backup QuickBooks to Flash Drive
This is a wonderful option. Using a third-party application can help you speed up the backup process for QuickBooks. Here are the steps that you need to know regarding using a third-party app to back up your files:
- Open the web browser and sign in to your QuickBooks Online account.
- Here, you need to choose the Apps tab on the left navigation bar.
- Now, you need to look for the third-party application that you want to use in the magnifying bar, or you can also select the Browse Category to search for the app.
Now, you can use the selected third-party application to back up the important QBO files to the flash drive.
Saving Forms, Lists, and Reports to a Flash Drive in QuickBooks
If you are a QuickBooks Online advanced user, you can import the data to Dropbox or Google Drive. The process to export your list and reports in QuickBooks Desktop is mentioned below:
- You need to visit the Gear icon and select Export Data in QuickBooks.
- Then, you need to set the date range on the Reports tab.
- Now, you can choose to add or remove items from the Reports and Lists tabs by turning them on or off.
- Finally, you need to click on the Export to Excel option available in the window.
Now, you can easily create a backup of this data and export it to Google Drive or Dropbox for saving purposes.
Scheduling Automatic QuickBooks Backup to Flash Drive
Do you know you can even schedule the automatic backup in QuickBooks Online? Well, it is a very good feature that will help you not get into the vicious cycle. You can just schedule an automatic backup while having your regular Cappuccino on your table. The steps that you need to follow to schedule the auto backup feature to the flash drive are as follows:

- First of all, you need to proceed to the File menu and click on Switch to Single-user Mode.
- You need to visit the File menu again, hover over Backup Company, and then proceed to click on Local Backup.
- Here, you need to choose the Local Backup option and then click on Next.
- Here, you need to browse the location where you want to save your backup files. In the case of a flash drive, you need to ensure the drive is plugged in and ready to use.
- Now, you need to choose the number of backup files that you want to create. This is an optional step, and you can choose to ignore this.
- Here, you need to run a complete verification step, which will ensure the authenticity of backup files.
- When you have completed all the above steps, you need to click the OK button.
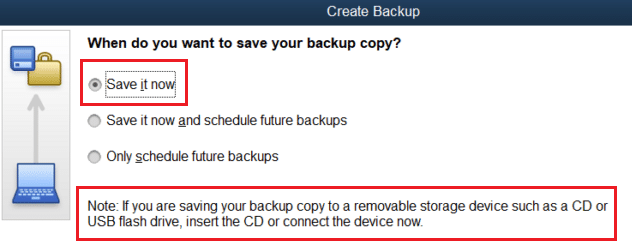
- You need to choose the option Save it now schedule future backups, and then tap on the Next button. If you don’t want to back up the company files now, then click on Only schedule future backups.
- Now, you need to select the ‘Save backup copy automatically when I close my company file’ checkbox.
- You need to click on the New option to create a schedule and then fill out the data fields to complete the backup schedule. You can choose a specific time/day for your QBO data to be backed up automatically.
- Click on the OK option to set up the schedule. You might be required to authorize this process by entering your Windows sign-in password.
- Finally, you need to click on the Finish option to complete the process.
Now, you will be able to automatically back up the QB Online data to the flash drive. You will receive the notification once it is done.
Memory Table to Backup QuickBooks to Flash Drive
Now comes a table that will help you to sum up the blog smoothly. Like eating and not leaving any crumbs, right? The table contains an overview of the important steps that you need to know.
| Topics | Key Points | Tips and Tricks |
| Before you begin the process | Do not forget to enable the auto backup feature and encrypt files | Try backing up daily and using strong passwords |
| QB Desktop Backup | You need to click on File>Save Copy> Backup Copy | You need to choose a Flash Drive as the location |
| QB Online Backup | You need to click on Settings > Export Data > Export to Excel | Here, you need to use the flash drive or cloud storage |
| Using 3rd-party apps | You need to search in Apps > Install > Backup | You can use applications such as Rewind, DataBackUpWizard |
| Auto-Backup File | You need to click on File > Backup Company > Schedule | Choose Flash Drive as the location and set the frequency to daily |
This table will help you memorize and sum up the crux of the content without going too in-depth. You can also save this table somewhere on your drive for future reference.
Summing It Up!
We just had a look at the steps to ‘backup QuickBooks to flash drive’ processes for the Desktop and Online versions. You must not forget to enable the auto backup feature and encrypt the files before starting the backup. This will help you to eliminate the possibility of damage to the company files. If you are unable to back up files on your own, you can freely contact Accounting Helpline’s experts on the matter by dialing the toll-free number 1.855.738.2784.
FAQs
Can you save QuickBooks to a flash drive?
Yes, you can easily save QuickBooks to a flash drive. You need to select the appropriate date settings, and then jump to exporting the data to the drive. QB will email you a download link. You need to save this file and copy it to your flash drive.
What is the best way to back up QuickBooks?
The best way to back up QuickBooks is through the Auto-Backup feature in QuickBooks. You need to open QuickBooks, proceed to the File menu, choose Back Up Company, and then set up Activate Online Backup.
How do I back up QuickBooks to an external hard drive?
You just need to open QuickBooks and click the File option. Here, you need to choose the backup option and browse the location where you want to back up the QBB file.
How do I download everything from QuickBooks?
To download all the data from QuickBooks, you need to go to the settings menu and select the Export Data option in the Tools column. Now, you need to select the date range for the backup to be completed.
How to backup QuickBooks online to a flash drive?
The process of backing up QB Online data to the local storage or external drive is not as simple as in the desktop version of the application. Your QBO data is in Intuit’s servers, and to back that up, you need to export it to your computer in Excel or another format. Next, you can copy or save that to your flash drive. You will need to manually do it every time you wish to create a backup of your QBO data.
Related Posts-
How to Use the QuickBooks Password Reset Tool
Resolving QuickBooks Error H505: Causes and Troubleshooting Solutions
Is Your QuickBooks Update Stuck? Know How to Fix It!
QuickBooks 941 Form: Filing, Due Dates, Errors, & Solutions
Resolving QuickBooks Payroll Not Deducting Taxes Issue With Causes & Solutions to Fix
Fixing the ‘QuickBooks Requires that You Reboot Loop’ Issue in Simple Methods

Edward Martin is a Technical Content Writer for our leading Accounting firm. He has over 10 years of experience in QuickBooks and Xero. He has also worked with Sage, FreshBooks, and many other software platforms. Edward’s passion for clarity, accuracy, and innovation is evident in his writing. He is well versed in how to simplify complex technical concepts and turn them into easy-to-understand content for our readers.