
Last Updated on April 23, 2026
When using QuickBooks, you may encounter common issues and errors while performing basic tasks and operations. The verify and rebuild data in QuickBooks Desktop is a built-in utility that can be used to diagnose your company file and repair any data damage. Many factors can contribute to and lead to a corrupted or damaged company file, which can hinder your everyday accounting tasks. You can run the verify and rebuild utility in QB Desktop to resolve any issues with your company file. Read through this blog to get a clear understanding of how to use the rebuild and verify data files in QuickBooks Desktop.
Need support to verify and rebuild data in QuickBooks? Our specialists are just a call away. Reach out at 1.855.738.2784 and let our Accounting Helpline’s experts guide you.
What is the Verify and Rebuild Data Utility?
The Verify and Rebuild Data in QuickBooks is a utility that allows users to identify common errors and issues in their company file and repair the data. It is a simple and straightforward utility tool that can be used for a quick diagnosis or repair of the company file. A lot of common errors and problems can occur due to a damaged company file, but the verify and rebuild data in QuickBooks Desktop can be used to troubleshoot them. Methods to run the QB verify and rebuild tool are listed in the next section for both Windows and Mac versions.
Segment 1: How to Verify and Rebuild Data in QuickBooks Desktop for Windows?
In the following segment, we have discussed how you can run the verify and rebuild utility in QB Desktop on your Windows system.
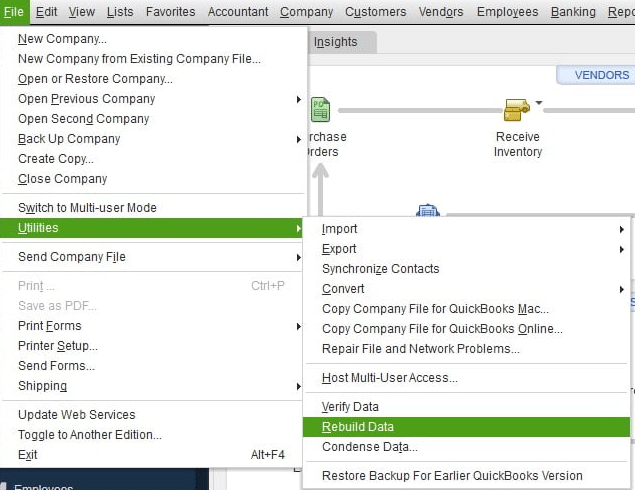
Verify the Company Data File
Follow the steps outlined below to verify and rebuild data in QuickBooks Desktop for Windows:
- Launch QB Desktop.
- Expand the Files menu.
- Click on the Utilities option.
- Locate and select Verify Data.
Once you verify your QuickBooks data file, you’ll see the following messages. We have added a brief explanation of each message to help you understand.
- QuickBooks detected no problems with your data: It simply means that there was no damage or corruption to your company file, and you don’t need to take any action.
- An error message: If you get an error code displayed on your screen, you will need to resolve it. You can note down the displayed error code and look it up here to fix the issue.
- Your data has lost integrity: In this case, you will need to use the QuickBooks rebuild data tool as your company file has suffered data loss or has become corrupted.
Now, let’s move on to the following method, where we have outlined how you can rebuild the damaged data file using the QB rebuild data utility.
Rebuild the Company Data
With the steps below, you can verify and rebuild data in QuickBooks Desktop for Windows:
- Launch QuickBooks Desktop.
- Open the Files menu.
- Expand the Utilities section.
- Click on Rebuild Data.
A prompt will appear on QuickBooks asking you to create a backup of your company file when you try to rebuild the data file on your system. You are required to create a company file backup before using the QB rebuild data file, following these steps.
- Hit OK on the prompt to create a backup.
- Now, specify a location to save the backup file and tap OK.
- Write a new name for the File and click on Save.
- ‘Rebuild has completed’ will be displayed on your screen; then, click OK.
Now, you have to verify your data again through the same process to ensure that there’s no additional damage. Please keep in mind that you don’t want to replace an old or other backup file; that’s why you must provide a new name for the backup file to avoid overwriting the existing backup file. If no errors are found, then proceed to restore a recent QB backup through the File menu and click on Open or Restore Company.
Segment 2: Process to Verify and Rebuild Data in QuickBooks For Mac
If you want to identify data errors in your company file by using the verify and rebuild utility in QuickBooks on Mac, then you can follow this process. Take the steps outlined below to verify and rebuild data in QB Desktop version for the Mac operating system.
Verify Data in QuickBooks For Mac
You can verify the damaged data in your company file on QuickBooks for Mac through the following steps.
- Head to QuickBooks Desktop
- Select the Files menu.
- Locate and pick Utilities.
- Now, click on Verify Data.
The verify data utility will run a diagnosis on your data file and identify if there is any damage or errors. If no data damage is reported by the tool, then you don’t need to repair your company file.
However, if the ‘Your data has failed the integrity check’ message is displayed on your screen, then you need to run the rebuild tool and repair your company file data. Continue to the following method to learn how to verify and rebuild data in QuickBooks for Mac.
Rebuild Company File in QuickBooks For Mac
You can take the following steps to rebuild the damaged company file in QuickBooks for Mac after verifying the data damage.
- Open QuickBooks Desktop.
- Go to the Files menu.
- Click and expand the Utilities section.
- Select “Rebuild Data“.
Remember: Before proceeding to verify and rebuild data in QuickBooks for Mac, you must create a company file backup on your system. Follow the steps from segment 1, b. Rebuild the company data to create a backup. In case you fail to create a backup of the company file in QBDT, then go through this blog to resolve it.
Now, let’s jump to the next section to learn how you can verify and rebuild data in QuickBooks Desktop manually.
Segment 3: Repair your Company File in QuickBooks Manually
In the following section, you can repair your damaged company file without verifying and rebuilding in QuickBooks. Ensure that you back up your company file before following this process.
- Open the QB Desktop.
- Expand the File menu and click on Utilities.
- Now select Verify Data.
The tool will run a diagnosis on your data file to identify errors and issues. Once done, click on Expand All to see the diagnosed errors on the Verify Results screen. Now you can manually fix the errors on your display by searching for the error code on our blogs.
Now let’s delve into the next section to understand when you might need to use verify and rebuild data in QuickBooks Desktop.
When to use the Verify and Rebuild Utility in QuickBooks Desktop?
The following list includes the potential cases that require you to use verify and rebuild in QuickBooks.
- QuickBooks keeps crashing and abruptly closing.
- You get company file error codes on your screen.
- There is missing transaction data.
- You can’t access the company data file.
- Fatal error with QB Desktop.
- The invoices and bill reports show a negative balance.
- QuickBooks payroll fails to update.
You can also repair your company file by using the QuickBooks File Doctor tool, as it is more thorough than the Verify and Rebuild Data tool in QB Desktop.
Quickview Table for Verify and Rebuild Data in QuickBooks
Tabulated below is a summary of the blog that provides a concise overview of essential information about the Verify and Rebuild Utility in QuickBooks Desktop:
| What is Verify and Rebuild Data in QuickBooks? | The Verify and Rebuild Data in QuickBooks identifies common errors in the company file and repairs the data. It provides a quick diagnosis and repair of the company file, fixing various common issues that might lead to a damaged company file. |
| Its uses | It can be used in the Desktop version of QuickBooks for both Windows and Mac operating systems. |
| Precautions to take | Ensure to back up your company file data on your computer system before you use the verify and rebuild utility in QuickBooks. |
| When to use it | Unable to access the company file, error codes on the data file, missing transaction data, QuickBooks keeps closing, major issues with QB Desktop, invoices and bill reports have a negative balance, and can’t update QuickBooks payroll. |
What You Should Remember
The Verify and Rebuild Data in QuickBooks Desktop is extremely helpful as it lets users run a quick diagnosis of the data file and repair any damage to the company file. We have provided the methods to run the QB verify and rebuild utility for both Windows and Mac operating systems. Although this tool is simple and easy to use, some technical complexities can also arise. Therefore, you can contact us and connect with our specialists to get support with the Verify and Rebuild Utility in QuickBooks. You may reach out at 1.855.738.2784 to get guidance from our Accounting Helpline’s experts.
Frequently Asked Questions (FAQs)
What is a verify and rebuild in QuickBooks?
The verify and rebuild data in QuickBooks Desktop is a utility feature that allows you to run a quick diagnosis of the company file to identify any common errors, data corruption, or integrity issues, and then repair the damaged company file with a few simple steps to get QuickBooks Desktop back on track.
What does rebuilding data do in QuickBooks?
The rebuild data in QuickBooks Desktop is a built-in utility tool that repairs your damaged company file data after identifying the issues. It helps resolve any errors, data corruption, or data loss of your company file so that your QB Desktop application does not face any performance issues and can work smoothly.
What does verify data do in QuickBooks?
The Verify Data in QuickBooks Desktop is a built-in utility tool that determines whether your data file has become damaged or corrupted due to common issues. It can also identify the loss of data integrity to help you resolve any issue that might potentially hinder your productivity.
How do I rebuild a QuickBooks desktop file?
In order to verify and rebuild data in a QuickBooks Desktop file, you can take the following steps on your device.
Verify your data:
– Open the Files menu.
– Expand the Utilities section.
– Click on Verify Data.
Rebuild your data:
– Click on the Files menu.
– Go to the Utilities section.
– Select the Rebuild Data.
Related Posts-
QuickBooks Error 15215: Practical Solutions to Fix It
Getting Rid of QuickBooks Error 1603: Error Causes & Fixing Methods
Powerful Methods to Overcome QuickBooks Payroll Error PS036
QuickBooks Print and PDF Repair Tool: How to Fix Print Problems
QuickBooks Error H202 in Multi-User & Solutions to Fix it
Fix QuickBooks Error 1601: Problem with Windows Installer

Edward Martin is a Technical Content Writer for our leading Accounting firm. He has over 10 years of experience in QuickBooks and Xero. He has also worked with Sage, FreshBooks, and many other software platforms. Edward’s passion for clarity, accuracy, and innovation is evident in his writing. He is well versed in how to simplify complex technical concepts and turn them into easy-to-understand content for our readers.