Last Updated on March 17, 2025
Have you ever experienced errors in QuickBooks multi-user mode? This can be an instance of QuickBooks Error 6010, which occurs when you are trying to access a company file in multi-user mode without the correct internet settings or sufficient admin permissions. It can also be caused when an antivirus interferes with QuickBooks’ communication process. You also need to know about the common symptoms of the error. You can get rid of this error by updating the QuickBooks, fixing the hosting settings, configuring the Windows firewall, or repairing the company files with the help of the file doctor tool.
Are you facing constant multi-user mode errors like ‘QuickBooks installation may have been modified’? You can easily explore the troubleshooting methods to fix such multi-user mode problems. Moreover, you can also call us on our toll-free number 1.855.738.2784 for guidance.
What is QuickBooks Error 6010 100?
The QuickBooks error code 6010 occurs when you attempt to open the company file in multi-user mode. It happens when the hosting system is not the server or when there is a problem with the hosting settings. This type of error can also happen when there is a problem with the company file. Apart from this, there are numerous other causes that can result in this 6000 series error. Let us see the causes and talk about the solutions to fix it.
Causes of the QuickBooks Error 6010
There can be several instances that can trigger error 6010 in QuickBooks. Below are some of the general causes of QuickBooks Error 6010:
- When the network data file is detached from the Transaction Log and QuickBooks company file, users might see a QuickBooks 6010 pop-up.
- Another cause for the 6010 error is a recent QuickBooks update that led to Windows registry corruption.
- Unintended deletion of the QuickBooks company file can bring up error code 6010, 100.
- Your Internet security settings of an anti-virus software block QuickBooks to access the server. This, in turn, brings forth QuickBooks error code 100.
- A user with junk files piled up in the system server can also experience error code 6010.
- If the registry files are removed by a third party or a registry-optimizing software on Windows, QuickBooks error 6010 will occur.
These are some of the common causes of Error 6010 in QuickBooks. These scenarios can trigger the error at any time. Do you know about the symptoms of the error? If not, let’s have a look at them.
Symptoms of QuickBooks Error 6010
Recognizing the error can solve half of your problem. After that, troubleshooting is left. So, you need to carefully recognize the error with the help of the following symptoms:
- The initial symptom is the QuickBooks error 6010 flickering on the screen.
- You might have difficulty accessing company documents.
- The company file goes live on the host device but not others because of the 6010 QuickBooks error.
- The QuickBooks installation process hangs in the middle, and the interruption causes crashes.
If you are able to recognize the error with its symptoms, then Congratulations! You now just need to follow the troubleshooting steps to fix the error.
Methods to Fix QuickBooks Error 6010
First, you will have to verify whether the QuickBooks company file you are trying to open is encrypted or not. If it is encrypted, verify and turn off your system’s encryption program. To turn off the encryption, visit Start, click Settings > Update & Security > Device Encryption. If it is turned on, then turn it off by clicking on the Turn Off option.
Now, you are all set to follow the methods listed below to troubleshoot Error 6010 in QuickBooks. Below are the troubleshooting methods for the 6010 error:
- Verifying and Updating QuickBooks Desktop
- Verifying and Fixing the Hosting Settings
- Configuring the Firewall Settings
- Renaming the QuickBooks Related Files
- Running QuickBooks File Doctor Tool
- Restarting QuickBooks Database Server Manager
- Creating Windows Firewall Exceptions for QuickBooks
These are the solutions that will help you to fix the QuickBooks error 6010. Let’s look at these steps in detail.
Solution 1: Verifying and Updating QuickBooks Desktop
Error 6010 in QuickBooks might appear if you have an outdated QuickBooks version. You can check the same and update your QBDT version by following the below steps:
- Open the QuickBooks application and press the F2 key.
- The Product Information window will appear. There, go to the Release Notes to verify the latest version and release.
- If you know that your version of QuickBooks is not updated, then follow the following steps to update it:
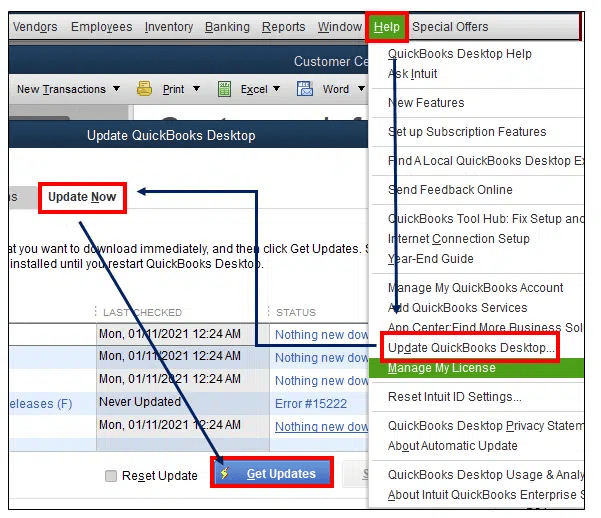
- Visit the Help option and then click Update QuickBooks Desktop.

- Choose the Update Now button and then click on Get Updates.
- Once the update process is finished, close your QuickBooks and re-open it.
- An installation window appears, requesting you to install the update.
- Click on the Yes option.
- After completing the installation process, then install as per on-screen instructions.
- Visit the Help option and then click Update QuickBooks Desktop.
These are the steps to verify and install the latest version of the QuickBooks application on your computer to get rid of error 6010 in QBDT. If this does not work, try implementing the next solution.
Solution 2: Verifying and Fixing the Hosting Settings
In QuickBooks, if a system, which is not a server, is hosting the company files, it may trigger Error 6010. In the multi-user environment, it is necessary for the server computer to host the company files. Apart from the server computer, if any other computer has enabled the multi-user mode settings, it can also trigger QuickBooks error 6010.
You need to check that the multi-user settings are disabled on the other devices by following these steps:
- Open the QuickBooks on any workstation.
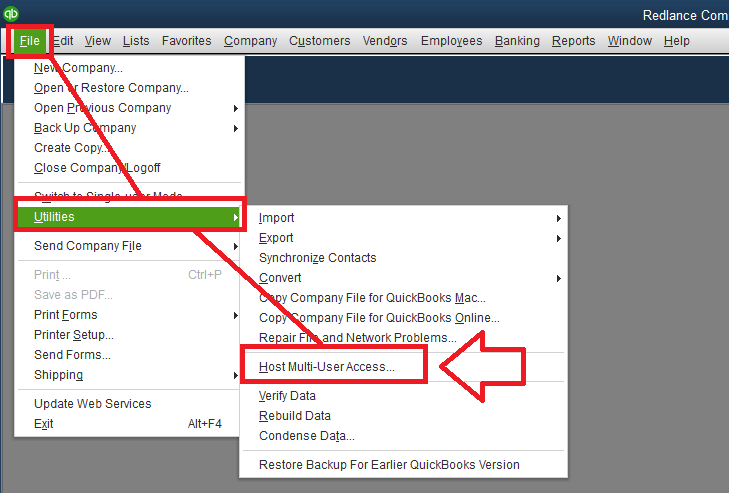
- Go to the File without opening the company file and then click Utilities.
- If you find the Stop Hosting Multi-User Access option, then click on it.

You can repeat the above steps on all the workstation devices where you are getting the QuickBooks error. Now, you can look at the next solution if this does not work.
Solution 3: Configuring the Firewall Settings
If your antivirus or firewall is blocking the communication in QuickBooks, this can also trigger Error 6010. To configure the firewall settings correctly, follow the steps mentioned below:
- Proceed to the Windows Start option, enter Windows Firewall, and then press the Enter key.
- In the Windows Firewall window, choose Advanced Settings.
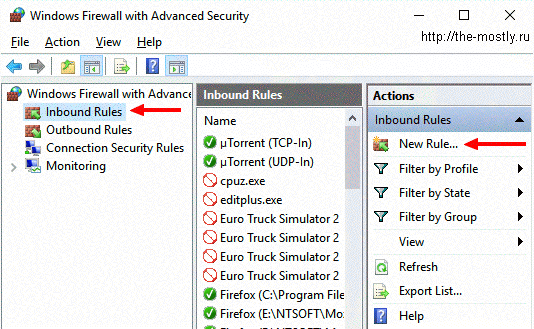
- Click Inbound Rules> click New Rule in the right pane.
- Click Port under the “What type of rule would you like to create” option and then click Next.
- In the Protocols and Ports window, make sure you have selected TCP under the query “Does this rule apply to TCP or UDP?” If not, then select it.
- Enter the correct ports under the Specified Local Ports field.
- Click on the Next option.
- In the New Inbound Rule wizard, under Action, click Allow the connection and then select Next.

- The Profile window appears. Choose all the profiles (Domain, Private, and Public) and then click Next.
- In the Name wizard, you can enter the name and description of the rule and then click Finish.
- While using the above steps, make sure that you select the Outbound Rules box instead of Inbound Rules.
After resetting the Firewall Settings, verify if the QuickBooks error 6010 is resolved or not. If not, then proceed with the next method.
Solution 4: Renaming the QuickBooks Related Files
The QuickBooks error 6010 may also arise if the QuickBooks configuration files, including Network Descriptor (ND) and Transaction Log (TLG) files, are damaged or corrupted. These files are important to open QuickBooks in a multi-user environment. If that is the situation, you can attempt to rename these files through the following steps:
- Find and open the folder where your company file resides.
- Next, search for the file name that is like your QuickBooks company file but with an extension, like.nd or.tlg.
- Then, right-click on the .nd file and proceed to select Rename.
- Append the word.OLD to the end of the file name.
Now repeat the same process to rename the.tlg files. If the error is still there, continue to the next solution for resolution.
Solution 5: Running QuickBooks File Doctor Tool
Sometimes, even a single corrupted company file can cause Error 6010 to show up in QuickBooks. For this, you might have to use the QuickBooks File Doctor Tool to repair the files. The steps to repair the company files in QuickBooks are as follows:
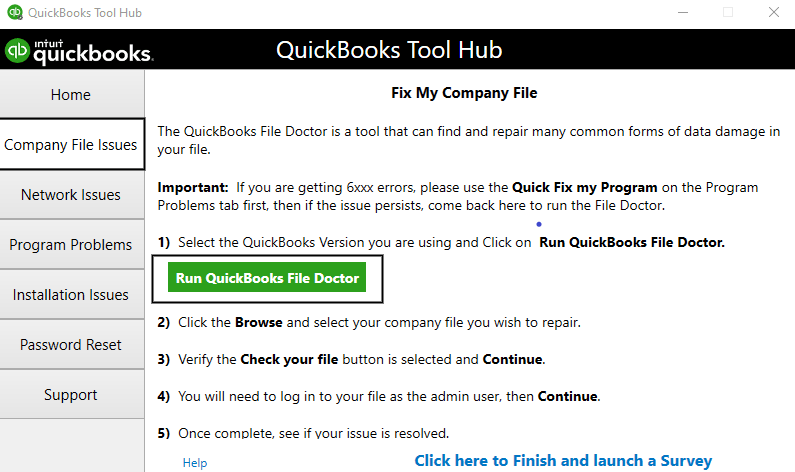
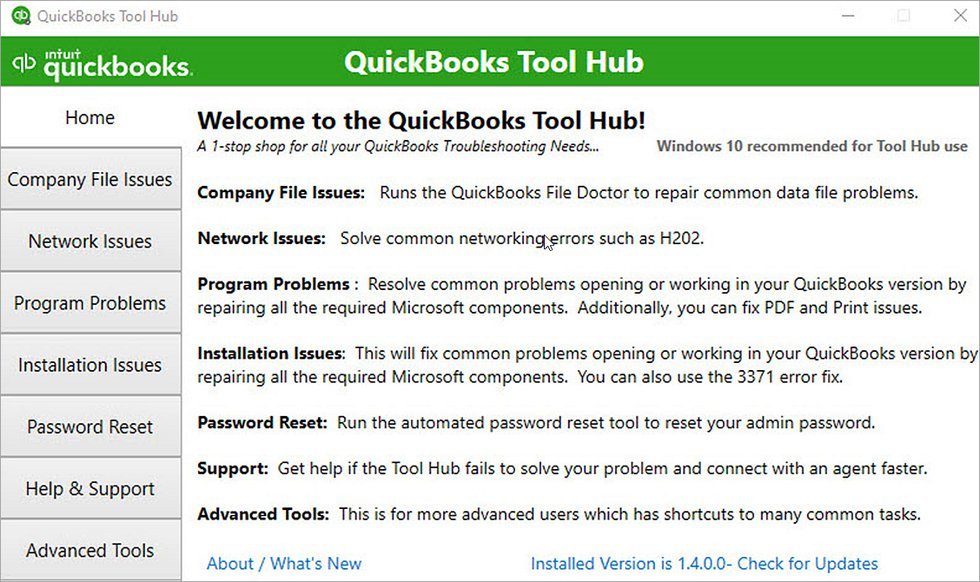
- Open the QB Tool Hub and click Company File Issues.

- Click Run QuickBooks File Doctor.
- Click on the drop-down list to choose the company file you want.
- Click Check your file and then Continue.
- You will be prompted to enter QuickBooks admin credentials.
- Enter the password and then click Next.
This tool will automatically run the diagnosis and repair the company files if found corrupted. If it does not work, try using the next solution.
Solution 6: Restarting QuickBooks Database Server Manager
QuickBooks Database Server Manager facilitates QuickBooks to open the company file stored on the server. QB error 6010 may occur when you are unable to open your company file. In order to resolve this problem, you have to restart the QB Database Manager service by using the following given steps:
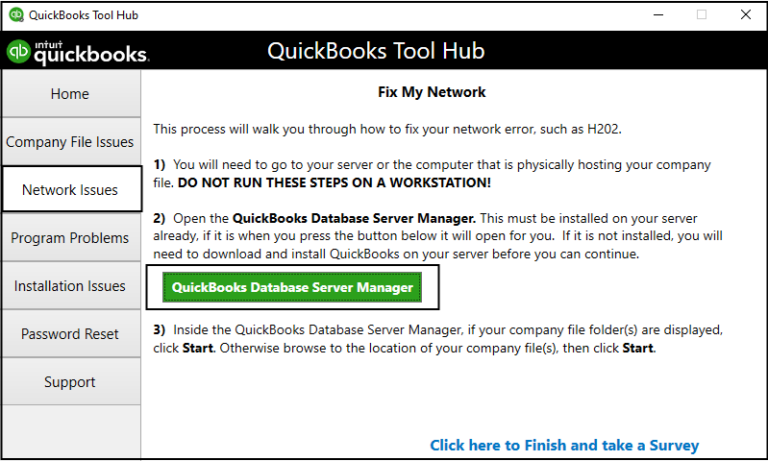
- Restart the QuickBooks Database Server Manager first and then scan the faulty company file
- Now click the Start icon on your Desktop and click All Programs subsequently.
- Locate and open QuickBooks and click QuickBooks Database Server Manager.
- Then select Scan Folders.
- If you do not view any folder, you will need to click Add Folder.
- Now, scan the files and try accessing them again.
If you still cannot open the company file, then attempt the next troubleshooting step to fix the QuickBooks error message 6010.
Solution 7: Creating Windows Firewall Exceptions for QuickBooks
QuickBooks employs executable files (.exe) to execute different tasks. In order to set up exceptions on each executable on the table, follow these steps:
- Go to the Windows Start menu, type Windows Firewall into the search box, and open Windows Firewall.
- Choose Advanced Settings.
- Right-click on Inbound Rules and click the New Rule tab.
- Select Program and then click Next.
- Then, select This Program Path and click on Browse.
- Find and choose any one executable file from the given table below. Then, click the Next tab.
- Proceeding further, choose the option Allow the Connection and then click Next.
- If you are asked, you must ensure that all profiles are checked. Further, press the Next button.
- Set a rule and name it “QBFirewallException(name.exe).”
- Finally, repeat the same steps to set outbound rules.
Now, we will see a list of some executable files along with their locations in the table drawn below.
| Executable Files | Location |
| IntuitSyncManager.exe | C:\Program Files\Common Files\Intuit\Sync |
| QBCFMonitorService.exe | C:\Program Files\Common Files\Intuit\QuickBooks |
| AutoBackupExe.exe | C:\Program Files\Intuit\QUICKBOOKS YEAR |
| QBW32.exe | C:\Program Files\Intuit\QUICKBOOKS YEAR |
| QBLaunch.exe | C:\Program Files\Common Files\Intuit\QuickBooks |
| OnlineBackup.exe | C:\Program Files\QuickBooks Online Backup |
| FileManagement.exe | C:\Program Files\Intuit\QUICKBOOKS YEAR |
When you have completed the above steps and you are ready, you must try opening the QuickBooks application to check the status of the error.
Wrapping It Up!
In this post, we tried covering the important aspects of the QuickBooks error 6010. We talked about the definition, causes, symptoms, and even the solutions of error 6010 in QuickBooks desktop. The main reason for the occurrence of error 6010 is the denied access to the network by QuickBooks Desktop. You need to check the internet settings and other issues as well. You can also reach out to the Accounting Helpline team at the toll-free number 1.855.738.2784 for guidance and quick resolution.
FAQs
What is error code 6010 in Intuit?
QuickBooks error 6010 is a general error code from the 6000 series that arises when access to the network is being blocked or your software is unable to connect to the network because antivirus or firewall is blocking. At times, a similar error also appears if QuickBooks software is reinstalling in your system.
What are the causes of Error 6010 in QuickBooks?
QuickBooks Error 6010 arises when opening a company file in multi-user mode, usually as a result of network problems, antivirus conflicts, or incorrect hosting settings. It blocks file access and can lead to data loss or system failure.
How to fix QuickBooks error 6010/100?
To fix QB error 6010/100, you can try updating the QuickBooks Desktop, verifying and correcting the hosting settings, configuring the firewall settings, or even repairing the company files with the help of QuickBooks File Doctor.
How do I fix the error ‘Cannot communicate with the company file’ due to the firewall?
To fix the firewall issues in QuickBooks, you can try running the QuickBooks File Doctor, updating QuickBooks to the latest version, reconfiguring the firewall settings, and setting up folder permissions.

Edward Martin is a Technical Content Writer for our leading Accounting firm. He has over 10 years of experience in QuickBooks and Xero. He has also worked with Sage, FreshBooks, and many other software platforms. Edward’s passion for clarity, accuracy, and innovation is evident in his writing. He is well versed in how to simplify complex technical concepts and turn them into easy-to-understand content for our readers.


