Last Updated on April 28, 2025
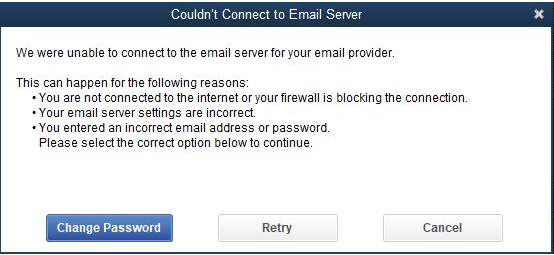
Users worldwide use QuickBooks to manage their business and accounting functions, which involves sending emails. But sometimes, QuickBooks Desktop might pose an error message stating that the app is unable to send the email due to a network connection failure. In such cases, there is a chance that the email preferences are incorrect or you are running the app in compatibility mode. If your QuickBooks is Not Connecting to the Server, keep following the instructions in this guide to resolve the issue with ease.
The inability to send emails in QuickBooks can be daunting for regular users. To fix the QuickBooks Not Connecting to Server issue, you can perform the troubleshooting process below or call our team for direct assistance. You can reach out to our specialists at 1.855.738.2784 to get immediate guidance on email server issues.
Main Reasons Why You Can’t Send Emails from QuickBooks
You might encounter problems while sending emails from QBDT due to the following common reasons –

- Your QB Desktop might be outdated or set to run as an admin automatically.
- You are using QuickBooks in compatibility mode while trying to send the emails.
- Outlook is not set as your preferred email option, and your email preferences are incorrect.
- Your web browser’s email preferences might be misconfigured, preventing QB from sending emails to Outlook.
- The MAPI32.dll file might be damaged, which can be another reason for the email server issues.
- A damaged company file, installation, or the QBDT program in general can also cause this issue.
Reliable Solutions to Address QuickBooks Network Connection Failure Issues
Until the QuickBooks Not Connecting to Server issue is resolved, QuickBooks won’t be able to establish a proper connection to send the email. Thus, you must follow the step-by-step process given in each troubleshooting solution below to fix this QBDT issue –
Solution 1 – Ensure that QB is not set to run as Admin automatically
You must ensure the app is not set to run automatically as an admin user; otherwise, QuickBooks might be unable to send emails. To check the QB admin privileges and uncheck the admin option, go through the following steps –
- On the Windows Start menu, use the search box to enter the words “QuickBooks,” right-click the QuickBooks Desktop icon, and click on Open file location.
- Go to the Properties tab, right-click QuickBooks.exe, unselect the box that enables “Run this program as an Administrator,” and click OK to rerun QuickBooks.
Note: If the admin option is greyed out, click Show Settings for All Users to make the option active, then unmark it.
Once done, try to send your email via QuickBooks Desktop to check the status of the message. If the email QuickBooks is not connecting to the server, follow the steps in the next troubleshooting solution.
Solution 2 – Set Outlook as your Preferred Email
If QuickBooks is unable to send your emails to Outlook, chances are that it is not set as the preferred email. Hence, for the correction of this error, it is necessary to make Outlook the first option in selecting the e-mail by following the steps mentioned below –
- In QuickBooks Desktop, click the Edit menu, select the Preferences option, and click Send Forms.
Note: If you are using Outlook, which has been installed with Microsoft Exchange Server, you need to launch Outlook and then log in before going to the next resolution steps. - Further, go to My Preferences, select Outlook as your preferred email option, and click OK to save the email settings.
Once Outlook is set as the first preference for the email, an attempt has to be made to send a trial email from QB. But if you still get an error message telling you that QuickBooks cannot send the email, go to the next solution to fix the email server connection error.
Solution 3 – Update QuickBooks Desktop to the Latest Release
Common program issues, like a lack of QBDT updates or outdated features, can prevent users from sending their emails. This problem can be resolved by downloading the recent QuickBooks Desktop updates and logging in as a Windows admin before trying to send the email to Outlook.
Once the application is up-to-date, you can send your email again and check if the email server issues are resolved; otherwise, follow the next solution.
Solution 4 – Toggle the Email Preferences
If QuickBooks is unable to send emails, another solution is to change the email preferences. You can follow the detailed instructions given below to toggle the email preferences in QuickBooks Desktop –
- Go to the Edit menu in QB Desktop, select Preferences, and click the Send Forms option.
- Move to the My Preferences tab, select QuickBooks E-mail or Webmail, and hit OK to turn off your email preferences.
- Now, repeat the same steps to toggle the preferences again, then return to the My Preferences tab and select Outlook.
- Lastly, click OK, then exit QuickBooks and all other open programs and rerun the app.
Once done, you can try sending the email again, but if the QuickBooks network connection failure persists, move to the next resolution step.
Solution 5 – Repair the MAPI32.DLL File
A damaged or corrupted MAPI32.DLL file can be why QuickBooks cannot connect to the mail server. To resolve the network failure, you must check if the problem lies within QuickBooks or Outlook, then repair the MAPI32.DLL file in the following manner –
Note: If you do not have prior troubleshooting experience or the process seems complex, you can contact your IT professional for assistance.
Step 1 – Send a Test Email from Microsoft Word
You can determine whether the issues while sending email occur due to problems within QuickBooks or Outlook mail by sending a test email from Word using the steps below –
- Restart your PC, open Microsoft Word, create a new document, and move to the File menu.
- In the menu, click Send, select the Email as PDF Attachment option, and check if the mail has been sent successfully.
If you cannot send an email from Microsoft Word, it is possible that Outlook or Office Suite has a technical problem that can be solved with the help of Microsoft Help and Support.
On the other hand, if you can send an email from Microsoft Word but cannot send it via QuickBooks, repair MAPI32.dll by following the steps in the next section.
Step 2 – Repair MAPI32.DLL File
MAPI32.DLL is a system file that is crucial in the communication between one’s e-mail programs and other programs on the computer; thus, if there is damage to this file, it can be why QuickBooks is not connecting to the server. Hence, you must repair this file using the following steps to fix this server connection issue –
- Start by exiting all open programs, then opening the Windows Start menu and typing “File Explorer” into the search panel.
- Further, access Windows File Explorer, type “C:\Windows\System32,” and find and open the Fixmapi.exe file.
- Finally, follow the on-screen instructions to run the file repair process, and when the repair is complete, restart your computer and open QuickBooks Desktop.
After doing this, attempt to send a test email, but if the email connection problem still persists, proceed to the next troubleshooting step to resolve this QB connection failure.
Solution 6 – Review the Email Preferences in your Web Browser
If your preferred email client is not set as the default choice in the web browser, it can be a reason why QuickBooks cannot connect to the server email. To resolve this issue, we recommend reviewing the default email preferences in Google Chrome as follows –
- Go to the Google Chrome browser, and when you click on the top of the browser home page, you will find the Chrome menu icon – click on it and then select Settings.
- In addition, navigate to the bottom of the page where you must click Show Advanced Settings, go to the Privacy section, and opt for Content Settings.
- Further, scroll down to the Handlers section, click the Manage Handlers button, and select your desired default email client.
After the steps are complete, reopen QuickBooks and try to send the email to check the status of the issue. However, if QuickBooks is still facing network connection issues while sending the mail, follow the steps in the next solution.
Solution 7 – Run the Verify/Rebuild Data Utility in QB Desktop
Sometimes, issues while sending emails in QBDT can occur if the company file is damaged or corrupted. To fix QuickBooks not connecting to server issues, you must review the data integrity and repair damaged data in the following manner –

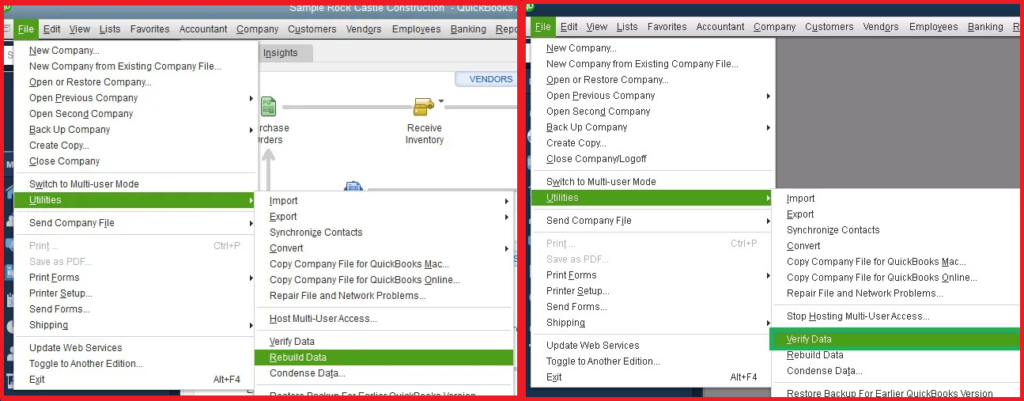
- Click on the File menu from the menu bar of the QBDT homepage, choose Utilities, and click on Verify Data.
- If you see “QuickBooks has detected no problem with your data,” select OK, but if Verify finds an issue with your data, click Rebuild Now or View Errors.
- Ow, proceed further and use the Rebuild Data tool to fix the company file damage, then wait for the process to end and rerun QB.
Try to send your email again, but if Quickbooks is unable to send emails, follow the steps in the next solution to eliminate the issue.
Solution 8 – Run a QuickBooks Repair
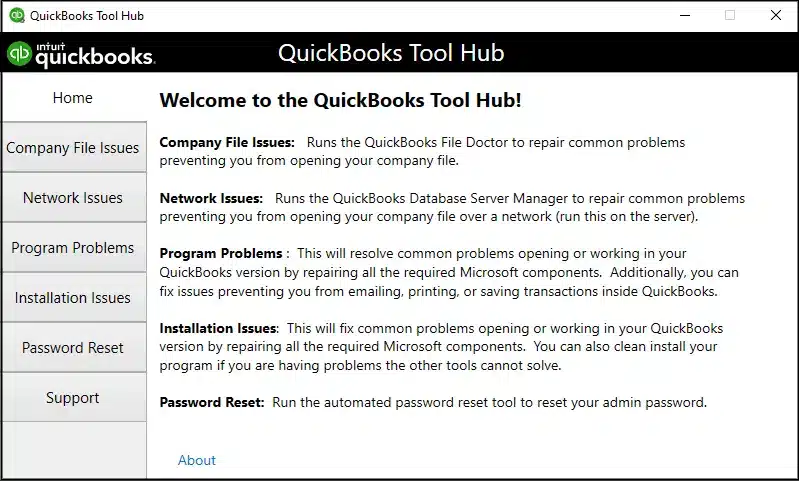
A damaged, corrupted, or incorrectly installed QuickBooks Desktop program can trigger issues while sending emails. To fix QuickBooks is not connecting to the server issues, you need to run a repair process by using the QuickBooks Tool Hub features as given in the detailed instructions below –

- After downloading and installing the latest QuickBooks Tool Hub version (1.6.0.5), launch the program and move to the Program Problems section.
- Further, select the Quick Fix My Program utility to resolve the QuickBooks program issues and check if QuickBooks can connect to the email server.
- If QuickBooks cannot connect to the email server, select the QB Install Diagnostic Tool from the Installation Issues tab.
Once the tool runs a scan and fixes the installation problems in QB, send a test email to check if the issue is fixed. If QuickBooks isn’t able to send the email, reinstall QuickBooks by following the next troubleshooting solution.
Solution 9 – Reinstall QB Desktop
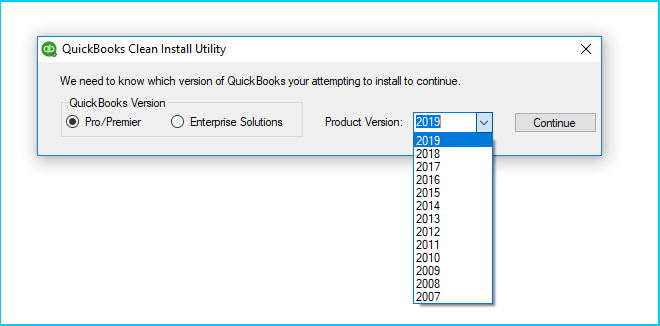
If none of the above solutions help address the email server issues, you can reinstall QuickBooks Desktop using the Clean Install utility and reactivate the application. This will help remove general issues and glitches in the current version that might be causing issues while users try to send emails via QBDT.

Once you reinstall the desktop app, run it and send the test email to check the issue’s status. If QuickBooks is still unable to send emails due to network connection failure, move to the next troubleshooting solution.
Solution 10 – Ensure QBDT is Not Running in Compatibility Mode
Running QBDT in compatibility mode can cause restrictions and prevent users from sending emails via Outlook. Thus, you check if the compatibility mode is activated while running QuickBooks; if yes, disable the mode in the following manner –
- Exit QuickBooks and other open programs, right-click the QB Desktop icon, and move to the Properties tab.
- Additionally, move to the Compatibility tab, from which, if the “Run this program in compatibility mode” checkbox is checked, one has to uncheck it to turn the mode off.
- Finally, click OK to save the settings and reopen QuickBooks in normal mode to send the email.
Now, try sending a test email in QuickBooks to check if Outlook is working, but if QuickBooks is not connecting to the server, follow the next solution.
Solution 11 – Send Emails through QuickBooks Using Webmail
If QuickBooks Desktop is unable to send your emails to Outlook, you can send emails using Webmail by following the steps below –
- Firstly, navigate to the Edit menu, select Preferences, and click Send Forms from the left corner.
- Now, select Web Mail, click Add, select your provider from the drop-down, and enter your email address.
- Select Use Enhanced Security, hit OK, then uncheck the box if you receive the “Network Error. Please try again.” message and sign in to your Intuit account.
Now, rerun QuickBooks Desktop and send your emails via Webmail to resolve the issue. You can resolve issues while sending emails through QuickBooks by following the solutions mentioned in this thorough guide. However, if these solutions don’t work and QuickBooks is Not Connecting to the Server, you can contact our Accounting Helpline’s support assistants at 1.855.738.2784 to get the email server issues promptly resolved.
Common User Questions
Why can’t I connect to the email server for the email provider while sending emails in QuickBooks?
One of the main reasons can be a poor/weak internet connection or not being connected to the internet. If the email server settings are not properly configured or you are using an incorrect ID or password, email server issues in QBDT can occur. If you are using an outdated version of QuickBooks Desktop, it can trigger the connection failure.
What if the antivirus blocks the outgoing emails from QuickBooks, leading to the “can’t send emails” message?
If your antivirus is blocking QB from sending the emails, you can try to temporarily disable the app before sending a test email. If you can send the email while the antivirus is off, reconfigure its settings to resolve the issue.
What are the steps to update the Microsoft Outlook app on your system?
To update Outlook, go to the File menu from the top-left corner and select Office Account. Then, in the window, click Update Options, select Update Now, and install the available updates on your PC.
Related Posts-
Resolving QuickBooks Payroll Not Deducting Taxes Issue With Causes & Solutions to Fix
Fixing the ‘QuickBooks Requires that You Reboot Loop’ Issue in Simple Methods
QuickBooks Automatic Update Greyed Out – What to Do?
Solving QuickBooks Won’t Open After Windows Update Issue
How to Fix QuickBooks Won’t Open After Update Issue
QuickBooks 941 Form: Filing, Due Dates, Errors, & Solutions

Edward Martin is a Technical Content Writer for our leading Accounting firm. He has over 10 years of experience in QuickBooks and Xero. He has also worked with Sage, FreshBooks, and many other software platforms. Edward’s passion for clarity, accuracy, and innovation is evident in his writing. He is well versed in how to simplify complex technical concepts and turn them into easy-to-understand content for our readers.

