
Last Updated on April 17, 2026
Intuit Data Protect (IDP) is one of the most effective subscription services by Intuit that allows QuickBooks users to backup their vital business information online on secure servers. A user can integrate IDP with 2017 and later versions of QuickBooks Desktop. Once the service is activated, it will automatically take the backup of your data at your preferred time every day. There are some common errors that users face while using Intuit Data Protect that we are going to discuss in this article, along with the causes that trigger these errors.
The common Intuit Data Protect Errors include firewall blockages, causing backup issues, and other problems. Follow the complete article for detailed information on resolving Intuit Data Protect Errors.
If You Need Technical Help for Troubleshooting Intuit Data Protect Related Errors Call Accounting Helpline Number 1.855.738.2784.
What are the Most Common Intuit Data Protect (IDP) Errors?
Most of the errors in Intuit’s® Data Protect service are caused by misconfigured Windows firewall settings and QuickBooks Desktop application settings. Follow the list below to learn more about the types of errors in Intuit Data Protect.
- Missing Intuit Data Protect icon from the Windows taskbar.
- IDP automatic startup is no longer working.
- Scheduled backup is not working.
- Online backup failed, or IDP is not able to take online backups.
- Error 305 while taking a backup.
- Error 8991 – (Backup encountered Backend error 8991).
- Backend error 2108 – (Intuit Data Protect Backup Failed: Firewall or connection issue).
- Intuit Data Protect login errors.
- IDP installation errors.
What Causes Errors in the Intuit Data Protect (IDP)?
Here are the common factors triggering Intuit Data Protect Errors:
- If QuickBooks Desktop application and Intuit Data Protect is not updated to the latest version.
- If IDP and Intuit websites are not selected under the trusted websites list in the Internet settings.
- Windows Firewall is blocking IDP services to connect with the internet.
- The user is not logged in as an administrator on Windows.
- An outdated version of Microsoft .NET Framework is installed on Windows, or the installation is corrupt.
- Incorrect login credentials cause login issue in Intuit Data Protect.
- Installation errors arise when the Windows computer does not meet the minimum system requirements for
- IDP installation.
- IDP services are not activated.
Quick Solutions for Intuit Data Protect Errors
We have laid down step-wise instructions to resolve Intuit Data Protect Errors:
IMPORTANT NOTE:
- On your Windows computer, make sure to login with an account that has administrative rights.
- Verify your user id and password to avoid any IDP account login errors.
- Make sure your system is having 1 GB of free disk space and a minimum of 150 MB of RAM available for running IDP.
Troubleshooting 1: Update QB Desktop and Intuit Data Protect
If you’re relying on old QuickBooks Desktop and Intuit Data Protect, you’ll surely face Intuit Data Protect Errors. So, update them as follows:
- Open your QuickBooks Desktop application, and under the Help tab, click Update QuickBooks.
- Click the Update Now tab and scroll down to make sure Data Protect is check-marked in the list of QuickBooks features.
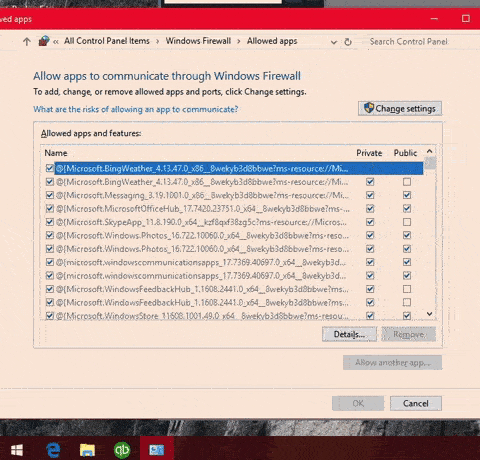
Troubleshooting 2: Adjust the Windows Firewall to Get IDP the Internet Access
Firewall blockages are the primary reason IDP and QB errors emerge. So, configure its settings as follows:
- Click the Windows Start button on your desktop and type Firewall in the Search Programs and Files search box.
- Click Allow a Program through Windows Firewall from the list.
- Now select Allow Another App and click Browse.
- Now navigate to Program Files (x86)\ Common Files \Intuit\ Data Protect folder, select QBIDPservice.exe file, and click Open.
- Click the Network Type button and checkmark the box beside the Private
- Click OK and then click Add once again to add the IBUenghost.exe and IntuitDataProtect.exe files.
Troubleshooting 3: Include IDP in the Trusted Websites list
If your browser doesn’t consider IDP a safe site, it will throw errors. So, add it to the trusted sites list as follows:
- Click the Windows Start button on Desktop and type Internet Options inside the Search Program and Files search box.
- Click Internet Options from the list and from under the Security tab select Trusted Sites.
- Now click Sites and type IDP and Intuit’s® websites one by one (backup.com, *.intuit.net, *.intuitdataprotect.com, *.intuit.com, *.QuickBooks.com, workplace.intuit.com) and click Add and make sure the Require Server Verification checkbox is not marked.
- Click Close and then OK after adding the websites.
Troubleshooting 4: Reinstall Microsoft .NET Framework
If your MS .NET Framework is damaged, you will face problems with IDP. So, follow the article on Reinstall .Net Framework on Windows for detailed instructions on reinstalling .NET Framework on Windows.
Troubleshooting 5: Run Intuit Data Protect Diagnostic Tool
Common Intuit Data Protect Errors can be resolved with the Intuit Data Protect diagnostic tool as follows:
- From the bottom right corner of your desktop, right-click the IDP icon and select About Intuit Data Protect.
Now press the Control key and F2 key at the same time on your keyboard. - Click Run Diagnostics.
- If the test result returns with success, then it means the issues have been fixed, but if you see any error message with a description, then connect with one of our experts for resolution.
Troubleshooting 6: Add Intuit Data Protect to Windows Startup Programs
Here’s how common IDP errors can be fixed when you add it to the Windows startup programs list:
- Press and hold the Windows key + letter R key on the keyboard at the same time.
- Type command msconfig in the Run box.
- Under the Startup tab checkmark all the QuickBooks services.
- Click Apply and OK.
Sometimes users have reported facing the same Intuit Data Protect Errors even after following all the necessary troubleshooting steps, and this might happen if any third-party firewall or security application is interrupting IDP’s connection with the internet and there are also some lesser-known reasons that trigger such error. We suggest you call Accounting Helpline Error Support Number 1.855.738.2784 for help and support.
FAQs
Why am I encountering Intuit Data Protect Errors?
You may encounter Intuit® Data Protect errors for various reasons:
1. Data corruption within your QuickBooks company file
2. Conflicts with other software or security applications on your computer
3. Problems with your network configuration, firewall settings, or internet connectivity
4. Using an outdated version of QuickBooks may generate compatibility issues with Intuit Data Protect.
5. If your user account doesn’t have the necessary permissions, it can prevent successful backups.
6. Occasionally, Intuit’s servers may experience downtime or service interruptions.
When do Intuit Data Protect Errors appear on the screen?
Intuit Data Protect Errors can appear on the screen in various situations, including:
1. Scheduled Backups: Errors may occur during scheduled automatic backups when Intuit Data Protect attempts to back up your QuickBooks data.
2. Manual Backups: When you manually initiate a backup using Intuit Data Protect, Issue can appear if there are issues with the backup process.
3. Backup Restoration: Issue may surface when restoring data from a backup created with Intuit Data Protect.
4. Configuration Changes: If changes to your backup settings or configurations exist, errors might appear when applying these changes.
5. Data Integrity Checks: During periodic data integrity checks, the software may detect issues and generate error messages.
How do I fix the common Intuit Data Protect Errors?
The general steps to address the common Intuit® Data Protect Errors include:
1. Check the reliability of your internet strength.
2. The latest QB version will ensure compatibility and the latest QB features.
3. Arrange your firewall and security software to allow Intuit Data Protect to access the internet and perform backups. Whitelist Intuit Data Protect in your firewall settings.
4. Check your network configuration to ensure it is correctly set up.
5. If your QuickBooks company file is corrupted, use the QuickBooks File Doctor or rebuild the company file to address data integrity issues.
What is Intuit Data Protect helpful for?
Intuit Data Protect is a backup service that offers the flexibility to back up your entire computer or your QuickBooks files and folders. Once configured, it automatically performs daily backups of your data. Whether you prefer to back up your entire computer or focus solely on your QuickBooks files and folders, this versatile service has you covered. Once the setup is complete, it operates seamlessly, performing daily backups to ensure the ongoing security of your valuable information.
Is Intuit Data Protect secure?
Yes, Intuit Data Protect (IDP) is generally considered safe for backing up and protecting your data. Here are some essential safety features of IDP:
1. IDP uses encryption to protect your data during transmission and storage. It ensures that even if someone intercepts your data, they won’t be able to access it without the encryption key.
2. Your backed-up data is stored on secure servers, which Intuit maintains. These servers have security measures in place to protect against unauthorized access.
3. To access your backed-up data, you need a password. It adds an extra layer of security, ensuring that only authorized users can retrieve the data.
4. Intuit keeps IDP updated to address security vulnerabilities and improve overall system security.

Edward Martin is a Technical Content Writer for our leading Accounting firm. He has over 10 years of experience in QuickBooks and Xero. He has also worked with Sage, FreshBooks, and many other software platforms. Edward’s passion for clarity, accuracy, and innovation is evident in his writing. He is well versed in how to simplify complex technical concepts and turn them into easy-to-understand content for our readers.