
Last Updated on July 29, 2025
QuickBooks is a popular accounting software developed by Intuit for business management, payroll, and other related work. It comes with various tools and features that simplify accounting tasks, automate payroll, and ensure high security. You can store your company and data files in QB and use them however you want to. These data files can be easily exported or imported into QuickBooks, so that you can manage your company files across different systems with ease. An IIF file, which is an acronym for Intuit Interchange Format File, is used to import data into QB Desktop. Let’s delve into this blog to learn about IIF files and how you can import IIF Files in QuickBooks Desktop.
If you want expert consultation regarding how to import IIF Files in QuickBooks Desktop, call 1.855.738.2784 to get professional assistance. Our Accounting Helpline’s experts will help you import data.

What are IIF Files in QuickBooks Desktop?
Intuit Interchange Format (.IIF) files are ASCII text, TSV (Tab-Separated Value) files, which QuickBooks Desktop uses for exporting or importing lists or transactions. You can easily transfer data to and from various sources, further enhancing your management of company files in QB. You can easily import IIF Files in QuickBooks Desktop because the program itself will format the files for both exporting and importing. It makes importing data directly into QBDT a lot more efficient and faster, although it may take some time for large amounts of data.
But if you create IIF files completely from scratch or adapt data from a different program, then there will be technical complications, as the formatting of delimited text files requires expertise and experience.
Maximum Number of List Entries for Importing IIF Files into QuickBooks Desktop
There is a limit to the number of list items to import iif files in QuickBooks Desktop. You can refer to the tables below to view the maximum number of entries for list limits and custom fields for both Windows and Mac.
List Limits for Importing IIF files into QuickBooks 2021 for Windows
| List name | Max number of entries (Pro, Premier) | Max number of entries (Enterprise) |
| Chart of Accounts | 10,000 | 100,000 |
| Total names: Employees, Customers, Vendors, and Other Names combined | 14,500 (individual limits of each list are 10,500) | >100,000 |
| Items, including inventory items (group items can contain only 20 individual items) | 14,500 | >100,000 |
| Items in an inventory assembly or sub-assembly | 100 | 500 |
| Categories | N/A | 10,000 |
| Job types | 10,000 | 10,000 |
| Vendor types | 10,000 | 100,000 |
| Customer types | 10,000 | 100,000 |
| Payroll items | 10,000 | 10,000 |
| Price Levels | 100 | 750 |
| Classes | 10,000 | 100,000 |
| Terms for receivables and payables | 10,000 | 10,000 |
| Payment methods | 10,000 | 10,000 |
| Shipping methods | 10,000 | 10,000 |
| Customer messages | 10,000 | 100,000 |
| Ship To addresses | 10,000 | 100,000 |
| Memorized reports | 10,000 | 29,000 |
| Memorized transactions | 10,000 | 50,000 |
| To-Do notes | 10,000 | 100,000 |
| Sales Reps | 10,000 | 10,000 |
| Sales Tax Codes | 10,000 | 10,000 |
| Group Items & Sales Tax Group Items | 50 | 50 |
| Advanced Inventory Sites | N/A | 1,000,000 |
| Advanced Pricing Price Rules | N/A | 100,000 |
| Contacts | No limit | No limit |
| Custom Fields | 20 | 45 |
| Item custom field | 5 | 15 |
| Customers/ Vendors/ Employees custom fields | 15 | 30 |
With the QuickBooks Desktop Enterprise 17.0 and later versions, you can add up to one million names (customers, vendors, employees) and up to one million items (for example, inventory, non-inventory, and service items). There may be some performance degradation to a certain extent as your lists reach these size thresholds.
If you want to review the list size in QB Desktop, press the F2 key or Ctrl + 1, then navigate to the List Information section or the File Size section in the File Information section.
To get custom fields, you can also choose totals from the table as a combination of the allowable custom fields for customers, vendors, and employees.
- QuickBooks Pro/Premier: Although it has a total of 15 custom fields, only 7 can be chosen per category.
- QuickBooks Enterprise Solutions: Similarly, it offers a total of 30 custom fields, but only 12 fields can be selected per category.
Note: You will get a warning on your screen by QuickBooks as you reach the limits for custom fields.
List Limits to Import IIF files in QuickBooks Desktop for Mac
| List name | Max number of entries |
| Chart of Accounts | 10,000 |
| Items, including inventory items(Group items can only contain 20 individual items) | 14,500 |
| Job Types | 10,000 |
| Vendor Types | 10,000 |
| Customer Types | 10,000 |
| Purchase Orders | 10,000 |
| Classes | 10,000 |
| A/R Terms and A/P Terms added together | 10,000 |
| Payment methods | 10,000 |
| Shipping methods | 10,000 |
| Customer messages | 10,000 |
| Memorized reports | 14,500 |
| Memorized transactions | 14,500 |
| To-Do List | 10,000 |
| Names added together (Employees, Customers, Vendors, and Other Names)* | 14,500 |
* Names added together: there can be up to 10,000 names for any of these lists, but the total number of names should not exceed 14,500 for all lists collectively.
Practical limitations
QuickBooks Desktop is ideally suited for small to mid-sized businesses, allowing them to store at least two years of detailed transactions in a company data file and compare reports or gain insights from prior-year project information.
The growth rate of QB Desktop company files can vary a lot for different companies. Therefore, data file size cannot be measured as an average or typical value, as each business has a different intended use and information to track.
In case you are facing performance issues, you can resolve them by installing the QuickBooks Database Server Manager to manage your data file.
If your old transactions in QB for prior years are important and you want to keep them, then you can condense your company file data.
Factors to Consider Before you Import IIF files in QuickBooks Desktop
- The transactions are not linked, and you will need to link invoices and invoice payments after importing IIF files into QB.
To do so, you can go to the Receive Payments or Pay Bills window or use third-party programs that import and link transactions. - Data in the item’s custom fields cannot be imported with the assembly items.
- If you have price levels set up on a per-item basis, then they cannot be imported or exported.
- Payroll data from Core, Premium, and Elite Standalone Payroll can only be exported with IIF files.
- IIF files cannot be exported or imported across different country versions of QuickBooks, such as the US version to the Canadian version or vice versa.
- You cannot store numbers in a cell beginning from zero (0) in Microsoft Excel. Therefore, as a workaround, you will have to format the column cells as Custom before creating an IIF import file.
Ensure that you go through these factors before you start importing IIF files into QuickBooks. Move on to the following section to learn about the import process.
How to Import an IIF File into QuickBooks for Different Versions
Let’s delve into this section to learn how you can import IIF files in QuickBooks Desktop across 2019 and later versions, as well as older versions, for both Windows and Mac.
Improved IIF Import Files in QuickBooks 2019 and later
If you use QuickBooks Desktop 2019 and later, you will find it easier and convenient to import lists and transactions using the improved Import IIF Tool. With this tool, you can scan and check your file for any errors before importing, preventing insufficient data from importing IIF files into QuickBooks 2021. If the tool detects any errors, it displays the number of items that were imported successfully and the number that failed to import. The Import IIF tool in QuickBooks 2019 and later versions can be used seamlessly in both multi-user and single-user modes.
How to Import IIF Files in QuickBooks Desktop: 2019 and Later for Windows
Follow the steps listed below for importing IIF files into QB 2021 in Windows.
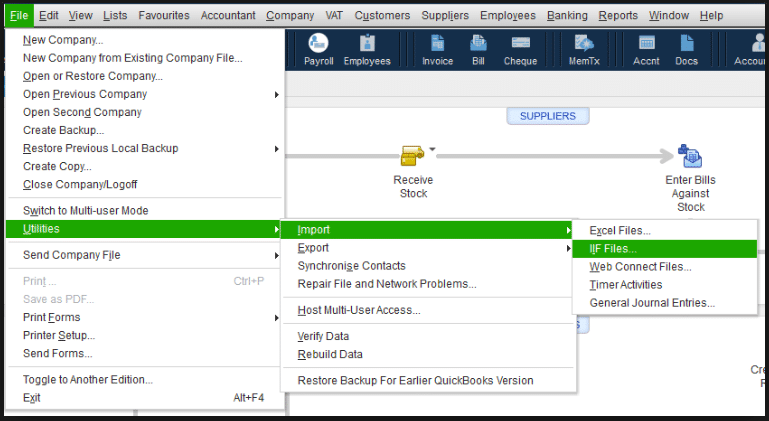
- Open the File menu, locate and select Utilities.
- Then, click on Import and choose IIF Files.

- Now, select Import IIF to import.
- Hit OK after you locate the file
- Once the process is over, click Done.
Note: If you opt for Import it for me. I’ll fix it later, then it will require you to switch from multi-user mode to single-user mode. Moreover, this option bypasses the data review and might lead to incorrect or incomplete import of your books. Therefore, we recommend that you do not use this option while you import IIF files in QB Desktop.
Process for QuickBooks IIF Import Files for Mac
This method can be used to import an IIF File into QuickBooks for Mac.
- Sign in to your company file as an admin.
- Head to the File menu, locate and click on Import.
- Then, choose “From IIF Files” and export your IIF file.
After this, the number of lists and transactions imported will be displayed. In case the file is not imported, then move on to the following method.
IIF File Not Imported in QuickBooks 2019 and Later
In case the import of IIF files in QuickBooks Desktop failed or was unsuccessful, then a number of lists and transactions for both failed and successful imports will be displayed on your screen. Additionally, the QB import IIF tool creates a separate.IIF file of transactions that failed to import, along with the error messages found. After that, you can move on with any of these options:
- Review now: It will open the newly created.IIF file consisting of data that failed to import. Detailed steps are given below if you decide to proceed with this option.
- Open in folder: It will open the location folder for the new file.IIF file.
- Close: It will close the window and ignore the Lists and Transactions that failed to import.

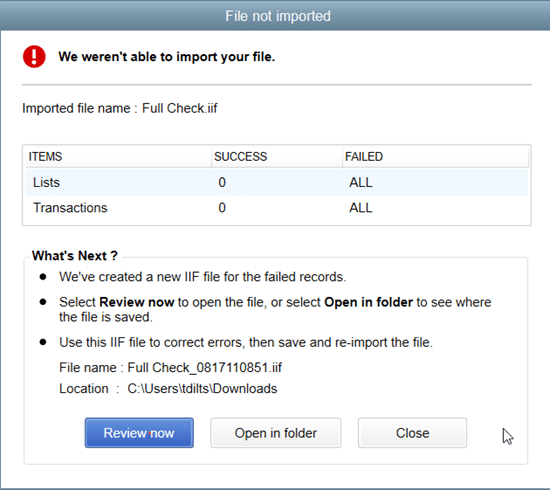
You can see the above image to get an understanding of how the file not imported message will appear to you. You can decide what you want to do and take the steps to review the errors in the.IIF files are listed below.
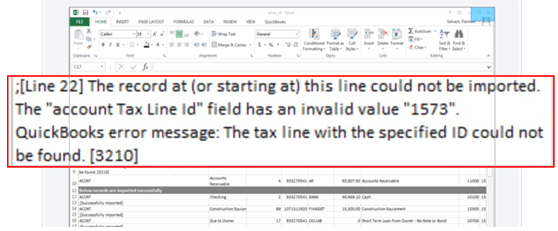
How to Review the Errors in.IIF Import File
If the import of IIF files in QuickBooks Desktop fails and you get the File not imported error, then you can take these steps to review it and resolve the error.
- Click on Review now.
- Locate the ERROR to see the exact issue(s) with the file.

- Fix the error and hit Save.
Important: If you are prompted whether to keep the file type, press Yes. - Now tap on the top-right corner to close the “File not imported” window.
- Finally, you can import the fixed.IIF file.
Once done, the import IIF file into QuickBooks process will be completed. Now, look at the table below to get a concise overview of the entire blog. In case you face QuickBooks IIF import errors QB Desktop 2019 2020, then refer to this guide to resolve them.
Import IIF Files in QuickBooks Desktop – A Quickview Table
Tabulated below is a summary of the blog that provides a concise overview of essential information about the QuickBooks IIF import files:
| What are IIF Import Files? | Intuit Interchange Format (.IIF) files are ASCII text or TSV (Tab-Separated Value) files. |
| Its uses | It can be used to transfer data to and from various sources for exporting or importing lists or transactions in QB. |
| Precautions to take | transactions are not linked, invoices and invoice payments require manual linking, data in item’s custom fields won’t import with assembly items, price levels set up on per-item basis can’t import or export, export payroll data from different versions such as core, premium, and elite standalone payroll, IIF files can’t export or import across different country versions of QuickBooks, numbers in a cell can’t begin from zero (0) in Microsoft Excel. |
| When to use it | For improved IIF Import Files in QuickBooks 2019 and later for Windows and Mac |
The Bottom Line
The import IIF files in QuickBooks Desktop helps you export or import lists or transactions without any hassle. It can be used to transfer data to and from various sources, fostering better management of company files. The QuickBooks IIF files are formatted by the program for import and export, although this process may take some time, depending on the file size. Additionally, we learned the procedures and methods to import the IIF files from QB 2019 and later versions for both Windows and Mac. Although it is simple to use, some errors can arise as well. But don’t worry, we have covered these common issues in this blog.
If you are facing issues in resolving the errors, you can connect with our Accounting Helpline’s specialists and receive assistance to import IIF files in QuickBooks Desktop. You may reach out at 1.855.738.2784 to get guidance from our experts.
Frequently Asked Questions (FAQs)
How to import an IIF file into QuickBooks Online?
If you want to import IIF files in QuickBooks Online, then start by exporting the data as an IIF file. Head to QBO and expand the File menu, then locate and select “Export”. There, you can choose ‘IIF Files’ as the file type and proceed by hitting OK. Up next, open the QuickBooks IIF file in a text editor of your choice, such as Notepad or Microsoft Word, to check the information in the file. Lastly, go to the File menu and choose Import, then select the QB import IIF files and hit OK.
How to Open an IIF File in Excel?
To open an IIF file in Excel, you can take the following steps.
– Export the IIF file and save it on your device.
– Launch Microsoft Excel, then open the File menu and select Open.
– Click on the File type dropdown and hit All Files.
– Now locate the IIF file and hit Open.
– Click on Next, followed by Next and Finish in the Text Import Wizard.
– Modify your QuickBooks import IIF file as needed.
– Now, tap “Save” under the File menu, then click “Yes”.
– After that, you can close Excel.
How to create IIF Files for QuickBooks?
You can follow this process to create an export IIF file from QuickBooks.
– Log in as an administrator to your company file.
– Choose Utilities from the File menu.
– Then, click on Export and select the Lists to IIF Files option.
– Now, specify the lists you wish to export, and click OK.
– Choose a location to store your IIF file in the Save in menu.
– Hit Save after entering a file name.
Related Posts-
QuickBooks Print and PDF Repair Tool: How to Fix Print Problems
QuickBooks Error H202 in Multi-User & Solutions to Fix it
Effortlessly Verify and Rebuild Data in QuickBooks Desktop with Simple Steps
A Comprehensive Guide to the QuickBooks Migration Tool for Data Transferring
An Expert’s Take on QuickBooks Error 15215: Guided Solutions
Learn to fix essential QB issues with QuickBooks Tool Hub

Edward Martin is a Technical Content Writer for our leading Accounting firm. He has over 10 years of experience in QuickBooks and Xero. He has also worked with Sage, FreshBooks, and many other software platforms. Edward’s passion for clarity, accuracy, and innovation is evident in his writing. He is well versed in how to simplify complex technical concepts and turn them into easy-to-understand content for our readers.