
Last Updated on April 17, 2026
The QuickBooks fatal error occurs when installing program updates for QuickBooks Desktop Point of Sale, using QB Statement Writer after upgrading, while importing employee time, etc. Users may encounter an error message“Fatal Error has occurred: This feature is not enabled or not available in this version of QuickBooks,” or an error code like 15943 35432, notifying the same. When it comes to the root causes, damaged installer files are the primary reason behind a fatal error in QB. In another case, if you encounter the fatal error while using a feature in QB, it may be because of incompatibility issue. If you’re unable to eliminate the QB Desktop fatal error and hence seeking solutions, we have brought this guide to help you fix the issue effectively. In this blog, we have addressed multiple working solutions and root causes in detail. Therefore, read the blog until the end and help yourself get past the error instantly.
Has it become challenging to fix the fatal error in QB? Resolve the error with the help of our experts. They’ll handle the issue on your behalf with utmost perfection. All you need to do is dial at 1.855.738.2784 and the rest will be taken care of by them.
Primary Causes of QuickBooks Fatal Error Message
Here are the primary reasons behind the occurrence of error message: “QuickBooks application navigation.exe encountered a serious error and must shut down”-
- A corrupt Windows Installer file
- QuickBooks Desktop Point of Sale installation file may be damaged.
- The QB Desktop might be old.
- The Windows version hasn’t been updated in a long time, causing a fatal error.
- QB Statement Writer fatal error appears if you are signed into the company file as an external accountant. Admin access is necessary to log into the company file and use the Statement Writer.
- Internal problems in Excel may be leading to this error.
- When attempting to open an Accountant’s Copy of QuickBooks Accountant 2010 on a Windows 7 system, you may encounter an error when launching ISW.
- Incompatibility between QuickBooks Statement Writer and MS Office can bring forth the QuickBooks fatal error.
- Problems with crucial Microsoft components, like the .NET framework, can trigger a fatal error.
Working Tricks to Resolve Fatal Errors while Installing QuickBooks POS
Here are the best tips and tricks that will fix the QuickBooks fatal error message instantly.
Solution 1: Download an External Patch Update for QBPOS
Update QuickBooks Desktop Point of Sale from an external patch when you get a fatal error message during its installation. The external patch would be secured and offer bug fixes, improvements, and enhancements without issues. Here are the steps to do so through an external patch:
- Tap the Downloads and Updates link on Intuit for QB and its products.
- Locate your version by entering the product, version, country, etc.
- Now, initiate the download by tapping Download Now.
Solution 2: Terminate QuickBooks Point of Sale Processes
If you have QuickBooks POS processes running in the background, they may contribute to fatal errors while installing QuickBooks POS. End these processes so their interference stops:
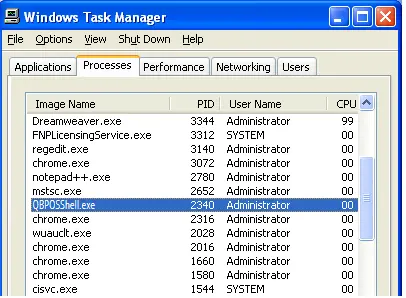
- Access Task Manager with Ctrl + Shift + Esc keys.
- Tap the Processes tab.
- Locate and terminate the following processes by right-clicking and choosing End Process:
- qbpos.exe
- QBPOSDBService.exe
- QBPOSShell.exe
- Find and put a stop to the following service through the steps below: QBPOS Database Manager vXX (XX representing the POS version).
- Use the Windows logo key to initiate the Search function.
- Type “services.msc” into the search section.
- Within the Services window, seek out QBPOS Database Manager vXX (XX representing the POS version).
- Right-click on it and choose Stop.
- Close the Services window when finished.
Solution 3: Erase the Contents of the Update Folder
Delete the update folder contents to resolve the fatal error arising during the update installation of QuickBooks Point of Sale. First, we’ll display the hidden files and folders to ensure you can reach the folder:
- Access Desktop or System Tray and tap the folder icon to launch the File Explorer.
- Choose the View tab and hit Hidden items.
Now, take the following points to resolve the fatal error:
- Access C:\ProgramData\Intuit\QuickBooks Point of Sale XX\UPDATE\.
- Use the keyboard to press Ctrl + A, then hit Delete.
After following these steps, exit the explorer Window and update the Point of Sale file through the file downloaded in solution 1.
Solution 4: Clean Install QuickBooks Desktop POS
To address issues encountered during installation or while using the software, a clean reinstallation may be necessary. Follow these steps to completely uninstall and reinstall QuickBooks Point of Sale on your computer:
Before proceeding, ensure that:
- You have backed up your data file.
- You possess the QuickBooks Desktop Point of Sale download file or installation CD.
- Your License and Product Numbers are accessible.
- You can log in as a Windows Administrator.
- The computers involved can be restarted.
Step 1: Uninstall QuickBooks Point of Sale
- Use the Windows + R keyboard keys to open the Run window.
- Enter “Control Panel” and click OK.
- Select Programs and Features (if in Category View, click Uninstall a Program).
- From the list of programs, select QuickBooks Desktop Point of Sale version, then click Uninstall/Change.
- Follow the prompts to complete the QBPOS uninstallation process.
Step 2: Rename All Point of Sale Folders
If uninstalling from the server or the computer with the locally saved POS data file, copy the Point of Sale data folder to the Desktop and put ‘OLD’ at the end of its name to prevent recognition by QuickBooks Desktop Point of Sale for creating a new one.
Folder locations to rename:
- C:\Users\Public\Public Documents\Intuit\QuickBooks POS XX
- C:\Program Files (x86)\Intuit\QuickBooks POS XX
- C:\Program Files (x86)\Common Files\Intuit\Entitlement Client\v8
- C:\ProgramData\Intuit\QuickBooks Desktop Point of Sale 18.0
Delete the QBPOSDBSrvUser Windows user:
- Go to Windows Start, then select Control Panel.
- Choose User Accounts, then proceed with Manage Another Account.
- In the User Account Control prompt, select Continue.
- Choose QBPOSDBSrvUser and delete the account.
- Confirm the deletion of the folder.
- Restart your computer.
Step 3: Download & Install QuickBooks Point of Sale
- Download the QBPOS version you require.
- After Point of Sale completes downloading, open the QuickBooks installation file located on your desktop. If prompted to overwrite existing extracted files, select Yes to All.
- Proceed with the installation wizard by clicking Next.
- Review the License Agreement. If you agree to all the terms, select “I accept the terms in the license agreement,” then click Next.
- Ensure you input your license and product numbers, then click Next.
- Choose the installation type:
- Only this computer: Suitable for single-user setups.
- Two or more computers: Suitable for multi-user setups.
- If installing on multiple computers, select the workstation type:
- Server workstation: Holds the company data.
- Client workstation: Typically used as a cash register and has program access.
- Click Install to initiate the installation process.
- Note: QuickBooks Point of Sale must be installed in the following file path: C:\Program Files (x86)\Intuit\QuickBooks Desktop Point of Sale (version).
- Upon completion, activate QuickBooks Point of Sale as needed. You may need to restart your computer and reopen QuickBooks to begin using the software.
Solution 5: Update QuickBooks Desktop Manually
Running an old or outdated QB app may be the prime reason why QuickBooks has encountered a problem and needs to close. Getting the latest patch through the manual update procedure should offer the correct fix to the fatal error. Let’s attempt it through the process given below:
- To begin, close both your company files and QuickBooks.
- Next, access the Windows Start icon.
- Search for QuickBooks Desktop and right-click the application.
- From the menu that becomes accessible, choose “Run as administrator.”
- Once QuickBooks opens to the No Company Open screen, navigate to the Help menu.
- Select “Update QuickBooks Desktop” from the options provided.
- Move to the Options tab within the update window.
- Click on “Mark All” and then proceed to save your selections.
- Now, select the “Update Now” option and ensure to check the “Reset Update” checkbox.
- When you’re prepared, click on the “Get Updates” button to initiate the update process.
Solution 6: Update Windows
If your Windows is outdated, you may face the QuickBooks Point of Sale installation fatal error. So, check the Windows operating system and update it as follows:
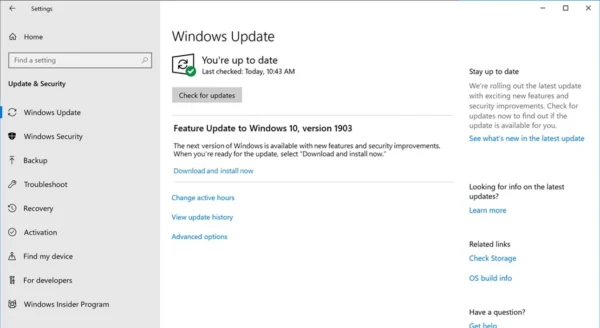
- Tap the Windows logo.
- On the Start menu, search the words ‘Check for updates.’
- If updates are available in Windows, click Install Now.
Solution 7: Get Help from Quick Fix My Program
When performance issues trigger problems in the QuickBooks application, Quick Fix My Program from the Tool Hub comes to the rescue. It can help avoid the causes that lead to issues and if QB has already been affected by errors, this tool will diagnose and fix those errors instantly. Follow the steps below to address the issue.
- Download QuickBooks Tool Hub.
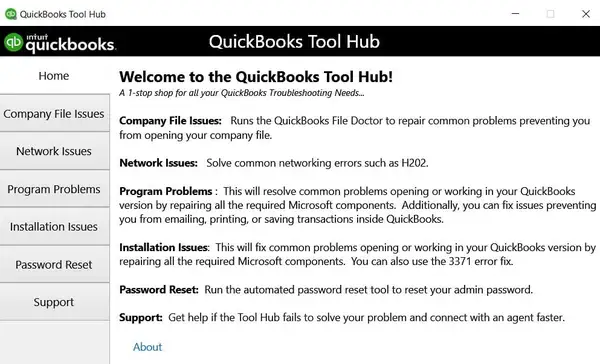
- Retrieve the downloaded file from the saved location.
- Double-click QuickBooksToolHub.exe to run the InstallShield instructions, accept the license agreement, and install QuickBooks Tool Hub.
- After you see the program on your apps list, open it.
- Tap Program Problems.
- Select Quick Fix My Program.
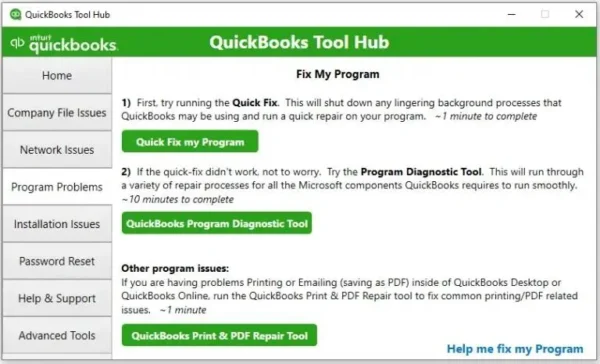
- The scan should help you fix errors in performance.
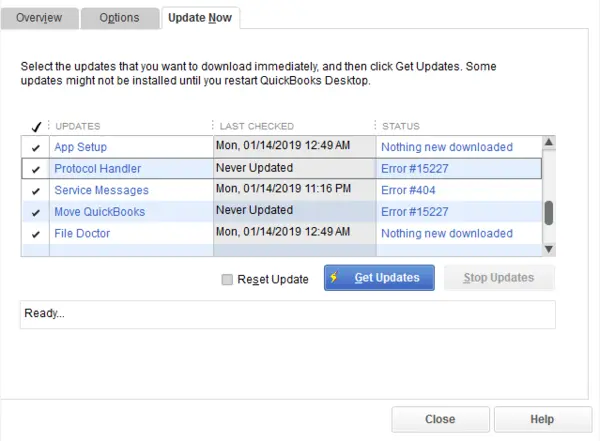
Solution 8: Update the Statement Writer
Let’s proceed with updating the Statement Writer to address the QuickBooks fatal error:
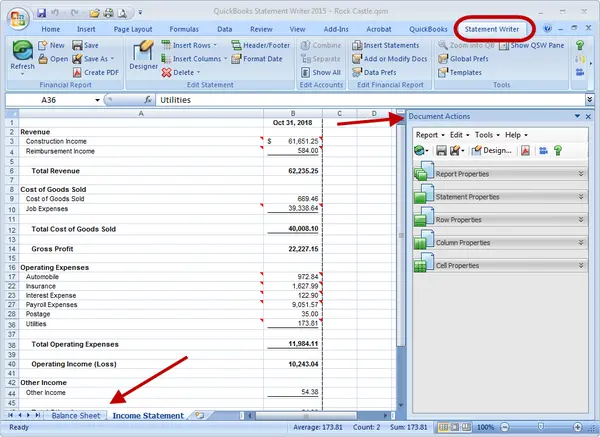
- To begin, open QuickBooks Statement Writer (QSW).
- Navigate to the Help Center and click on Update.
- If you encounter a Download/Install update prompt each time you open QSW or after updating, simply select Cancel to access QSW.
- Once the update is complete, return to QuickBooks and open a statement to ensure everything is functioning correctly.
Solution 9: Resolve the Problems with the Statement Writer
If the QB program encounters fatal errors while running the Statement Writer, consider the following steps:
Step 1: Verify Regional Windows Settings
- Examine your system tray to see if there is a Windows language bar.
- If you notice codes for languages other than English, such as EN and JP, it’s necessary to adjust your regional settings to English (United States/Canada).
Tip: If there are no visible letters, it likely means that the Regional Setting is already configured to English (United States/Canada).
Step 2: Adjust Regional Settings to US/ Canada
- Press Windows+R for the run command to launch on the Windows screen.
- Enter ‘control panel’ and press OK for the window to open.
- Select Clock, Language, and Region, then click Change Location.
- Under Home Location (Current Location in Windows 7 and Vista), choose the United States/Canada.
- On the Administrative tab, click Change System Locale, then select English (United States/Canada).
- Click Apply > OK.
- Reboot your computer.
Step 3: Modify User Settings by Enabling Windows User Account Control (UAC)
- Provide the Run (Windows + R) command to launch it on the screen.
- Type “Control Panel” and launch it by tapping OK.
- In the Control Panel, access User Accounts, then navigate to User Accounts (Classic View).
- Choose “Change user account control settings.” (Note: If you are requested by UAC, select Yes to proceed).
- Adjust the slider:
- Move it to “Never Notify” and hit OK to deactivate UAC.
- Move it to “Always Notify” and hit OK to activate UAC. (Note: If you are requested by UAC, select Yes to proceed).
- Restart your computer and enable the changes.
Step 4: Don’t Run QB Or Excel as Administrator
- Ensure that QuickBooks or Excel is not running with Administrator privileges.
- Right-click on the QuickBooks or Excel version you are using in the Programs menu, then choose Properties.
- Navigate to the Compatibility tab and ensure that no check boxes are selected.
Solution 10: Download the Trial Version of the Latest Release
You may be using a discontinued QB version, which is why you are receiving fatal errors in QB. In such cases, get a trial license for the newest version and access the Statement Writer from there as follows. Before that, let’s help you back up your QB company file from the old QB version:
- Access the File menu in QB and choose Switch to Single-user Mode.
- Next, go back to the File menu, move to Back up Company, and then click on Create Local Backup.
- In the window coming up next, choose Local Backup and move forward by clicking Next.
- Under the Local Backup Only section, choose Browse to reach the location where you want to save the backup company file.
- Optionally, you can specify the number of backups to retain.
- A test will be conducted to verify the integrity of your backup file before saving it.
- Once you are prepared, click OK.
- Finally, select Save it now and then click Next to complete the backup.
To obtain the trial version, follow these steps:
- Visit the QuickBooks Desktop 30-day trial page.
- Input your business details.
- Click on the “Get your trial” button.
Afterward, proceed with the installation of QuickBooks by following these instructions:
- Launch the downloaded QuickBooks file.
- Respond affirmatively to any pop-up messages that appear.
- Select “Next” to initiate the installation process.
- Check the box indicating your acceptance of the license agreement, then click “Next.”
- Enter your License and Product numbers, and then proceed by selecting “Next.”
- Follow the on-screen prompts to continue the app’s installation.
Solution 11: Uninstall & Reinstall Compatible Office
If you have an incompatible MS Office installed, like the 64-bit program, on your system, you might receive a fatal error while running the Statement Writer. Let’s uninstall and reinstall the compatible version of Office (32-bit) to fix the error:

- Launch the Windows Start menu.
- Look for “Control Panel” and access it.
- Choose the button “Programs and Features” or “Uninstall a Program.”
- Locate Office 365 (64-bit) from the list of installed programs.
- Click on “Uninstall/Change” and then go with “Remove.”
- Proceed by selecting “Next” and follow the on-screen prompts to finish the removal process.
- Afterward, install Office (32-bit).
Solution 12: Manually Fix Microsoft .NET Framework
Microsoft applications, including Microsoft .NET Framework, are necessary for QB to function properly with web-based applications. If there’s an issue with the .NET Framework, QuickBooks may encounter functionality issues.
For Windows 10 and later versions:
- Close all currently open programs.
- Open the Windows Start menu.
- Search for “Control Panel” in the search bar and access Control Panel.
- Navigate to Programs and Features.
- Click on Uninstall a Program. Note that you won’t actually be uninstalling anything.
- Choose Turn Windows features on or off.
- Locate the .NET Framework in the list.
- Configure the settings for both .NET Framework 4.5 (or later) and .NET Framework 3.5 SP1.
(Note: The steps are the same for fixing .NET Framework 4.5, 4.6, 4.7, and 4.8.)
For .NET Framework 4.5 (or later):
- If the checkbox for .NET Framework 4.5 (or later) isn’t checked:
- Check the box to enable .NET Framework 4.5 (or later).
- Click OK to save changes.
- Restart your computer.
- If the checkbox for .NET Framework 4.5 (or later) is already checked:
- Uncheck the box to disable .NET Framework 4.5 (or later). Keep it disabled.
- Click OK to save changes.
- Restart your computer.
- After signing back into Windows, follow the steps to re-enable .NET Framework 4.5.
Solution 13: Press the Ctrl Key to Suppress QuickBooks
Try the following solution when you get a fatal error while opening QB and see if it is possible now:
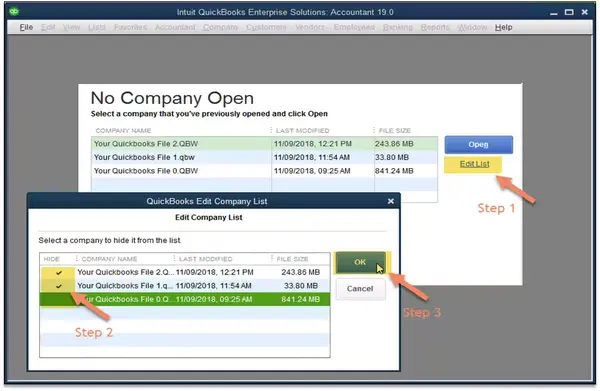
- keep pressing the Ctrl key on your keyboard.
- Double-click QuickBooks Desktop.
- Keep the Ctrl key pressed until the “No Company Open” window appears unless QuickBooks freezes or shows an error.
- In the “No Company Open” window, go with a company file.
- Click on Open to proceed.
Solution 14: Use Verify and Rebuild Data Tools
Verify and Rebuild Data tools are recommended for use when you get a fatal error in QuickBooks Desktop. This error can be easily resolved with the data damage scan and then rebuild the company file further for any data damage. Here’s how the process for these tools works:
- Access the File menu.
- Navigate to Utilities.
- Choose Verify Data.
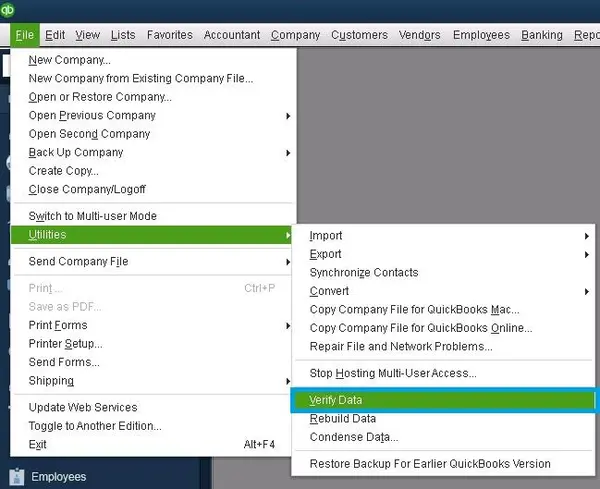
- Let it load.
- Access the File menu again.
- Navigate to Utilities, then select Rebuild Data.
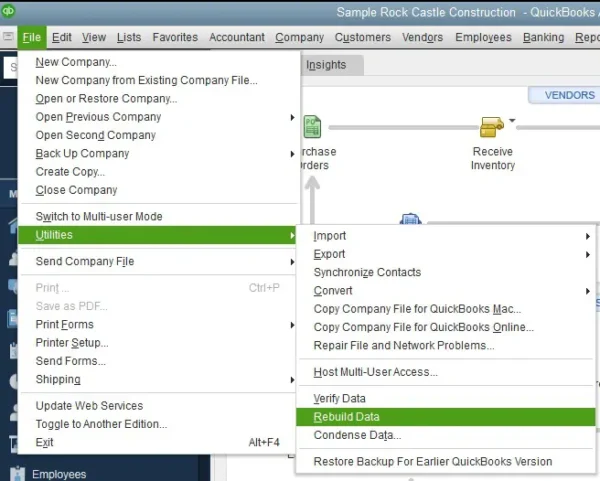
- Click OK when you receive the message “Rebuild has completed”.
Solution 15: Open QBO in a Private Browser
If you get a fatal error aborting the application message in QB Online, we suggest you try accessing the application in a private or incognito browser:
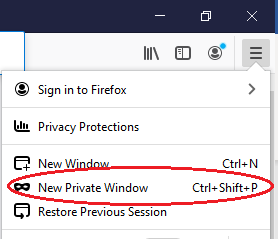
- Mozilla Firefox: Shift + Command + P
- Google Chrome: Ctrl + Shift + N
- Microsoft Edge: Ctrl + Shift + N
- Safari: Shift + Command + N
Solution 16: Run QB Install Diagnostic Tool
QuickBooks Install Diagnostic tool is another top-notch tool in QuickBooks Tool Hub that helps resolve all the errors related to installation in QB Desktop. Here is the complete process that will help you run the tool seamlessly:
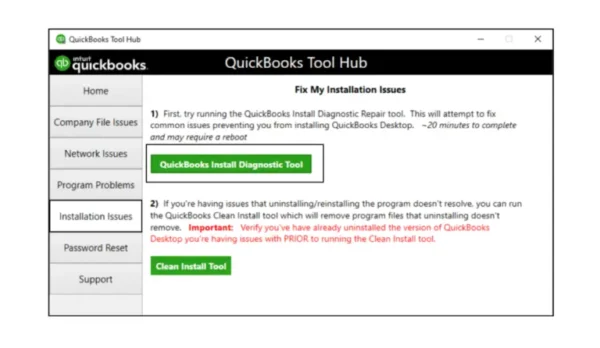
- Ensure you have QuickBooks Tool Hub downloaded and installed already.
- Open it and navigate to Installation Issues.
- Choose QuickBooks Install Diagnostic Tool.
- The scan duration for installation diagnosis will be around 20 minutes. Finish it.
- Now, see if you still get a fatal error.
Solution 17: Reinstall the QuickBooks Program
Let’s get the help of Clean Install process to reinstall your QuickBooks when you receive a fatal error. This method will rename and recreate all current QuickBooks installation directories to initiate a fresh start. Renaming the folders will keep your company file data secure, only affecting the program itself.
Before you begin
- Download the installer related to your QuickBooks version.
- Keep your license number accessible. It’ll be found on the original package or in the purchase confirmation email if bought online. Another option is that you can retrieve this information from your account management portal.
Step 1: Uninstall QuickBooks
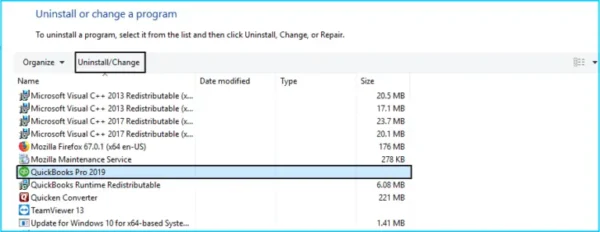
- Access the Windows Start menu and start the search for “Control Panel,” then open Control Panel.
- Choose the button Programs and Features or Uninstall a Program.
- From the list of programs on the screen, select the version of QuickBooks Desktop you wish to delete.
- Select Uninstall/Change, then choose the Remove option and click Next.
- If this option isn’t visible, get out of Windows and log back in as an administrator (or a user with administrative privileges).
Step 2: Rename The Installation Folders Manually
- Display the hidden files.
- Access the Windows Start menu, start the search for “File Explorer,” then launch File Explorer.
- Locate and launch the folder holding your QuickBooks company files, typically found within your QuickBooks folder. The folder is commonly in one of these directories:
- C:\ProgramData\Intuit\QuickBooks (year)
- C:\Users(current user)\AppData\Local\Intuit\QuickBooks (year)
- C:\Program Files\Intuit\QuickBooks (year)
- For the 64-bit version: C:\Program Files (x86)\Intuit\QuickBooks (year)
- Right-click on any of these folders and click the Rename option.
- Put “old” at the end of the folder name. QuickBooks won’t access it when you reinstall.
Step 3: Reinstall QB Desktop
- Ensure that your computer meets all the crucial QuickBooks prerequisites.
- Acquire the necessary QuickBooks Desktop version from the official Intuit website and store it in a convenient location, such as your desktop or downloads folder.
- Keep your product and license numbers readily accessible for easy reference.
- Get started on the installation process by launching the QuickBooks.exe file.
- Manage the on-screen directives, accept the license agreement, and proceed by selecting Next.
- Input your product and license numbers into the fields required, then proceed by clicking Next.
- Proceed with either Express Install or Custom and Network Install, depending on your specific needs.
- Complete the installation process by following the prompts to ensure a successful installation of QuickBooks.
Solution 18: Get QuickBooks Desktop Updates from the Internet
If the solutions don’t work to resolve the fatal error for you, we recommend you install the QB Desktop updates from the internet:
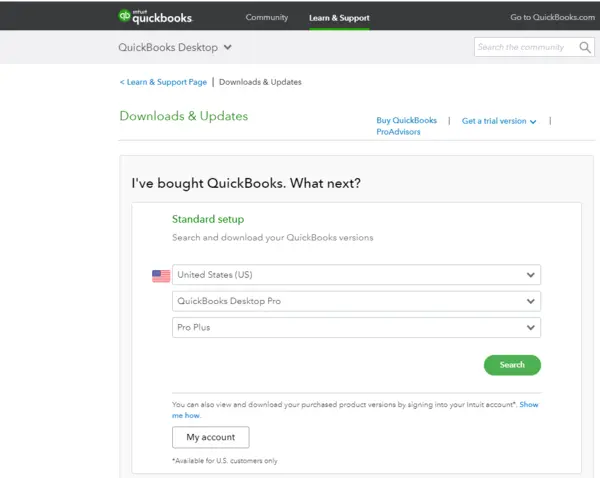
- Navigate to the Downloads & Updates page and choose the standard setup option.
- Look into the “Select Country” dropdown menu to choose your country.
- Look into the “Select Product” dropdown menu to choose your country.
- Look into the “Select Version” dropdown menu to choose your version (year).
- Hit the “Search” button.
- Select “Get the latest updates.” Once the download is complete, open the file to initiate the update installation.
- Follow the on-screen instructions to complete the installation process after the QB update installation finishes.
Solution 19: Install QuickBooks in Compatibility Mode
QuickBooks and Windows may not be compatible with one another, leading to fatal errors. So, install and run QB in compatibility mode as follows:
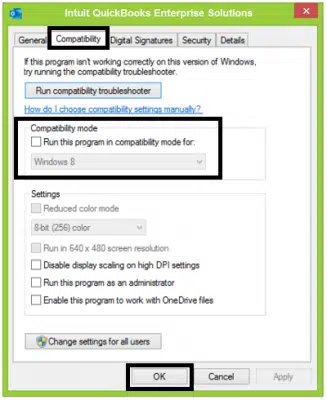
- Reach the folder where the QB install file is located.
- Right-click it and tap Properties, then go to the Compatibility tab.
- Choose the box “Run this program in compatibility mode,” then the Windows version.
Run the QB installation process and resolve the fatal error in QuickBooks Desktop.
Bottom Line
We hope our comprehensive guide detailing the QuickBooks fatal error helps you eliminate the problem instantly. The error interrupts various operations, like logging into QB, opening the QB app, and installing QuickBooks Desktop, Point of Sale, etc. Hopefully, the troubleshooting approaches mentioned in this blog would have been suitable to fix such issues. If not, we recommend you reach out to our dedicated QuickBooks experts and let them manage the situation. Our Accounting Helpline toll-free number +1.855.738.2784 is active 24*7 to answer your queries.
FAQ’s
What are the various scenarios of receiving a QuickBooks fatal error?
The scenarios where you may receive the fatal error in QB include:
1. While installing QBPOS updates.
2. A fatal error message appears, after which you can’t use the Banking button to access the bank account. F1 and Chart of Accounts also don’t work. Running a report leads to an unrecoverable error.
3. After upgrading MS Office, QB seems to work fine except for the Statement Writer, which throws a fatal error.
4. Web Connect fails to download employee time cards from Icon Time Systems, leading to manual entry of hours due to persistent issues. Despite attempting recommended fixes, including those suggested on the website, the problem persists. A recent variation in the error message, indicating a fatal error related to feature availability in the QuickBooks version, prompts the need for further guidance. You may face a “Fatal Error has occurred: This feature is not enabled or not available in this version of QuickBooks” or “Fatal Error has occurred: The request has not been processed.”
5. A fatal error code 15943 35432 appears while opening QuickBooks, causing issues.
6. You may be receiving a fatal error message preventing QuickBooks from opening, advising you to “Turn Windows features on or off in the control panel” or configure Microsoft Edge, followed by QuickBooks exiting.
7. A fatal error aborting application message appears on the screen, causing trouble when migrating the data.
8. Unable to log into QB due to fatal error code 1407215768 31995.
9. You may be facing a challenge with QuickBooks Statement Writer while attempting to open a specific company file. The issue persists across several computers. You may be encountering a Fatal Error.
10. An installation issue may appear when attempting to install QuickBooks 2012 on a new machine. During installation from the office disc, a DLL Registry error occurred halfway through, followed by a fatal error halting the process.
Which versions encounter the fatal error in QB?
The following versions may face QuickBooks fatal error:
QB Pro 2018
Office 365 (64-bit)
QB 2015 Enterprise
QB Desktop Enterprise 2019
QB Online
QB Desktop Pro 2022
QB 2010
Windows 10
Windows 7
How do I eliminate a QuickBooks fatal error?
Resolving the QuickBooks fatal error requires following the steps below:
Download QB Desktop and QB POS updates from the internet
Reinstall QB and QBPOS
Update QB manually
Run Verify and Rebuild Data
Use QB Install Diagnostic Tool & Quick Fix My Program
Open QBO in private browser mode
Install the app in compatibility mode
Suppress QB
Reinstall Office (compatible version)
Load the trial version
Fix the Microsoft .NET Framework
Correct the language regional settings
Enable User Account Control to modify user settings
Update the Statement Writer
Delete the content of the update folder
Terminate the QBPOS process
Do not run QuickBooks or Excel as an administrator

Edward Martin is a Technical Content Writer for our leading Accounting firm. He has over 10 years of experience in QuickBooks and Xero. He has also worked with Sage, FreshBooks, and many other software platforms. Edward’s passion for clarity, accuracy, and innovation is evident in his writing. He is well versed in how to simplify complex technical concepts and turn them into easy-to-understand content for our readers.