Last Updated on April 16, 2026
The QuickBooks unable to backup company file issue emerges when users try to back up or copy the company file and attempt to open it. Facing this glitch can be troublesome and worry-inducing. Users need adequate troubleshooting solutions to fix this problem so they don’t lose any data.
Failure of the hardware device or an attack by a malicious infection can damage data. Thus, it is essential to back up your data to avoid such troubles regularly. Problems arise when backing up data trigger errors in QuickBooks. If you find that your QuickBooks cannot back up company files, follow the steps mentioned in this article to troubleshoot the error quickly. If you are also getting the “QuickBooks Unable to Backup Company File” or “QuickBooks backup failed” message, follow the complete article until the end for full troubleshooting info.
Are you finding it difficult to back up your company files and seeing the error repeatedly emerge on the screen? You should dial the Accounting Helpline Direct Helpline Number 1.855.738.2784 immediately. The QuickBooks specialists will assist you in resolving your problem instantly.
A Quick Description of QuickBooks Company File Backup Error
Users encounter a QuickBooks backup failed error while attempting to back up QuickBooks company files with the .QBW extension. You may try to back up through the backup options of the software. Users can arrange for automatic backups or undertake them manually at regular intervals. However, these backups may suffer from failure due to specific instances.
If you are trying to back up multiple company files or the file you are trying to back up is large in size, then there is a possibility of getting errors during backup. One more instance when QuickBooks won’t back up is when you frequently switch devices to store the backup. Once you encounter the error, you might get one of the following messages on your screen:
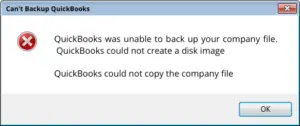
[Backup Failed: QuickBooks was unable to back up your company file. QuickBooks could not create a disk image]
Reasons that Cause the ” Unable to Back Up Company File Error
If you’re wondering why my QuickBooks backup is failing or QuickBooks Backup Not Working, here are some prominent reasons for the issue:
- The primary cause of the error is the unavailability of the storage device that stores the backup file. For example, the external storage device where the QuickBooks backup is created is no longer connected to the computer.
- Damage to the company file data is also a reason that causes failure to back up the data in QuickBooks.
- Setting up the wrong backup path can cause QuickBooks to freeze or display a backup failed error to the user.
- One more situation where QuickBooks cannot back up the company file is not having enough storage available in the memory to store the backup file.
- A corrupted Network Data File may also trigger a QuickBooks backup failed Mac error.
- You may face this error when the company backup file exceeds the character limit of 65 characters.
- Further, you may see this error when the company backup file size is larger than 3 GB.
- If another program is using the QB files while the backup runs in the background, you may see this issue.
- Blockages forced by the antivirus or firewall software may be why QuickBooks won’t back up.
- Your system doesn’t meet the necessary requirements of QuickBooks Desktop, triggering the backup failed issue.
- An outdated QuickBooks Desktop application is another contributor to this error.
- System issues may also interfere with QuickBooks creating backups.
- QuickBooks won’t back up to a flash drive, especially if it is damaged, unauthorized, or inaccessible.
- Virus or malware triggers may also cause this issue.
- The upgrade process may have moved the .QBW file without the.ND file.
- You may be using incorrect admin credentials or not using admin rights at all to back up your company file.
- The company file extension used may be incorrect (.ADR).
Solutions to Resolve Problems During QuickBooks Company File Backup
Here are the most pressing, expert-recommended troubleshooting solutions you must implement to resolve QuickBooks could not copy the company file. Before proceeding, update your QB Desktop (for Mac and Windows) and ensure a stable internet connection.
Solution 1: Verify and Rebuild QuickBooks Company File
QuickBooks is unable to back up the company file because of a damaged QuickBooks company file. Running the verify and rebuild data utility will help fix the company file corruption, so backup can process smoothly:
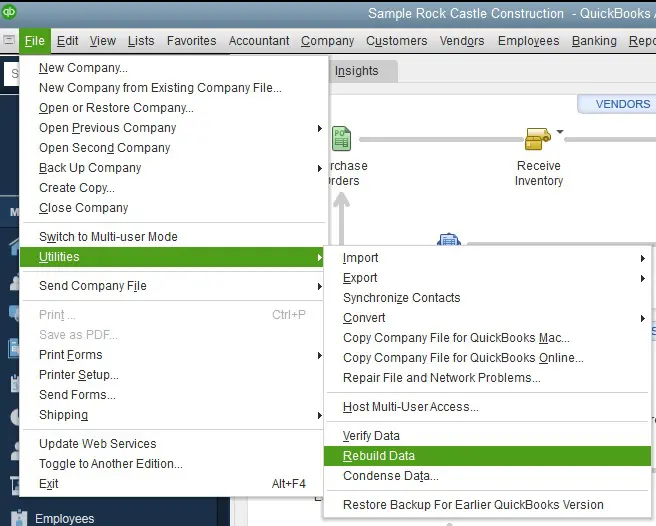
- Open QuickBooks and from the File menu go to the Utilities drop-down and select Verify Data.
- If the Verify Data tool found issues with the company file, then go to the Utilities drop-down once again and click Rebuild Data.
- Let the tool repair the damage in the company file, and once done, try to back up the company file again and check if this resolves the “QuickBooks not backing up” error.
For more detailed instructions, follow our article on how to run the QuickBooks Verify and Rebuild Data Tool to resolve damage in the QuickBooks Company File Data.
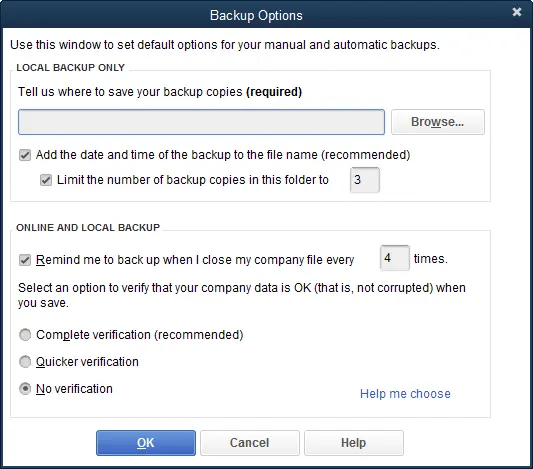
Solution 2: Verify the Backup Directory in QuickBooks
Navigate your preferences and check the QB backup directory to fix the QuickBooks cannot backup company file. If the backup file is faulty, you may encounter errors. Resolve them as follows:
- Open QuickBooks Desktop and navigate to the Preferences section.
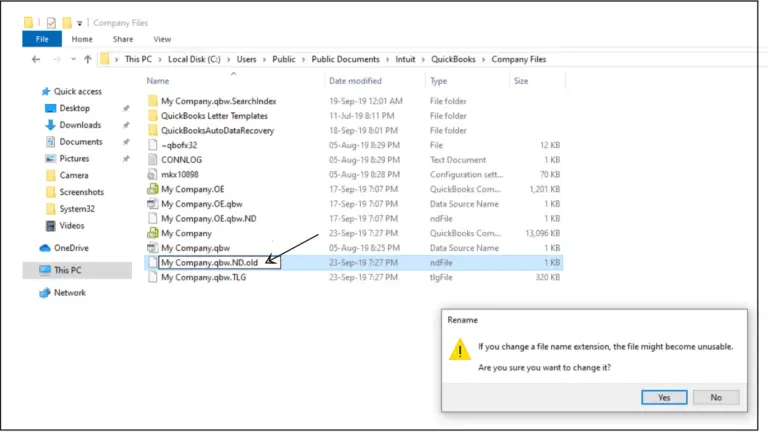
Solution 3: Rename QuickBooks Network Data (.ND) File
When your QuickBooks Network Data File is damaged, you may modify its name. Renaming will push QuickBooks to consider the new file for use instead of the old one. Take the following renaming steps to fix the backup company file in QuickBooks desktop:
- Exit the QuickBooks Desktop software and open Windows File Manager.
- Navigate to C:\ Users\ Public\ Public Documents\ Intuit\ QuickBooks \ and locate the network data file.
- The file will have the same name as your company file but with .ND extension.

- Right click the file and select Rename.
- Add .OLDFILE at the end of the file name and save the file.
- Try to create a backup of the company file once again.
- If QuickBooks was unable to back up your company file, follow the next troubleshooting method.
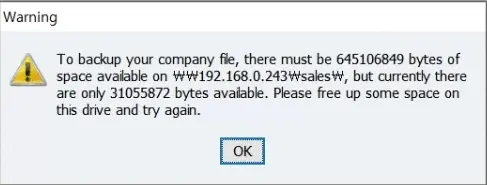
Solution 4: Verify Available Storage on the Backup Device
If you are getting a warning message “To backup your company file, there must be 645106849 bytes of space available on 192.168.0.243, but currently there are only 31055872 bytes available. Please free up some space on this drive and try again,” this indicates low storage on the backup storage, and you must consider deleting unnecessary files from the drive to provide sufficient space for QuickBooks to create a backup. Here is a detailed guide to free up space on your storage devices.
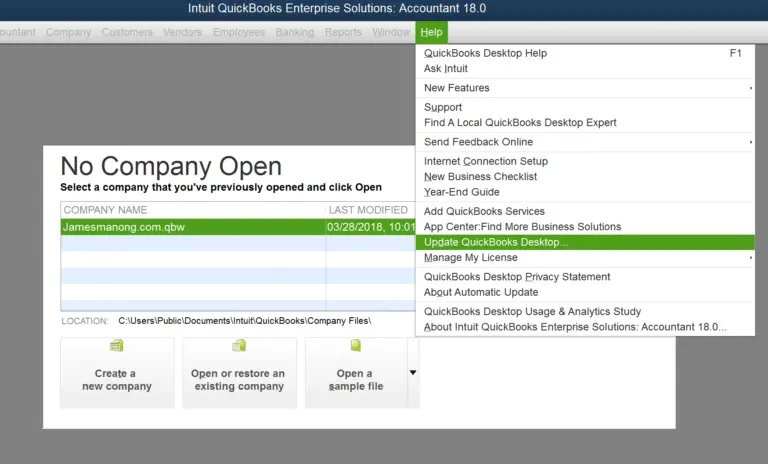
Solution 5: Reset QuickBooks Updates
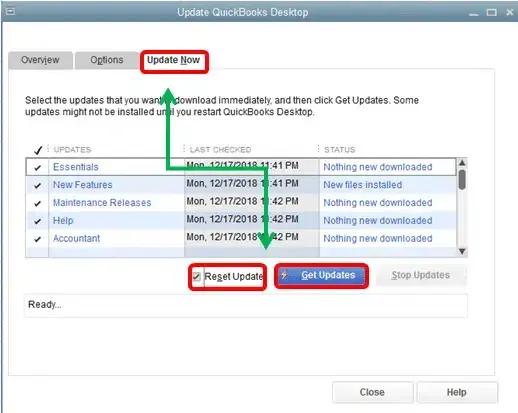
Verify your QuickBooks updates to ensure error-free backup QuickBooks desktop company file:
- Open QuickBooks and click the Help tab.
- Select Update QuickBooks Desktop option and go to the Update Now tab.
Undertake the same method in Mac through the following steps:
- Access your company file and navigate to the top menu bar.
- Hit the QuickBooks drop-down to opt for the Check for QuickBooks updates option.
- Select Install update if a newer version is available.
- Click the Install and re-launch button when prompted.
- QuickBooks for Mac automatically opens when completed.
Solution 6: Rename QuickBooks Files
Your QuickBooks files might be damaged and cause errors in backing up files. Further, having special characters in the file name may also lead to errors. Thus, rename them to rectify errors causing backup failure. The steps to do so for error resolution are as follows:
- Head to the location of your company file C:\ Users\ Public\ Public Documents\ Intuit\ QuickBooks\. Verify the company file name.
- Right-click the file and hit the Rename option.
- Delete extra and special characters in the file name. Change the name by adding old if you want.
- Tap OK to save the changes. You’re done, and you can check your QuickBooks files and attempt backups.
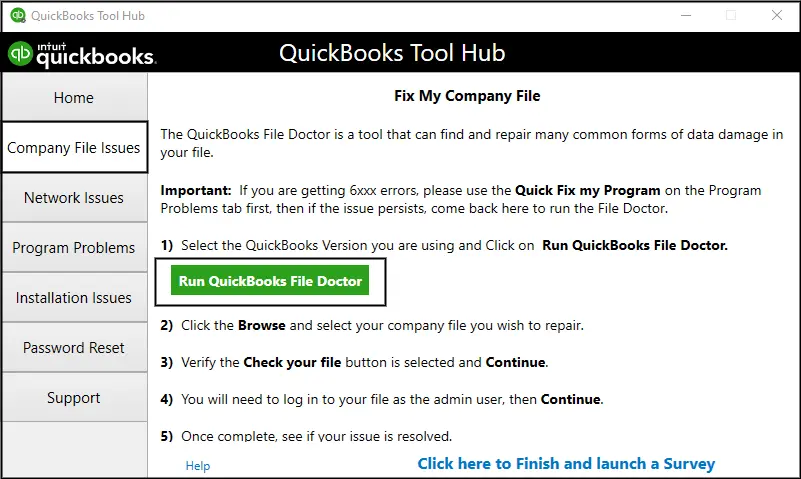
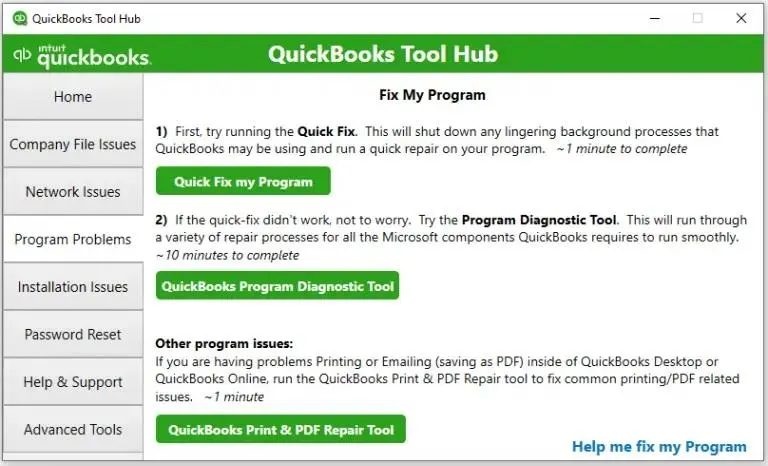
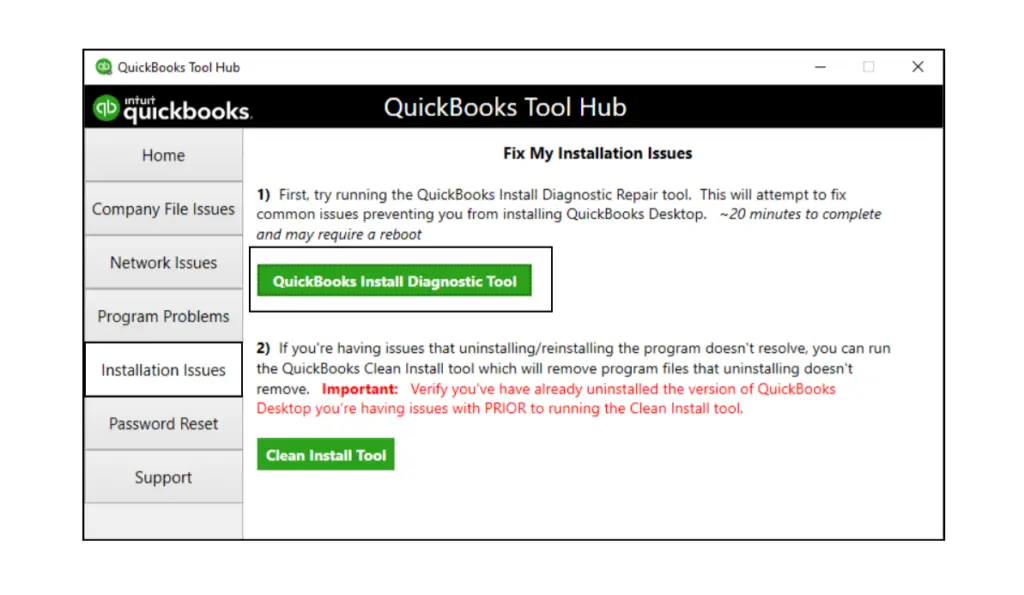
Solution 7: Use QuickBooks Tool Hub
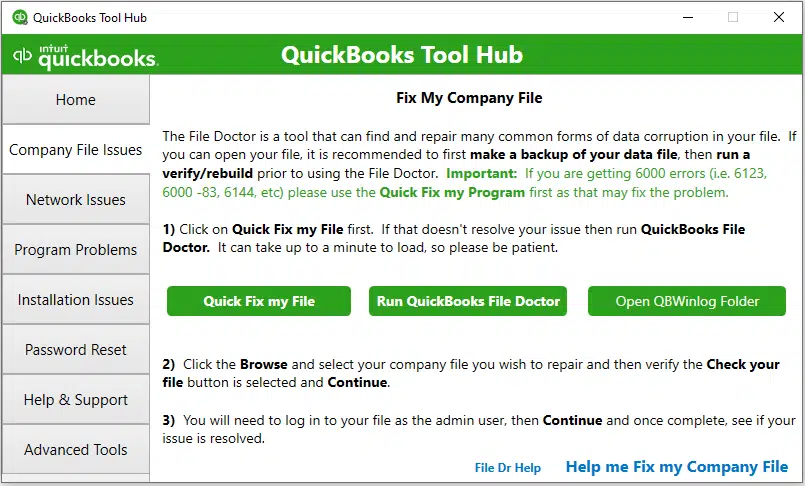
QuickBooks Tool Hub is an excellent solution for all the common errors users face while running QuickBooks. If you’re facing backup failure due to an unknown or undetected reason, use the utilities available in QuickBooks Tool Hub to resolve your problems. The steps involved in downloading, installing, and using the QuickBooks Tool Hub utilities are as follows:
- You’ll need to access the official Intuit website to locate the download link for QuickBooks Tool Hub.
- Once you find it, tap it and save the package to a preferred location. This means you can either store it in the default location (downloads folder) or Browse for a custom place.
- After choosing the place and downloading the tool hub successfully, it is installation time. Visit the place where you saved the QB Tool Hub.
- Double-tap the QuickBooksToolHub.exe file to install the program.
- he installation wizards will begin running on the screen. Agree to them accordingly. Also, accept the tool hub’s terms and conditions.
- Set it up and start using QB Tool Hub.
You’ll find numerous tools in QuickBooks Tool Hub to resolve the QuickBooks unable to backup company file error. A few are mentioned here:
- QuickBooks File Doctor= QuickBooks File Doctor tool is a utility that fixes issues with company files. It is available in the Company File issues section. If your company file or data in the file is damaged, you may see the backup company file error.

- Quick Fix My Program= In the Program Problems section, you may see Quick Fix My Program. Performance issues, lags, and related issues will get fixed in the application.

- QuickBooks Network Diagnostic Tool= The Network Issues section contains the network diagnostic tool that can resolve problems with the Network Data file.
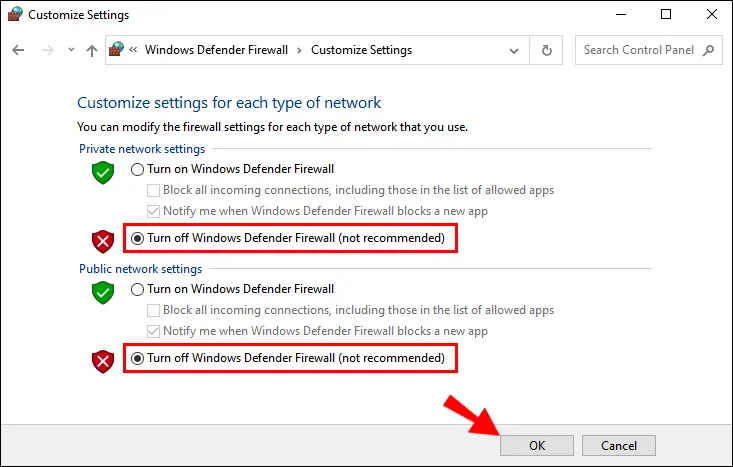
Solution 8: Disable the Firewall or Antivirus Programs
If your firewall or antivirus system is blocking your connection to QuickBooks, add its ports as an exception to QB:
- Tap the Windows icon to launch the Start menu and type Windows Firewall. Hit Enter to view the results.
- Tap Advanced Settings and right-click Inbound Rules. Then, tap New Rule.
- Hit the port option and click Next.
- Ensure to choose TCP.
- Enter the specific ports needed for your QB version year in the specific local ports field:
- QuickBooks Desktop 2020 and later: 8019, XXXXX (dynamic ports).
- QuickBooks Desktop 2019: 8019, XXXXX (dynamic ports).
- QuickBooks Desktop 2018: 8019, 56728, 55378-55382.
- QuickBooks Desktop 2017: 8019, 56727, 55373-55377.
- Hit Next after entering the port number.
- Choose to Allow the Connection and tap Next.
- Make sure you mark all the profiles if prompted and hit Next.
- Form a rule and name it.
- Hit Finish once you are done. Repeat the steps for Outbound Rules.
Further, create Windows Firewall exceptions for QB programs that use executable files to perform different tasks.
- From the Start menu, search for Windows Firewall and hit OK.
- Tap Advanced Settings and right-click the Inbound Rules option.
- Choose New Rule, then Program, and finally, Next.
- Tap the This Program Path option and hit Browse.
- Look for and choose AutoBackupExe.exe and OnlineBackup.exe files. The locations are C:\Program Files\Intuit\QUICKBOOKS YEAR and C:\Program Files\QuickBooks Online Backup, respectively.
- Click the Allow the Connection option and tap Next.
- Mark all the profiles if they aren’t already. Hit Next.
- Create a rule and name it. Repeat the steps and execute them for Outbound Rules.
- Launch QuickBooks Desktop and switch to multi-user mode. See if you are still getting error messages while backing up the data file.
Further, verify your antivirus and firewall settings and configure them to allow QuickBooks through the blockages. You can turn off the antivirus temporarily to eliminate the error.
Solution 9: Restore your Backup Company File for Mac
Have you lost your data? Are you unable to back up your company file? Or do you want to undo recent modifications in your company file? There’s no need to worry as we offer steps to restore your QuickBooks file on Mac.
Step 1: Look for your backup company file
QuickBooks for Mac forms a DMG file when you generate a backup. This file has a copy of your company file and other documents saved in QuickBooks, such as forms or PDFs.
If you’re unsure about the location where you have saved your backup company files, here’s how you can look for it.
- Hit Preferences from the QuickBooks menu.
- Tap Backup.
- Opt for the Reveal Backup Folder. Then, double-click the folder where you saved your backup files.
- You can choose the Date Modified option to sort by date and get your latest backup.
Important: Remember your backup company file name also contains the year version of QuickBooks you use. Thus, it becomes easy to locate the backup for your QuickBooks version. For instance, if you use QuickBooks for Mac 2020, your backup company will be “Your business name.qb2020.”
Step 2: Restore your backup company file
Once you know the backup location, here’s how you can restore it in QuickBooks:
- Double-tap the backup file. A new window will open, showing a copy of your company file. If you have attached documents in your backup, you should also look for a folder named Attachments Library.
- Drag the company file copy to the folder where you store your QuickBooks company. If you are able to see Attachments Library, drag the folder to the same location.
Tip: If an existing company file exists and you don’t wish to overwrite it, you can move the backup copy to another folder. - Launch your QuickBooks for Mac.
- Hit Browse and go to the folder where you saved the copy of the company file. Choose the company file, then Open it.
- A prompt will notify you that you are opening a backup file then click Continue.
- Write a name for the company file and save it.
- Hit OK.
Step 3: Restore your attached documents
If you shifted your Attachments Library folder, you could restore it. It will help you use the attached documents in your QuickBooks.
- Tap Preferences from the QuickBooks menu. Then, choose Attachments.
- Hit the Attached library dropdown menu. Then, select Existing.
- Choose the Attached library folder you moved earlier, then Open it.
- Exit the Preferences window.
Solution 10: Undertake an Antivirus or Malware Scan
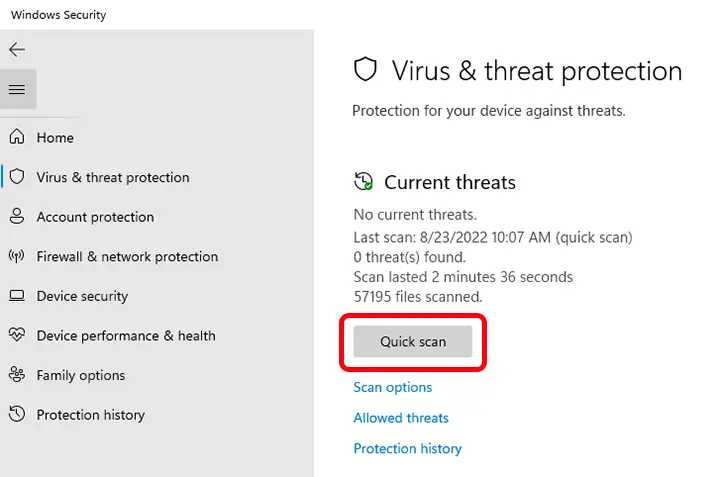
If you get the QuickBooks unable to backup company file error because of virus and malware triggers, you need to conduct in-depth scans. The scanning process will identify and eliminate any possibilities and potentials of such threats. Thus, these scans are necessary to remove QuickBooks unable to backup company file error.
Bottom Line
In case you are still facing problems backing up the QuickBooks Company file, this indicates unrecoverable damage in the company file and you will be required to restore the most recent backup of the company file before taking the backup. If you need help restoring your data repairing the damaged company file, or resolving the “QuickBooks backup failed Mac” error, then you can get in touch with us at our Accounting Helpline Number 1.855.738.2784.
FAQs
Where does QuickBooks store backups?
The QuickBooks Company Backup file is usually available in the following path:
C:\Users\Public\Public Documents\Intuit\QuickBooks\Company Files
Why is QuickBooks unable to back up company file?
Company file backups may become problematic due to a damaged company file, lengthy file name, problems with backup storage, etc.
When does the QB backup problem arise?
QuickBooks unable to backup company files emerges when you attempt to generate a backup and can’t due to this message.
How to quickly fix the QB unable to backup company file issue?
The issue with backing up QB company file can be rectified as follows:
1. Reset your password
2. Restore the missing payroll data
How to create QB Online backups for company files?
Generate QB Online company file backups as follows:
1. Click Settings.
2. Tap Back Up Company.
3. Hit the User menu.
4. Select a folder to save your backup.
5. Let QB generate backups through more instructions.

Edward Martin is a Technical Content Writer for our leading Accounting firm. He has over 10 years of experience in QuickBooks and Xero. He has also worked with Sage, FreshBooks, and many other software platforms. Edward’s passion for clarity, accuracy, and innovation is evident in his writing. He is well versed in how to simplify complex technical concepts and turn them into easy-to-understand content for our readers.