Last Updated on March 11, 2025
We collaborated with experts to develop this guide on the fastest and easiest methods to repair QuickBooks Desktop so that you can resume your regular business operations as soon as possible.
Whenever QuickBooks Desktop faces program-related issues or errors, it needs to be repaired to resolve such glitches. These errors can appear in different forms and affect almost every user’s operation. If your QuickBooks Desktop is damaged, you can struggle to open/restore the company file, run reports, do online banking, run payroll, or even start QuickBooks. The various QuickBooks Desktop issues relate to program damage and can quickly be fixed by simply repairing QuickBooks. To rectify such common QuickBooks errors, our certified Pro-Advisors have explained How to Repair QuickBooks Desktop in this article, so follow the complete article until the end for detailed instructions.
Read the article below or contact Accounting Helpline’s Support At 1.855.738.2784 for expert assistance when errors arise.
Steps to Repair QuickBooks Desktop
If you want to repair QuickBooks Desktop with tools provided by Intuit, you will have to download QuickBooks Tool Hub. It’s an effortless process explained below:
Step 1: Download QuickBooks Tool Hub
The first step involves downloading QuickBooks Tool Hub (the latest version) you can find online. If you already have the hub downloaded on your system, you can go to the Home page and check its version. Otherwise, the tool hub download steps are as follows:
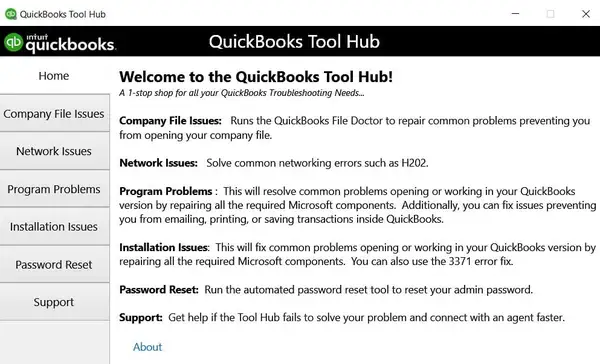
- Access the official website of Intuit and browse the download link for QuickBooks Tool Hub.
- Begin the download by tapping the link and determining a place to save the QuickBooks Tool Hub installation file. It should be convenient to open and initiate installation.
- Once the download ends, go to this location, locate QuickBooksToolHub.exe, and run the InstallShield wizards.
- The License Agreement will appear, which you must read and accept.
- Successfully finish installing QuickBooks Tool Hub and double-click the tool hub icon that appears on the Windows desktop.
- You have successfully downloaded, installed, and opened QuickBooks Tool Hub.
Step 2: Repair QuickBooks Installation with QuickBooks Install Diagnostic Tool
Now, we can focus on repairing by attending to the problematic installation files as follows:
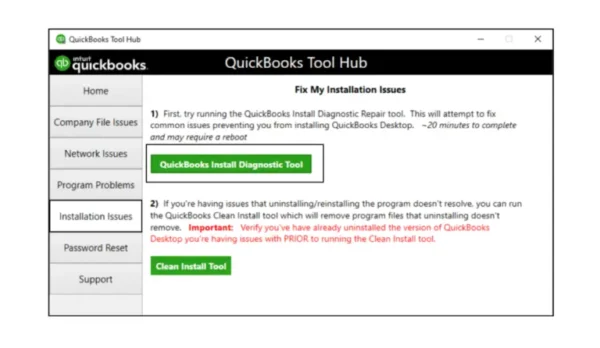
- Open QuickBooks Tool Hub.
- Go to the Installation Issues tab and select the QuickBooks Install Diagnostic Tool option.
- Depending on the configuration and performance of your computer system, the tool might take more than 20 minutes to repair the QuickBooks Desktop installation completely.
- Once the QB program is repaired, run it and check if you still get the same issue you were dealing with earlier.
After running the QuickBooks Install Diagnostic tool, we suggest you update your QuickBooks application to the latest release as follows:
- Tap the Help menu in QuickBooks.
- Choose the Update QuickBooks Desktop option.
- Select Update Now.
- Hit the Get Updates option.
- Install the updates successfully.
Step 3: Run Quick Fix My Program
Now, we will run the Quick Fix My Program and repair all the issues your program is facing to make it error-free:
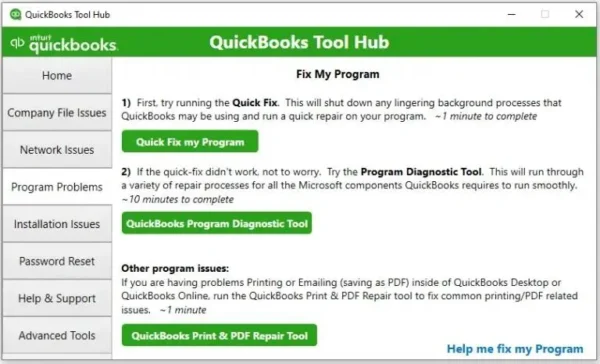
- Relaunch QuickBooks Tool Hub and go to the Program Problems tab this time.
- Select the option “Quick Fix my Program” and let the tool find and repair any glitches in the QuickBooks Desktop program.
- Verify if this solution resolves the error.
Repairing QuickBooks Desktop through Control Panel
Another way you can repair QuickBooks Desktop in Windows is through Control Panel or Settings. We have detailed these steps below for different Windows versions:
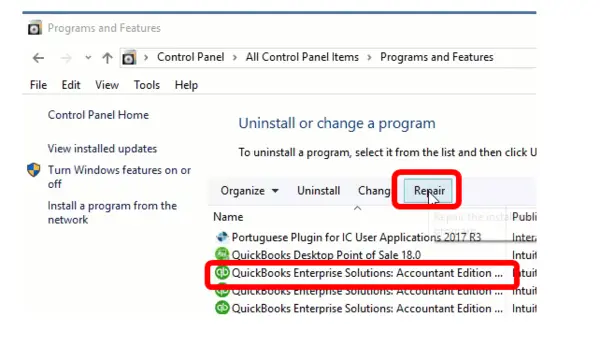
Note:– Before starting, Make sure to prepare the QuickBooks Desktop installation CD.
Repair QB in Windows 7, 8, 8.1
Here are the steps you should take in Windows 7, 8, and 8.1 to repair QuickBooks Desktop:
- First of all, restart your PC to close other programs which can affect QuickBooks.
- Make sure to back up your company file as follows:
- Click File and Switch to single-user mode.
- Again, go to File, then tap Back Up Company.
- Hit Create Local Backup and choose Local Backup in the window. Tap Next.
- Access the Local Backup only section and specify where to save your file.
- Know the number of backups you need and input these details, then run a test to verify the file’s integrity.
- Choose OK when you’re done.
- Hit Save it now > Next.
- Open the Control Panel on your computer.
- Go to Programs and Features, and uninstall any unnecessary programs.
- Now, select QuickBooks and choose Uninstall/Change.
- Click Continue and Next.
- Click Repair and wait for the repair to complete.
- After completing the repair, click Finish and restart your computer.
Repair QB in Windows 10
Now, let’s see the steps for the same process in Windows 10:
Repairing from the Settings Page:
- Access Start > Settings > Apps > Apps & features.
- Within the Apps & features section in Settings, locate and click QuickBooks to address.
- Under the app’s name, click on the Advanced options link (Note: Some apps may lack this option). On the next page, choose Repair if available. If Repair is not an option or doesn’t resolve the issue, tap Reset.
Repairing from the Control Panel:
- Input Control Panel in the taskbar search box and click on Control Panel from the search results.
- Select Programs > Programs and Features.
- Right-click on the QuickBooks program name and choose Repair. If Repair is unavailable, select Change. Follow the on-screen instructions thereafter.
Repair QB in Windows 11
The repair process for Windows 11 resembles Windows 10. You can fix specific apps and programs like QB if they are not functioning correctly.
Repairing via the Settings Page:
- Follow the path Start > Settings > Apps > Apps & features.
- Within the Apps & features section in Settings, locate QuickBooks and click on the More icon next to it.
- Click on the Advanced options link under the QB name (Note: Some apps may lack this option). Choose Repair if it is available on the following page. If Repair is not available or does not resolve the issue, hit Reset.
Repairing via the Control Panel:
- Type Control Panel in the taskbar search box and hit Control Panel from the search results.
- Follow Programs > Programs and Features.
- Right-click the QB program and choose Repair. If Repair is unavailable, select Change. Follow the on-screen instructions thereafter.
Repair Errors that may occur during the process
If you get an error or a message like Files in use during the repair process, Then follow the below steps:
- Click Ignore, then OK.
- To continue the Repair, you might have to click Ignore several times.
- After this, click Close and restart the computer.
Steps to Repair QuickBooks Desktop Point of Sale
If you encounter problems running QuickBooks Desktop Point of Sale, you can repair it through the following actions:
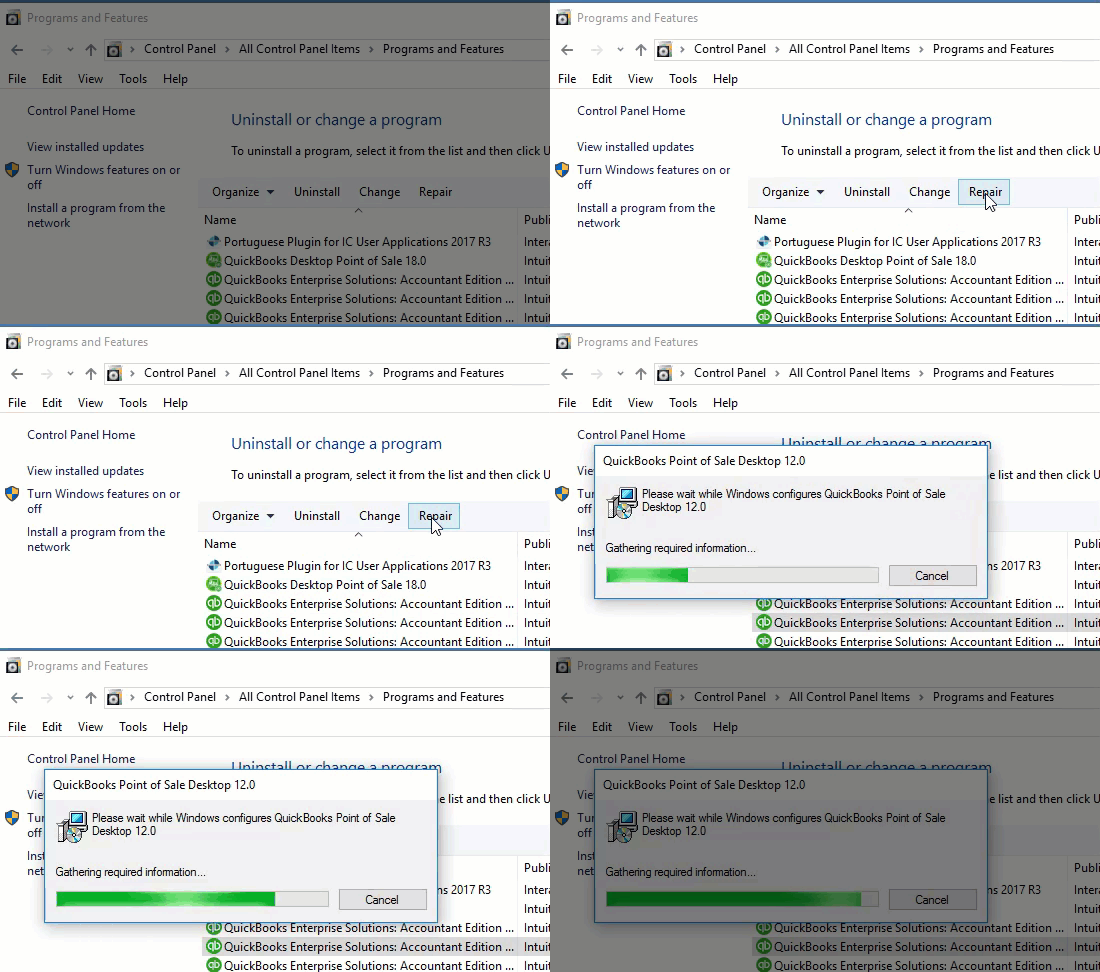
- Close QuickBooks Point of Sale.
- Access the Start menu when you get to the Windows desktop.
- Type “Control panel” into the Start menu’s search bar and hit Enter.
- Choose your edition of QuickBooks Desktop Point of Sale.
- Adhere to the on-screen instructions to initiate the program repair process.
Conclusion
These simple steps can help you repair QuickBooks Desktop without hassle. We have simplified the steps so you can follow each individually and fix your issues. However, if any problem arises at any point, we offer you our Accounting Helpline’s Customer Care Phone Number 1.855.738.2784. Avail of Accounting Helpline services from certified and experienced experts instantly. We are eager to help you 24 hours a day.
FAQs
When does the need to repair QuickBooks Desktop arise?
The need for fixing QuickBooks Desktop may arise in the following situations:
When installation issues prevail.
Your program has some problems.
Update and installation of the problem is becoming challenging.
Several bugs and error codes keep arising, causing difficulties in carrying out QB operations.
What do I do if QuickBooks Desktop Point of Sale doesn’t get repaired through the Control Panel?
If QuickBooks Desktop Point of Sale doesn’t get resolved through the Control Panel, your only option is to clean install it. The steps involve:
Keeping backups and following other prerequisites.
Uninstalling QB Desktop Point of Sale.
Renaming the POS installation folders.
Installing QB Point of Sale again.
Restoring the POS file backups.

