
Last Updated on April 17, 2026
The Rebuild Data Tool is one of the most excellent utilities available to QuickBooks users to resolve data damage. While you can rectify all your file problems with this tool, sometimes the QuickBooks Rebuild Data Tool may fail to provide relevant solutions. The QuickBooks rebuild error may emerge right after trying to repair the damage to the company data. You come to know about these errors in the rebuild results that appear after running the rebuild data utility, and there are a number of different error messages and codes you may get. That is why we have created this thorough guide, covering every aspect concerning issues you might face when rebuilding data in QuickBooks.
While we discuss how you can get rid of different QuickBooks rebuild data errors, we also offer instant support by Accounting Helpline at 1.855.738.2784. Our support team is available at the other end to support you and help you with all your worries
What is the QuickBooks Rebuild Data Utility?
If the Verify Data utility detects errors or inconsistencies, you can use the Rebuild Data utility to repair and rebuild your company file. Rebuilding the data resolves data integrity issues and reorganizes the data in your file to ensure it is in a healthy state. The utility attempts to repair the damaged or corrupted data, rebuilds the data indexes, and restructures the file to eliminate potential issues.
What does QuickBooks Rebuild Error Mean?
“QuickBooks Rebuild Data Error” is a generic term that refers to an error or issue encountered while attempting to use the Rebuild Data utility in QuickBooks. This error message typically indicates a problem during the data-rebuilding process.
The specific error message you receive may contrast, as QuickBooks can display different error codes or descriptions based on the problem’s nature. Some common QuickBooks rebuild errors you may encounter include:
QuickBooks Error 350
QuickBooks error 350 may emerge, stating, “Verify ToC: Verify has failed due to an error under Transfer of Credits related to transactions.” Transfer of Credits generally has an invoice, a payment, and a journal entry. It arises due to the inaccurate linking of transactions.
Rebuild Error Code 310: Problem not fixable by rebuild
This error code may arise when you try backing up QB Desktop, but errors may appear in the QBWin.log file. You may have an encrypted credit card stored somewhere, depending on your issue.
el_cname.c (38990) : MESSAGE: 3876: Wed Feb 13 09:44:32 LVL_SEVERE_ERROR–GetDecryptedCreditCardNumber Failed: The decryption has failed.
prefuser.c (33376) : CHECKPOINT: 3876: Wed Feb 13 09:44:32 Error: Verify Encrypted Data: Failed to decrypt customer’s credit card number. Customer ID: 1176.
prefuser.c (33377) : CHECKPOINT: 3876: Wed Feb 13 09:44:32 (This problem is not fixable by Rebuild.)
el_cname.c (38990) : MESSAGE: 3876: Wed Feb 13 09:44:32 LVL_SEVERE_ERROR–GetDecryptedCreditCardNumber Failed: The decryption has failed.
prefuser.c (33376) : CHECKPOINT: 3876: Wed Feb 13 09:44:32 Error: Verify Encrypted Data: Failed to decrypt customer’s credit card number. Customer ID: 1257.
prefuser.c (33377) : CHECKPOINT: 3876: Wed Feb 13 09:44:32 (This problem is not fixable by Rebuild.)
QBWin.log errors
Sometimes, a message may arise asking you to rebuild your company file. You may see the following error messages about your .log file:
- Verify Primary: Duplicate transaction number: Primary, Trans, txn#, date, doc#.
- Verify Primary: totTrans wrong. Is ### should be ###.
- Verify Primary: Next trans number is ### should be ###.
- LVL_ERROR–Error: Verify Names List: Index XXX record XXX.
Payroll Service Data Error
This is a recurring error, which means that once you run the rebuild data tool, it will show that the errors are fixed in the payroll data. However, when you re-run the verify data tool, you get the same errors in the verify results.
Error(2)
APPROVALS ApprovalsDataLayerAdapter GetTxnsApprovalStatus trying to read approval status for TView 17 txnStatus 4200927600
APPROVALS ApprovalsDataLayerAdapter GetTxnsApprovalStatus trying to read approval status for TView 17 txnStatus 4200927600
Why do QuickBooks Rebuild Errors Arise?
The reasons why users encounter rebuild data errors are as follows:
- The rebuild error emerges when transactions aren’t linked correctly.
- You may have encrypted data stored in a customer you deactivated.
- You may have an expired date entered without a credit card number.
- QB shuts down unexpectedly without warning.
- Corruption in the company file can be a possible reason for getting rebuild data error in QuickBooks Desktop.
- When the total targets exceed 350,000 in QuickBooks.
Instant Approaches To Fix Rebuild Data Error in QuickBooks
The numerous approaches you can take to resolve QuickBooks rebuild error codes are as follows:
Solution 1: Update QuickBooks
Updating your QuickBooks application should be your top priority to fix any problems your app or its built-in utilities face. When the verify and rebuild utilities fail to yield results, then do the following:
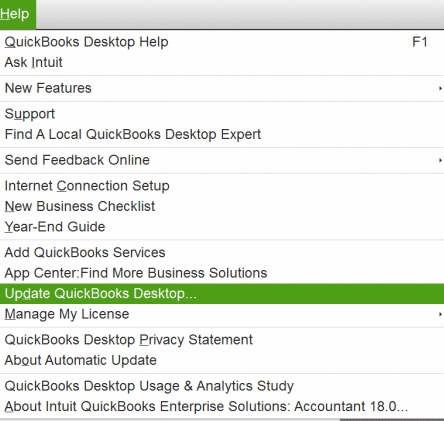
- Move to the Help menu.
- Select Update QuickBooks Desktop.

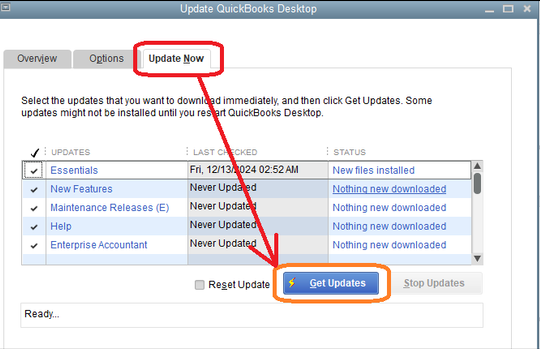
- Tap Update Now.

- Click Get Updates and restart QuickBooks.
Solution 2: Fix Errors using Transaction Log Numbers (For Mac)
Record numbers assist in detecting errors recognized by QB during the company file verification. A link will be available to access the QuickBooks.log file for any errors in your file. All the problems with your company file will be here in this list.
Any time you wish to find the QuickBooks.log file, do as follows:
- Hold the Command key.
- Click Go.
- Tap Library.
- Double-click the Logs folder.
- Double-click the QuickBooks.log file.
- Inputting the QuickBooks.log file will trigger QuickBooks to show record numbers referenced as RefNum and RecNum. These details showcase the internal record numbers used by the QuickBooks Desktop user.
- For instance, if an error displays, “Verify Employee YTD Bal: ytd out of balance. Name = Han T. Miller. Ref = 40,” the record number will remain 40 to enable you to rebuild data in QuickBooks Desktop.
- Tap Edit.
- Hit Find.
- Find @recnum.
- Input the record number. For instance, @recnum40.
- All records with this transaction number will pop up on QB. Examine the results and modify or re-enter data if necessary.
Solution 3: Run the Rebuild Data Utility again
If you encounter QuickBooks rebuild errors, then try rerunning the Rebuild Data utility. In some cases, the error might be a temporary glitch, and running the utility a second time may successfully resolve the issue.
- After confirming your data’s accuracy, you can repair any errors or data issues in your company file.
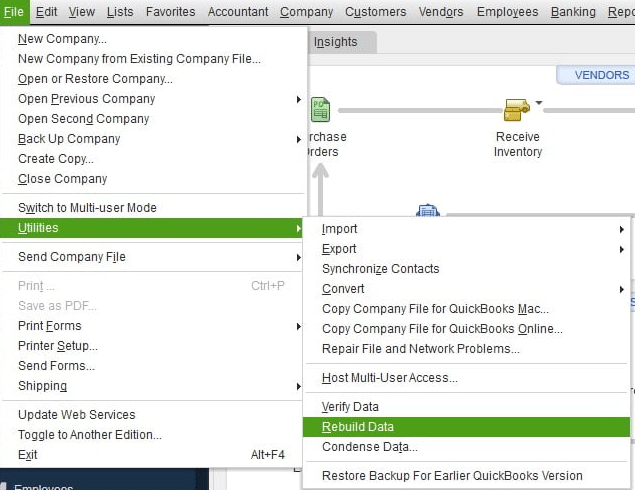
- Click on “File” and then choose “Utilities.”
- Select “Rebuild Data” and click “OK” to close all open windows.

- QuickBooks will prompt you to generate a backup before initiating the rebuilding process. Opt for “OK” to initiate the backup. If you prefer not to make a backup, select “Cancel” to proceed with the file rebuilding.
- If you haven’t configured any backup preferences, QuickBooks will ask you to set them up. Click “Backup Preferences” and make the necessary adjustments, then choose “OK.”
- Once the backup is completed, click “Show in Finder” to locate the backup file, or select “OK” if you have finished this step.
- After the rebuilding process is done, click “OK.”
- To ensure your file is free from errors or data damage, verify your company file again. If errors or damage persist, repeat the file-rebuilding process.
Solution 4: Review the Rebuild Report
Take the following steps after you have rebuilt your file:
- Launch QuickBooks and open your company file.
- Press the “F2” key to unlock the Product Information window.
- Click on “Review last Verify/Rebuild.”
- Examine the results of the Verify/Rebuild process. Click on “Expand All” to view if QuickBooks has identified any errors.
- If you find a QuickBooks rebuild error even in the final report, move to the next solution.
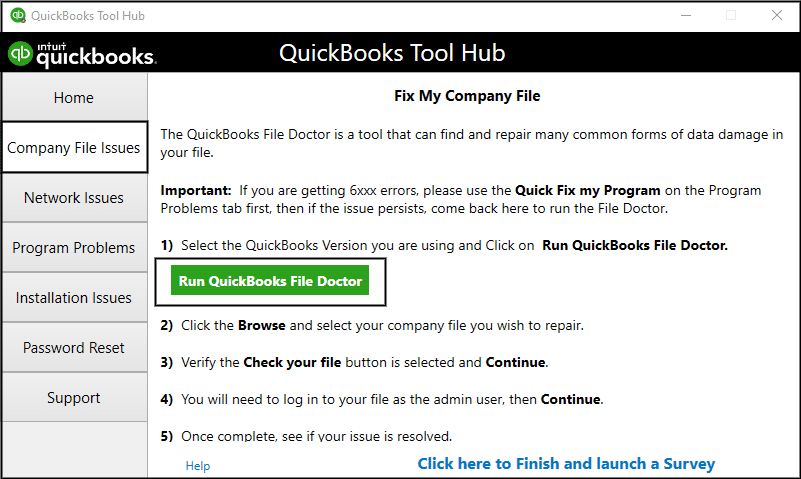
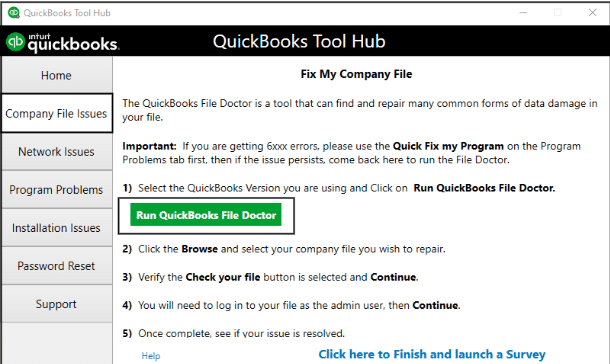
Solution 5: Use QuickBooks File Doctor
QuickBooks File Doctor is a built-in diagnostic tool that enables repairing various company file issues, including data integrity problems. You need to run the QuickBooks File Doctor to detect and resolve any errors that might be contributing to the Rebuild Data errors.
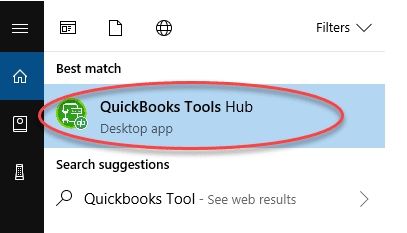
- Launch QuickBooks Tool Hub.

- Click Company File Issues.
- Select Run QuickBooks File Doctor.

- Select your company file from the dropdown.
- Hit Browse and locate your file.
- Tap Check your file.
- Select Continue.
- Log in.
- Hit Continue.
- Now, it’ll take a few minutes to resolve any errors and issues in the company data.
Solution 6: Condense Data to Reduce the Total Targets in QuickBooks
If the total targets in QuickBooks exceed 350,000 for QBO Plus or 750,000 for QBO Advanced, you might face issues rebuilding the data. Here is how you can verify the number of targets in QuickBooks and fix them to resolve the QuickBooks rebuild error.
- Launch QuickBooks and press F2 to open the Product Information window to check the total targets.
- If you find that the total targets are exceeding the limits, proceed to condense the data.
- Go to the File Menu, select Utilities, and find and click the Condense Data option.
- When a notification displays ‘Budget data may be moved during cleanup. Do you want to continue anyway?’ appears on the screen. Click Yes.
- Now choose the option that says ‘Transactions before a specific date.’
- Select the date from the Date field and click Next.
- After selecting the method to summarize the transactions, click Next.
- Finally, hit Begin Condense to condense the data file to reduce the number of targets.
If you find that condensing the data is not helpful in resolving the QuickBooks rebuild error, you can try creating a portable company file.
- Go to the File menu and select the Create Copy option.
- Hit the option that says Portable Company File and click Next.
- Select a location on the local storage to save the portable company file, and when QuickBooks asks you to close the company file, click OK.
Solution 7: Try this for QuickBooks error 310
Managing your damaged customer or encrypted credit card, causing a QuickBooks rebuild error, requires the following actions:
- Rebuild your file and examine the outcomes.
- Click on or expand error 310.
- Print that particular list.
- Then, export your customer list to a .IIF file and open it using Excel.
- Search for the customer ID mentioned in the error list within the spreadsheet.
- Retrieve the customer’s name.
- Locate the customer’s name in the QuickBooks customer list.
- Proceed to the payment settings and input a fictitious credit card number.
- Finally, click on “Save.”
The steps to export your customer list to an IIF file are as follows:
- Open the “File” menu.
- Navigate to “Utilities.”
- Choose “Export” and opt for “Lists to IIF Files.”
- In the Export window, select “Customer List” and click “OK.”
- Provide a name for the file, and then select “Save.”
Solution 8: Use Quick Fix My File
Get Quick Fix My File to resolve your QuickBooks rebuild errors:
- Tap Company File Issues in the tool hub.
- Select Quick Fix My File.

- Hit OK after the process ends.
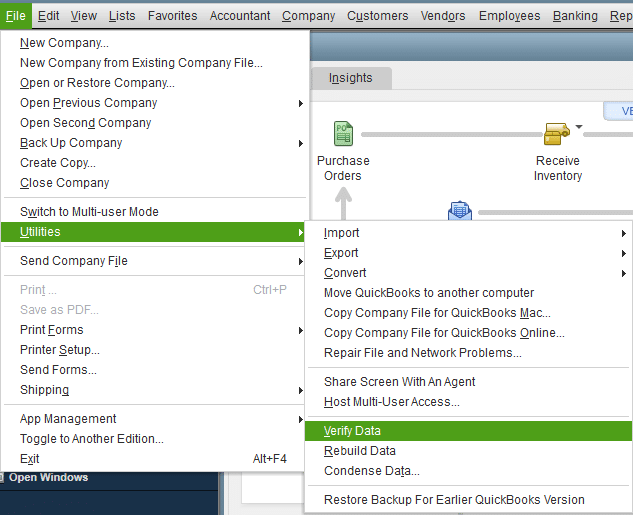
Solution 9: Verify the Company File
The verification process can help identify any existing data integrity issues and provide more specific error messages to guide you toward resolving the problem.
- Click File.
- Select Utilities.
- Tap Verify Data.

- Hit OK to exit all windows.
- Rebuilding will become critical if you witness “Your data has failed the integrity check.”
- If no issues arise, you’re done.
Hopefully, all these problems will be resolved with these rectification procedures for rebuilding error codes in QuickBooks Enterprise
Conclusion
Make sure to verify the data once again to ensure that your data is repaired and no QuickBooks rebuild error is left. In case the verify data utility again finds some errors in the data and the rebuild data tool is unable to resolve the errors, we need to figure out the error by reviewing the qbwin.log file saved in the QuickBooks folder. You can get in touch with the Accounting Helpline experts team by dialing 1.855.738.2784 for immediate help and assistance.
FAQs
What is the difference between Verify Data and Rebuild Data in QuickBooks?
Verify Data is a utility that checks your QuickBooks company file for data integrity issues and identifies errors or inconsistencies. Rebuild Data is a utility used to repair and rebuild the company file. It attempts to fix data integrity issues identified by the Verify Data utility.
How often should I run the Rebuild Data utility?
It is generally recommended to run the rebuild data utility regularly, such as once a month or after primary data entry or update tasks. Rebuilding the data is typically done as needed, such as when the Verify Data utility detects errors or inconsistencies. If you face company file issues and are doubtful about file damage, you can run these tools to detect the root cause.
Can rebuilding the data cause data loss?
While rare, there is a slight risk of data loss when using the Rebuild Data utility. Creating a backup of your company file before running the utilities is crucial to ensure you can revert to a previous state if needed. Backups can be generated as follows:
– Click File in QB.
– Select Create Local Backup.
– Follow the instructions on the screen to save the data backup.
Can third-party applications interfere with the Rebuild Data utility?
Yes, certain third-party applications, such as antivirus software or firewalls, can interfere with the data-rebuilding process. Temporarily turning off such applications or adding QuickBooks as an exception can help resolve conflicts.
How do I fix QuickBooks rebuild errors?
QuickBooks rebuild errors can go away with the following solutions:
– Update QB
– Run Verify and Rebuild
– Attempt to fix using transaction log numbers
– Scan the rebuild report
– Use QuickBooks File Doctor and Quick Fix My File
– Restore data from a backup
– Condense the data file
– Create a portable company file
– Attempt Auto Data Recovery
– Export Data into IIF Files

Edward Martin is a Technical Content Writer for our leading Accounting firm. He has over 10 years of experience in QuickBooks and Xero. He has also worked with Sage, FreshBooks, and many other software platforms. Edward’s passion for clarity, accuracy, and innovation is evident in his writing. He is well versed in how to simplify complex technical concepts and turn them into easy-to-understand content for our readers.