Last Updated on October 28, 2025
QuickBooks has become one of the core software for accounting tasks and managing businesses. Many businesses rely on it for various operations, and it is also used to store company data. The company files that are created in QuickBooks Desktop include valuable information about the business. The risk of losing such significant data is not only stressful for users but also raises concerns about data security.
This is why it is important to back up your data frequently, as it will help protect your data. In order to ensure that you can do this effectively, it is best to set up a QuickBooks scheduled backup. After successfully scheduling a local backup in QB Desktop, your company file will be saved automatically to ensure data protection. Wondering how to set up the QuickBooks backup schedule? Read through this blog to explore simple and easy methods for doing so.
Our specialists are just a call away to help you set up a QuickBooks Online local backup. Reach out to the Accounting Helpline at 1.855.738.2784, and our experts will guide you.

What is the Need to Set Up a QuickBooks Backup Schedule?
In many cases, having a backup of the files for QB Enterprise can feel like a life-saving achievement. Refer to the list below to see why setting up QuickBooks scheduled backup can be helpful.
- The computer system that has the QB Desktop can crash.
- Some accidental changes need to be undone, reverting to a recent backup version.
- You are looking to transfer QuickBooks from your current computer to a new one or another system.
- There is a need to share the company file or data related to your business with another computer.
- To keep the data secure in cases of damage or loss, or possible tampering with it.
These are some key points that require you to set up a QuickBooks scheduled backup. Now, let’s move to the next segment and see how you can actually carry this out.
Segment 1: Know How to Schedule a QuickBooks Online Local Backup
Explore the various methods for scheduling a QuickBooks backup to local storage in the Online version, along with additional details.
Data That You Can Back Up in QuickBooks Online Advanced
Tabulated below is a list of data that you can back up in QBO Advanced across transaction data, list data, and other data.
| List data | Transaction data | Other data |
| Tax agencies | Purchases and purchase orders | Exchange rates |
| Accounts | Refund receipts | Preferences |
| Budgets | Time activities | Inventory shrinkage and adjustments back up as journal entries |
| Classes | Payments | Attachments |
| Items | Transfers | Company Info |
| Payment methods | Invoices | Entitlements |
| Tax codes and tax rates | Deposits | Intuit Payroll info backs up as journal entries |
| Terms | Bills and bill payments | |
| Vendors (except the Tax fields) | Credit memos | |
| Currencies | Vendor credits | |
| Customers | Journal entries | |
| Departments | Estimates | |
| Employees (except their SSN) | Sales | |
| Receipts |
Moving on, we will go through a list of items that you can not set up for QuickBooks scheduled backup in the Online version.
Data That You Can Not Back Up in QuickBooks Online Advanced
The following data cannot be backed up in QBO Advanced. However, it is non-posting data, so your accounts will not be affected.
- QuickBooks Online Payments info
- Customer types and price rules
- Delayed credits and charges (although associated invoices are backed up)
- Recurring transactions
- Bank feeds and their links to transactions and bank rules
- Reconciliation reports
- Account-based billable expenses
- Item-based billable expenses with markup
- Custom reports
- Custom form templates
- Audit log entries
Even though the data listed above can not be backed up, you don’t have to worry about it. Since this data will not affect your accounts. Now, let’s learn what data you can not restore from the QuickBooks Online local backup.
Data That You Can Not Restore from QuickBooks Backup
Although we set up the QuickBooks scheduled backup to restore all crucial data, some data cannot be restored. Check out the following table to learn which data you cannot restore and how to work around these limitations.
| Data | Work arounds |
| Budgets | You can convert budgets to a CSV file for export. |
| Inventory | Data such as the inventory history and inventory adjustments are not included in the backup. |
| Tax rates using expense accounts | Such data is restored in your liability accounts by the Online Backup and Restore app. |
| Data backed up using the personal cloud archive feature | Such data is stored in the .cab format on your personal cloud account, such as Google Drive. Currently, QBO Advanced does not support restoring data from a personal cloud archive. |
Now, let’s move on to the processes that you need to carry out in order to set up the QuickBooks scheduled backup in the Online version.
Simple Steps for Creating a Company File Backup in QuickBooks Online
You can manually create a backup of the company file in QBO by following the steps outlined below. This can be helpful when you want to save the data before making any changes.
- Open QBO on a browser.
- Click on Settings.
- Choose the ‘Back up company’ option.
- Sign in to your Intuit Account, if asked.
- Then, tap Authorize to proceed.
- Next, tap on Add company.
- Expand the Select company dropdown.
- Now, specify the company to back up.
- Tap on Continue.
- Repeat these steps for multiple companies.
- Locate the Action column.
- Click on three dots menu (
 ).
). - Hit Run backup.
Open the Status in the Back up tab to check if it’s been done yet, as a manual backup takes time to be saved. Once you complete these steps, a backup will be created. Move on to the following section.
How to Upload the QuickBooks Backup Onto Google Drive?
You can follow these steps to upload the QBO backup to Google Drive. By doing so, you will be able to save it for when you link your account after setting up QuickBooks scheduled backup.
- Open your preferred web browser.
- Head to QB Online.
- Navigate to Settings.
- Tap on Back up company.
- If asked, sign in with your Intuit Account.
- Hit Authorize to continue.
- Select the User menu.
- Choose a location to save the backup.
- Click on ‘Link Google Drive’.
- Follow the instructions on the screen.
- Allow QB to create backups.
Please note that this procedure can take at least 10 minutes or longer until the file is saved in Google Drive. Moreover, if you save data using the personal cloud archive, then it can not be restored using Online Backup and Restore.
Process for Restoring the Data from QuickBooks Online Advanced Company Backup
You can restore your data from a specific date and time using the backup. This process takes a while to finish, sometimes up to an hour to set up the QuickBooks scheduled backup.
Important note: Refrain from making any changes in your company file while the Online Backup and Restore app is running. Once the restoring process is complete, a tick in the Status column of the Restore tab will be visible.
- Open your browser.
- Navigate to QuickBooks Online.
- Open the Settings.
- Hit the ‘Back up company’ option.
- When asked, sign in to your Intuit Account.
- Hit Authorize to move on.
- Now, select the company to restore.
- Go to the Action column.
- Press the three dots ().
- Tap on Restore.
- Enter a date in the Date field.
- Input the time in the Time dropdown.
- Press the Next button.
- Follow the displayed instructions.
- Lastly, choose Restore.
All the backup snapshots that were taken in the last 1 year are saved by the Online Backup and Restore app. However, backups dated prior to the one-year time period can not be restored by the company. Only the data that is dated within the one previous calendar year can be retrieved by the company through the QuickBooks scheduled backup.
Did the QuickBooks backup restore fail? Go through our dedicated guide to resolve it immediately.
Activate the Online Backup and Restore App in QuickBooks Online for your Data
You can use the Online Backup and Restore app to automatically back up all your data in QB Online. Follow the steps below to turn it on, and it will keep track of the changes made to the company file.
- Launch a web browser.
- Log in to QuickBooks Online.
- Head to Settings.
- Select the ‘Back up company’ option.
- Sign in to your Intuit Account.
- Tap Authorize to proceed.
- Locate the company file for automatic backup.
- Move to the Action column.
- Click on three dots ().
- Hit Turn on backup.
Once you finish these steps, the QuickBooks scheduled backup will be enabled. Additionally, you can turn off automatic backup with the following method.
Turn off Automatic Backup in QuickBooks Online
You can carry out the following steps to disable the Online Backup and Restore app. By doing so, the automatic back-ups will not be created for QBO data.
- Open your preferred browser.
- Log in to QB Online.
- Go to Settings.
- Select ‘Back up company’.
- Log in to your Intuit Account.
- Click on Authorize to continue.
- Find the company file to disable automatic backup.
- Expand the Action column.
- Tap on three dots ().
- Press Turn off backup.
- Next, select Agree.
- Again, hit Turn off backup.
Once done, the QuickBooks Online local backup will not be created automatically. Moreover, you can enable it again with the steps outlined in the blog above. Now let’s move on to the next segment.
Segment 2: How to Set up QuickBooks Scheduled Backup in the Desktop Version?
Now that we have covered every aspect of QuickBooks local backup, we can move on to the Desktop version. Similar to QBO, you can either back up the data manually or automatically. Continue reading this section to get a firm understanding of setting up a QuickBooks backup schedule.
You can back up all the data currently present in your company file in QBDT. Accounting data, templates, letters, logos, images, and related files (QuickBooks Statement Writer, Cash Flow Projector, Business Planner, and Loan Manager) will be covered as well. Do note that the payroll forms are excluded from the backup. However, we will also provide you with the steps to create a backup of payroll forms.
Easy Process for Scheduling the Automatic Backup in QuickBooks Desktop
Follow the steps outlined below to set up the QuickBooks scheduled backup in the Desktop version.
- Open the QBDT application.
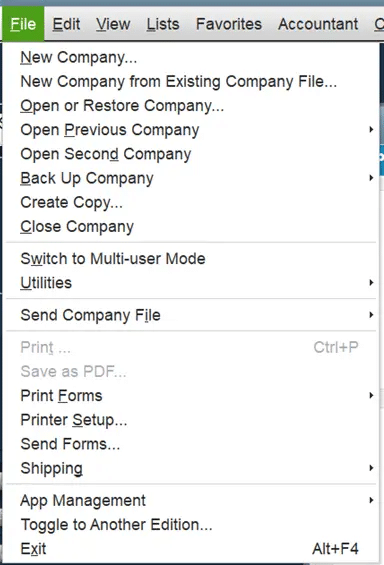
- Expand the File menu.
- If the Multi-User Mode is active, then.
- Select the Switch to Single-user Mode option.
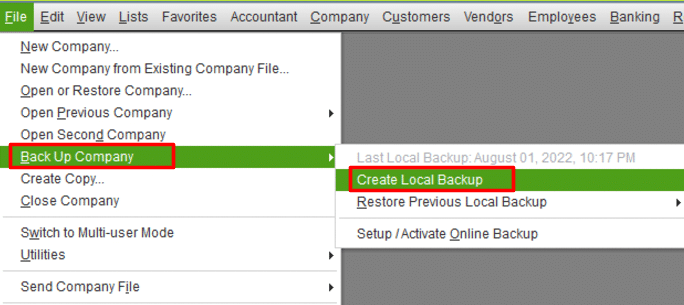
- Again, open the File menu.
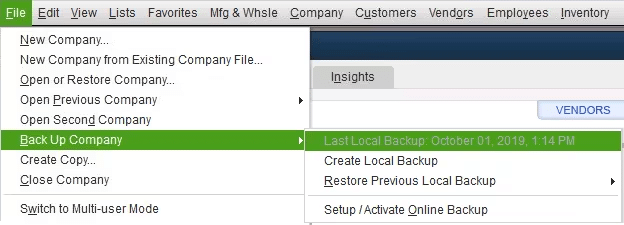
- Put your cursor over the “Back up Company” option.
- Hover over the extended panel.
- Press on Create Local Backup.

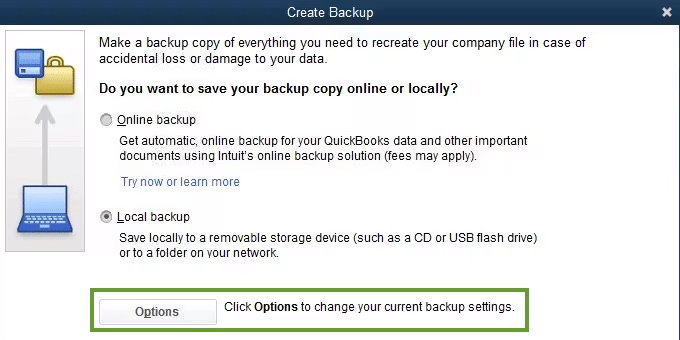
- Wait till the window opens.
- Then, choose Local Backup.
- Continue with Next.
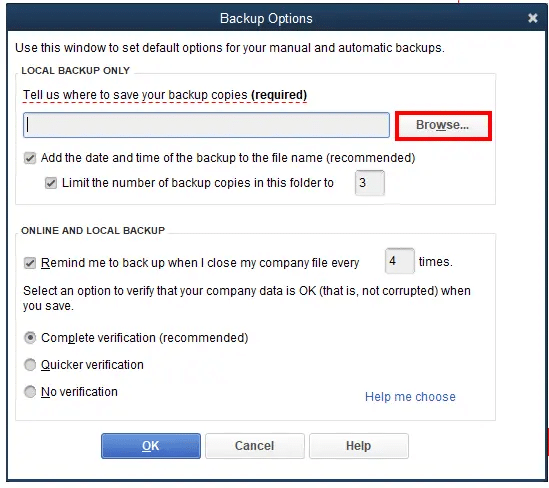
- You will see the Local Backup Only section.
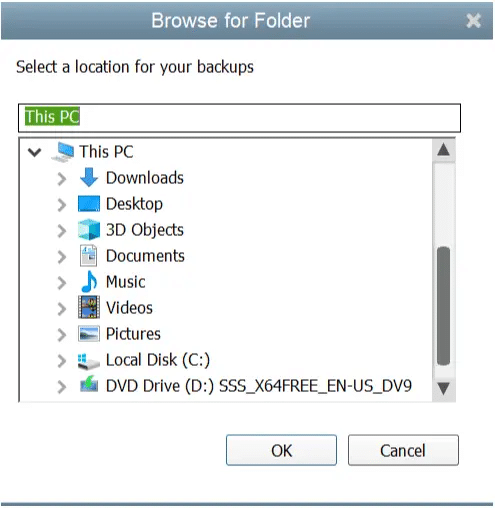
- Click Browse and specify a location to save the backup.
- Optionally, you can decide the number of backups to keep.
- You can also set up future backup reminders.
- Open the Online and Local Backup section.
- Click on the Complete verification button.
- A test will be run to verify the backup.
- You can ensure that the backup is good before saving it.
- Once you are ready, tap on OK.
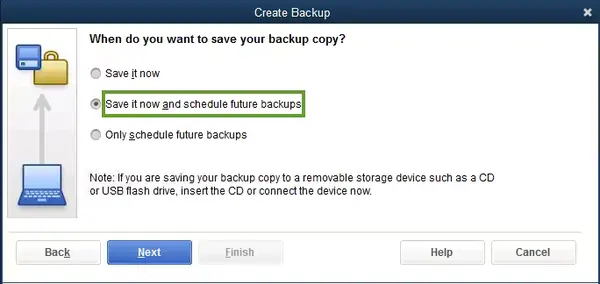
- Choose Save it now and schedule future backups.

- Press Next to continue.
- Alternatively, you can hit Only schedule future backups.
- This can be done to schedule a backup for later.
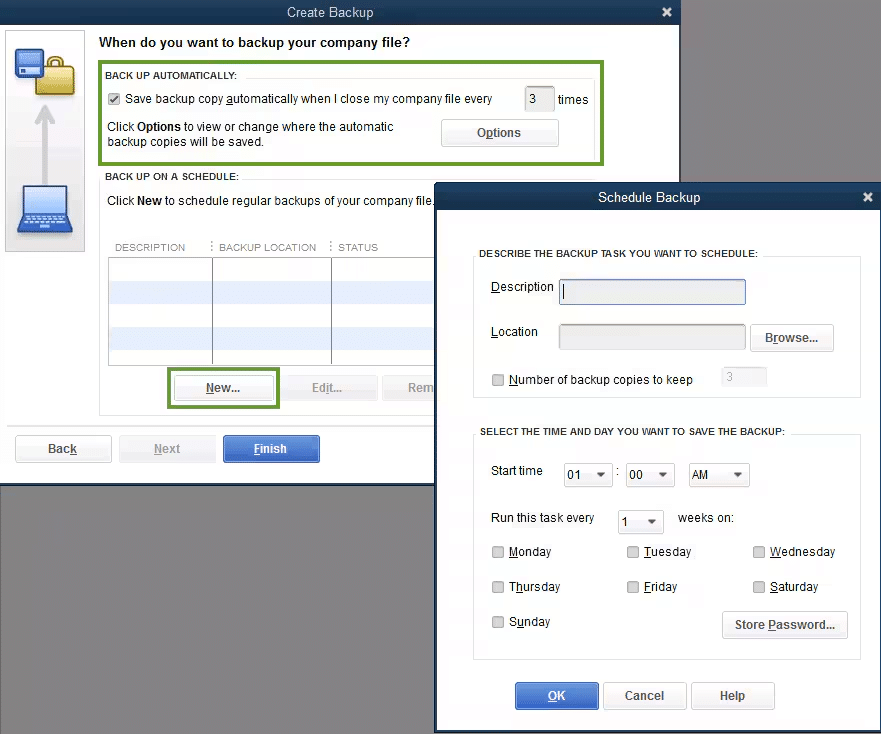
- Tick the Save backup copy automatically when I close my company file checkbox.

- Specify the frequency between backups.
- Press New to create a schedule.
- Enter the data and set the time.
- Hit OK and enter your Windows sign-in password.
- Once you’re done, select Finish.
A backup is created, and the QuickBooks scheduled backup is also set for the future. You will receive a confirmation message once it’s done.
How to Create a QuickBooks Desktop Local Backup Manually?
You can manually create a backup of the QB Desktop company file at any time by following this process.
- Open the QBDT application.
- Expand the File menu.

- Hit Switch to Single-user Mode.
- Again, click on the File menu.
- Select Back up Company.
- Tap on Create Local Backup from the panel.
- Then, press Next with Local Backup.
- The Local Backup Only section will open.

- Click Browse and pick a folder to store the backup.

- You can also choose how many backups to keep.
- Head to the Online and Local Backup section.
- It will run a test on the backup file to check its health.
- Once done, you can continue to save it.
- Hit OK and select Save it now.
- Lastly, click on Next.
The process is similar to automatic backup, except you won’t make a QuickBooks scheduled backup. A single QB backup of the company will be created and saved. Additionally, you will receive a confirmation message.
Is it Possible to Back Up Payroll Forms in QuickBooks Desktop?
Although QBDT does not automatically back up payroll forms, you can use the following method to save them. You can send the folders with saved payroll forms to your accountant so that they can make edits.
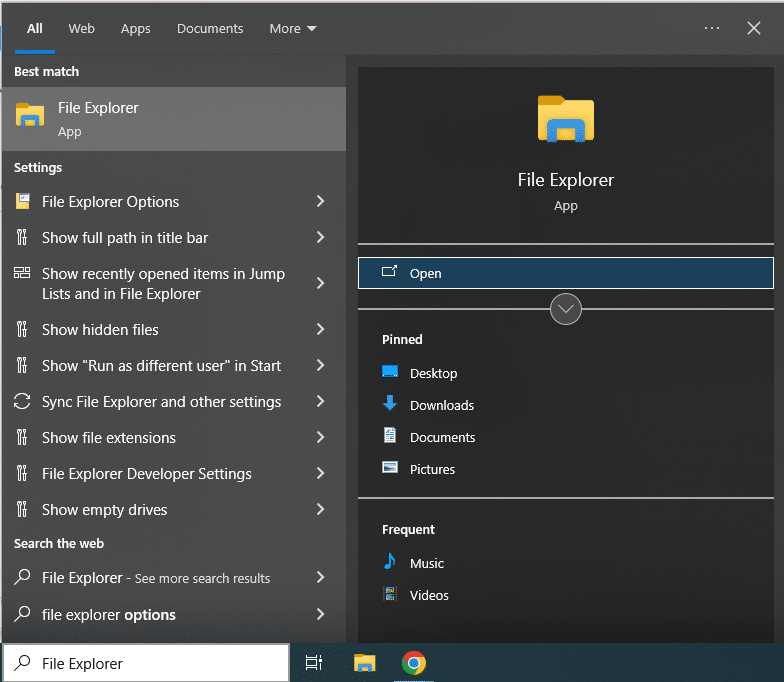
- Hit the Windows icon.
- The Start menu will open.
- Enter ‘File Explorer’ in the search box.

- Hit Open from the panel.
- Now, locate the following folder:
- [your company name] Tax Forms
- You can find all your payroll data in this folder.
- Right-click the folder, then hit Save.
- Send this folder along with the backup company file to the accountant.
- The accountant needs to restore the backup.
- Once done, the Tax Forms folder should be stored in the same folder as your company file.
- Let the accountant review the payroll forms.
- Once done, ask them to make a copy and send the Tax Forms folder back to you.
- Now, repeat the same steps to load the updated forms on your device.
Alternatively, you can print copies and store them on the hard drive, or save them as PDFs through QuickBooks Enhanced Payroll.
How to Adjust the Settings for QuickBooks Scheduled Backup?
The process outlined below can be helpful when you want to look at the most recent backed-up version of your company file.
- Launch QB Desktop.
- Open the File menu.
- Move your cursor over Back Up Company.

- An extended panel will appear.
- Check the Last Local Backup: [Date, Time].
Now, in order to change the backup preferences, you need to carry out the following steps.
- Open QuickBooks Desktop.
- Click on the File menu.
- Select the Back Up Company.
- Click on Create Local Backup from the panel.

- Hit Options from the opened window.
- Modify the changes as you want.
- Once done, press OK.
Now, let’s move on and learn how you can restore the QuickBooks backup of the company file.
Restoring the QuickBooks Company File Backup in Desktop
Once you have created a backup and also set up the QuickBooks scheduled backup, it’s essential to know how to restore it. Refer to this article to learn how to restore your company file in QBDT. Moreover, you can easily locate the backup file because the file name has a .qbb extension at the end.
Additionally, if your backup files are stored on an external device or a hosting service such as Box, then make sure to move them to the local hard drive before restoring. If you are unable to set up QuickBooks scheduled backup, then it’s possible that the scheduled backup is not working. Go through this article to understand the issue and troubleshoot it effectively.
Quickview Table for QuickBooks Scheduled Backup
Tabulated below is a summary of the QuickBooks backup schedule, which lets you save the company file or schedule it to save it later.
| Why set up a QuickBooks scheduled backup? | To secure data from computer crashes, to reverse any accidental changes, to transfer QuickBooks from an old computer to a new or another system, to share the company file or data related to your business, and to secure data from damage, loss, or possible tampering. |
| Different methods for backup | Scheduled and manual backup across the Desktop and Online versions, or using the Online Backup and Restore App. |
Bringing It All Together
You can automatically save company files to a folder on your local drive by setting up a QuickBooks scheduled backup. Many key factors require you to back up all your data to keep it safe. Although you may encounter technical issues when setting up the QuickBooks backup schedule, you can still complete this procedure manually. If you still face challenges to do so, then you can connect with our team of experts and get specialized assistance. Dial Accounting Helpline Support at 1.855.738.2784 for instant help from professionals.
Frequently Asked Questions (FAQs)
What is the best way to backup QuickBooks Desktop?
You can use the Create Local Backup feature in QuickBooks Desktop to save the company file and protect data. Firstly, open the QBDT application and expand the File menu from the navigation bar on the top of the screen. Locate the Back Up Company option and hover your cursor over it to extend an additional menu panel. Once you get to that, click on the Create Local Backup option and select a folder to save your company files.
How to schedule QuickBooks backup?
In order to set up the QuickBooks scheduled backup, you can carry out the steps in the given order. First, click on the File menu from the top bar, then hover your cursor over the Back up Company option. An extended menu will appear on the right; you have to select Create Local Backup from that and hit Next. You have to modify the local backup preferences and choose either of the following options: “Save it now and schedule future backups” or “Only schedule future backups“. After that, hit New to set up a QuickBooks scheduled backup, and don’t forget to set the frequency, time, and designated location before you save it.
Does QuickBooks backup automatically?
Yes, both QuickBooks Desktop and Online have built-in features to back up the company files automatically. Although both operate differently from one another, they get the job done and keep your data safe. In QBO, the data is backed up automatically every night and uploaded to the Cloud. Whereas the QuickBooks scheduled backup in Desktop mode saves the data each time you close the application or at the time set by you. The data in QBDT is backed up and stored either on the local hard drive or on a network drive.
Is it necessary to backup QuickBooks Online?
Although it is not strictly necessary to back up the company file and data in QBO, it can be a good countermeasure against data loss. If you set up the QuickBooks scheduled backup, you can keep your data secure when a computer crashes. Moreover, in case you accidentally make some changes in the data and need to revert those, then the backup file can come in handy. It can also be used to transfer QB from one computer to another while maintaining data integrity. QuickBooks Online local backup is the best solution to safeguard your data from damage, loss, or tampering.
Related Posts-
QuickBooks Desktop Combine Reports from Multiple Company Files
The Right Way to Reactivate Payroll Subscription QuickBooks Desktop
[Resolved] QuickBooks Reactivate Subscription Not Working
QuickBooks Error 213 | Guided Steps to Resolve It
QuickBooks Assisted Payroll | A Complete Guide
QuickBooks 1099 E-File | How to Create and File the Tax Form

Edward Martin is a Technical Content Writer for our leading Accounting firm. He has over 10 years of experience in QuickBooks and Xero. He has also worked with Sage, FreshBooks, and many other software platforms. Edward’s passion for clarity, accuracy, and innovation is evident in his writing. He is well versed in how to simplify complex technical concepts and turn them into easy-to-understand content for our readers.