Last Updated on April 17, 2026
QuickBooks cannot create PDF is a common error faced by many users. This issue can occur when you prompt QuickBooks to generate PDFs for you. This problem often comes with error messages like “QuickBooks could not save your form as a PDF file” or “Your forms were not sent because QuickBooks could not create the necessary PDF files.” QuickBooks provides the QB Print and PDF Repair Tool to resolve common printing errors, but it sometimes fails to resolve the QuickBooks Cannot Create PDF Error.
If your QuickBooks PDF is not working, you’ve arrived at the right place. In this blog, we’ll cover the guided troubleshooting methods you need to resolve the QB cannot save to PDF issue.
Has saving QuickBooks data to PDF files become a hassle due to errors during the process? If yes, you shouldn’t hesitate to contact our Accounting Helpline professional team at toll-free Number 1.855.738.2784. We’re only a call away from Help and Troubleshooting Assistance for PDF and Printing Errors in QuickBooks.
What is the QuickBooks Printing and PDF Feature?
QuickBooks provides a PDF and printing feature that lets users create PDFs and print documents directly from within the software. QB Desktop PDF files allow sharing and archiving documents. These files can be compressed and stored in small sizes, with accessibility across all platforms that support the PDF format. This built-in feature can also help create and email PDF invoices, reports, and more.
PDF statements can also be emailed to customers without the hassle of printing them physically. So let us now discuss how you can utilize the QuickBooks PDF and printing feature generally:
Create PDF Files

The QuickBooks program lets you generate PDFs of numerous financial documents, including invoices, sales receipts, purchase orders, reports, and financial statements. Rather than printing these documents, you can preserve them in digital PDF format on your system. It is useful for archiving, sharing electronically, or emailing documents to clients, vendors, and customers.
Printing
The software also supports traditional printing for hard copy output. You can print invoices, checks, packing slips, and other business documents directly from QuickBooks to your connected printer.
Customization
QuickBooks offers customization options for PDF and print templates. You can modify the layout, design, and content of your printed documents to match your company’s branding and preferences. This way, you can create professional-looking documents that reflect your business identity.
Printer Setup
The printing feature can only be used after setting up the printer in QB. The QuickBooks program will detect all the available printers, from which you must select the suitable one.
PDF Settings
You can adjust PDF settings in QuickBooks, including the resolution and quality of generated PDF files. It enables you to balance file size and quality based on your requirements.
Emailing PDFs
In addition to generating PDF files, you can email them directly from QuickBooks to the relevant parties. It conveniently sends invoices, estimates, and other financial documents to customers or vendors without leaving the software.
These points explain how the QuickBooks PDF and printer feature works and detail its significance. Since it’s clear why you might need these characteristics, let’s investigate the QuickBooks cannot save to PDF error.
How to Save Invoices or Reports as PDFs in QB?
Before digging into the QuickBooks print to PDF problems, let’s learn the procedure for saving invoices or reports as PDFs with the steps given below:
Step 1: Open QB Desktop
- Launch the QuickBooks software.
- Log in to your company file.
Step 2: Create or Open an Invoice
If you haven’t created the invoice yet, follow the steps given below:
- Go to the “Customers” menu.
- Hit “Create Invoices”.
- Fill out the critical details for the invoice.
If you already have the invoice you want to transform into a PDF, then you can uncover it through the following procedure:
- Drive to the “Customers” menu.
- Pick “Invoice”.
Step 3: Preview the Invoice
- Before you save a QuickBooks invoice as a PDF, you should preview it to ensure that all the information is accurate.
- To do so, select the “Print or Preview” button at the bottom of the invoice window.
Step 4: Select the Printer
- Access the preview window.
- Tap the dropdown tab in the upper-left corner (beside the printer icon) to select a printer.
- Select the “Save as PDF” option from the list of known printers.
Step 5: Adjust Settings (If required)
If needed, you can hit the “Options” or “Settings” button in the print preview window to adjust PDF settings, such as the file name, save location, and resolution.
Step 6: Save the Invoice as a PDF
- Click on the “Save as PDF” option.
- Adjust necessary settings
- Hit the “Print” or “Save” button (whatever is available on your QuickBooks version).
- Then, choose the location on your computer where you want to save the PDF file.
Step 7: Verify the PDF
- After saving, navigate to where you saved the PDF file.
- Open it to verify the invoice was correctly converted to a PDF.
Here’s how to save a QuickBooks report as a PDF.
What is the QuickBooks Cannot Create PDF Error?
The QuickBooks PDF not working error is a common issue users may encounter when trying to generate PDFs from within QuickBooks. This error prevents the user from saving or emailing forms, reports, or transactions as PDFs.
Since QuickBooks users may need records for accounting and bookkeeping, a digital PDF is necessary. But this error makes it so challenging to prepare and save PDFs, let alone print or email them to the respective parties. Therefore, addressing ways to fix PDF and print problems with QuickBooks Desktop becomes crucial.
Detailed Description of QuickBooks PDF Generation Error Message
The following is the detailed description of the QuickBooks form-to-PDF generation error:
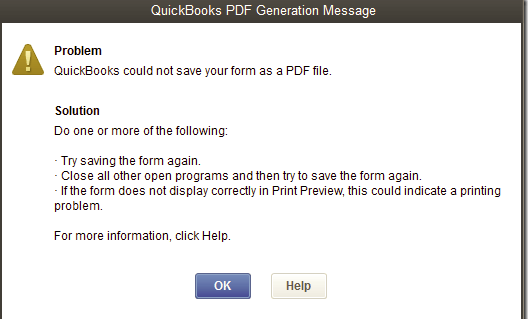
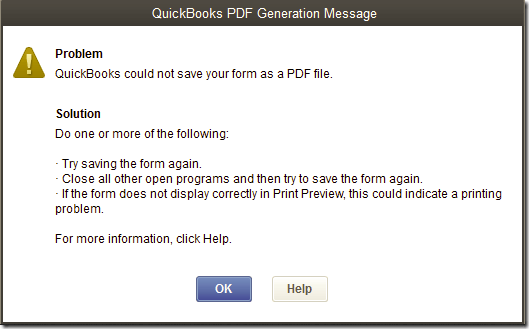
“Problem
QuickBooks could not save your form as a PDF file.
Solution
Do one or more of the following:
- Try saving the form again.
- Close all other open programs, then try saving the form again.
- If the form does not display correctly in print preview, this could indicate a
Printing problem.”
Let’s discuss this error in detail.
Why Upgrading to Windows 10 Leads to QuickBooks PDF Generation Error?
Are you wondering why you are encountering the QB PDF generation error after upgrading to Windows? When a user installs or upgrades to Windows 10, a new Microsoft XPS Document Writer device is added to the system configuration. It attaches to the default port, “PORTPROMPT.” This causes conflicts, and eventually, the QuickBooks save as PDF not working error arises.
Other detailed reasons for QuickBooks PDF not working are as follows:
Printer Driver Issues
Problems with printer drivers can prevent QuickBooks from communicating with the printer or generating PDF files. Outdated, incompatible, or corrupted printer drivers can lead to QuickBooks cannot create PDF file errors in QuickBooks Desktop.
PDF Converter Errors
QuickBooks uses its internal PDF converter to create PDF files. If the PDF converter component is missing or damaged, you may encounter problems saving or emailing forms as PDFs.
Compatibility with the Operating System
QuickBooks may encounter compatibility issues with particular operating systems or system configurations. Updates to the operating system or other software might affect the functionality of QuickBooks’ printing and PDF features.
User Account Control (UAC) Settings
The User Account Control settings on your device can sometimes prevent QuickBooks from creating PDFs or communicating with the printer.
Third-Party Software Interference
Other installed software, particularly security or antivirus programs, can conflict with QBDT and cause a QuickBooks PDF error.
Data Damage
If your QuickBooks company file or the data for the specific form or report you’re trying to print is corrupted or damaged, it can cause issues with printing or saving as a PDF.
Printer Connectivity
If your printer isn’t properly connected to the computer or there are issues with its connection, QuickBooks won’t be able to send print jobs to it.
QuickBooks Software Issues
Bugs, glitches, or errors in QuickBooks can cause issues with printing or generating PDFs.
Insufficient Permissions
Sometimes, the user account used to run QuickBooks may not have sufficient permissions to print or perform PDF-related actions.
Outdated QuickBooks Version
Using an outdated version of QuickBooks may cause compatibility issues with the operating system or other software components, affecting printing and PDF functionality.
Temp Folder Accessibility
If the TEMP folder is corrupt or inaccessible, QuickBooks users will have to use the QuickBooks PDF repair tool for printing and PDF-related problems.
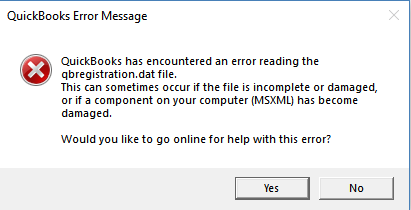
Damaged MSXML
A damaged MSXML component may lead to printing and PDF-related errors in QuickBooks Desktop.
All of these can trigger issues with QuickBooks printers and PDF options, causing significant problems. Let’s examine the problems arising due to these factors and the signs users have been experiencing for a long time.
Then, let us look at the technical team’s suggested steps for resolving the QuickBooks report-to-PDF not working error without using the QuickBooks Print and PDF Repair Tool.
Different Errors Surrounding QuickBooks Print and PDF
The various problems QuickBooks users may encounter while using the print and PDF feature, and that the PDF repair tool QuickBooks can resolve, are as follows:
- A problem has arisen when trying to link to your currently selected printer, Microsoft XPS Document Writer, on the XPS port.
- PDF Error: The QuickBooks program can’t complete the current action because the PDF file element is missing.
- QuickBooks freezes when you attempt to reconcile accounts.
- The QB software is not replying.
- PDF Converter displays offline.
- You cannot print explicitly to the QuickBooks PDF Converter.
- The device is not prepared.
- It could not print to the printer.
- Unable to preserve as a .pdf file.
- QuickBooks PDF Converter Activation Error -30, -41, or -20.
- QuickBooks could not hold your form or reports as a .pdf.
- Print Driver Host for 32-bit Applications has Ceased Working.
- Crises printing transactions or reports.
- Unrecoverable error.
- Error 1722 or 1801 while installing PDF Converter.
- The reconcile window vanishes or doesn’t show.
These are the issues you can resolve with the QuickBooks Print & PDF Repair Tool.
Use Cases for the QuickBooks Print & PDF Repair Tool
Listed below are the use cases for the QuickBooks Print & PDF Repair Tool:
PDF Errors
You encounter frequent errors when saving forms, invoices, reports, or other documents as PDFs. This situation includes error message(s) you may receive about problems with the PDF converter.
PDF Converter Missing
QuickBooks shows that the PDF converter is missing when you try to save something as a PDF. It could be due to the converter being accidentally uninstalled or not installed correctly during the QB Desktop installation.
QB Freezing or Crashing While Generating PDF
QuickBooks freezes or crashes when attempting to generate a PDF, disrupting your workflow and causing frustration.
Inability to Email Forms as PDF
QuickBooks lets you email forms such as invoices, estimates, and reports as PDF attachments. If this feature is not working, it could indicate a problem with the PDF component.
Printing Issues
You experience difficulties printing invoices, checks, or other documents from QuickBooks. The printer may not be detected, or print jobs may fail to complete successfully.
Trouble with Printer Settings
QuickBooks might not be able to communicate with your printer, or it may not display the correct printer settings when you attempt to print.
Compatibility Problems
After updating your operating system or installing new software, QuickBooks’ printing and PDF functionalities might stop working correctly.
Recent QuickBooks Update
After a recent QuickBooks update, printing or PDF features started malfunctioning, prompting you to troubleshoot print and PDF issues in QuickBooks Desktop.
Getting these signs, error messages, or codes during printing indicates that you need a fresh troubleshooting approach or tools to fix the underlying causes. Therefore, let’s investigate the instances of how you can rectify the print and PDF problems in QuickBooks Desktop without any issues.
Pre-Requisites for Troubleshooting QuickBooks PDF Error
Before you troubleshoot the unable to save PDF files in Windows 11 error, make sure you implement the things given below:
Backup Your QuickBooks Data
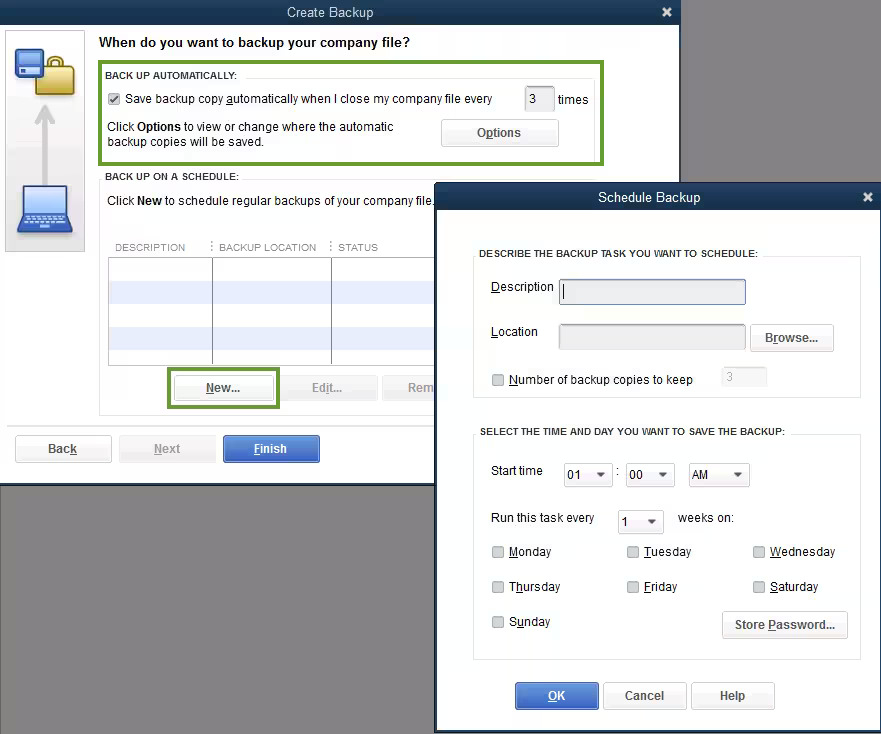
If you haven’t already, consider spending your time backing up the company files. The resolution approach may consider measures that endanger or remove the protective shield of critical QuickBooks data. Therefore, make sure you have a backup saved before resolving the PDF and printing issues that arise.
Update QuickBooks
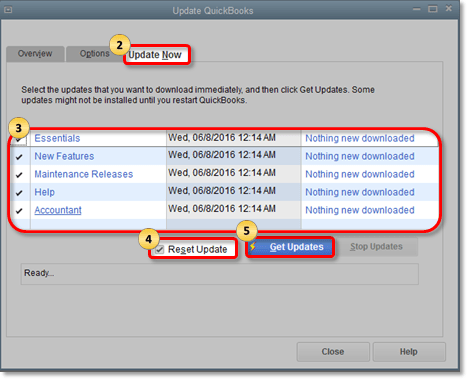
No software is fully functional without regular maintenance and related updates, elevating the platform’s performance, efficiency, and effectiveness through bug fixes, improved security, etc. Therefore, updating to the latest QuickBooks application version is critical to resolving errors related to print and PDF features.
Check Printer Drivers

Verify that your printer drivers are compatible with QuickBooks and up to date. Outdated or corrupted printer drivers can cause printing and PDF errors in QuickBooks.
Verify PDF Converter
Ensure the QuickBooks PDF converter is installed and functioning correctly on your computer. This component is essential for generating PDF files from QuickBooks.
Run QuickBooks as an Administrator
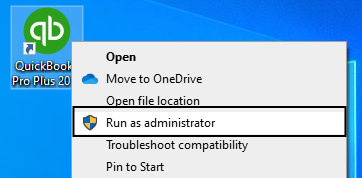
To prevent potential permission-related issues, try running QuickBooks with administrative privileges. Right-click the QuickBooks icon and choose “Run as administrator.”
Disable User Account Control (UAC)
Temporarily disable UAC on your computer, as it might impede and trigger the print from PDF not working error.
Test with Sample Company File
If you encounter PDF issues with a specific company file, test the PDF functionality with a sample company file. It helps determine if the problem is specific to your QB data file or a more general program issue.
Use the Latest Repair Tool
If you plan to use the print and PDF repair tool in QuickBooks, ensure you have the most up-to-date version downloaded from the official Intuit website.
Review Third-Party Software Interference
Check for any third-party software, particularly security or antivirus programs, that may hamper QuickBooks’ PDF and printing features. Test this instance by turning the active third-party apps off for a while.
Restart Your Computer
Before attempting any troubleshooting steps, restart your computer. Sometimes, QuickBooks PDF not working issues can be resolved with a simple system reboot.
Now, let us proceed with more technical troubleshooting steps to resolve the QuickBooks cannot save to PDF issue.
The Tried and Tested Way to Avoid Exporting QuickBooks Data to PDF Error
Listed below are the methods you can use to resolve the problem of QuickBooks cannot create PDF:
Add a New Printer to Your System
Here’s an excellent, successfully experimented method to ensure seamlessness while you implement how to export invoices from QuickBooks to PDF:
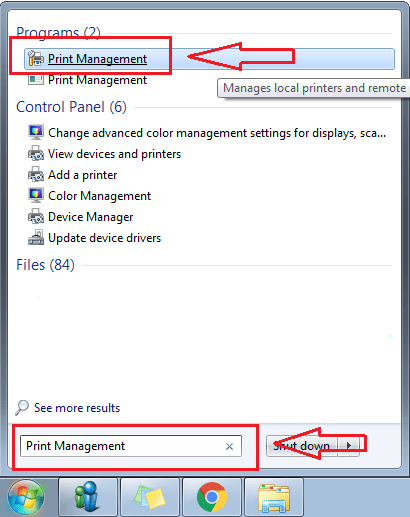
- Click the Windows Start button.
- Type “Print Management” in the Search Programs and Files search box.

- Press Enter and click the Printmanagement program that appears at the top.
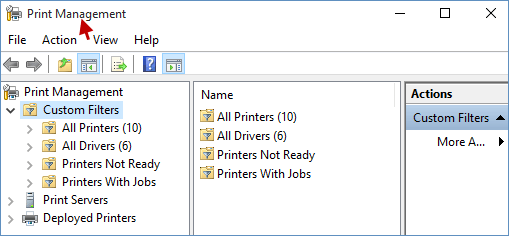
- The Print Management window opens up. On the left side of the window, expand Print Server.
- Click your PC’s name, then select Printers.
- Delete the Microsoft XPS Document Writer by right-clicking on it. The writer might have caused the Exporting QuickBooks Data to PDF Error.

To add a new printer, go through the following steps: - In the empty space below the printers, right-click and select Add Printer.

- The Network Printer Installation Wizard opens up.
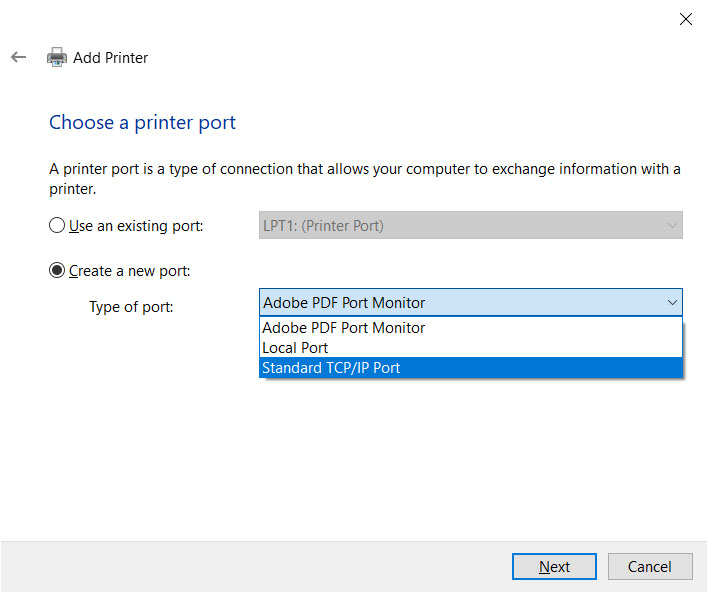
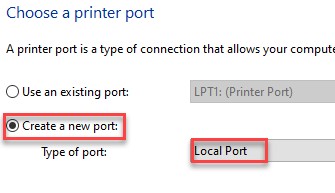
- Click on Create a New Port and add a new printer.

- From the drop-down list, click Local Port.
- In the Enter a Port Name text bar, type XPS.
- The Printer Driver window has the option of installing a new driver.
- Click Have Disk and move to the new downloaded Microsoft XPS Document Writer driver location, then select the driver’s INF file.
- You will be asked to enter the printer’s name. Here, you need to type “Microsoft XPS Document Writer.” Make sure you type it as it is, without the double quotation marks.
- Finally, click on Next to complete the task.
Restart your computer, then open QuickBooks. Create a PDF to see if the QuickBooks Save as PDF not working error is resolved.
Run the QuickBooks Print and PDF Repair Tool from the QB Tool Hub
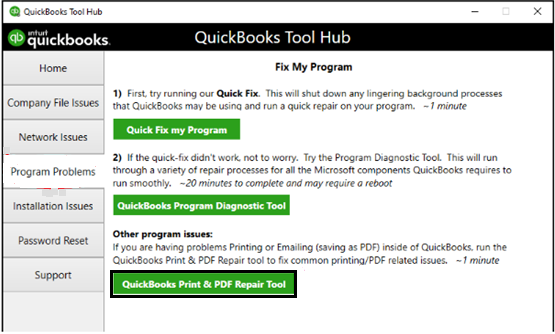
An excellent utility you can lean on whenever QuickBooks fails to create a PDF is the Print and PDF repair tool. This tool can potentially resolve a list of problems that the PDF and printing features in QB Desktop can face. To use this tool, follow the steps given below:
- Download and install the QuickBooks Tool Hub application.
- Run the Tool Hub Program and open the Program Problems tab.
- Select the QuickBooks Print & PDF Repair Tool, then let it run to fix print-related errors and issues in QB Desktop.
Reboot Your PC and Reset Temp Folder Permissions
Rebooting your computer and resetting the permissions on the TEMP folder can help resolve the QuickBooks print-to-PDF not working error. Follow these measures to perform these actions:
Step 1: Reboot Your Computer
- Exit and seal all open programs and files on your gadget, including QuickBooks.
- Reserve any unsaved work to prevent data loss during the reboot.
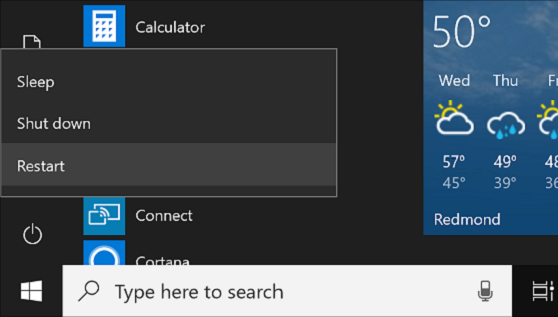
- Hit the “Start” button or icon in the bottom-left junction of your desktop.
- Pick the “Power” option.
- Click on “Restart” from the dropdown menu.
Step 2: Reset TEMP Folder Permissions
- Finish rebooting your gadget.
- Sign in using a Windows account with administrative privileges.
- Press the keyboard’s Windows key + R simultaneously.
- The “Run” dialog wizard will pump out.
- Input %temp% in the “Run” dialog window.
- Hit Enter or click “OK.”
- It will open the “Temp” folder.
- Inside the “Temp” folder, press Ctrl + A to select all the files and folders.
- Right-click the selected items.
- Hit “Delete.”
- If prompted for validation, tap “Yes” to delete the files and folders.
- Then, right-hit on the temp folder’s empty area.
- Tap Properties.
- Hit Security.
- Check the User Names and groups in Security.
- Give Full Control to all.
- After setting the permissions to Full Control, reattempt saving as a PDF in QB.
- Exit the “Temp” folder window.
- Relaunch the Run dialog window (Windows + R).
- This time, type C:\Windows\Temp (without quotes).
- Click Enter or “OK.”
- It will launch the “Windows\Temp” folder.
- Press Ctrl + A keys.
- Select all files and folders in the Windows/Temp folder.
- Hit Delete and validate with OK.
- Close the “Windows\Temp” folder window.
- Now, right-click the Windows taskbar.
- Tap “Task Manager.”
- Hit the “Processes” tab in the task manager.
- Look for any processes related to QuickBooks or PDF generation.
- When you find any, pick them.
- Tap “End Task” to terminate the processes.
- Exit the Task Manager.
Step 3: Test QuickBooks Printing and PDF
- Launch QuickBooks and open the company file with the printing or PDF error.
- Try printing a document or generating a PDF to see if the QuickBooks can’t print to PDF issue is resolved.
The QB program uses a few components of the XPS Document Writer, part of Microsoft Windows, to save files as PDFs. You can test whether the XPS Document Writer can print, and the QuickBooks cannot create PDF error is resolved with the steps given below:
- Open Notepad.
- Input Test.
- Hit File.
- Pick Print.
- Opt for the XPS Document Writer.
- Choose Print.
- Assign this file a name and save it on your desktop.
- Return to the Desktop.
- Access the XPS document printed from Notepad.
If the print to XPS or the printer outside QB fails, access IT professionals or Microsoft for assistance.
Form a New Template
If QuickBooks won’t save a PDF, you should institute new templates for your form. You can attempt a customized template and set it as the default form for the specific transaction. Here’s how you can accomplish it:
Step 1: Open QuickBooks
- Open the QuickBooks software.
- Log in to your company file.
Step 2: Initiate or Open the Form
- Determine the type of form you want to customize (e.g., invoice, sales receipt, purchase order).
- On this basis, create a new one or open an existing document.
Step 3: Customize the Form
- Once the form is open, you can customize it.
- Hit the “Customize” or “Customize Design” button (whatever button you have for your QuickBooks version).
- The customization window will launch.
Step 4: Edit Template
- In the customization window, you can modify various form elements.
- It involves the layout, fonts, colors, logo, and other design elements.
- Drive the vital shifts to the template to suit your preferences and branding.
Step 5: Save the Template
- After customizing the form, hit the “Save” or “Save and Close” button.
- The alterations made to the template will be saved.
Step 6: Set the Template as Default
The following steps will assist you in utilizing the newly created template as the default form for the specific transaction:
- Go to the “Lists” menu.
- Choose “Templates” or “Custom Templates,” whatever your QuickBooks version possesses.
- The Templates list will arise.
- Discover the template you just created or customized.
- Right-hit on the template.
- Tap “Make Template Inactive.”
- It will remove the existing template from being used as the default.
- Right-tap on the customized template again.
- Choose “Make Template Active.”
- It sets the new template as the default form for the transaction.
Step 7: Test the PDF Creation
- Try creating a new transaction (e.g., an invoice or sales receipt) using the customized template.
- Save or send it as a PDF to see if the “QuickBooks cannot create PDF” error is resolved.
Things to Try With IT Professionals
If you keep encountering problems while printing or making a PDF in QuickBooks Desktop, you must attempt the following things with an IT professional beside you:
- Ensure the XPS services are switched ON.
- Give a test run to the XPS Document Writer.
- Print outside QB.
- Remove and reinstall Microsoft XPS Document Writer.
- Ensure your security software, like Norton, AVG, McAfee, etc., doesn’t interrupt or block the .xps file creation.
- The XPS Document Writer must have Windows User Grants to print to it and convert the file to PDF.
This would resolve the issue you were dealing with.
Conclusion
The QuickBooks cannot create PDF error is an issue that many users face, which generally occurs due to program problems with the QB Desktop application. This can hamper your workflow and important business processes. We have covered the potential factors that can trigger this issue to appear on your screen, along with the methods needed to troubleshoot it, in this blog. If you are still facing the same problem, feel free to contact Accounting Helpline at 1.855.738.2784 today!
FAQs
Why is QuickBooks showing the “Cannot create PDF” error when saving forms or reports?
The “Cannot create PDF” error in QuickBooks can occur for various reasons. It might be related to issues with the QuickBooks PDF converter, damaged or missing components, printer driver problems, user account control settings, data damage, or compatibility issues with the operating system.
How can I quickly rectify the “QuickBooks cannot create PDF” error?
To rectify the “QuickBooks cannot create PDF” error, you can try the following steps:
– Verify and fix printer-related issues.
– Check if the QuickBooks PDF converter is installed and functional.
– Update QuickBooks to the newest version and install any available updates.
– Reset the TEMP folder permissions.
– Adjust User Account Control settings on your computer.
– Repair the QuickBooks installation.
– Test with a sample company file to identify data-related issues.
– Temporarily turn off third-party security software for troubleshooting purposes.
How do I check if the QuickBooks PDF converter is installed correctly?
You can check if the QuickBooks PDF converter is installed correctly as follows:
– Access your PC’s “Devices and Printers” section.
– Look for a printer named “QuickBooks PDF Converter” or “QuickBooks PDF Converter 3.0.”
– Undertake your QB’s reinstallation or repair if you cannot find it.
What should I do if my printer is not detected in QuickBooks?
If your printer is not seen in QuickBooks, try the following steps:
– Your printer should be connected correctly to your gadget and enabled.
– It would help if you verified your printer drivers are up-to-date and compatible with QuickBooks.
– Restart your gadget and printer to refresh the connections.
– Verify that the printer is the default printer in your operating system.
Related Posts –
Here’s How to Download QuickBooks Direct Deposit Form
Decoding the QuickBooks Error PS034: Definition, Causes, and Solutions of the Error
How to Fix QuickBooks Won’t Open After Update Issue
Effortlessly Verify and Rebuild Data in QuickBooks Desktop with Simple Steps
QuickBooks Error 30134 – What Do I Do Next?
QuickBooks Error 213 | Guided Steps to Resolve It

Edward Martin is a Technical Content Writer for our leading Accounting firm. He has over 10 years of experience in QuickBooks and Xero. He has also worked with Sage, FreshBooks, and many other software platforms. Edward’s passion for clarity, accuracy, and innovation is evident in his writing. He is well versed in how to simplify complex technical concepts and turn them into easy-to-understand content for our readers.