
Last Updated on April 29, 2026
You might experience issues in QuickBooks while operating it, accessing the company file, processing payroll, printing, or sending PDFs. One of the most common issues that occurs in QuickBooks Error 800706be is when working with company files. This error can be caused by incompatibility between QuickBooks and the operating system or by corrupted company file data. It may also occur if the file is not stored in the default location.
As a result, you may be unable to perform tasks because damaged data prevents QuickBooks from reading the file structure. To better understand and resolve this issue, follow the solutions outlined below. So, let’s take a long jump into the page to gain useful insights.
What is QuickBooks Desktop Error 800706be?
Error code 800706be in QuickBooks is a common unrecoverable error that occurs when accessing a company file. It is caused by a corrupted company file or a virus/malware infection. Incompatibility between QB and OS can further trigger it. Let’s go through the guide to explore various methods to fix it.
Main Contributors Behind QuickBooks Error 800706be
To eliminate the error at its roots, it is important to understand the causes the issue stems from. Here is a list of factors that cause QB to crash with error 800706be.
- Corrupted or damaged company files that prevent QuickBooks from reading data properly.
- The company file is not being stored in the default location.
- Incompatibility between QBDT and OS.
Now that you know the causes of QuickBooks error code 800706be, it’s time to go deeper into the guide and try fixing the issue.
Prerequisites to Tackle Error 800706be in QuickBooks Desktop
Before moving to the resolutions, ensure the following things are executed to achieve a seamless elimination of the error code 800706be in QuickBooks.
- Keep your Windows up to date with the latest release. Here is how to get the recent update of Windows:
Windows 10- Tap on the Start menu.
- Click Settings.
- Choose Update & Security.
- Select Windows Update, followed by Check for Windows updates.
- Choose Download & install if this finds any available updates.
- Your system will download and install the updates.
- You will have to restart the computer to apply the updates.
- Keep a backup of the company file data. See how to create one:
There are two ways you can consider to create a backup of your company file.- Schedule automatic backups
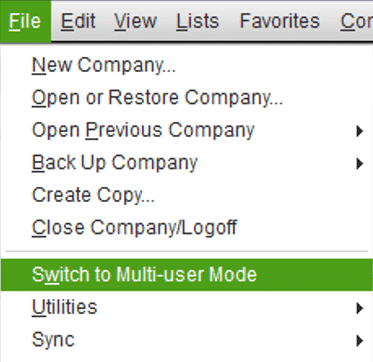
If you opt for this, you won’t have to manually back up your company file. Let’s do it automatically:- Go to the File menu.
- Click on Switch to Single-user Mode.

- Move back to the File tab.
- Click on Back up Company.
- Next, choose Create Local Backup.

- In the current window, choose Local Backup, followed by Next.
- In the Local Backup Only section, choose Browse.
- Select a location where you wish to save your backup company file.
- You can also set the number of backups you want to create. You can skip this step.
- Choose Complete Verification in the Online and Local Backup section. It will run a test to ensure that the backup company file is in good condition.
- Choose OK when you are ready.
- Click on Save it now and schedule future backups, followed by Next.
- In case you don’t want to save the backup now, simply select only schedule future backups.
- Now, tap on the checkbox that says Save backup copy automatically when I close my company file.
- Then, pick the number of times between backups.
- Click New to create a schedule.
- Input the required details to create a backup schedule.
- Moreover, you can set a specific time or day of the week when you want this backup to run.
- Choose OK after setting your schedule.
- QuickBooks may ask you to enter your Windows sign-in password to let QB run the scheduled backups.
- Select Finish.
- When it is done, you will receive a confirmation message.
- Schedule automatic backups
- Manually back up your company file data
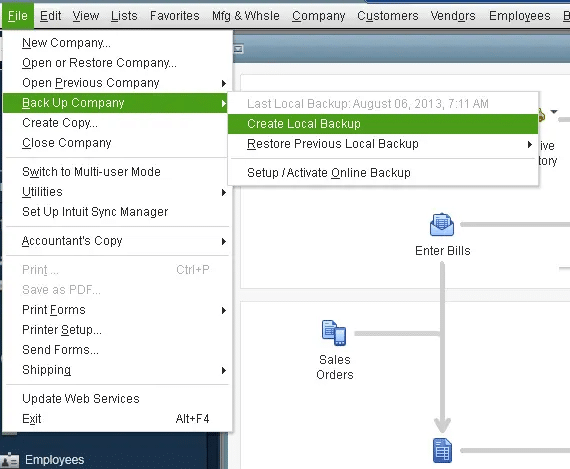
Here are the steps to manually create a backup of your company file.- Go to the File menu.
- Choose Switch to Single-user Mode.
- Move to the File menu.
- Head to Back up Company.
- Tap on Create Local Backup.
- Choose Local Backup, followed by Next.
- In the Local Backup Only section, choose Browse.
- Choose a location to save your backup company file.
- You can set the number of backups you want to create, or skip this step.
- It will run a test to ensure that the backup company file is in good condition.
- Choose OK when you are ready.
- Click on Save it now, followed by Next.
- Give admin access to the users.
- You must have proper disk space in your system.
The above are some points you need to remember before fixing QuickBooks error code 800706be. Now let’s move to the next section and explore various resolutions.
Quick and Easy Fixes For QuickBooks Error 800706be
In this section, you will uncover some technical ways to overcome QuickBooks Desktop error 800706be. Let’s walk through each method:
Method 1: Make Necessary Changes in the Network Data File Name
As we discussed, a corrupted company file can damage the entire software. So, change the network data file name and resolve this problem:
- Open the QB application, along with the company file.
- Launch the Product Information window by pressing the F2 key.
- Look for the location of the QuickBooks data file.
- After this, you need to tap on the Windows icon.
- Paste the file location in the search bar.
- Hit Enter and look for the Network Data file in the current window.
- It will have the same name as the company file but with a different extension, which is .qbw.nd.
- Now, you need to right-click on the file and choose Rename.
- Also, type.OLD at the end of the file name.
- Finally, close the window and move to QB. It will automatically create a new.ND file.
Renaming the file can work in most scenarios. However, if you are still stuck with the issue, jump to the next solution.
Method 2: Moving the Company File to the Default Location
In case the error is caused by the location of the company file, you can shift the company file to the default location and rectify this issue.
- For this, you need to close the QB window.
- Move to the company file location.
- Take your cursor to the file with the .qbw extension.
- Right-click on the file and choose Copy.
- Move it to the original file location where QB files are automatically stored.
- Paste the path into the File Explorer search bar:
C:/User/PublicDocuments/Intuit/QuickBooks/Company Files - Paste the company file into this location.
- Close the window.
- Open the QB application.
- Click on the option that says Find a company file.
- Click on the Local Drives option.
- While looking for the company file, pick one from the default location.
- Hit Open.
If even after implementing this method, you failed to resolve the QB error 800706be. Go to the next solution.
Method 3: Run Verify and Rebuild Data Utility
Repair the data damage, as this problem might stem from it. See how:
Step 1: Verify the company file data
Here are the steps to scan your company file to check for damage.
- Go to the Window.
- Choose Close All.
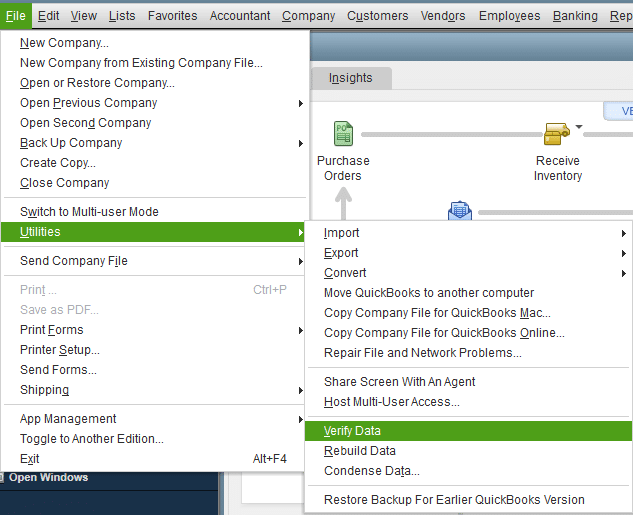
- Move to the File menu.
- Click on Utilities.
- Choose Verify Data.
- After this, you may receive one of the following messages on the screen:
- “QuickBooks detected no problems with your data“: If you see this message, it means your data is clean, and you don’t need to do anything.
- An error message: If an error appears, search for it on the QuickBooks Desktop support site for troubleshooting steps.
- Your data has lost integrity: It indicates that there is some damage to the data that needs to be fixed. Rebuild your company file to repair data damage.
Step 2: Rebuild your company file data
After you have scanned your company file and found data damage, follow the steps below to rebuild your company file.
Note: If you use Assisted Payroll, contact Accounting Helpline experts before you rebuild your data.
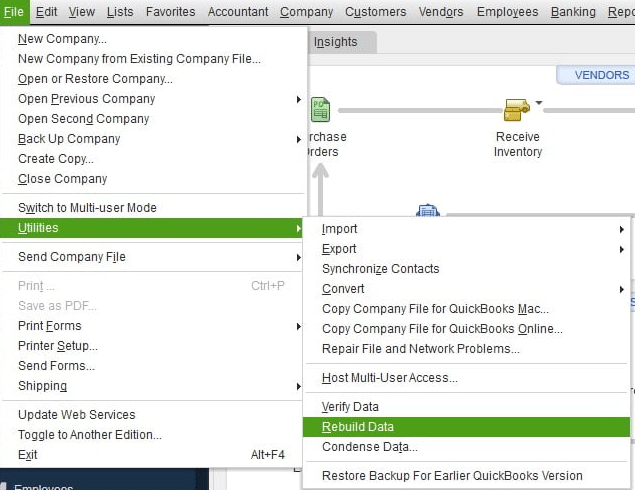
- Head to the File menu.
- Choose Utilities.
- Click on Rebuild Data.

- This will ask you to create a backup of the company file before proceeding.
- Choose OK.
- Select a location where you wish to save your backup.
- Click OK, and remember, you are not replacing another backup.
- Go to the File name section and enter a new name.
- Hit Save.
- Choose OK when you see a message stating Rebuild has completed.
Step 3: Verify data again to check for additional damage
After rebuilding, you must once again verify your data to ensure a successful repair.
- Head over to the File menu.
- Choose Utilities.
- Tap on the Verify Data option.

- If it finds more damage, you will have to fix it manually. For the errors found, search on the qbwin.log on the QuickBooks Desktop support site and learn to fix them.
- If your error is not there, you can restore a recent backup.
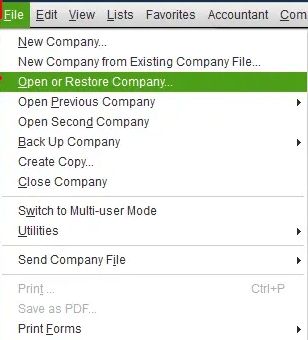
- Go to the File menu.
- Choose Open or Restore Company.

- Remember, you don’t need to replace your existing company file. Also, enter the information into your company file again after creating the backup.
If running the verification and rebuild tool doesn’t help, go to the next method below.
Method 4: Suppress the QuickBooks Desktop Program and Access It
Accessing the company file directly may trigger Error 800706be in QuickBooks. Try opening QuickBooks in suppressed mode instead.
- Close all the applications that are running in the background on your device.
- Long-press the Ctrl key on your keyboard.
- Access the program and continue holding the Ctrl key until the No Company Open window appears.
- Select the company file and again hold the Alt key.
- Choose Open.
- Press and hold the Alt key.
- Choose OK.
After implementing these methods, let’s take a look at the table below that describes things more precisely.
Quick Overview Table: QuickBooks Process Request Error 800706be
Here is a table given to help you better grasp the information given in the complete blog. A table makes complex information easier to understand.
| Error description | Error code 800706be in QuickBooks Desktop is basically a company file issue that prevents you from running QB or accessing the file. |
| Potential reasons behind it | Malware or virus infection, incompatibility between software and the operating system, or when the file is not saved in the default file storage location. |
| Prerequisites | 1. Keep your Windows updated. 2. Keep a backup of the company file data 3. Give admin access to the users 4. Ensure sufficient disk space is available |
| Effective ways to fix it | 1. Make necessary changes in the network data file name 2. Shift the company file to the default location 3. Run verify and rebuild the data utility 4. Suppress the QuickBooks Desktop program and access it |
Parting Thoughts
This guide explained the causes and solutions for QuickBooks Error 800706be. For instance, it arises when there is damage to the company file or when there is incompatibility between QB and the OS. However, remember to keep Windows up to date and create a backup of the company file before fixing it. We hope that the methods outlined above help you resolve the issue. If the problem still persists, you can also consult our Accounting Helpline experts at 1.855.738.2784 and get professional help resolving error 800706be.
Frequently Asked Questions
What leads to QuickBooks error 800706be?
A damaged company file, disabled payroll services, a corrupt Windows installation, a missing installation file, or a virus attack can cause QuickBooks error code 800706be.
Is the error code 800706be in QB related to payroll?
Yes, you can encounter this problem if the payroll update services are disabled. Updating payroll and enabling QuickBooks File Copy Services can help resolve the issue.
How to easily fix QuickBooks error 800706be?
The following methods are easy to use:
– Rename Network Data (.ND) File
– Shift the company file to the default location
– Run the Verify and Rebuild Data utility
What if the error keeps occurring?
If the error persists, try running QuickBooks File Doctor within the Tool Hub or check for Windows registry issues.
Related Posts-
Guided Methods for the QuickBooks Error 15XXX | Top Resolutions
QuickBooks Full Service Payroll for Small Businesses
Understanding QuickBooks Error 30159: Causes, Symptoms, and Solutions
Solving QuickBooks Won’t Open After Windows Update Issue
Comprehensive Guide to Set Up QuickBooks Desktop Inventory
QuickBooks Cleanup: The Guide for a Stress-Free Tax Season

Edward Martin is a Technical Content Writer for our leading Accounting firm. He has over 10 years of experience in QuickBooks and Xero. He has also worked with Sage, FreshBooks, and many other software platforms. Edward’s passion for clarity, accuracy, and innovation is evident in his writing. He is well versed in how to simplify complex technical concepts and turn them into easy-to-understand content for our readers.