
Last Updated on March 18, 2026
QuickBooks offers a feature to integrate foreign currencies into the system. When you set up QuickBooks, you are asked to designate a default/home currency. For example, if you live in the United States, you would have set up the default currency as USD (United States Dollar). However, there might be a case in which you have to change the default currency. Scenarios such as shifting to a different location or strictly dealing with clients from another country, such as Canada, can be a contributing factor for you to change your currency in QB. But if you have the multi-currency option activated, you will have to set up a new company file in order to create a new home currency.
In this blog, we’ll learn how to change currency in QuickBooks Desktop and Online in great detail. So, let us get started with a short explanation of multi-currency in QuickBooks.
Need help with changing your home currency in QuickBooks Desktop? Contact our Accounting Helpline’s professionals today at 1.855.738.2784!

What is Multi-Currency in QuickBooks Desktop Enterprise and Online?
The multi-currency feature in QuickBooks allows a business to make and track its transactions in multiple international currencies, in addition to its default currency (home currency). This helps in converting all the transactions, managing international sales and purchases, and calculating taxes much more easily for the business. Additionally, it also records all the exchange rates and fluctuations to set the currency value automatically.
What Can I Do to Change Currency in QuickBooks Desktop?
If you don’t have multi-currency enabled, you can change currency in QuickBooks Desktop with these steps:
- Firstly, open the Edit menu in QuickBooks Desktop.
- Then, click on the Preferences option.
- In the Preferences window, click on Multiple Currencies.
- From the list on the left.
- Now, go to the Company Preferences tab.
- Choose Yes, I use more than one currency.
- Now, set your home/default currency from the dropdown menu.
- Finally, press OK to save the changes.
This would change your default currency in the QuickBooks Desktop application. However, if you have multi-currency in QuickBooks already enabled, you won’t be able to make changes to your currency. To do so, you would have to make a new company file and set up a default currency there.
Change Currency If You Have Multi-Currency Enabled Already
As we discussed, you would have to create a fresh company file to change the currency if you had multi-currency enabled. Let’s learn how to change currency in QuickBooks Desktop for this case with these steps:
- Open the QB Desktop application.
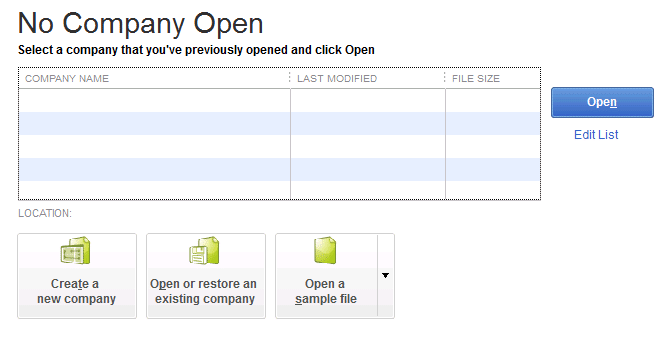
- Make sure the No Company Open window is open.

- Then, click on Create a new company.
- Now you would have two options:
- Express Startup or Start Setup:
- Select this if you need to set up the company file and start working on it straight away.
- You would need to enter your business name, industry, and business type.
- Then, just select Create Company File to start working.
- You can enter the rest of the information later.
- Detailed Start:
- Select this if you want to do a complete setup right from the very beginning.
- Express Startup or Start Setup:
- Now, follow the steps on your screen to finish the setup:
- This company file would be given a different name from your existing company file.
- Press Start Working.
Now, just follow the steps to set up multi-currency from the section above, and set a new home/default currency.
How to Change Default Currency in QuickBooks Online
Now, let us see how to change currency in QuickBooks Online. This depends on whether the multi-currency feature is activated or not.
If the Multi-Currency Feature is Not Activated
Only if the Multi-Currency Feature is not activated in QuickBooks Online, the following steps will help to change the home currency in QuickBooks.
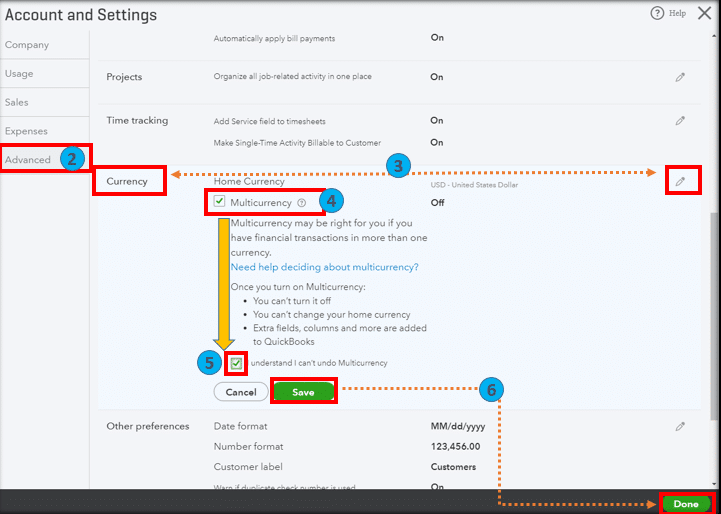
- In the QuickBooks Online homepage, click the Gear icon and then select Account and Settings.

- From there, navigate to Advanced and in the column of Currency, click the Edit button.
- Under the Home Currency column, choose the currency you want to change from the drop-down menu next to it.
- Click on Save and hit Done.
NOTE: If dealing with any errors while using or setting up multi-currency in QuickBooks, follow our article How to Fix QuickBooks Multi-Currency Problem.
If the Multi-Currency Feature is Activated
If your company file has transactions for 60 Days or more, it is not wise to delete it. You should start a new company and set up the right currency.
Start a new company:
- Sign in to your QuickBooks Online account using the same user ID and password.
- For payroll, sign up on the Workers tab.
QuickBooks Change Customer and Vendor Currency: Here’s How to Do It
If you need to change currency in QuickBooks Desktop for your customer, you should have the multi-currency feature already set up. However, if the customer already exists with a designated currency:
- You would have to create a new customer profile.
- Set up a foreign currency of your choice.
This will get you started and help you resume your everyday QB operations.
Now, let us show you how to change an assigned currency for a customer or vendor in QuickBooks Online. What you should do is create a new customer or vendor and assign the new currency.
Making the vendor or customer inactive
Follow the steps below to make a customer inactive:
- To begin with, locate the name of the customer you want to change the currency for.
- Choose Edit, and note down all the information for the customer.
- Go to Save and then navigate back to the Customers list.
- Once again, find the same customer and select the Action ▼ dropdown button for it.
- From the list of options, choose Make inactive followed by Yes.
Follow the steps below to make a vendor inactive:
- To begin with, locate the name of the vendor for whom you want to change the currency.
- Choose Edit, and note down all the information for the customer.
- Go to Save and then navigate back to the Vendors list.
- Once again, find the same vendor, and select the Action ▼ dropdown button before it.
- From the list of options you see, choose Make inactive, followed by Yes.
Creating a new customer or vendor profile
Follow the steps below to create a new customer:
- Choose New customer, and type in all the information for the customer that you took notes of earlier.
- After that, tap on the Currency ▼ dropdown and select a currency.
- Now, add a currency to the customer’s display name, and choose Save.
Follow the steps below to create a new vendor:
- Choose the New vendor option, and type in all the information for the customer that you took notes of earlier.
- After that, tap on the Currency ▼ dropdown option and select a currency.
- Now, add a currency to the vendor’s display name, and choose Save.
This will help you set up a new currency for customers and vendors.
Conclusion
In this blog, we talked about how you can change currency in QuickBooks Desktop and Online, and the detailed steps for it. However, if you need help with that or for any further assistance, you can contact our Accounting Helpline experts at 1.855.738.2784!
FAQs
How to change home currency in QuickBooks Desktop?
To change your home currency in QuickBooks Desktop, go to the Edit menu, click on Preferences, select Multiple Currencies, choose Yes, I use more than one currency, and just set your default currency from the dropdown menu.
How to change home currency in QuickBooks Online?
To change the currency in QuickBooks Online, you would have to first click on the Gear Icon, then press Account Settings, and select Advanced. Now, go to the Currency column and press edit. Then, in the Home currency column:
– Choose the currency from the drop-down menu.
– Finally, press Save, followed by Done.
How to change customer currency in QuickBooks Desktop?
To change customer currency in QuickBooks Desktop, ensure that you haven’t already assigned a currency to them. If you have, create a new customer profile and assign a currency to them.
How to change currency in the Chart of Accounts in QuickBooks?
To change currency in the Chart of Accounts in QuickBooks, you would have to create a new account by clicking on Transactions, going to Chart of Accounts, selecting New, choosing the Category, and entering a Name. Then, enter the Description, choose the Currency, and press Save and Close.
How to change customer currency in QuickBooks Online?
To change the customer currency in QuickBooks Online, go to Customer & leads, select Customers, press the New Customer option, fill in the required info, choose Payment and billing, navigate to the This customer pays me with field, choose the customer currency, and press Save.
Related Posts-
QuickBooks Cloud Hosting | Its Advantages & Features
Fix QuickBooks Error 3371 status code 11118/11104/1 With Hustle Free
QuickBooks Multi-User Mode Not Working: Fix Connection & Access Issues
Understanding QuickBooks Error PS107: Causes of the Error and Troubleshooting Steps
Learn How to Set Up Email In QuickBooks Effortlessly
QuickBooks Cannot Communicate with the Company File [SOLVED]

Edward Martin is a Technical Content Writer for our leading Accounting firm. He has over 10 years of experience in QuickBooks and Xero. He has also worked with Sage, FreshBooks, and many other software platforms. Edward’s passion for clarity, accuracy, and innovation is evident in his writing. He is well versed in how to simplify complex technical concepts and turn them into easy-to-understand content for our readers.