Last Updated on September 15, 2025
QuickBooks Online can connect with your bank account to eliminate the need to enter your accounting data manually. After the bank account is linked to QB, it will automatically download the last 90 days of transaction data, which you are able to view in the Transactions section. However, users might encounter error 176 in the process. The QuickBooks error 176 is a common error that prevents the user from updating their bank transactions and connecting their bank account to QuickBooks. Error 176 is categorized as a general script error and needs to be handled in a timely manner to avoid any inconvenience.
In this blog, we’ll learn how to tackle this error in no time with our step-by-step guide. So let’s get started.
Having trouble dealing with error 176 in QuickBooks? Contact our Accounting Helpline’s experts at 1.855.738.2784 today to resolve it in no time!
All the Potential Causes for the QuickBooks Error 176
Listed below are some of the potential causes for the error 176 in your QuickBooks Online website:
- It can occur because your connection failed.
- Your QuickBooks session could’ve timed out.
- The QBO session might have failed.
- A web server error can cause this issue.
- Stored cache and cookies in your browser can also cause QuickBooks error 176.
- Problems with your bank servers.
Now that we know about the causes, let us know how to resolve this QuickBooks error 176 with guided troubleshooting methods.
Resolve the QuickBooks Online Error Code 176 | Guided Steps
Listed below are some of the methods you can implement to resolve the QuickBooks Online error 176:
Disconnect and Reconnect Your Bank Account in QuickBooks Online
You can fix the QuickBooks error code 176 by disconnecting and reconnecting your bank account from the accounting software. First, let’s see the steps to disconnect your bank account.
Step 1: Disconnect Your Bank Account from QBO
- First, go to the Banking or Transactions tab.
- Then, click on Banking.
- Now, choose the title for the account you need to disconnect.
- Select the pencil icon.
- Now, press the Edit account info option.
- Select the checkbox beside Disconnect this account on save.
- You won’t see this option if QuickBooks is downloading any new transactions.
- Wait a few minutes and try again.
- Lastly, select Save and Close.
Now, you have to reconnect your bank account.
Step 2: Connect Your Bank Account to QBO
- Click on Connect Account.
- Then, search for your bank by either name or URL.
- Or select a bank from the list.
Note: You can manually upload the transactions if you can’t find your bank.
- Or select a bank from the list.
- Click on Continue.
- Now, in the window that pops up, sign in to your bank.
- Click on the dropdown menu.
- Select the bank account that you wish to connect to.
- Choose the dates to pull the transactions.
- Hit Next.
- Some banks let you download the transactions for the past 90 days.
- Other banks may let you download the transactions for 24 months.
- Then, select the QuickBooks account.
- Click the Account type dropdown menu.
- Select the account type that matches your chart of accounts in QBO.
- Choose to press Next.
- If you chose Bank account in the Account Type dropdown menu.
- Go to the Detail Type field, and select either Checking or Savings.
- Now, name the account.
- Press Save and Close.
- Click on the Existing accounts dropdown menu.
- Select the bank account and press Next.
- Press the Connect option.
- Then, select Done.
- Now, go to the Bank Transactions screen.
- Click on Update.
- This would download your recent bank transactions automatically.
Performing these steps would resolve the QuickBooks error 176.
Update Your Banking Information in QuickBooks Online
One of the main reasons you might be dealing with error 176 in QuickBooks Online is that you haven’t updated your banking info after changing it. You can fix that by updating your bank in QBO with these steps:
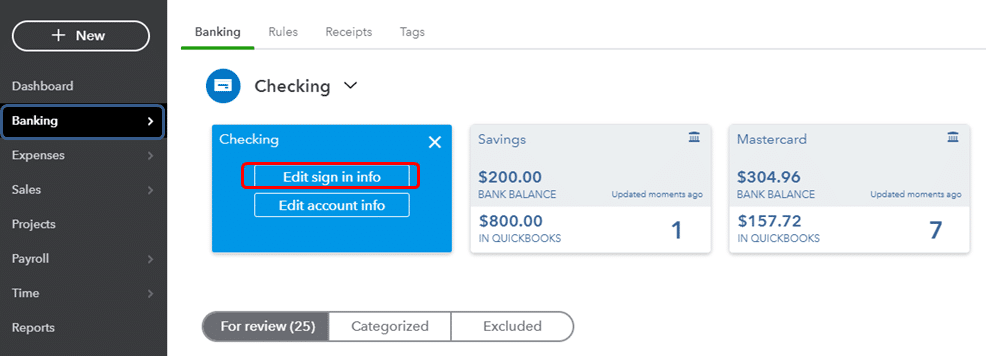
- Click on the account card for the bank account you’re using in QB.
- If you don’t see the account card, click on the dropdown menu beside the bank account.
- Select Show account cards.
- Now, click on Edit.
- Press the Edit sign-in info option.

- Now, feed in the updated bank info.
- Click on Save and connect.
This would fix the QuickBooks error 176. If you still face the same issue, check the next solution.
Try to Use QuickBooks Online in Private Browsing Mode
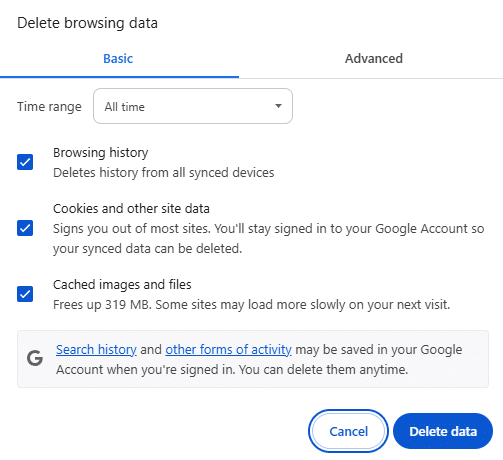
Cache and cookies in your browser can cause your QuickBooks Online website to not function properly. You can get rid of the QuickBooks error 176 by using the QBO website in private browsing mode. Shortcut keys for private browsing in different browsers are given below:
- Google Chrome – Ctrl + Shift + N
- Microsoft Edge – Ctrl + Shift + N
- Mozilla Firefox – Ctrl + Shift + P
- Safari – Command + Shift + N
- Opera – Ctrl + Shift + N
- Brave – Ctrl + Shift + N
If you’re able to resolve the error 176 in QuickBooks by using the QBO website in a private window, you can clear your browser cache and cookies with the next solution.
Clear the QuickBooks Cache and Intuit Cookies

You can resolve the QuickBooks error 176 by clearing the Intuit cache and cookies from your web browser. This would help clear all the piled-up junk from your browser and help eliminate any other errors you might be facing while using the QB Online website. If the issue isn’t fixed, look over the next solution.
Update the Bank Info and Bank Feeds in QuickBooks Online
If you don’t see the transactions getting updated in QuickBooks Online from your bank account, you can follow these steps:
Step 1: Manually Update Them
You can manually update the transactions in QBO if they aren’t showing up in the transactions section.
Step 2: Check the Website of Your Bank Account
If the transactions aren’t updating, it can be due to a problem with the servers of your bank account. You can sign in to your bank to check the same with these steps:
- Open your bank’s website
- Sign in to the netbanking section
- If you can’t sign in, then that means your bank’s servers are down
- In this case, you should wait until the servers are functioning normally again
Note: QuickBooks updates transactions with banks within 24 hours, so if the transactions aren’t showing up, wait for a day.
Step 3: Update Your Bank Info
See the steps to update your banking info from solution two if you need to.
Now, you won’t have to face error 176 in QuickBooks Online again.
QuickBooks Error Code 176 – A Quick View Table
Given below is a table that consists of a concise summary of this blog on the topic of QuickBooks banking error 176:
| Description | The QuickBooks error 176 is a bank connection error, which can prevent you from being able to auto-update your bank transactions in the Online version of the software. This can hamper your workflow and tax calculation processes. |
| Its causes | It is caused by a poor network connection, your bank servers being down, cache and cookies in your browser, QB session being timed out, QBO session being failed, and a web server error. |
| Methods to fix it | Disconnecting and reconnecting your bank in QBO, updating the bank info in QB if it has changed, using QBO in a private window, clearing cache and cookies, and updating the bank feed and info. |
Conclusion
In this blog, we talked about the QuickBooks error 176 in great detail, with the reasons that can cause it. Additionally, we provided you with a step-by-step guide you can use to fix this problem in no time. If you’re still at bay with the same issue and are unable to access your bank transactions in QuickBooks, you can contact our Accounting Helpline’s experts at 1.855.738.2784 today to solve your problem at a moment’s notice.
FAQs
How to fix the QuickBooks script error?
To fix the QuickBooks script error, first add Intuit as a trusted website in your browser, clear cache and cookies in your browser, and reinstall the Microsoft Edge browser on your PC.
What is error code 176 in QuickBooks Online?
The QuickBooks error 176 is a general script error that occurs when a user tries to update their bank transaction in QB Online. This renders them unable to perform critical business processes such as calculating taxes.
What is error code 187 in QuickBooks Online?
QuickBooks error 187 is a banking error that occurs when your bank’s security requirements are not met correctly. This can include one-time passwords and security questions.
How do I download bank transactions if error 176 persists?
You can try downloading the bank transactions manually if the error code 176 interrupts automatic updating. To do so, from the Banking or Transaction menu, go to the Bank tab. Next, select the option to Update, which will ensure the linked bank and credit card transactions update automatically, and the transactions in the accounting tile will auto-populate.
Related Posts-
QuickBooks Error 6210, 0 | Detailed Troubleshooting Steps
QuickBooks Multi-User Setup – Benefits, Precautions & Limitations
What to do When QuickBooks Won’t Update? (10 Fixes)
How to Set up Payroll in QuickBooks? An In-depth Guide
Fixing the QuickBooks Problem With Multi-User Hosting Setup
How to Fix QuickBooks Error 1327: Invalid Drive Installation

Edward Martin is a Technical Content Writer for our leading Accounting firm. He has over 10 years of experience in QuickBooks and Xero. He has also worked with Sage, FreshBooks, and many other software platforms. Edward’s passion for clarity, accuracy, and innovation is evident in his writing. He is well versed in how to simplify complex technical concepts and turn them into easy-to-understand content for our readers.


