QuickBooks Online Payroll service allows small businesses to run payroll from anywhere around the world and helps you calculate taxes and pay your employees online. If you are a subscriber of QuickBooks Online payroll, you can easily print and file all the necessary tax forms to the state and federal tax authorities online. Every year, you are required to submit form W2 if you have employees earning more than $600 in that fiscal year.
Whenever an employee requests a reissue of a W2 form, businesses require reprinting them; this might happen because your employee has lost the form or simply because the form has been damaged somehow. You can follow the IRS (Internal Revenue System) guidelines to reprint W2 in QuickBooks, which we discussed in our article. We will guide you on how to print the W2 form in QuickBooks Assisted Payroll and other editions in QBDT and QBO.
The following guide will help you reprint the W2 form in QuickBooks. However, if you are facing time boundations and don’t want to follow the steps on your own, call Accounting Helpline Payroll Support Phone Number at 1.855.738.2784 for quick assistance.
An employer automatically deducts the appropriate amount from your paycheck and files your taxes on your behalf, so you don’t need to worry about paying taxes. This is why the W2 is also called the Wage and Tax Statement form. After each fiscal year, employers send a W2 form to every employee and the IRS. This form provides a yearly breakdown of the amount withheld from the employee’s account, which is then used for tax filing.
Attaching a W2 form is important for the following reasons –
It is used for income reports as it contains details about your yearly income, including salary, wages, and other payments.
It contains details about the taxes deducted from your earnings, which helps the IRS identify that you have paid the correct amount. The IRS compares the information in your W2 with your tax return to detect any discrepancies and inconsistencies.
Your W2 form has precise income information to help you claim tax credits and deductions.
When you attach a W2 form, it confirms that you have complied with the tax laws and can help speed up the audit process.
This is why a W2 form is crucial, and you must have a copy with you. If you have lost the copy or didn’t receive it, you must reprint the form from QuickBooks.
Now, let’s see what the IRS guidelines are for printing W2s in the next section.
IRS Guidelines to Follow While Reprinting Employees’ W2 Forms in QuickBooks
Before Reprint W2 in QuickBooks for your employees, make sure the following things are considered –
Firstly, ensure QuickBooks is up-to-date and that you have the latest payroll tax table updates on your PC.
W2 form must contain the word “REISSUED STATEMENT” in it.
For laser and inkjet printers, use a pre-printed form or use blank paper.
You must place the paper horizontally inside the printer
Perforated or Blank Paper
There are two different types of papers that you may choose to print on –
Blank 3-part perforated paper
Blank 4-part perforated paper
Also, it is recommended that you order these from the official website of Intuit. Follow the below instructions to place an order for the same –
Visit the Intuit Market website and then navigate to the page where you can find the QuickBooks Checks & Supplies.
Move your cursor over the Tax Products drop-down menu and choose Blank W-2 Kits.
Enter the required information in the fields for QuickBooks Version, Payroll Version, State, and Quantity.
Add the order to your cart and complete the purchase.
Further, you may need to make changes in your printer settings to successfully print these pages as different kinds of paper require different settings –
In QuickBooks, tap on the Settings menu tab.
Click on Payroll Settings and hit the W2 print preference Edit button.
Choose the variant of paper you wish to print on and press OK.
QuickBooks Online
Use black-colored ink while printing W2 for better clarity.
Ensure that you have all the QuickBooks Online payroll services active on your system.
Make sure that you are using blank paper to reprint the W2 form.
Perforated or Blank Paper
As per the IRS guidelines, you can print copies of your employee’s W2 forms on plain or perforated paper that your employees can easily separate. It also gives a professional and clean look to the forms. You can also get the preprinted forms directly from Intuit® or any authorized third-party vendor. To order W2 and other tax forms directly from Intuit®, follow the link to Intuit® Marketplace. Make sure to fill forms with a pen or typewriter, as the IRS does not accept forms filled by software.
Standard Office/Home Laser and Inkjet Blank Ink
IRS does not require you to print W2 forms using any particular type of ink or special kind of printer. You can print W2 forms in QuickBooks Online using regular ink used in an ordinary inkjet or laser printer. Make sure that the ink is non-reflective black ink. For more details, you can download the PDF published by the IRS on Paper and Ink Requirements by IRS
Once these requirements are considered, follow the next section to learn how to print W2/W3 forms in QuickBooks.
Effective Steps to Print W2 Form in QuickBooks Desktop
If you want to Reprint W2 in QuickBooks Desktop payroll, refer to the step-by-step guide given below –
Reprint W2 Form in QuickBooks Desktop Assisted Payroll
You can print the W2 and W3 forms in QuickBooks Desktop Assisted Payroll by performing the following steps –
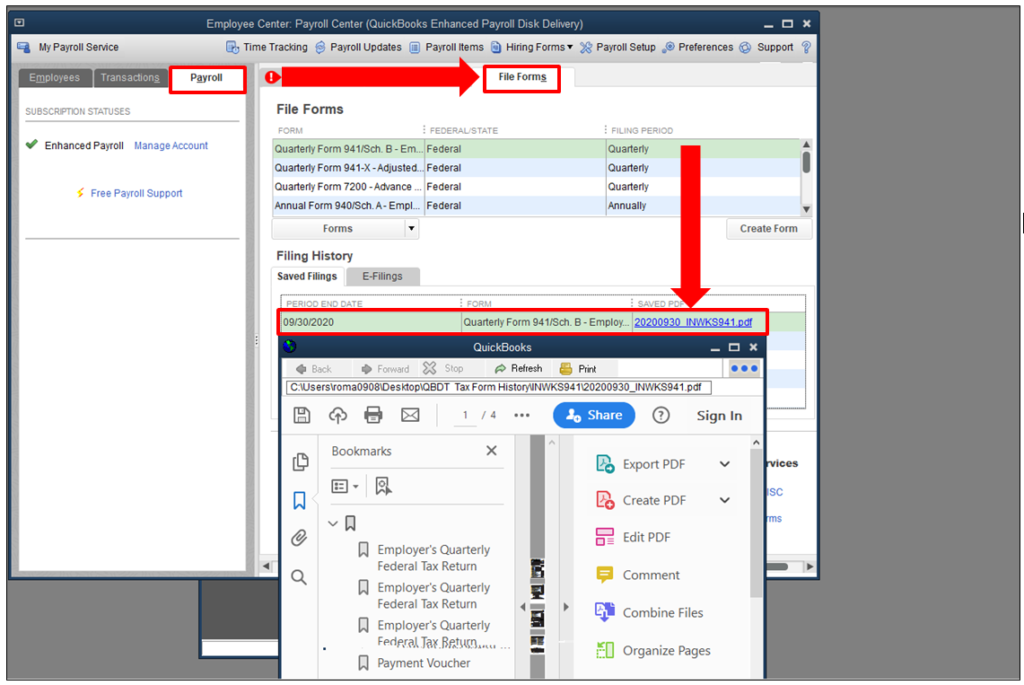
Open QuickBooks Payroll Tax Center.
Click Payroll Center under Employees
Under the File Forms tab, click View/Print forms & W2s.
Enter the PIN of your Payroll and click OK.
Click the W2 Page to see the list of employees (if you don’t find the list of employees, then click View/Print W-2 forms for all years)
Now click the names of your employees to view and print their W2 forms. (In case you are not able to open W2 form press and hold, Ctrl + Alt key when you click on Employee W2 form).
Now select View Reprints and make sure that forms have REISSUED STATEMENT watermark on them, which is added automatically when you click W2 forms.
Open forms with Adobe Reader and print them on perforated paper. (You can also print the form on a simple paper if you do not have perforated paper, but make sure to provide the W2 filling instructions form to your employees).
Note: If you are unable to view or print filed taxes PDF reports because of a pop-up blocker, then press and hold the Ctrl + Alt key together just after PTC launches and continue holding the keys until the PDF file opens.
What if You Print the W2 Form in QuickBooks Yourself?
From January 31st, if you opt to print and mail the forms by yourself, you can send the W2 form to the employees. After that, you must get the requirements ready, like purchasing the W2 paper, to ensure the forms are printed correctly.
After you have the print paper ready, continue printing the W2 & W3 form in QuickBooks Desktop for the previous/current year using the steps mentioned above.
QuickBooks Desktop Payroll Enhanced and Standard
If you wish to learn how to print W2/W3 in QuickBooks Desktop Payroll Enhanced and Standard, perform the steps below –
QuickBooks Desktop Payroll Enhanced and Standard
Go to the Employees dropdown menu, select Payroll Tax Forms & W-2s, and click Process Payroll Forms.
Select Annual Form W-2/W-3 – Wage and TaxStatement/ Transmittal from the File Forms tab, and click Create Form.
Now, select all or individual employees to file, then enter the year, and click OK.
Select all or individual employees to print and click Review/Edit to review each W2 separately. Note: The reviewed W2 forms will contain a checkmark in the Reviewed column.
Lastly, select Submit Form and go through the on-screen steps to print and file the forms.
Note: Since you’re reprinting the W2/W3 form because your employee lost it or didn’t receive the original form, write “REISSUED STATEMENT” on the top and add a copy of the W2 instructions.
After completing these detailed steps, you can print W2 and W3 successfully in QuickBooks Desktop.
Practical Steps to Print W2 and W3 Forms in QuickBooks Online
If your automated taxes and forms setting is turned off, you can print your W2s on or after January 1. However, if these settings are active, you can print your W2s on or after January 15. To print your W2/W3 forms in QuickBooks Online, follow the steps given below –
Print W2 and W3 Forms in QuickBooks Online
Print W2 and W3 Forms in QuickBooks Online
Print W2 and W3 Forms in QuickBooks Online
If the Automated Taxes and Forms are Turned On
If the automated taxes and forms are active, Intuit pays and files the forms for you from Jan 16 to Jan 31. You can reprint these W2/W3 forms on plain paper on or after Jan 13.
Prerequisite – Select the Paper for Printing W-2s under Payroll Preferences
Click the Gear icon at the top right corner and select Payroll Settings.
Click the Form Printing link under the Preferences option.
Choose the appropriated option (Plain or Perforated Paper), and click Okay.
Steps to Print W2s for the Current Year or 1 Year Prior
To print or Reprint W2 in QuickBooks for the current year or one year prior, perform the detailed steps given below –
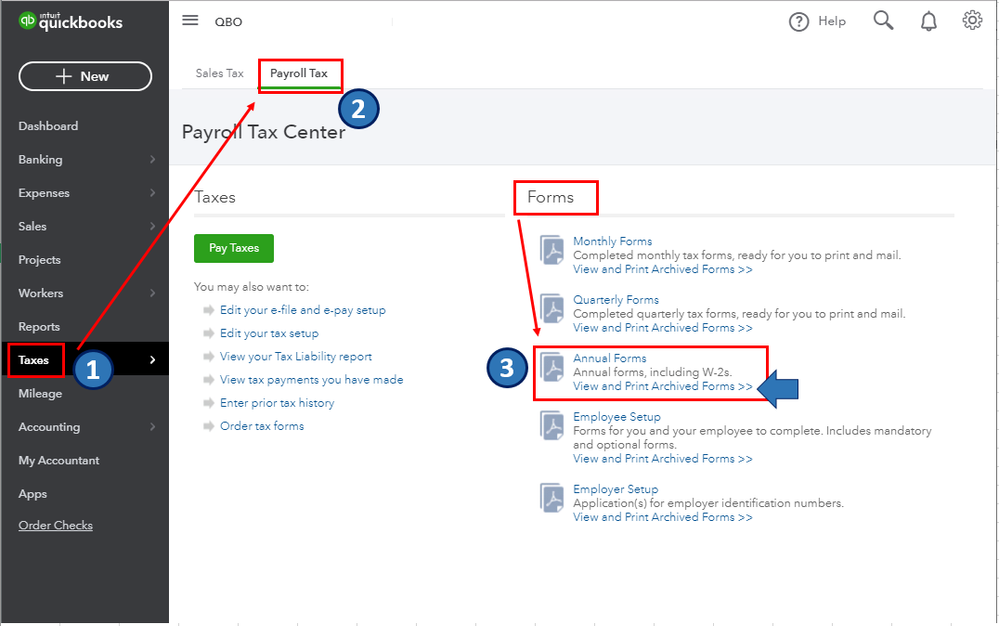
Click Taxes, then select Payroll Tax, and click Filings.
Select Resources, click W-2s, and review the employee list to check who opted for a printed copy.
Remember, W-2 forms won’t print for employees who selected the paperless mode; they can print the copy from QuickBooks Workforce. If you want to change the chosen paper type, select Change Setting and choose between Printed Copy or Paperless.
Further, click View or Manage on the copy you need from the following options –
W-3 Summary Transmittal of Wage and Tax Statements
W-2, Copies B, C & 2 (for employees)
W-2, Copies A & D (for employers)
Next, select View and Print, click the Print icon on the Adobe Reader toolbar, and select the Print option.
Note: Since you’re reprinting the W2 form because your employee lost it or didn’t receive the original copy, type/write “REISSUED STATEMENT” at the top and ensure to add a copy of the W2 instructions with it.
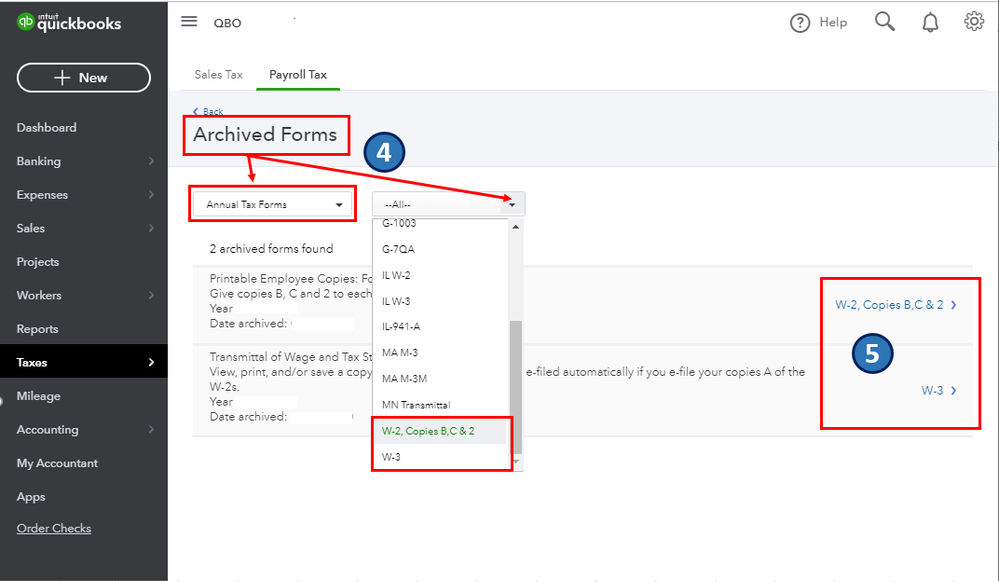
Steps to Print W2s for Previous Years
Implement the following steps to Reprint W2 in QuickBooks Online for previous years –
Click Taxes, then select Payroll Tax, and click the Filings option.
Select Resources, go to Archived Forms and Filings, and pick the date range you need.
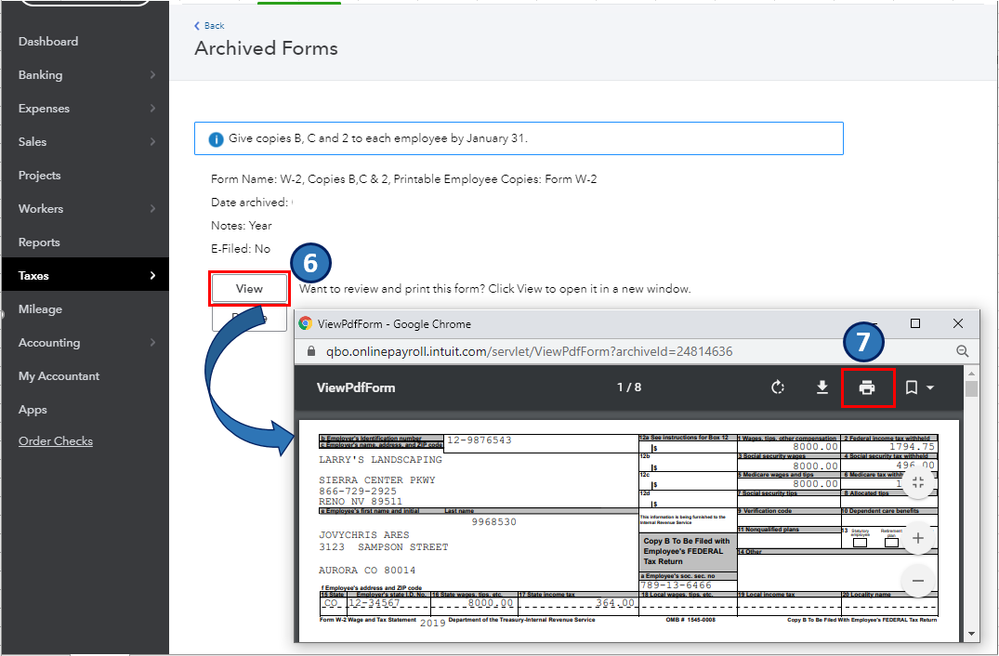
You can search for the required forms, then select View on the W2 or W3 form you want to print.
Lastly, select the Print icon on the Reader toolbar, then click Print to print the W2s.
If Automated Taxes and Forms are Turned Off
If the automated taxes and forms are turned off, you’ll have to print and mail the forms to your employees postmarked on or before Jan 31.
To print W2/W3 in QuickBooks Online when the settings are off, perform the same steps mentioned above in the “If Automated Taxes and Forms are Turned On”section.
Note: You must review your Form W-2 Print settings if the automated taxes and forms settings are turned off.
After the process ends, you will be able to reprint the W2 and W3 forms successfully in QBO.
Method to Customize Print W2 on Perforated Paper
In some cases, you might accidentally print a separate page for Copy 2. To avoid such a situation and prevent wastage of forms, follow these instructions to customize your printing –
In QuickBooks, navigate to the Archived Forms window and access the W-2 Forms for employees.
Press the View button and then tap on Print.
Click on the Pages menu, select Custom, and edit the number of pages you wish to print. Do not include the number of pages for a duplicate copy or Copy 2 of the forms.
Press the Print button, and this should successfully print the forms.
Conclusion
This guide will help you successfully Reprint W2 in QuickBooks Assisted Payroll and other versions. However, you might need outside assistance if you are getting any errors while printing the form because of improper security settings or popup blockers installed on your computer. You can contact Accounting Helpline Payroll Support at 1.855.738.2784 for help in reprinting W2 in QuickBooks in the shortest time possible.
FAQs
How can I access my W2 form from QuickBooks?
You can access your W2 form from QuickBooks by going to the Employees menu. Select Payroll Center, go to the File Forms tab, and select View/Print Forms & W2s. Then, you must enter your payroll PIN, and you will be able to see the form in the next window.
How can I find archived W2 forms in QuickBooks Online?
You can view an archived W2 form in QBO by using the following steps: – Go to the Taxes section, select Payroll Tax, and move to the Filings tab. – Select Archived Forms and Filings, then check all the listed archived forms to find the one you require. – Finally, click View, and you will see the archived W2 form.
What information is required to create W2 forms for employees?
The checklist for gathering information while creating W2 forms for employees in QuickBooks includes the following: – Employee’s full (legal) names. – Social Security Numbers. – Mailing addresses. – Total earnings. – Federal and state withholding amounts. – Employee’s local tax info and wages and taxes withheld. – Social security and Medicare wages. – Other plans, like dependent care benefits.
How can I view/print W2 forms with the QuickBooks Workforce app?
You can view/print your W2s using QuickBooks Workforce by implementing the following steps: – Firstly, click Taxes, then select More, and choose W-2s. – Now, click Download and select the W-2 form you want to view/print. Note: To choose a paperless print type, select Go Paperless from the “Ditch the snail mail!” section.
Edward Martin is a Technical Content Writer for our leading Accounting firm. He has over 10 years of experience in QuickBooks and Xero. He has also worked with Sage, FreshBooks, and many other software platforms. Edward’s passion for clarity, accuracy, and innovation is evident in his writing. He is well versed in how to simplify complex technical concepts and turn them into easy-to-understand content for our readers.