Last Updated on March 10, 2025
Are you trying to restore a QuickBooks backup file and are unable to do so? Don’t worry; below, we have provided a comprehensive guide that will help you restore a backup file quickly.
Creating backup files in QuickBooks is an essential aspect of accounting and bookkeeping operations on this safe, secure, and excellent platform. It helps users safeguard their critical data, ensuring it doesn’t get lost due to some unforeseen circumstance. The backup files are stored with the .QBB extension and are available for restoration whenever a user loses access to their primary company data (.QBW) or requires it to be verified. To help you with the same, we have created this entire blog with a simple restoration process to ensure there are no errors during its course.
Are you not sure how to restore the QuickBooks backup file? Clear all of your doubts by dialing Accounting Helpline team at 1.855.738.2784 and talking to the support staff anytime
How to Restore Company File in QuickBooks Desktop through Backup
QuickBooks backup file (.QBB) becomes the company file (.QBW) when you restore it. So, before you start to restore the backup file, ensure your file is on the local hard drive. It should not be on an external device like a USB or a Hosting Service like Box.

- Open QuickBooks and select the File
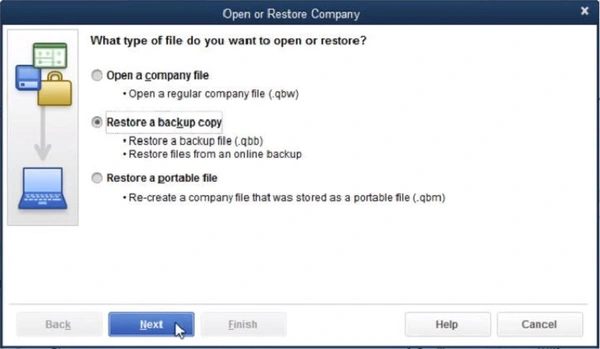
- Go to Open or Restore Company, select Restore a backup copy, and click on Next.
- Click on Local Backup and then select Next.
- Now, you need to browse your PC and look for the backup company file. You may see it like (Yourcompanyname.qbb). Please be aware: If you open the backup within the same folder as your current company file, there is a risk of overwriting your data. To prevent unintentional overwriting, consider renaming your existing company file or the backup, ensuring their names are distinct. Alternatively, you may think of storing the backup in an entirely separate folder.
- Once you are prepared, tap If any messages about the possible overwriting of your data appear, choose the best-fitting option. Ensure to not overwrite anything unless you wish to.
You can work from your new company file in QB now.
How to Restore QuickBooks Backup File in QuickBooks Desktop for Mac
The process of restoring QuickBooks backup files in QB Desktop for Mac is as follows:
Step 1: Browse to the Location of the Backup Company File
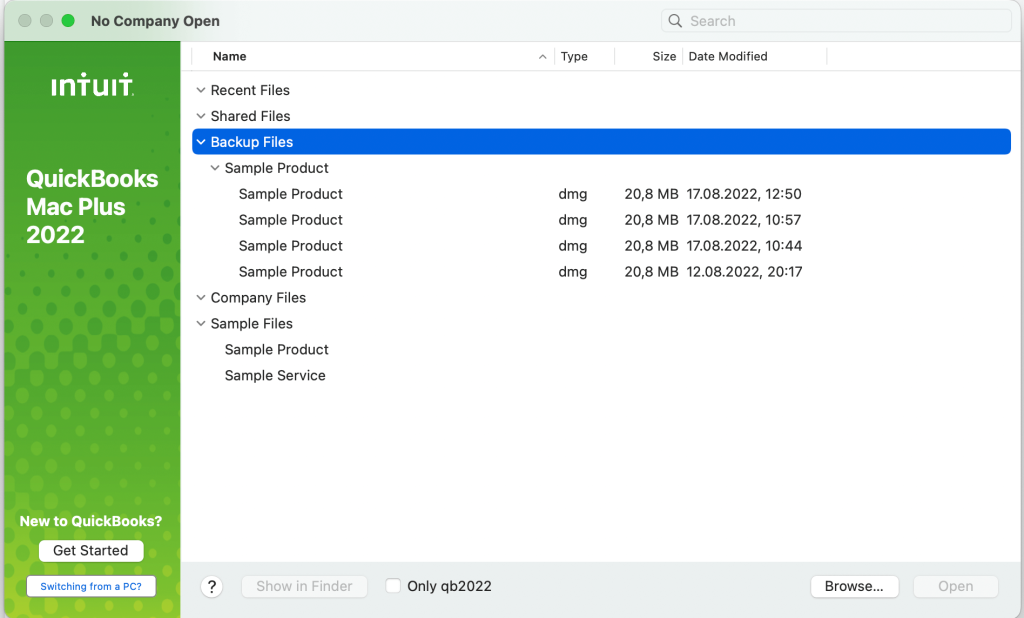
QuickBooks for Mac creates a DMG file when creating a backup. This file has a duplicate of your company file and additional documents, such as forms or PDFs, saved in QuickBooks.
If uncertain about the location of your backup company files, follow these steps to locate them:
- Access the QuickBooks menu and hit Settings.
- Tap Backup.
- Click on Reveal Backup Folder, then double-click the folder where backup files are stored.
- To view the most recent backup, use the Date Modified option for sorting.
It is crucial to note that the backup company file’s name indicates the year version of your QuickBooks. This simplifies the process of identifying the backup corresponding to your QuickBooks version. For instance, if using QuickBooks for Mac 2022, your backup company file should be named “Your business name.qb2022.”
Step 2: Restore the Backup Company File for Mac
After locating your backup file, follow these steps to restore it in QuickBooks for Mac:

- Double-click the backup file to open a new window displaying a copy of your company file. If there are attached documents, you’ll also see a folder named Attachments Library.
- Drag the copy of your company file to the folder where you store your QuickBooks company. If there’s an Attachments Library folder, drag it to the same location.
Tip: If you have an existing company file and want to avoid overwriting it, consider moving the backup copy to a separate folder. - Access QuickBooks for Mac.
- Select Browse, navigate to the folder where you saved the company file copy, choose the company file, and click Open.
- A prompt will inform you that you’re opening a backup file. Hit Continue.
- Provide a name for the company file and click Save.
- Select OK to complete the restoration process.
Step 3: Restore Attached Documents
If you relocated your Attachments Library folder and wish to restore it for use with your attached documents in QuickBooks, follow these steps:
- From the QuickBooks menu, hit Settings, then select Attachments.
- In the Attached library dropdown menu, choose Select Existing.
- Locate and select the Attached library folder that you moved earlier, then click Open.
- Close the Preferences window to complete the restoration process.
How to Restore QuickBooks Backup File in QB Desktop Point of Sale
A backup serves as a compressed copy of your data stored outside the company data folder. Before accessing it in QuickBooks Desktop Point of Sale, it needs to be decompressed (restored).

Note: Restoring a file to a name already in a default folder will replace the existing data in that file.
Follow these steps:
- From the File menu, choose Company Operations.
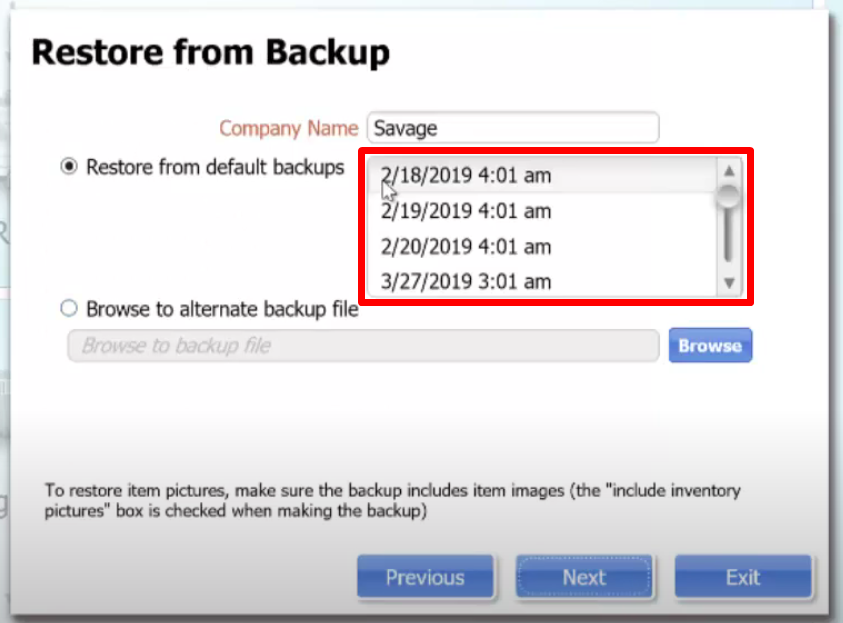
- In the Start Company window, hit Restore from Backup, then click Next.
- Input a filename in the Company Name
- Specify the location to restore from:
- Hit Restore from default backups to restore from a default folder.
- Click Browse to alternate backup file to restore from a network or removable drive.
- Click Next and then Close.
QuickBooks Desktop Point of Sale will decompress and copy the backup files into your working directory. If needed, you will be prompted to insert sequential restore disks.
To test the backup and restore functions:
- Follow the steps to create a backup copy of your QuickBooks Online company file.
- Create a new customer in your data file using a fictitious name like John Doe.
- From the File menu, hit Restore Backup File.
- Select the backup you created in step 1, identifying it by date and time.
- Click OK, confirm with YES, and then tap OK
- Click OK when the restore process completes.
- Locate the customer created in step 2.
If you don’t find the customer name in this file, the backup and restore processes are functioning as expected. This is because you added the customer after saving the backup.
How to Restore a Backup in QuickBooks Online Advanced Company
If you have QuickBooks Online Advanced company, restoring the backup is a seamless process through the Online Backup and Restore App for your data. You need to turn it on to automatically back up your data. After it’s over, it can track any changes to your company data. Then, the backup data can be restored to any point in time:
- Access Settings.
- Choose Back Up Company.
Note: You may have to sign into your Intuit account, and then click Authorize to proceed.
Things that won’t Restore
During the restoration of a backup, note that the following components cannot be restored:
- Budgets: Export them as a CSV file before restoring.
- Inventory: The restoration does not include inventory history and inventory adjustments.
- Tax Rates using Expense Accounts: The Online Backup and Restore app restores tax rates associated with expense accounts into your liability accounts.
- Data backed up using the Local Backup feature: Data saved in .cab format on personal cloud accounts such as Google Drive or Dropbox cannot be restored using the local backup feature. The restoration of data from a local backup is currently not supported.
Restoring the QB Online Advanced Company Backup
Use the QB Online Advanced Company backup to restore your data to a specific date and time. While it may take up to an hour for the restoration process, it often completes much faster, especially for companies with minimal data.
Crucial Note: Avoid making any changes to your company while the Online Backup & Restore app is restoring your data. Once the restoration is complete, a checkmark in the status will indicate that it’s safe to resume using your company.
Follow these steps:
- Navigate to Settings, then hit Back up company. Note: You may need to sign in with your Intuit account and select Authorize to proceed.
- Locate the company for which you want to restore a backup.
- Hit Restore from the Action dropdown list.
- In the Date field, tap the date you wish to restore.
- In the Time dropdown list, choose the specific time for the restoration.
- In the “Ready to restore your backup?” section, enter “AGREE.”
- Select Next. If there is a list of recommended actions, complete them first. Once done, click Refresh to continue.
- Click on Start Restore.
How to Restore Files with Intuit Data Protect
Intuit Data Protect helps backup and restore files from one PC to another. Set it up on your new PC and start the restore process through it. The files to transfer and restore through IDP are as follows:
Files within QuickBooks data folder:
- Logos and images files
- Business Planner (.bpw) files (only QuickBooks Desktop Premier and Enterprise)
- Transaction log (.tlg) files
- Cash Flow Projector (.cfp) files
- Network data (.nd) files
- Loan Manager (.lmr) files
Files (and add-ons) from other places:
- QuickBooks Statement Writer (only Premier Accountant and Enterprise)
- QuickBooks letters and templates
- Fixed Asset Manager
- Spell checker
- Printer settings (QB can recreate these files)
Bottom Line
At this point, we would like to end our blog on how to restore a QuickBooks backup file. We hope that the content written in this post will answer all your queries. However, if it misses any question, call on the toll-free number 1.855.738.2784 and get immediate assistance from the Accounting Helpline Support team.
FAQ’s
Why does one restore their data from the QuickBooks backup file?
Restoring the data from the QuickBooks backup file becomes critical if you have lost your data due to damage, corruption, theft, virus, or other reasons. Further, if you wish to undo the latest changes in your company file or your computer crashes, you may need to restore your accounting data.
Can I restore QuickBooks Online backup files to a previous point in time?
QuickBooks Online takes care of automatic backups, ensuring your data is backed up securely using the same level of protection employed by banks and financial institutions.
Here’s how QB Online ensures the safety and security of your data:
1. Whenever changes are made to your company file, your data is simultaneously saved to two hard drives.
2. Periodically, QBO copies all data to a third-party hard drive, providing an additional layer of protection. This ensures your data is safeguarded in the event of any issues with the first two hard drives.
3. Automatic backups are performed every night, enhancing the regularity and consistency of your data protection.
However, due to the continuous updating of your records with each change, QBO cannot restore your files to a previous point in time. However, this comprehensive backup system is designed to offer optimal security and peace of mind for your QuickBooks Online data.
Is the backup and restore accessible by only the primary admin or both primary and company admins at the same time?
Certainly, the primary administrators of the account have continuous access to the backup copy. In cases where the primary contact admin and the company admin are separate individuals, both have the capability to view the data simultaneously on Google Drive or Dropbox.
For optimal restoration of backup data into the online account, it is recommended to ensure that all users are signed out from the program. This precautionary measure ensures that the file won’t be overwritten during the restoration process, allowing recent changes to seamlessly integrate.

Edward Martin is a Technical Content Writer for our leading Accounting firm. He has over 10 years of experience in QuickBooks and Xero. He has also worked with Sage, FreshBooks, and many other software platforms. Edward’s passion for clarity, accuracy, and innovation is evident in his writing. He is well versed in how to simplify complex technical concepts and turn them into easy-to-understand content for our readers.

