Last Updated on April 17, 2026
To move QuickBooks to another computer is a great deal, especially when you have loads of crucial data on your storage. You may have to move from one computer to another for any reason. However, encountering issues while transferring, like the screen turning grey, can cause panic and fear among users regarding their data safety. That is why we have curated this blog to inform you about the seamless procedure that let you move QuickBooks to another computer.
There could be several reasons you might want to move your QuickBooks Desktop application to a different computer along with the license, and in this article, we are going to discuss the whole process in details. Know the answer to ‘can you transfer QuickBooks from one computer to another’. The process of transferring the QuickBooks Desktop application to a different computer is not complex unless you know the right method and follow the correct instructions. Further, in this article, know the answer to the query ‘can you install QuickBooks on multiple computers.’ You will find the requirements and step-by-step instructions for installing QuickBooks on a different computer. Along with this, you will also find the additional steps you need to take after you move QuickBooks to new computer.
Has moving QuickBooks Desktop to another computer become a trouble-prone procedure? Reach out to the Accounting Helpline Specialists at the Desktop Support Number 1.855.738.2784 and Get Help from an Expert Transferring QuickBooks Desktop to a Different Computer seamlessly.
What does moving QuickBooks to Another Computer Entail?
While considering how to move QuickBooks to a new computer, you are essentially looking to transfer usage of the QB application from one device to another. It usually happens when you face troubles with the existing device, like inadequate space, incompatibility between systems, expanded needs, etc. Get answers to can I move QuickBooks from one computer to another. Whatever the reason, it’s always wise to invest in a seamless migration tool to transfer your content.
There are other methods for you to access QuickBooks from another computer. Let us uncover each of them in detail and analyze the steps you can perform for the successful execution of the same.
Ways to transfer QuickBooks to another Computer
If you are wondering how can I have QuickBooks desktop on two computers, here’s what you need to know about the same. You can install QB Desktop on your two computers with the same product key and versions and set up the multi-user mode for file access and sharing.
Understand can I transfer QuickBooks from one computer to another? Further, when the multi-user setup can’t get configured, you’ll have to back up and restore from one computer to another. Since it can be a hassle-full process, you might want to consider third-party sources. However, if synchronizing transactions between the two is not an issue, the answer to whether can I install QuickBooks on my desktop and laptop is affirmative. A single license enables using QB on two devices.
Now, let’s focus on the methods you can use to install QuickBooks desktop on new computer:
- You can use a Migrator Tool to transfer from one computer to another.
- You can try manual methods to move QuickBooks desktop to another computer.
You May Also Like To Read – Fix QBDBMgrN Not Running
Move QuickBooks Desktop to a New Computer Greyed Out! Let’s Fix it
If you notice that the option to move your QuickBooks Desktop to a new computer is greyed out, you can follow the instructions below and reactivate the option for quick data migration.
- Make sure that the flash drive you use to move your QuickBooks Desktop has files from a 64-bit operating system. If you try to transfer files from a 32-bit operating system to a 64-bit system, the QuickBooks migrator tool will stop responding, and the option to move QuickBooks Desktop will be greyed out.
- Ensure enough free space to hold all the files you need to move to the new system.
- If you are trying to move your QuickBooks Desktop over the network, install QuickBooks Database Server Manager first on the new and the old system.
Requirements of Moving QuickBooks Desktop to a Different Computer
Before starting the process of moving QuickBooks to a new computer, make sure to have the following things ready:
- Make sure to install QuickBooks on new computer with an internet connection, as you will need to register the product after the installation.
- You will need an external storage device to move your QuickBooks Desktop files (For example, a USB storage device or an external hard disk).
- License and Product registration information when you move QuickBooks license to another computer.
- QuickBooks Desktop installation disk or the setup file on an external storage device. Analyze if you have got the answer to your query, ‘can I transfer QuickBooks to a new computer’.
- Remove QuickBooks Desktop from the first computer.
- Make sure to take a backup of your QuickBooks company file before moving QuickBooks to another computer.
Using QuickBooks Migrator Tool to Transfer QuickBooks to a Different Computer
Here’s how you can utilize the QuickBooks migrator tool when moving QuickBooks desktop to a new computer:
Firstly, you need to run the migrator tool as a company admin. If you’re using the US version of QB Desktop 2018 or any latest version as a single user, you can use the migrator tool to move QuickBooks from one computer to another and up to three company files.
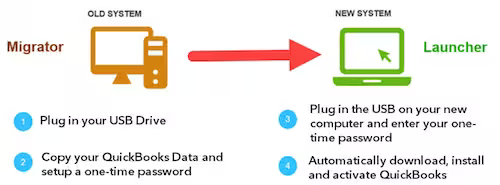
Working on the Migrator Tool
Here’s a brief understanding of how do I install my QuickBooks on a new computer through the migrator tool and its functioning:
- You begin by plugging the USB into the old system, which is known as the migrator. Realize can I use QuickBooks desktop on more than one computer. You copy your QB data and create a strong one-time password. Then, your plugin the same USB to a new computer and enter the created OTP. The new system and the launcher will automatically download, install, and activates QuickBooks Desktop program. This answers, “can I install QuickBooks Pro on two computers?”
- The one-time password you create should be unique and complex. It is necessary to unlock everything copied on the new computer. Therefore, note it somewhere safe once you set it up so you don’t forget it. The password will be needed only once to use the migrator tool to move QuickBooks license to new computer.
- The last three opened company files and supporting company files get copied to the USB Flash Drive.
- The USB Flash drive helps move the files, but the Migrator Tool handles the technical work of transferring QuickBooks to a new computer.
- You can download the correct QuickBooks Desktop version with the tool to your new computer and set up your files.
- Your drive won’t get reformatted with the tool. Neither will any of your files get erased. Learn how do I move my QuickBooks to a new computer.
- If your USB contains files from 64-bit QuickBooks Desktop 2022 or 2023, you may face interruptions in working the migrator tool in 32-bit Windows OS. You can migrate 64-bit files only from one 64-bit Operating system to another. Check how do I transfer my QuickBooks to a new computer.
Things needed while using the migrator tool-
When considering QuickBooks transfer to new computer, you’ll need the following things:
- Your new computer must have an active internet connection.
- You require a USB flash drive with adequate space to hold all the company files for QuickBooks move to new computer. You’ll know how much space you need through the migrator tool. Usually, it stays between 150 to 200 MB.
You May Also Like To Read – How to Fix QuickBooks Error 1603
Setup and using the Migrating Tool
Here are the steps you need to perform while you learn how to install QuickBooks desktop on a new computer:
Steps to Perform on Old Computer
- Make sure to sign in as an administrator on your computer.
- Plugin the USB drive into the computer when you learn how to access QuickBooks from another computer.
- Open QuickBooks Desktop and from under the File tab click Move QuickBooks to another Computer.
- Click I’m Ready and choose a strong password.
- Now select the USB drive to copy all the files that need to be moved to the other computer.
- Wait until the file copy process completes, and then safely remove the USB drive from the computer to transfer QuickBooks desktop to new computer.
Perform on New Computer
- Insert the USB drive and wait until the QuickBooks Migrator tool automatically appear. If it doesn’t open due to Windows security restrictions, then open the flash drive to view the files. Click the Move_QuickBooks.bat file from the USB drive to let QuickBooks migrate to new computer.
- Now enter the password you set up while moving files on the old computer.
- Click Let’s go and wait for the tool to complete the QuickBooks migration task.
- It might take a while if your computer’s performance is low. The time for QuickBooks move to another computer depends on the internet and computer speed, accompanied by the file size. If the migrator doesn’t open after choosing and running the file, you’ll have to update your Windows version.
- After the installation, open QuickBooks, and from under the Help tab, click Register QuickBooks.
- Enter all the required information for the registration, like phone number, postal code, and license key, and register the product.
- Once you’re done installing QuickBooks on a new computer, the migrator tool automatically removes your QuickBooks files from the flash drive. Your old computer will still possess your QuickBooks files. You can change the file names on the old computer to avoid confusion and using the wrong file.
Steps to follow after Moving QuickBooks to the Other Computer
- In order to use all the feature of QuickBooks Desktop like Payroll and Intuit® Data Protect you will need to sign in into each service separately. When you wonder how do I transfer QuickBooks from one computer to another, sign into your payroll and payment services. Intuit Data Protect lets you set up your backup schedule.
- If you have more than one company file, copy the other files to the new computer using an external storage device while you move QuickBooks to a new computer.
- Make sure to create a backup of your company file data on the new computer.
Things that get copied in the Migrator tool:
It’s crucial to know that when you install QuickBooks on new computer without disk and use the migrator tool, you can’t copy everything exactly. There are some things that will be left behind while you attempt to emulate. Mostly everything gets copied, and nothing gets deleted from the old computer. So the new computer gets up and running with the following tools while you learn how do I transfer QuickBooks to a new computer:
- Spell Checker (spell.ini and UserDictionary.tlx)
- QuickBooks Desktop details, including the version of the software and other information required to install QB Desktop on your new system.
- Business Planner (.bpw)
- QuickBooks letters and templates
- Scheduled and memorized reports
- Printer Setting (PrintEng.ini, wpr.ini, and QBPrint.qbp)
- Advanced reports (for QuickBooks Enterprise)
- Financial Statement Designer (FSD clients)
- Related files, custom templates & forms
- Financial Statement Designer (FSD data)
- Cash Flow Projector (.cfp)
- Local attachments
- Loan Manager (.lmr)
- Statement writer (for QuickBooks Accountant)
- Recent company files- at least the last three company files that you were working on the old computer, including sample files
However, the following tools don’t get copied when you learn how to transfer QuickBooks desktop to another computer:
- Multi-user setup– If you have configured multi-user settings in your QuickBooks Desktop version on the previous computer, they won’t get copied in the new one. You’ll have to set up the connections and hosting again.
- Payroll and payment setup- Because of the data protection policies of QuickBooks, while you learn how to transfer my QuickBooks to a new computer, you will have to enter and sign in to the payment and payroll services again.
- Intuit Data Protect- You’ll have to log out and uninstall this facility on the old computer and install and open it on the new computer. Go through the setup procedure again, and you’ll find the previous backups still available.
- Older company files- Company files older than the three recently opened won’t get copied. While learning how to transfer QB desktop to another computer, you’ll have to move them manually.
- Backup files- Manual backups that you created won’t get copied.
Manually moving or reinstalling QB Desktop without the Migrator Tool
If you want to know how do I install QuickBooks on a second computer, reinstall or move the QB Desktop installation as follows:
- Begin by extracting your product and license information from the old computer’s QB Desktop. Open the QB Desktop app, press F2 or Ctrl + 1 on the keyboard, and note the product and license information available from the Product information window.
- Next, uninstall the existing QuickBooks application in the system if you are trying to learn how to install QuickBooks desktop on second computer.
- Download the QuickBooks installation files or use a CD to get the installation files in the system where you want the second QB Desktop.
- Now, finish the installation as you usually would by following the prompts and accepting all the terms and conditions.
Frequently asked questions while you reinstall or move an existing installation
Here we have addressed a few common questions about reinstallation or moving an existing installation while you learn how to download QuickBooks desktop to a new computer.
What if I don’t have my installation CD?
If you possess your license and product number but do not have the installation files or a CD, get yourself the installation package from official Intuit sources online. Download the files in your system and save them in accessible locations to transfer QuickBooks from one computer to another.
Can you log into QuickBooks on different computers?
Yes, you can log into QuickBooks on different computers with a single license and product number. See how to move QuickBooks from one computer to another. However, the multi-user setup won’t be configured, and you’ll have to set everything manually.
Is it crucial it register QuickBooks after removing or reinstalling it?
Reinstallation prompts QB users to undertake registration again when they transfer QuickBooks license from one computer to another. It can happen as follows:
- Visit the Help menu and hit the Register QuickBooks option to begin the procedure.
- Once your information is entered, Intuit verifies and decides the registration status of your QuickBooks copy and records the information for the new computer. Check how to move QuickBooks to another computer.
What happens to the company files after reinstallation?
Your QB company files don’t get moved when you transfer QuickBooks to another computer. Instead, you’ll have to perform this task separately. Also, reinstalling QB over an existing installation doesn’t affect the existing files. The reinstalled copy of QuickBooks can open the existing company files without hassle.
Manually moving your files to a new computer
The following section covers how do you transfer QuickBooks from one computer to another. These steps will help you move your files from one folder to another on the same computer, on and off your network, or to another computer.

The requirement to transfer QuickBooks to new computer Mac arises from specific reasons like troubleshooting or moving the accounting data to a new computer. The easiest way to achieve this is by creating and restoring a backup company file. It will save your data and supporting files.
Another option is to simply copy and paste your entire QB folder to a new location to transfer QuickBooks license to new computer. You can use the QuickBooks Migrator Tool when you do not host multi-user files and are in a single-user mode.
Otherwise, the following steps will reign to help you transfer QuickBooks to new computer:
Move your company file to another computer
When you undertake how to use QuickBooks desktop on two computers, you must know that moving your company files to another computer doesn’t affect your product license. The steps to undertake these actions involve the following:
- Begin by installing QuickBooks Desktop on your new computer.
- Now, you need to create a backup of your company file on the original computer. It involves the following steps:
- Open QuickBooks and move to the File menu. From here, switch to the single-user mode. See how to transfer my desktop to another computer.
- You can schedule automatic or manual backups. The steps for the latter involve going to the File menu.
- Choose the Backup company option, followed by Create Local Backup when you attempt to learn how to put QuickBooks on another computer.
- In the following window, choose Local Backup, followed by Next.
- When you reach the local Backup Only section, choose the Browse option. Now, select the location where you wish to save the backup file.
- Set the number of backups you wish to maintain and ensure the backup file is in good shape before use. Learn how to transfer QuickBooks desktop to a new computer.
- Choose OK > Save it now > Next.
- You’ll receive a confirmation message when the backup gets created.
- When creating the backup file while learning how to add QuickBooks to another computer, save it with a unique name for straightforward identification and to prevent accidental overwriting.
- Now, ensure to save the backup file in an easily accessible location.
- It’s time to attempt to answer how do you move QuickBooks from one computer to another by moving the backup file to the new computer.
- Put the backup file either on a flash drive or an external device. You can also share it if your new computer is on the same network.
Restore the backup of your file
- Next, you need to undertake steps to restore the backup of your company file.
- It involves going to the File menu to undertake how to add QuickBooks to a second computer.
- Choose the Open or Restore Company option.
- Select Restore a backup copy, followed by Next.
- Choose Local Backup, then Next while implementing how to transfer QuickBooks from one computer to another.
- Browse the computer for your backup company file, which would look like (yourcompanyfilename).qbb.
- Next, find a folder to save the restored company file. Choose Open while you attempt to implement how to install QuickBooks on a new computer.
- After you’re ready, choose Save. If any options regarding overwriting appear on your screen, choose the best fit of them all. Ensure not to overwrite anything unnecessarily. Now, you can begin working from a new file while you implement how to transfer QuickBooks online to desktop.
- While restoring the backup, ensure to give the file a unique name.
- If you also use payroll, you need to download the latest tax tables after you implement how to migrate QuickBooks desktop to another computer.
Read Also – How To Fix QuickBooks Migration Failed Unexpectedly
Move the company file to another location on the same computer
You can learn how to transfer QuickBooks to a new computer and move the company file to another location on the same computer as follows:
- You need to begin by following the steps to create the backup of your company file.
- After creating the backup, make sure to keep a unique file name for easy access and to prevent accidental overwriting.
- Next, while you learn how to install QuickBooks on a second computer, save the backup somewhere easily accessible. You also need to note that if your company file is hosted over a network, you need to save the backup on the computer’s local hard drive. It is suggested not to save it on the network.
- Finally, follow the steps to restore the backup of your files to the new location while you implement how to install QuickBooks on another computer. Keep the filename unique.
After restoring the backup, use it as your new main company file. It is also recommended to change the name of the original company file. Know not to use it anymore by adding old to it. Thus, follow all these steps when you implement how to install QuickBooks on laptop.
Move your entire QuickBooks Data Folder
If you don’t wish to create a backup company file, simply move your entire QuickBooks folder as an alternative. The steps involved in learning how to transfer QuickBooks to new computer:
- Launch the QB app and the file you wish to move.
- Hit F2 or Ctrl + 1 to access the Product Information Window.
- Move to the file information section and know where your company file is saved on the hard drive. Consider QuickBooks how many computers can open.
- Now, go to the Start menu and access File Explorer.
- Locate the folder with your company file.
- Right-click the folder and choose the Copy option.
- Open an external device where you can move the files. Launch the new location on the hard drive and hit the Paste option.
Now, you have an entire copy of the folder. The next steps in how to load QuickBooks on a new computer involve launching QB and selecting the Open or Restore an existing company option. Browse the computer for the copied file and open it.
There are certain difficulties you might face after moving QuickBooks to the other computer, as the migration process does not transfer all the QuickBooks data. If you have successfully transferred your QuickBooks Desktop to a new computer and now you are dealing with errors or any difficulties then get in touch with us at our Desktop Helpline Number 1.855.738.2784 for assistance.
FAQ
How to restore with Intuit Data Protect?
While learning how to migrate QuickBooks to a new computer, use Intuit Data Protect to get the backup of your files. The steps involve:
1. Create a backup of your company file on the original computer.
2. Sign in to IDP on your new computer.
3. Follow the steps to restore backup files with IDP.
This is how to move QuickBooks desktop to a new computer.
Can I use QuickBooks on two computers?
Yes, you can use QB on two computers.
Can QuickBooks desktop be used on multiple computers?
Yes

Edward Martin is a Technical Content Writer for our leading Accounting firm. He has over 10 years of experience in QuickBooks and Xero. He has also worked with Sage, FreshBooks, and many other software platforms. Edward’s passion for clarity, accuracy, and innovation is evident in his writing. He is well versed in how to simplify complex technical concepts and turn them into easy-to-understand content for our readers.