
Last Updated on April 17, 2026
QuickBooks connection has been lost error message can interrupt a user while working on the application. This interference can lead to significant difficulties in opening the company file and using the app correctly. If this error challenges you, study this guide till the end for complete resolution.
QuickBooks software tries to keep up with the user demands and ensures a smooth experience of working with complex business data. Accessing the company file is critical, but errors like listing QB connections can impede the system. Additionally, the complete QB upgrade process needs a proper procedure, and many times users have reported the QuickBooks Connection Has Been Lost issue. In this blog, we walk you through the steps to get the QuickBooks Connection Has Been Lost error fixed with easy steps.
Is your QuickBooks connection lost? Are you unable to update your application and access your company file? Reach out to our Accounting Helpline specialists at the Helpline Number 1.855.738.2784 and avail of professional resolutions.
What is Meant by the QuickBooks Connection has been Lost Issue?
While trying to open and use QuickBooks Desktop, users can encounter an error accessing the company file. The error is connection has been lost QuickBooks and appears with the following message:
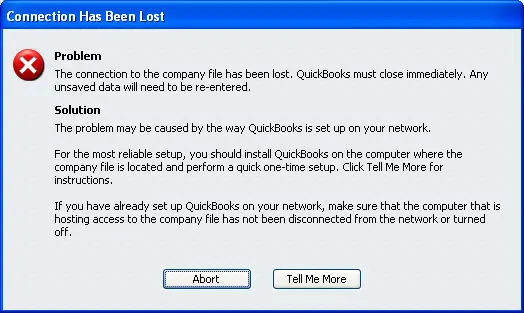
“The connection to the company file has been lost. QuickBooks must close immediately. Any unsaved data will need to be re-entered.”
This description states that opening the company file is challenging due to network connectivity errors. Users can apply some quick tips to rectify the issue. These include:
- Start the Database Server Manager again
- Transfer the file to another folder
- Shift the Power Saving option to Never
Inaccurate folder permissions, internet settings in Windows, and firewall configuration may produce the following errors when launching company file in Windows:
- -6000, -80
- Server Busy
- -6000, -77
- The file you specified cannot be opened make sure that it is not currently being used by another program or a read-only file. The Windows error was: The system cannot find the path specified
- -6176, 0
Other immediate tips when you use a standalone computer and encounter QuickBooks abort lost connection are as follows:
- Offer additional permissions to the folder where the file is saved.
- Check for corruption in QB Files.
- Third-party products and services through an antivirus firewall may restrict QuickBooks connectivity, which you need to fix.
Reasons Why QuickBooks Connection Has Been Lost
You may notice the QuickBooks connections has been lost error message due to the following reasons:
- Your internet connectivity may be poor.
- You might need additional permissions for the folder to save and access your file. Not having these permissions can lead to this error.
- The antivirus firewall and its third-party products and services can attract this error.
- The non-wired network connection might be unstable.
- Power saving mode might be enabled, causing this error to emerge.
- Corrupted QuickBooks files are also a reason the QuickBooks connection has been lost.
- An outdated QuickBooks application is another contributor to the error.
- Having more than one system on the network configured to host the company file may lead to this error.
- You may see this error if your company file is stored on an external portable device.
- Multiple systems with multi-user mode enabled may lead to this error.
Seeing this error can cause considerable trouble. So, let’s understand how to eliminate this issue effectively by removing the root triggers.
How to Face the “QuickBooks Connection to Server has been Lost” Error?
Here are the solutions you need to implement to resolve QuickBooks 2023 connection has been lost error:
If you notice the following symptoms in your QuickBooks program or computer device, you have encountered the connection issues –
- Inability to open and operate the company data file.
- A similar error has occurred in the device previously.
- The server will be unable to connect with the workstation.
- You might be unable to create or delete a non-QuickBooks file or folder.
- Instability arises in the device when using a wireless connection.
- If the system crashes or freezes all of a sudden.
- The QBWUSER.INI file might get damaged.
- “The connection to the company file has been lost in QuickBooks” error message might flash on the screen.
- You may encounter a Windows error or a similar problem while running other applications.
- Both server and host systems may face these problems.
- Computer connections might be full of hassles, including cables, routers, protocols, etc.
If you’re encountering these signs, you need to undertake troubleshooting methods to eliminate the issue correctly. The below section details expert-recommended solutions to help you fix the problem.
How to Tackle the “QuickBooks Connection to Server has been Lost” Error
Here are the solutions you need to implement to resolve QuickBooks 2023 connection has been lost error:
Method 1: Restart QuickBooks
The most simple quick fix to the “QuickBooks Connection to Server has been Lost” error is sometimes just simply closing and opening the QuickBooks.
Method 2: Restart the System
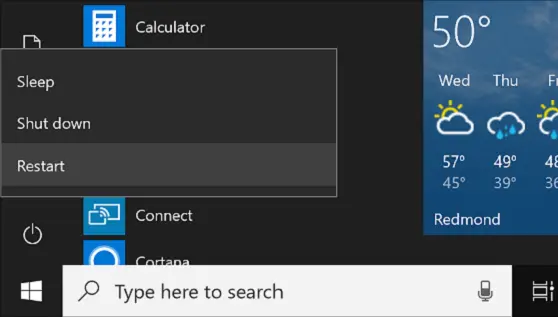
Sometimes the application update does not come to effect until you restart the computer. So make sure to restart the Windows after installing the updates.
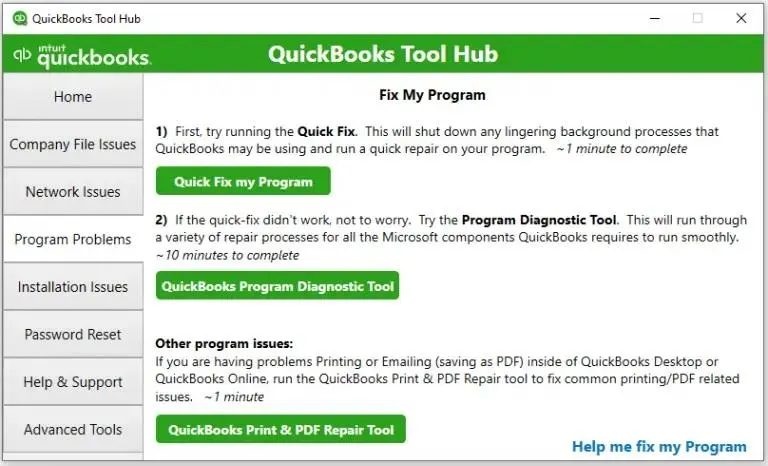
Method 3: Use Quick Fix My Program Tool for General QuickBooks Errors
Quick Fix My Program tool helps counter general errors and glitches that lead to errors like “QuickBooks Connection Has Been Lost.” Before running the tool, make sure to exit QuickBooks.
- Download QuickBooks Tool Hub by clicking the link HERE.
- Save the Tool Hub installer file to a location where you can easily find it post download.
- Once downloaded, go to the download folder and double-click the QuickBooksToolHub.exe file to begin the installation.
- When prompted, agree to the terms and conditions and follow the on-screen instructions to complete the installation.
- Run QuickBooks Tool Hub using the desktop icon, go to the Program Problems tab, and select Quick Fix My Program tool.
- Let the tool run and repair QuickBooks.
Method 4: Run QuickBooks File Doctor for Issues with the Company File
In rare circumstances, connection errors in QuickBooks can be a result of damage in the company file. Follow the instructions below to run QuickBooks File Doctor to fix issues with the company file.
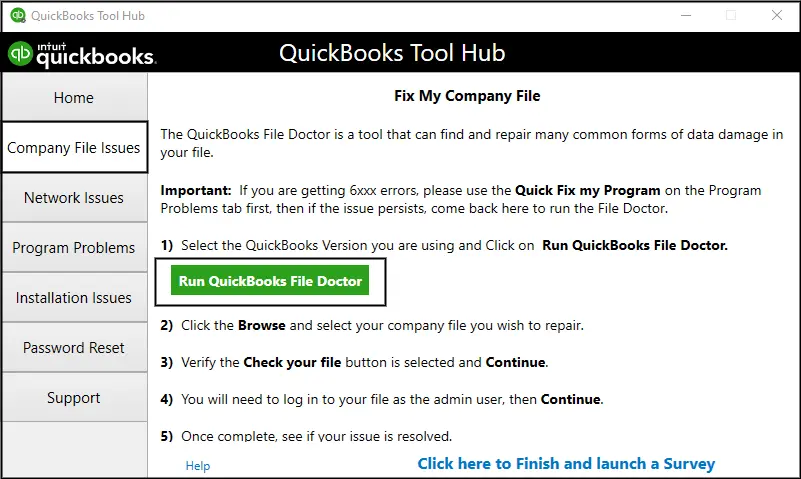
- Re-run QuickBooks Tool Hub and click the Company File Issues tab.
- Select QuickBooks File Doctor and choose the options to repair the company file.
- See the results and outline the following steps:
- If the No problem detected in your company file message emerges on the screen, click OK.
- If the error keeps arising, use the Verify and Rebuild Data utilities.
- When data damage is detected by the tool, the following steps can help:
- Undertake the file repair and see if the tool fixes your file.
- You should restore the recently backed-up company files.
- Use QB Auto Data Recovery to recover the lost files.
- Allow QuickBooks Technical Experts to eliminate your problems.
- Once the file is repaired, try to access it on the local machine or server to check if the error is resolved.
Method 5: Host Multi-user Access
Ensure that your server is running in Multi-User mode and workstation in Single-User mode.
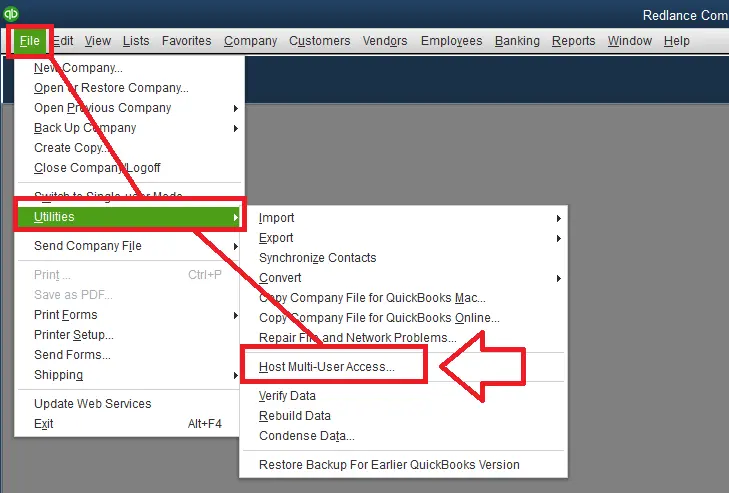
- On the workstations apart from the hosting computer, click on the File menu and select Utilities.
- Check if Host Multi-User Access is present on the list.
- The workstations that display Stop Hosting Multi-User Access click on it to disable it.
Method 6: Check the Portable drive
Usually, it is advised to store your company file on the local drive. You should not work on the file while it is on a portable device, like a USB drive or external hard disk. However, follow this method at your risk, if you decide to do so.
When you have your company file stored on an external storage device, it is crucial to verify that the drive is connected correctly and functioning. There are also a few other factors that you must verify when you are not accessing the file from the local storage of your system, which you can find below.
- Make sure to properly insert the removable device. You may try:
- Disconnecting and reconnecting your drive.
- Finding your QuickBooks company file on your removable drive from My Computer.
- Saving other files to your drive to make sure that it’s working.
- Make sure your drive has enough available space. It must at least have free space double the size of your company file.
Method 7: Check your Network
If the company file is saved on a folder on the network, you must ensure that your system has access to that particular folder on the network drive.
- Open or save another company file on the server to see if you have the necessary access.
- Create and delete Microsoft Excel or WordPad files present on that computer.
- If you’re unable to create and delete a non-QuickBooks file in that folder then, Set up Windows access permissions required for QuickBooks.
- Check if the help resolving QuickBooks lost connection error.
Method 8: Run QuickBooks Auto Data Recovery
There is a possibility that QuickBooks cannot create a connection because of data corruption. In this case, the only tool that can come to the rescue is QuickBooks Auto Data Recovery Tool. Following are the steps to download, install and run the tool to overcome the obstacles connecting with the company file because of data corruption.
- Try to access the company file, and if the issue persists, you will need to recover the data using QuickBooks Auto Data Recovery Tool.
- Follow our detailed guide on recovering lost QuickBooks data using QuickBooks Auto Data Recovery Tool for detailed instructions
Method 9: Use Verify and Rebuild Data Utility
If your QuickBooks company file is damaged and causing the QuickBooks connection has been lost error message to pop up; you should try verify and rebuild data utilities by QB. Check them out as follows:
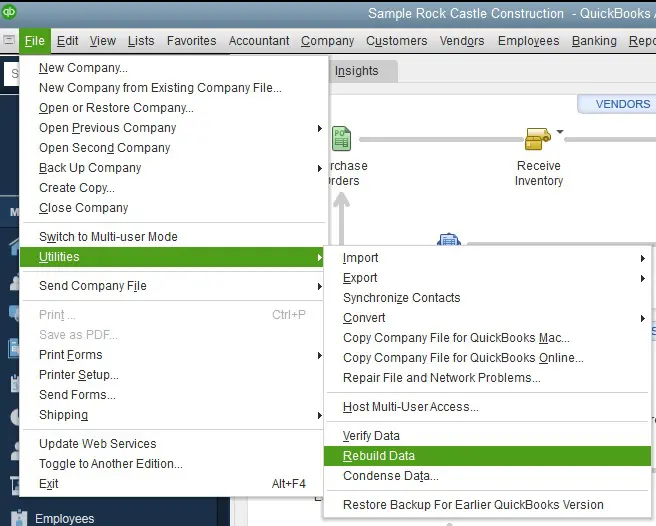
- Open QuickBooks Desktop and navigate to the File menu.
- Select Utilities, followed by Verify Data.
- Let the scan detect errors in the application and the company file.
- If the verify data scan shows errors, you should run the rebuild data utility. For that, go back to the File menu in QuickBooks Desktop.
- Select Utilities, then Rebuild Data.
- Let the scan run and repair all the errors in the company file.
Method 10: Restart All the Computers in the Network
If you’re facing troubles due to the lost QuickBooks connection, you need to restart the server and workstation computers. Sometimes, the glitch gets resolved with a simple refresh, which will help you resolve the problem effectively. So while you restart the server, ensure no other computer is connected. Similarly, restart the workstations accordingly to rectify the error.
Method 11: Ensure Adequate Permissions in Multi-user Mode
Accessing files in the multi-user mode requires having sufficient Windows permissions. If you don’t have them, you’ll face multi-user errors like a QuickBooks connection has been lost error message. Eliminate its possibility by configuring these settings. However, before you proceed, consider the following points:
- Make sure the installation directories have the necessary permissions.
- While running the Microsoft Windows Home edition, you might be unable to view the security tab in normal mode. In such cases, switch to the safe mode as follows:
- Start your computer again and press the F8 key until you see the Advanced Boot window open.
- In this window, choose Safe Mode and hit Enter.
- Your QB Desktop version determines QBDataServiceUserXX. For instance, QuickBooks Desktop version 2019 will be QBDataServiceUser19.
- When multi-user access is enabled on workstations, it can inadvertently switch to Alternate Hosting mode, taking sole ownership of the company files. In such cases, other users can’t access the company file.
Ensure accurate permissions set-up
While setting up folder permissions, ensure they are set up correctly as follows:
- Access the Windows Start menu and select File Explorer.
- Right-click the folder with the company file and opt for properties.
- Tap Advanced in the security tab.
- Choose QBDataServiceUserXX and hit Edit.
- Switch the settings to Allowed for the following:
- Traverse Folder/Execute File
- Read Attributes
- Create Files/Write Data
- List Folder/Read Data
- Create Folders/Append Data
- Write Attributes
- Read Extended Attributes
- Read Permissions
- Write Extended Attributes
When the permissions aren’t set correctly, the following steps are necessary:
- Go to the folder where your company file is saved and right-click it.
- Select properties.
- Tap Security, followed by Edit.
- Opt for QBDataServiceUserXX. Choose Full Control, then Allow.
- Hit Apply and OK.
Alter folder permissions
You might need to modify the folder permissions to rectify the QuickBooks connection has been lost error. Do so as follows:
- In the Windows Start menu, look for File Explorer.
- Locate, right-click, and perform the next actions for each of the following folders:
- C:\Program Data\Intuit\Entitlement Client
- C:\Program Data\COMMON FILES\INTUIT\QUICKBOOKS
- C:\Users\Public\Public Documents\Intuit\QuickBooks\Sample Company Files\QuickBooks Enterprise Solutions X.0 (X = version) or C:\Users\Public\Public Documents\Intuit\QuickBooks\Sample Company Files\QuickBooks 20XX (XX = year)
- C:\Program Data\Intuit\Entitlement Client\v6.0
- C:\Program Data\Intuit\Entitlement Client\v5
- C:\Program Data\Intuit\Entitlement Client\v8
- C:\Program Data\Intuit\Entitlement Client\v3
- C:\Program Data\COMMON FILES\INTUIT
- C:\Users\Public\Public Documents\Intuit\QuickBooks\FAMXX (XX = year)
- C:\Program Data\Intuit\QuickBooks Enterprise Solutions X.0 (X = version) or C:\Program Data\Intuit\QuickBooks 20XX (XX = year)
- C:\Users\Public\Public Documents\Intuit\QuickBooks\Company Files
- After right-clicking each folder, select Properties.
- Choose Everyone in the Security tab. If you don’t find everyone as an option in the group or user name checkbox, click Add and type it in the box. Then, hit OK.
- Now, select Full Control, followed by Apply, and OK.
Allow Windows Permissions to Share Company Files
You should let Windows access permissions to share the company file over the network. Do so with the following steps in Windows 10:
- In the Start menu, type File Explorer as a command.
- Look for the folder with your company file and right-click it.
- Tap Properties, followed by Sharing, and opt for Share Add.
- Choose the service corresponding to the QBDataServiceUserXX version.
- Allow Full Control as the permission level for both users and choose Share.
Method 12: Manage Hosting on All Computers
You should fix the hosting settings on all computers to resolve QuickBooks connection has been lost error. Take the following steps for host computers and workstations:
Host Computer Activities
To manage the hosting on the server, the following actions will help:
- You should install QuickBooks Database Server Manager on the host computer (server).
- Tap the Windows key on the keyboard and type QuickBooks.
- When QuickBooks or QuickBooks Database Server Manager doesn’t appear in the list, it means these programs are not installed on the computer.
Manage Hosting Settings
When you have QB installed on the host computer, follow the steps mentioned in Method 5.
When QuickBooks is not installed on the host computer, also known as the server, take the following steps:
- In the Windows system tray, locate and double-tap QuickBooks Database Server Manager. Alternatively, go to the Start menu > All Programs > QuickBooks > QuickBooks Database Server Manager.
- Hit the Database Server tab.
- See if your company file emerges in the window below the Currently connected company files and logged-in users. If you can’t find it, click the scan folders tab. Then, choose Help to get more information about adding the company file.
- Shut down the QB Database Server Manager window.
Erase and Recreate the .ND File
The information about the computer hosting the file is stored in the .nd file. You should scan the folder possessing your company file to create the Network Descriptor, aka the .nd file.
- Tap the Windows icon on the keyboard and type QuickBooks Database Server Manager.
- Choose it, select Add folder, and look for folders storing the company files.
- After adding all the folders, hit the Start scan option.
- You’ll see the data files under the QB company files found section. Tap Close.
- Browse and look for folders with the company files. Ensure the .nd file is created for each company data file.
Note: When you do not see QB Database Server Manager in the Programs list, you should uninstall QB and then reinstall it. Choose the second option, “I’ll be using QuickBooks on this computer, AND I’ll be storing our company file here so it can be shared over our network.”
Workstation Activities
Take the following actions:
- Ensure hosting on the workstation is disabled as follows:
- Launch QuickBooks Desktop.
- In the File menu, select Utilities.
- If you see the Stop Hosting Multi-user Access option in the menu, select it to turn the hosting off on this computer. Then, continue with the next step. However, if you view the Stop Hosting Multi-user access option, click to repair it.
- If the Host Multi-user access menu appears, it means that hosting is already off. You can continue with the subsequent steps. You should see the workstation stating Host Multi-user Access. If it does, you need not change it.
- Launch the company file through a UNC Path.
Open the company file through the UNC path with these steps:
- Launch QuickBooks and move to the File menu.
- Select File, followed by Open or Restore Company.
- Choose to open a company file and tap Next.
- Select My Network Places in the left pane of the open company window.
- Double-tap Entire Network and access the location on the server where you have your company file.
- Choose your company file and hit Open.
Method 13: Configure Firewall Settings
When Firewall and anti-virus applications restrict QuickBooks connectivity, you need to check the settings and add QB ports as exceptions. You can add multiple versions of QuickBooks Desktop on the same computer through the following steps:
- Launch the Start menu and type Windows Firewall in the search box for results.
- Click it and select Advanced Settings.
- Now, right-click Inbound Rules, followed by choosing the New Rule option.
- Tap Port, followed by Next.
- Ensure to choose the TCP option.
- When you arrive at the specific local ports field, enter them as follows according to your QB Desktop version:
- QuickBooks Desktop 2020 and later: 8019, XXXXX.
- QuickBooks Desktop 2019: 8019, XXXXX.
- QuickBooks Desktop 2018: 8019, 56728, 55378-55382.
- QuickBooks Desktop 2017: 8019, 56727, 55373-55377.
Important: QuickBooks Desktop 2019, 2020, and future versions utilize dynamic ports. These constitute specific firewall ports (not a range) assigned while installing. It ensures QuickBooks Desktop receives exclusive use of a given port.
- After entering the port number, tap Next.
- Choose to Allow the Connection. Select Next.
- Ensure to mark all the profiles if prompted and click Next.
- Form a rule and assign it a name like QBPorts(year).
- Once done, tap Finish.
- Repeat the steps for Outbound Rules.
Now, launch QuickBooks Desktop and switch to the multi-user mode. See if you still encounter QuickBooks connection has been lost error.
Form Windows Firewall Exceptions for QB
Since QB uses executable files to conduct various tasks, you need to create exceptions for them as follows:
- Launch the Start menu and search for Windows firewall. Tap Enter when the results emerge.
- Hit Advanced Settings and right-click the inbound Rules option.
- Choose New Rule.
- Tap program, then Next.
- Opt for This Program Path, followed by the Browse option.
- Search for and choose any executable file. Then, hit Next.
- Click Allow this connection, then select next.
- Make sure all the profiles are marked when prompted. Then, tap Next.
- Create a rule and name it like QBFirewallException.exe.
Finishing Up
The above solutions for the error “QuickBooks Connection Has Been Lost” must be enough to resolve it. But, there might be certain steps that will require technical assistance available through Accounting Helpline Support Number 1.855.738.2784.
FAQ’s
Why does QuickBooks Connection has been lost error appears when QB is connected to a network, and the data file is saved on another computer?
When you see the QuickBooks Connection Has Been Lost Error Message while being connected to a network, the following reasons might contribute to the error:
1. You may have an unstable network connection, especially non-wired.
2. The folder with the company files might require additional permissions to run.
3. Your Firewall and anti-virus software might be restricting QuickBooks from functioning and connecting over the network.
4. When the power saving mode is enabled, you might experience the error.
How does the network lost error in QB show up?
You may see the network breaking in various ways, including:
1. A Windows error or a related problem might appear on your computer.
2. You may experience the same difficulties with server and host computers.
3. A problem may arise in the computer connections, including the routing, cables, protocols, etc.
4. Error messages like “Network Lost” or “Lost Connection to the Server” may appear.
5. Inability to access the QuickBooks company file.
6. Sluggish performance and unresponsiveness.
7. Error codes like H202, H303, or H505 may be displayed.
When does the QB connection loss issue emerge?
Usually, this problem arises when the company file you’re trying to access isn’t available. The QuickBooks (QB) connection loss issue can emerge in various situations, including:
1. Poor network connectivity or disruptions in the network can lead to connection loss.
2. QB often encounters connection problems in multi-user mode when several users access the same file simultaneously.
3. Overly strict firewall or security software settings may block QB’s network communication.
Improper multi-user mode or network configuration setup can lead to connection problems.
How do I eliminate the connection loss issue?
Use QB File Doctor, Quick Fix My Program, manage multi-user access, and reboot QB to resolve the connection loss issue in QB. Other resolutions include:
1. Network Check: Ensure a stable network connection and resolve any network-related problems.
2. Multi-User Setup: Configure multi-user mode correctly with sufficient user licenses.
3. Firewall and Security: Adjust firewall and security software settings to permit QB’s network access.
4. Server Maintenance: Maintain the server hosting the QuickBooks company file, ensuring it runs smoothly.
5. Configuration Review: Verify network and multi-user settings for accuracy.
Why does the QB app not connect to the server?
The server connections may be disrupted due to firewall or security system interferences. Other causes include:
1. Network Issues: Poor or unstable network connections can restrict the app from communicating with the server.
2. QB App Version: Outdated or incompatible versions of the QB app may not work with the server.
3. User Permissions: Insufficient user permissions may restrict access to the server.
4. Server Load: High server usage or heavy network traffic can slow down or disrupt connections.

Edward Martin is a Technical Content Writer for our leading Accounting firm. He has over 10 years of experience in QuickBooks and Xero. He has also worked with Sage, FreshBooks, and many other software platforms. Edward’s passion for clarity, accuracy, and innovation is evident in his writing. He is well versed in how to simplify complex technical concepts and turn them into easy-to-understand content for our readers.