
Last Updated on May 7, 2026
The Intuit Data Protect backup failed error can be tough to deal with because backing up QuickBooks data is critical to protecting yourself from losses. Intuit Data Protect (IDP) is a subscription service designed to safeguard your QuickBooks data file, preventing potential loss or damage. Users encountering IDP failure can get error codes like #2229, messages like “Intuit Data Protect Backup Failed: Firewall or connection issue,” “Backup could not be completed because it ran out of disk space,” and “Intuit Data Protect backup incomplete: Files did not backup because they were open or not reachable.” Let’s help you fix this error and get your backups running.
Are you unable to back up your files due to the Intuit Data Protect Backup Failed error message? Let our Accounting Helpline expert team help you resolve this issue quickly. Call our toll-free number 1.855.738.2784.
Reasons for Intuit Data Protect Backup Failure
Here’s why you are unable to back up with Intuit Data Protect:
- Firewall or antivirus restrictions are the primary reason behind IDP backup failure.
- Misconfigured Internet Explorer settings, overloaded cache, cookies, etc., can trigger this problem.
- The browser does not trust Intuit and QB-related sites, causing it to restrict the backup.
- Outdated QB Desktop and Intuit Data Protect can trigger issues related to the Intuit Data Protect backup.
- You may have reached your storage limit in Intuit Data Protect, triggering failure in the process.
- You may have canceled the backup before it finished, causing the errors related to Intuit Data Protect.
- The QuickBooks company file is accessed through a mapped network drive at the time of the backup.
- The IBuEngHost.exe process is operating under the local user account instead of the SYSTEM user.
- Your Windows File System is not formatted as NTFS.
- Your system’s component may be damaged or be blocking the automatic backup.
Troubleshooting Approaches to Fix Intuit Data Protect Backup Failed
You can resolve the Intuit Data Protect backup failed error with the following expert-recommended solutions:
Action 1: Run the Intuit Data Protect Diagnostic Tool
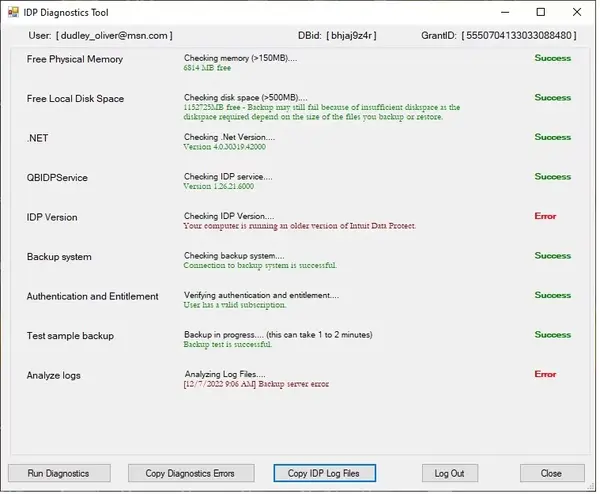
The first solution you can try to resolve the IDP backup failure error is the Intuit Data Protect Diagnostic tool. It’s a specially designed utility that fixes problems with this subscription service offered by Intuit. It verifies your computer’s RAM, storage capacity, Windows components such as .NET Framework, and the version of Intuit Data Protect. Additionally, it assesses the connectivity to the backup servers.
The following steps guide you on running it:
- Right-click on the icon representing Intuit Data Protect, symbolized by a green padlock in the Windows System Tray, typically at the lower right corner of your screen. Tap the option stating “About Intuit Data Protect.”
- To initiate the Intuit Data Protect Diagnostics Tool, press Ctrl+F2 on your keyboard.
- Within the Diagnostics Tool, tap the “Run Diagnostics” function. Suppose the tool identifies any issues related to a firewall or third-party security software. In that case, it will be necessary to adjust the settings of the software and/or hardware to permit access to Intuit Data Protect files.
- Refer to your manufacturer’s website for guidance on configuring your security software and/or hardware. Additionally, include the following files as exceptions:
- C:\Program Files(X86)\Common Files\Intuit\Data Protect\IntuitDataProtect.exe
- C:\Program Files(X86)\Common Files\Intuit\Data Protect\IbuEnghost.exe
- C:\Program Files(X86)\Common Files\Intuit\Data Protect\QBIDPServices.exe
Here’s how to assess IDP diagnostic results:
| Issue | Details | Fix |
| Free Physical Memory | IDP requires at least 150MB of free physical memory. If you get an error message here, it indicates insufficient space to run IDP. | Address the issue by either freeing up memory or installing additional memory. |
| Free Local Disk Space | IDP requires .NET version 3.5 or higher. If encountering errors related to .NET, repair or reinstall Microsoft .NET Framework. | Resolve by freeing up space on your drive, or consider moving the file/set to a drive with more space. |
| .Net | Fix. Net-related errors by repairing or reinstalling Microsoft .NET Framework. | Tap the Windows icon and access the Start menu. Input services. MSC in search. Fix by selecting QBIDPService, restarting it from the window’s left side, and running the IDP Diagnostic Tool to verify the resolution. |
| QBIDPService | IDP requires this service. To resolve this, restart the service through the Services window. | Tap the Windows icon and access the Start menu. Input services.msc in search. Fix by selecting QBIDPService, restarting it from the window’s left side, and running the IDP Diagnostic Tool to verify the resolution. |
| IDP Version | Ensure you are running the latest version of IDP. | Resolve by verifying and installing the latest update for Intuit Data Protect. |
| Backup System | The error indicates a problem with IDP servers or your connection. Wait and try again if previously used without issues. | If recently used without problems, wait and retry. Check Security and Antivirus applications for potential blocks. |
| Authentication System | The error suggests an issue with Authentication servers or your connection. Wait and try again if recently used without problems. | If not used successfully, wait and retry. Check Security and Antivirus applications for potential blocks. |
| Authentication and Entitlement | The error here requires contacting support for further assistance. | If an error is detected, contact support for guidance on the next steps. |
| Test Sample Backup | A small test file is backed up to ensure proper functionality. If an error occurs, contact support for further instructions. | If an error is observed, reach out to support for additional guidance. |
| Analyze Logs | Log files are analyzed for error details. If an error is found, contact support for assistance. | If an error is identified, get in touch with support for further guidance. |
Action 2: Include IDP Ports as Exceptions for the Windows Firewall
The Intuit Data Protect incomplete backup error can come up if the Windows firewall is blocking it. So, adding IDP ports as exceptions to the Windows firewall can help you resolve the issue:
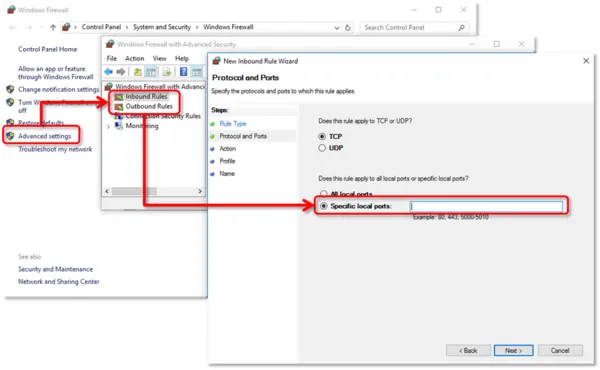
- Navigate to the Start menu and enter “Control Panel” into the search field.
- Access “System and Security,” then hit the “Windows Firewall” option, and proceed to select “Advanced Settings.”
- Tap “Inbound Rules” on the left side within the Advanced Settings window. From the right side of the same window, choose “New Rule.”
- Input the specified ports and click “Next.“:
- Incoming Port: 80
- Outgoing Ports: 443, 16841
Note: Intuit Data Protect uses Internet connectivity through HTTP ports 80 and 443. Intuit Data Protect should function correctly if you can browse the internet and log in to secure websites.
- Follow the on-screen wizards.
- Repeat steps 1-4 for “Outbound Rules.”
Further, it would be best to allow and add crucial IDP files to Windows Firewall:
- Press the Windows key on your keyboard and type “Firewall” in the search field.
- Choose the “Allow an app through Windows Firewall” option, then tap “Allow another app.”
- Click “Browse” and navigate to Program Files(x86)\Common Files\Intuit\Data Protect.
- Select QBIDPservice.exe and hit “Open.”
- Choose the Network types and tick the Private checkbox. Click “Add.”
- Follow steps 4 and 5 for the files IBUenghost.exe and IntuitDataProtect.exe. Your configuration is complete if a message indicates that the files already exist.
Note: Your computer’s third-party antivirus software may also block these crucial files. Ensure that these files are permitted. If unsure, consult the software manufacturer for guidance on this process.
Action 3: Erase Internet Explorer Cookies, Cache, Temporary Files, and SSL State
You can resolve Intuit Data Protect backup failure by clearing the cookies, cache, SSL state, and temporary files in Internet Explorer. If you have an overloaded cache, cookies, temporary files, etc., your backup process can undergo failure. So, the steps to follow for this process are given below:
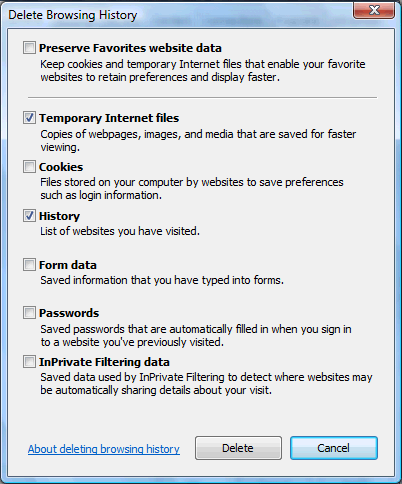
- Launch Internet Explorer.
- Access the Tools menu and choose the Internet Options button. Note: If you cannot locate the Tools option in your browser, press Alt once to view hidden tabs.
- Move to the General tab and hit “Delete…” under the Browsing History tab.
- You should check the following boxes: Temporary Internet files and website files, Cookies and website data, History, Form Data, and InPrivate Filtering. Then, unmark the Preserve Favorites and website data box.
- Hit Delete to remove the selected items.
- Access the Content tab.
- Hit the Clear SSL State option and then select OK.
Action 4: Add Intuit-related Sites to the Trusted Sites list of Internet Explorer
The Intuit Data Protect backup remains incomplete when Intuit-related sites are not added to the Trusted Sites list of Internet Explorer. So, adding them to this list will help resume the backup procedure:
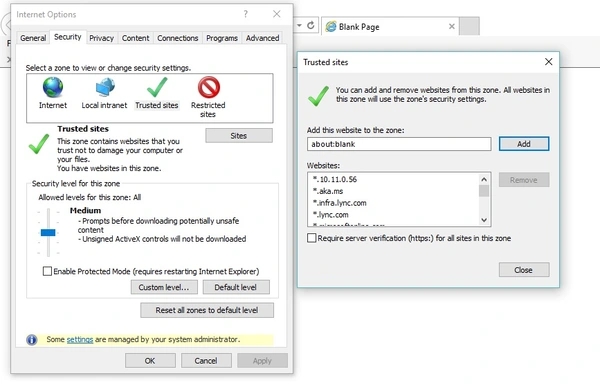
- Launch Internet Explorer.
- Tap the Tools menu and hit the Internet Options option.
- Access the Security tab and deselect the Enable Protected Mode option.
- Hit Trusted Sites and then click on Sites.
- Uncheck the box with the message Require server verification (https:) for all sites in this zone.
- Add *.backup.com, *.intuit.com, and *.intuit.net. Also add *.intuitdataprotect.com, *.quickbooks.com, workplace.intuit.com, emerald.backup.com (a new trusted site that helps update your Intuit Data Protect certificates)
- Click Close.
- Navigate to the Privacy tab and hit Sites.
- In the Address of Website box, include the following websites: *.quickbooks.com and *.intuit.com.
- Tap “Allow each time you add the web addresses.”
- Finally, hit OK to apply these changes.
If Internet Explorer is no longer available, you’ll have to ensure Intuit websites are a part of Trusted Websites in Internet Options. Although the steps are similar, we have added them below for clarity:
- Press the Windows key on your keyboard and enter “Internet options” in the search field.
- Click on Security, then choose Trusted Sites.
- Select Sites and input the following websites. You can copy (Ctrl + C) and paste (Ctrl + V) or manually type the sites, clicking Add for each of them:
- Backup.com
- *.intuit.net
- *.intuit.com
- *.intuitdataprotect.com
- *.quickbooks.com
- Workspace.intuit.com
- emerald.backup.com (a newly trusted site that updates your Intuit Data Protect certificates)
- Ensure that the checkbox for “Require server verification (https: )” for all sites in this zone is not checked.
- Click Close, followed by OK.
- Verify that you can access the Intuit Data Protect certificate site, as this is crucial to preventing errors in your backups.
- Attempt to back up using Intuit Data Protect. If the IDP backup issue persists, proceed to the next solution.
Action 5: Ensure IBuEngHost.exe doesn’t run as a Windows User
For Intuit Data Protect to function correctly, the file IBuEngHost.exe must run under the System user.
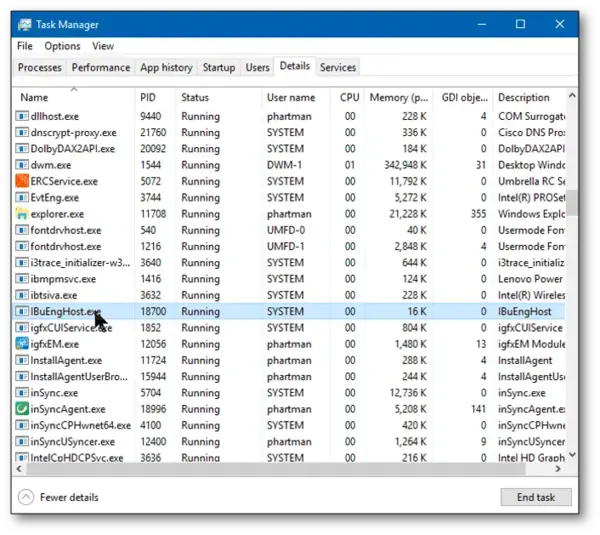
Check if IBuEngHost.exe is running as System:
- Right-click on your Windows taskbar and choose Start Task Manager.
- Navigate to the Details tab and access IBuEngHost.exe. Ensure that the User name is listed as System and the Status indicates it is running. You may have to choose ‘Show processes from all users’ to see IBuEngHost.exe. The file path might appear at the top of the Explorer window.
- Important: If the displayed user is anything other than “System,” Intuit Data Protect will be unable to back up open files.
- To address this, ensure that QBIDPService.exe is running and restart your system.
- Check if QBIDPService.exe is running by opening the Services Console using the Windows Run line. It involves typing “Services.msc” and pressing Enter.
- QBIDPService.exe should appear with a Status of “Started.” If it is not, initiate the service and then restart your computer.
If IBuEngHost.exe is still not running as a System, you need to use the Admin user to install QB. So, uninstalling and reinstalling QB with a Windows Admin user is necessary as follows:
- Download a new installer for your specific QuickBooks version. Note: Save the file in a location easy to open.
- Go to the saved installer location.
- Right-click the QB installer and choose Run as Administrator.
- Proceed with the reinstallation process.
- After the installation, check Task Manager for IBuEngHost.exe. Confirm that the status is running and the User name is System.
- Attempt to back up using Intuit Data Protect. If the issue persists, proceed to the next set of instructions.
Action 6: Update QB and IDP
Ensure you aren’t using old QuickBooks and Intuit Data Protect versions because they can cause the Intuit Data Protect backup error. Here’s the procedure for both IDP and QB Desktop:
QuickBooks Desktop
- Exit QB and your company files.
- Open the Windows Start menu.
- Search for QuickBooks Desktop. Right-click its icon and tap Run as administrator.
- On the No Company Open screen, access the Help menu and tap Update QuickBooks Desktop.
- Choose the Options tab. Hit Mark All and then tap the Save button.
- Go to the Update Now section and mark the Reset Update checkbox.
- When you’re prepared, click Get Updates.
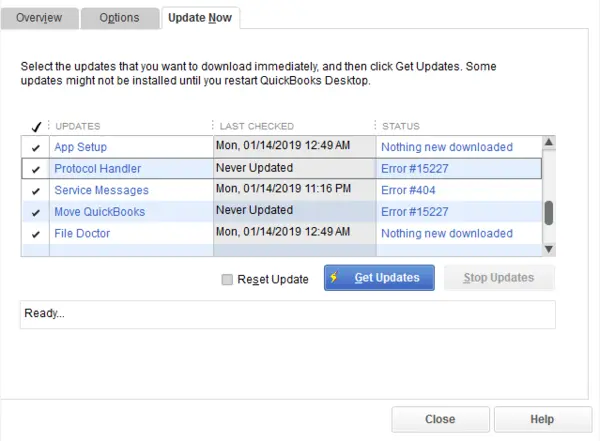
Intuit Data Protect
- First, download the update by going to the Help menu and choosing Update QuickBooks.
- Click on the Update Now tab.
- Ensure that Data Protect is selected from the list, then click Get Updates.
- Now, install the update by tapping the upward arrow ^ on your desktop toolbar, typically located in the lower-right corner near the clock.
- Right-click the Intuit Data Protect icon, resembling a green padlock.
- Choose About Intuit Data Protect.
- Click Update.
- Once the IDP update is complete, click OK.
Action 7: Free Space in Intuit Data Protect
When you reach the storage limit in Intuit Data Protect, it’s better to free up some space as follows. IDP provides 100 GB of backup capacity. Deleting your saved data can help resume the backup process as follows:
- Look into your IDP version.
- Erase backup folders. Caution: Once deleted, backed-up files cannot be recovered. As a precaution, download the backed-up files before proceeding. Intuit Data Protect does not alter your data or make any changes to your computer.
- Right-click the Data Protect icon at the bottom right of your Desktop screen and choose Open Intuit Data Protect. Alternatively, press Ctrl + R on your keyboard to access a screen where you can delete backed-up files.
- Data Protect will calculate the size of each folder. Once the calculation is complete, click Delete.
- Confirm your decision to permanently delete the backup folder by selecting Yes. Click OK to complete the process.
- Decrease the backup file size:
- Right-click the Data Protect icon at the bottom right of your Desktop screen and hit Open Intuit Data Protect.
- Click on Change Backup Settings.
- Uncheck any files and folders that are not essential for your backup needs.
- Continue through the settings until you exit the Backup Settings.
- Attempt the backup process again.
Action 8: Let the Backup Complete Properly
If you’ve received an email notification stating that your backup encountered Error #2229, it indicates that you interrupted the backup process before it finished. The duration of the initial backup may vary depending on the amount of data selected, and the first backup generally takes longer than subsequent ones. It is advisable to allow the backup process to run its course for successful completion.
Otherwise, undertake manual settings for the IDP setup and use:
- Launch QuickBooks on the system or server with your QuickBooks file. If you’re unsure of its location, press F2 in QuickBooks to retrieve this information.
- Navigate to File, then choose Back Up Company, and tap the Set Up/Activate Online Backup option.
- Log in with the email used during signup (distinct from your QuickBooks login), and click Continue.
- Tap your QuickBooks company file and click Continue. For the entire PC plan, select the folders for backup and click Continue.
- Check the box for Back up local selected documents, and tap Continue.
- Hit the specific files and folders you wish to back up and choose Continue.
- Set a schedule for your daily backup, and choose the Continue option.
- Configure your notification settings, and click Continue.
Note: The initial backup may take several hours based on the number and size of files. Subsequent backups will be quicker.
Action 9: Free Up Space on the PC
You may have to free some space on your system to make way for IDP backups. We have detailed the steps to free up space using Cleanup recommendations (Windows 11):
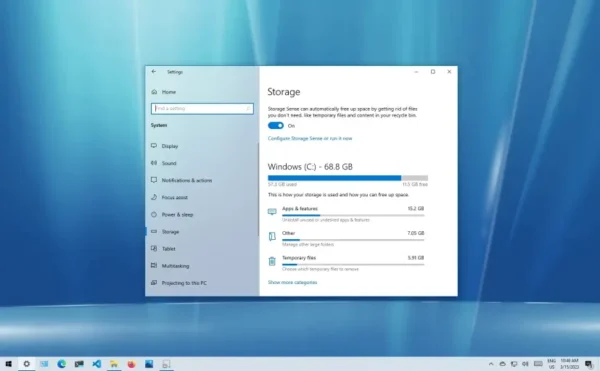
- Choose Start > Settings > System > Storage > Cleanup recommendations.
- Examine each category, such as Temporary files, Large or unused files, Files synced to the cloud, and Unused apps. Click the items you want to delete. Windows will suggest files for removal and display the amount of space you’ll recover by removing those items.
- Once you’ve made your selections, click the Clean Up button for each section.
Action 10: Move IDP Temp Files to Another Location
You can transfer the temporary files to a partition or drive with more available space. Follow these steps:
- Follow the steps to update Intuit Data Protect to the latest release.
- Press the Windows key on your keyboard to type ‘Notepad’ in the search bar. Then, press Enter.
- Input the folder path where you want to relocate your IDP temp files. For instance:
If your wish is to move the file to: Things you should enter in Notepad Drive Folder D:\ IDPBackup SymantecWorkingFolder=D:\IDPBackup E:\ IDPBackups in the Business Files folder SymantecWorkingFolder=E:\Business Files\IDPBackups - Access the File menu and hit Save As.
- In the Save As window, navigate to C:\Users\AppData\Local\Intuit\Intuit Data Protect.
- Input “IntuitDataProtect.properties” in the File name field and choose All Files (“.”) from the Save as type drop-down. Click Save.
- Press the Windows key + E, and access C:\Users\AppData\Local\Intuit\Intuit Data Protect.
- Hold Ctrl, then hit the Work and Temp folders. Right-click on any of the two folders, then choose Copy.
- Navigate to the destination folder for your IDP temp files. Right-click anywhere and select Paste.
You can now proceed with your file backups using Intuit Data Protect, and the temporary files will be stored in a location with more available space.
Action 11: When the QB Desktop File is Opened via the Network Drive
Intuit Data Protect cannot perform a backup if the QuickBooks company file is currently open.
- Close the QuickBooks company file.
- Right-click the Intuit Data Protect icon located in the system tray, near the system clock, and select Open Intuit Data Protect.
- Tap the Back up Now option.
Action 12: Verify the Drive File System if it is NTFS
If the file system differs from NTFS, Intuit Data Protect will be incapable of backing up open files.
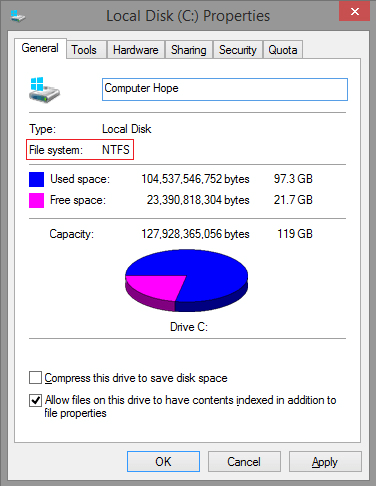
To determine the file system in use on the drive:
- Open My Computer.
- Right-click the C drive and hit Properties.
- Confirm that NTFS is listed as the file system.
Note:
- Suppose the QuickBooks company file (with the extension .QBW) and Intuit Data Protect are not on the same computer. In that case, it’s necessary to close the company file in QuickBooks to ensure a successful backup.
- When backing up a file located on a network resource, ensure you are using a mapped drive rather than the UNC path (\).
Action 13: Ensure Your Computer Meets the System Requirements
Ensure your system meets the minimum requirements for QuickBooks Desktop to work correctly. These points include:
QB Pro/ Premier 2023 or QB Enterprise 23.0
- Use the following compatible operating systems:
- Windows 11/ 10 64-bit, natively installed
- Windows Server 2022/ 2019/ 2016/ 2012 R2/ 2012 Standard and Essentials
- Make Google Chrome your default browser to add Intuit as a trusted website. Microsoft offers no more support for Internet Explorer 11, and neither do QB’s latest versions.
- Look into antivirus and anti-malware compatibility.
Also, look into the recent alterations to the End User License Agreement (EULA) for QuickBooks Desktop 2023 subscription products.
Action 14: Change IDP Backup Settings
If you wish to back up additional files and documents on your system, you will have to modify some settings. Otherwise, you might find it incomplete or working incorrectly:
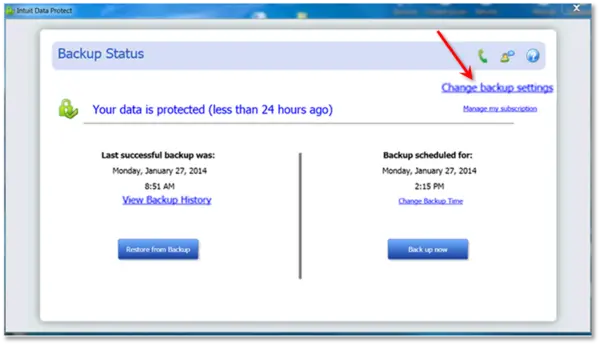
- Launch Intuit Data Protect from your system tray.
- Tap “Change backup settings.”
- In the “Select QuickBooks Data” window, tap the files you wish to back up, and then press Continue. For Entire PC Users, after clicking Continue, choose additional folders for backup on the “Select other folders to back up” window.
- Tap Continue. On the “Notifications Email Settings” window, decide whether to receive notifications or not.
- Click Continue once more, then set your preferred backup time.
- Select Continue to save the changes, and then exit from the settings window.
Summing Up
We hope our extensive guide on the problem “Intuit Data Protect backup failed” helps you fix your problem without hassle. We have tried to cover every reason and potential solution that can resolve the issue. However, if you’re still encountering this problem and need a proper fix, we recommend you call our toll-free number 1.855.738.2784. Our dedicated team will get started on your issue immediately.
FAQ’s
What are the scenarios where you receive the Intuit Data Protect Backup failed message?
Here are the instances where you receive the Intuit Data Protect backup failed error message:
1. When using Intuit Data Protect (IDP), you encounter the following error message: ‘Intuit Data Protect Backup Failed: Firewall or connection issue.’
2. An error 2261 may appear, indicating full storage and causing incomplete IDP backups.
3. Sudden messages about Backup could not be completed because it ran out of disk space.
4. You may be unable to back up your file with messages like “Intuit Data Protect backup incomplete: Files did not back up because they were open or not reachable.”
5. The issue may ask you to burn CD copies rather than back up automatically, triggering the problem.
6. A backup error message, 1071, might appear, indicating a firewall or connection issue.
7. After updating QB 2022 to QB 2023, problems with backup may arise.
8. The program backs up your files but not documents, pictures, etc.
9. Even after modifying backup settings, IDP might not recognize your need to back up additional documents and pictures.
How do I back up with Intuit Data Protect?
The backup process for Intuit Data Protect goes as follows:
1. Right-click the icon for Intuit Data Protect and choose the option to Open Intuit Data Protect. This icon, resembling a green padlock, is located on the Windows toolbar.
2. Click on Back up now.
3. Choose the specific files and folders you wish to back up, then click Continue.
4. Tap Backup now. A message confirming the successful backup will appear.
5. Click OK.
Which QB versions can face Intuit Data Protect backup failure?
You can encounter backup failures in Intuit Data Protect with the following versions:
1. QB Pro 2019
2. QB Enterprise 2023
3. QB Desktop Pro 2021
How do I get my Intuit Data Protect backup up and running?
If your Intuit Data Protect backup is failing constantly, try the steps below to fix the problem:
1. Use the IDP Diagnostic Tool.
2. Add IDP port exceptions to the Windows Firewall
3. Remove the cache, cookies, SSL State, and temporary files from your browser
4. Don’t run IBuEngHost.exe as a local user
5. Add Intuit-related sites to the Trusted Sites list of your browser
6. Meet system requirements for your QB version
7. Keep QB Desktop and IDP updated to the latest release.
8. Free up space in IDP and your PC.
9. Ensure you don’t click Cancel before your IDP backup ends.
10. Don’t have your QB company file and IDP backup open simultaneously
11. Look if the file system is NTFS
12. Modify the backup settings to include additional documents
13. Transfer IDP temp files somewhere else

Edward Martin is a Technical Content Writer for our leading Accounting firm. He has over 10 years of experience in QuickBooks and Xero. He has also worked with Sage, FreshBooks, and many other software platforms. Edward’s passion for clarity, accuracy, and innovation is evident in his writing. He is well versed in how to simplify complex technical concepts and turn them into easy-to-understand content for our readers.