
Last Updated on March 18, 2026
The QuickBooks reconciliation discrepancy report helps a user identify any changes that were made since the last discrepancy, ensuring that your financial data matches your bank statements. Your previously reconciled bank transactions can have discrepancies due to duplicate entries, missing data, and other reasons. It can be extremely frustrating and time-consuming. It’s important to resolve this problem on time for the user to continue their important work process and accurately calculate taxes. Now, let us talk about this in detail, starting with its short explanation in the next section.
Need help in fixing QuickBooks reconciliation discrepancies? Contact our Accounting Helpline’s experts today at 1.855.738.2784, who can help you fix this problem.

Reconciliation Discrepancy Report QuickBooks Online – A Concise Explanation
The option to run the QuickBooks reconciliation discrepancy report can be found in the Banking section inside the Reports menu. Running this report can help you find any discrepancies in the transaction, such as addition, deletion, or modification, since the last time you reconciled your account in QuickBooks Online. Knowing this is crucial so that you can make changes to ensure your bank statement matches that of the account in QBO. So let us now see some of the potential causes of seeing discrepancies in the account you have already reconciled before.
Causes of Discrepancies in QuickBooks Reconciliation Report
Below are some of the most common causes for you seeing discrepancies in the QuickBooks account you have reconciled before:
- Due to human error, someone might’ve mistakenly entered an incorrect ending balance at the start of the reconciliation.
- A person might’ve edited or deleted some transactions that were reconciled before.
- Some transactions might be missing in QuickBooks.
- There might be duplicate transactions in QuickBooks.

- You or someone else could have entered a transaction in QuickBooks that hasn’t cleared your bank.
- If you adjusted your prior reconciliation with a journal entry.
- You could’ve reconciled a duplicate transaction.
- The transaction might’ve been sorted into the wrong category.
- You reconciled the transactions for the wrong account.
These are some of the most common reasons for which you might have to run the QuickBooks reconciliation discrepancy report.
How to Run a Reconciliation Discrepancy Report in QuickBooks Online?
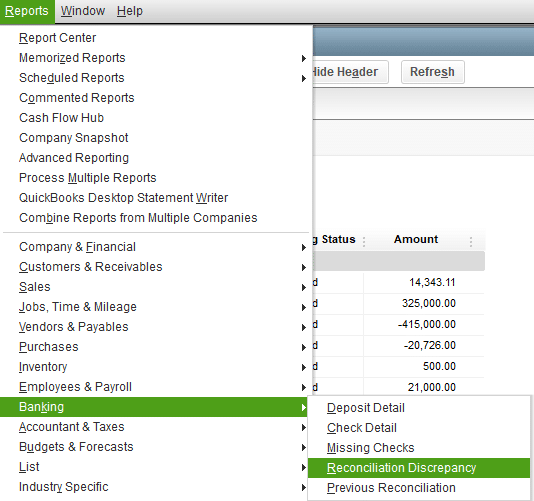
The steps to run a reconciliation discrepancy report in QuickBooks Online are given below:
- First, go to the Reports menu.
- Then, click on the Banking option.
- Now, select Reconciliation Discrepancy.

- Choose the account for which you want to run the QuickBooks Reconciliation Discrepancy Report.
- Press OK.
- Then, review the report and find the discrepancies.
These were the steps to run the reconciliation discrepancy report in QuickBooks Desktop. Now, let us see how to reconcile an account in QB Online.
Account Reconciliation in QuickBooks Online
There are two ways you can reconcile an account in QuickBooks Online: one being AI-powered reconciliation, and the other is to reconcile manually. Let’s see how to do both of them.
Use AI for Account Reconciliation
If you’re on the QB Online Plus or Advanced plan, you will get the AI-powered reconciliation tool in your Reconcile page. You can enable the automatic importing of bank statements or import them manually to reconcile. Follow these steps:
- Go to the Transactions section.
- Click on the Reconcile tab.
- Now, choose the account you want to reconcile.
- Check if the beginning balance in QB matches that of the statement you are going to upload.
- Then, upload your bank statement.
- Till the AI feature is in its early stages, a human will verify if the statement extraction was accurate.
- You might need to leave and return after the verification process is complete.
- After the process is complete, the Account Agent fills in the statement’s ending balance and ending date after extracting.
- Click on Start Reconciling.
- The Accounting Agent will let you know if there are any potential problems.
- Each of those problems would have Review present in the status column.
- Use the details in the Explanation column to know what steps you need to perform to fix the issue.
Now, let us see the steps for reconciling an account manually in QuickBooks Online.
Manually Reconcile an Account in QBO
With the option of AI reconciliation present in QBO Plus and Advanced, you can still reconcile your account manually by not uploading the bank statement. However, there are some prerequisites to this:
- If reconciling for the first time, review the opening balance.
- It should match the balance of your bank account or credit card till the day you started tracking transactions through QuickBooks.
Then, let’s proceed to list the steps for manual reconciliation:
- If reconciling for the first time:
- Click on Get Started.
- Now, press the Account dropdown menu.
- Select the account you want to reconcile.
- Ensure you’re selecting the same account as present on your statement.
- You might see a message about past reconciliation.
- You need to fix the issue before reconciling.
- Click on We can help you fix it and follow the instructions.
- Then, ensure the Beginning balance in QB matches the one on your statement.
- If they don’t, fix the errors.
- Now, enter the Ending balance and ending date on your statement.
- Some banks call the ending balance “new balance” or “closing balance”.
- If your account isn’t enabled for online banking:
- Add service charges or interest earned during this period.
- If seen, check the Last statement ending date.
- This is the ending date of your last reconciliation.
- Your current account statement should start the day after.
- Now, compare the transactions in QuickBooks to your statement one at a time.
- If the listed transaction in QB matches your statement:
- Check it off, which would mark it as reconciled.
- If you have found a match with small mistakes:
- Select Edit and edit the details to match the statement.
- If the transaction listed in QB isn’t present on the statement:
- Leave it unmarked.
- If the listed transaction in QB matches your statement:
- After reaching the end, the difference between QB and your statement should be $0.00.
- If that’s the case, click on Finish now.
If the amount still isn’t 0, follow the troubleshooting steps given below.
Troubleshoot the Problem in Manual Reconciliation
If the amount after reconciling isn’t $0.00, you can do the following to fix the QuickBooks reconciliation discrepancy report:
- Firstly, ensure that the dates for each transaction on your statement match the dates of each transaction entered in QuickBooks.
- If any of the transactions are missing:
- Click on + New.
- Add the missing transactions.
- If there are more QuickBooks transactions:
- Click on the Cleared date to show any transactions that have been added to QuickBooks manually.
- This is usually where you will find discrepancies in your reconciliation.
- You can use the audit log to help you edit or delete these transactions.
- If the number of transactions in QB matches your statement.
- Ensure that each transaction amount in your statement matches each transaction amount in QuickBooks.
This would fix the issue if you weren’t seeing $0.00 after reconciling your bank account. Now, you can print the reconciliation report in QuickBooks Online.
Fix Issues With QuickBooks Reconciliation Discrepancy Report
To fix the issues you see in the reconciliation discrepancy report in QuickBooks Online, first, you need to perform these steps;
- Review each transaction in a report:
- Click on View to see the change history of the transaction.
- Now, check the Change Type column.
- See what has changed.
Then, you would need to make edits based on the message in the Change Type column.
If You See that the Amount Has Changed
This generally means you or someone else moved the transaction to another account or edited it. You can fix it with these steps:
- Select the transaction and expand the view.
- Now, click on edit, which would open the form.
- Then, adjust the account.
- Or amount, whichever is needed.
- Click on save, followed by close.
If the Transaction Was Unreconciled in the Register
This just means that someone unreconciled a previously reconciled transaction. You can fix that with the following steps:
- Firstly, go to the bank register.
- Then, click on Reconcile.
- Enter the info from the statement in these two fields:
- Ending balance field
- Ending date field
- Now, select Start reconciling.
- Review the transactions.
- Now, put a check mark if the transaction in QB matches the transaction in your statement.
- If it doesn’t, then leave it unchecked.
- Lastly, select finish.
Reconciled in error
This generally means that a user has already reconciled the transactions by mistake. You can follow these steps to resolve it:
- Click on the transaction to expand the view.
- Now, select the box in the checkmark column until it is blank.
- Or you see a C.
- The transaction would then be removed from the reconciliation.
- Hit Save to finish.
Check the next solution if the transaction was deleted.
The Transaction Was Deleted
This error occurs when the transaction was deleted by the QB user by accident. If you want it to show up in your reconciliation report, follow these steps:
- First, click on the + New option.
- Now, choose the right form, i.e:
- Invoice
- Sales
- Receipt
- Expense etc
- Fill out the form.
- Then, hit Save and close.
- Navigate to Settings.
- Click on the Chart of Accounts option.
- Now, search for the account you put the transaction into.
- Select View register.
- Then, find the transaction.
- Select the transaction to expand the view.
- Now, until you see an R:
- Select the box in the checkmark column.
- This would manually reconcile the transaction.
- Lastly, press Save.
Now, if you still face an alert the next time you reconcile:
- Open the discrepancy report.
- Check if the deleted transaction is on your list.
- But the amount difference is $0.00.
If so, don’t worry, this won’t have an impact on your reconciliation.
QuickBooks Reconciliation Discrepancy Report – A Quick View Table
In the table below is given a concise summary of the topic of QuickBooks reconciliation discrepancy report:
| Description | There might be discrepancies in accounts you’ve already reconciled before. To check them, you may have to run the QuickBooks reconciliation discrepancy report. |
| Causes of discrepancies in reconciliation | Someone entered the wrong ending balance in reconciliation, already reconciled transactions might be deleted, there can be a missing transaction in QuickBooks, and someone may have already reconciled the account before. |
| Ways to fix discrepancies | First, check the message you see in the Change type column and make changes accordingly. |
Conclusion
This is a blog about the QuickBooks reconciliation discrepancy report and its uses. It also includes the steps you need to run the discrepancy report and fix any mistakes a user may find. If you face any issues in reconciling your transactions in QuickBooks, you can contact the Account Helpline’s professionals at 1.855.738.2784!
FAQs
Where is the reconciliation discrepancy report in QuickBooks Online?
To find the reconciliation discrepancy report in QuickBooks Online, navigate to the Reports menu and click on Banking. Then, select Reconciliation Discrepancy, select the account you want to review, and press OK.
Does QuickBooks Online have a reconciliation discrepancy report?
Yes, QuickBooks does have a reconciliation discrepancy report, which can help you list any transactions that have been deleted, added, or modified since the last reconciliation of the account.
How to fix the QuickBooks reconciliation discrepancy report?
To fix the QuickBooks reconciliation discrepancy report, first, review each transaction in the report and click on View to see the changed history. Then, click on the Change type column to see what has been modified. Now, make corrections based on the message you see.
How to print the reconciliation discrepancy report in QuickBooks Online?
To print the reconciliation discrepancy report in QuickBooks Online, first open the report by going to the Reports menu, clicking on Banking, and pressing Reconciliation Discrepancy. Then just hit Ctrl + P on your keyboard to print the report.
Related Posts-
What are the Steps to Clear QuickBooks Cache and Cookies?
How to Align Pre-Printed Checks in QuickBooks Payroll?
QuickBooks Error 3140: Pro-Recommended Troubleshooting
Learn How to Fix QuickBooks Banking Error 163
QuickBooks Multi-User Setup – Benefits, Precautions & Limitations
An Expert’s Take on QuickBooks Error 15215: Guided Solutions

Edward Martin is a Technical Content Writer for our leading Accounting firm. He has over 10 years of experience in QuickBooks and Xero. He has also worked with Sage, FreshBooks, and many other software platforms. Edward’s passion for clarity, accuracy, and innovation is evident in his writing. He is well versed in how to simplify complex technical concepts and turn them into easy-to-understand content for our readers.