Last Updated on March 10, 2025
Once again, the tax season is coming as we move toward the end of the year, and a large number of employers and taxpayers are looking to pay their taxes on time. If you are a business or an individual who has received or made a payment of $600 in the fiscal year, then you are required to file form 1099 MISC to report your income to the IRS. The last date to E-file 1099 to the IRS is 31st March for e-filing and 2nd March if you are sending the form by mail. In this article, we will guide you every step of the way to help you learn how to print and How to E-file 1099 in QuickBooks Desktop
This blog will help you learn how to e-file 1099 MISC in QuickBooks Desktop. However, if you don’t want to file the form by yourself or need assistance with the same, contact our Accounting Helpline’s experts at 1.855.738.2784 for a quick consultation. Our experts will provide you assistance in filing and printing the 1099 successfully.

Prerequisites Before Preparing 1099 in QuickBooks
You must consider the given points before preparing the 1099 MISC in QuickBooks –
- Ensure that all the information you are going to fill about your contractors is correct.
- Make sure to use the form specified for filing 1099 to the IRS, you cannot use any form that has been downloaded from the internet.
- Don’t ignore the deadlines and to ensure timely delivery of contractor copies to IRS e file them before 27 of January.
- Make sure to include 1096 summary form when you print and mail 1099 to the IRS.
- Exclude any payments that you have made through credit/debit card, PayPal, gift card, or from any third party service.
Now that we have learned about the requirements, let’s understand the steps to e-file 1099 MISC in the next section.
Steps to E-File 1099 MISC Form in QuickBooks Desktop
If you use QuickBooks Desktop, you can create and e-file 1099 Form MISC by following the step-by-step process below –
Note: For e-filing 1099 online with QuickBooks, you must be subscribed to the QuickBooks 1099 E File Service. The basic plan starts at $14. 99, you can file up to three 1099 MISC forms with the IRS. If you are planning to print and mail 1099s, then you need to have the 2018 1099 Kits, which you can purchase and download from Intuit® Market.
Step 1 – Update QuickBooks Desktop
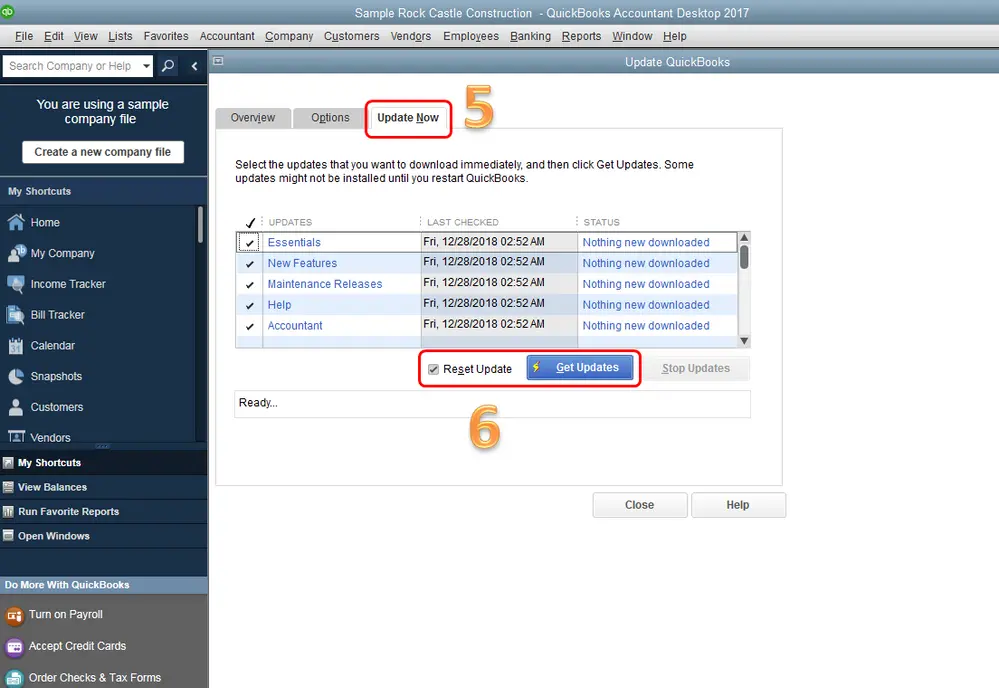
Before you create and e-file 1099 MISC, you must download and install the latest QuickBooks Desktop updates on your PC. After QB is updated to the recent release, move to step 2 and create the form.
Step 2 – Create the 1099 MISC
You can create the 1099 MISC form in QBDT by using the following steps –
- Go to Vendors, select 1099 Forms, and click the Print/E-file 1099 Forms option.
- Create a backup, then select Get Started for the 1099 form you want to create.
Note: If you need to create both 1099-NEC and 1099-MISC, repeat the steps for the other form and choose your forms carefully. Before selecting a 1099 form type, check with your accountant if you think you have made different types of payments. - If you’re filing for New Jersey or Wisconsin, 1099 forms will have special rules for boxes 16 and 17 (refer to this link).
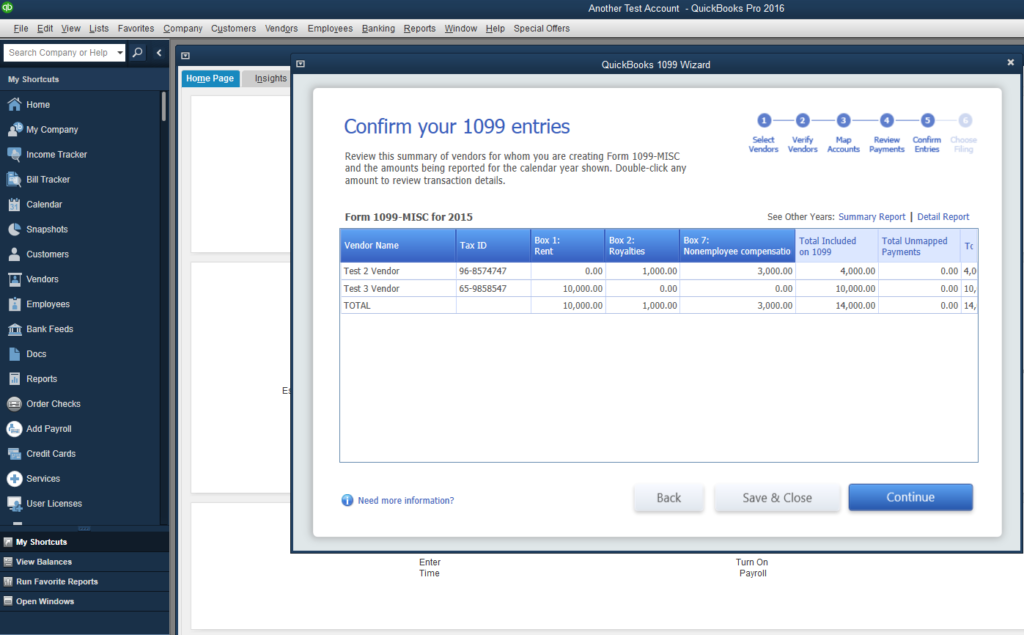
- Select vendors that need a 1099 form, then click Continue and verify the vendor information.
- Edit any incorrect information by double-clicking on the section that needs updating, then click Continue.
- Map the vendor payment accounts, go to the drop-down in the Apply payments to this 1099 box section, and choose the account you want to link the payment to., then click Continue. If you find some boxes are grayed out, they are mapped to the other 1099 form.
Note: If you receive a message highlighted in red that your settings and the current IRS thresholds are mismatched, click Show IRS 1099-MISC filing thresholds and choose Reset to IRS Thresholds. - Review your payment information for exclusions and check what payments are excluded from 1099 MISC. Then, click View Included Payments or View Excluded Payments to check the detailed reports, and hit Continue.
- Review the vendors and amounts you’re going to report, select Continue, and click View Summary Report to see the vendors who don’t meet the IRS threshold.
- Choose whether to print 1099s or e-file and if you choose to e-file, follow the next steps.
Note: If you have at least ten combined 1099s, W-2s, or other federal forms to file, you must file them electronically.
Once done, move to the next step to import your data to Tax1099.
Step 3 – Import your Data into Tax1099
After preparing the 1099 in QuickBooks Desktop, you must select the e-file button to import your data into your Tax1099 account. You can import the data to Tax1099 using the Web Connector or the Plugin.
Once the data is imported, move forward with the next step, which is to start the e-filing.
Step 4 – E-file 1099s in Tax1099
Now, you must e-file 1099 in Tax1099 by going through the following steps –
- Select the vendor name or click Edit to edit the vendor/box information, then click Update.
Note: Changes you make in Tax1099 don’t flow back to your QuickBooks company file; thus, you must make changes in the company file again. - Enter the 1099 information under the appropriate state boxes, select the vendors you want to upload to the e-file by checking the box, then hit Next. If there are any errors or you get a pop-up message, make the correction, select the vendors again, and click Next.
- Select the vendors by checking the box next to the Date column, and choose how to send copies to the recipient/vendors by selecting USPS Mail (chargeable) or Email Recipient. You may also click Download Multiple PDFs to provide copies to the vendors.
- Choose the state you are filing in, then select Next or Calculate Tax1099.com Fee for the total filing fee.
- When you finish the options on the Select Forms page, go to the Payment page, enter your payment info, and select Pay & Submit to e-File.
After filing the form electronically, move to Step 5 below.
Step 5 – Check the Form Filing Status
The last step after submitting the form to the IRS is to check their filing status in the following manner –
- On the dashboard, click the + sign in the upper-right corner and select the Check On Status option.
- Next, enter your 9-digit reference number and click Check Status. If you don’t have a reference number, go to Forms and select Check Forms. Then, choose the tax year and payer name, and check the status under the Status column.
The form filing status can be pending, processing, accepted, or rejected. If the form is Rejected, resubmit it with the necessary changes (go to Forms > Rejected Forms).
Once the form is filed and the status is confirmed, the process is successful.
Steps to Print 1099 MISC in QuickBooks Desktop
The steps to print your 1099 depend on whether you have already e-filed the form or not. Depending on the scenario, undertake the following steps to print 1099 MISC in QuickBooks Desktop –

Case 1: You Have Already Filed Your 1099s
If you have already filed the 1099 Form using Tax1099, you can check the submitted form to print a copy. To check where you have submitted the form, use these steps –
- Open the Dashboard, click Forms, then select Manage Forms and open the Manage Forms page.
- Next, select the Payer and Tax Year, and you will see the list of recipients and forms.
- Click the drop-down menu under Select, then select View/Print and print a copy.
Case 2: If You Didn’t File Your 1099s
If you didn’t file the 1099 electronically with Intuit, you need to file it with the IRS yourself. You can use the Information Returns Intake System (IRIS) to e-file the form directly with the IRS. Once the form is filed, purchase your 1099 kit, which will contain 1099-MISC forms, 1096 forms, and compatible double-window envelopes. Then, to print your 1099, implement the detailed steps below –
- Firstly, ensure QuickBooks is updated to the latest release so your 1099s can print correctly.
- Go to Vendors, select 1099 Forms, and click the Print/E-file 1099 Forms option.
- Now, go to the Choose a Filing Method window, click Print 1099-MISC, and pick the date range for the forms.
- Click OK, then select all vendors you wish to print 1099s for, and click Print 1099.
- Finally, double-check your printer settings to ensure everything is set, and select Print.
Once the process ends, you will have successfully printed 1099 MISC from QuickBooks Desktop.
Conclusion
By following this detailed guide, you can easily print and E-file 1099 MISC form in QuickBooks. However, if you face issues while e-filing or aren’t able to perform the steps on your own, you might need professional assistance. You can contact our team of Accounting Helpline’s professionals at 1.855.738.2784 to get immediate guidance in filing 1099 and fixing the related issues.
FAQs
What payments aren’t allowed to be reported in 1099-MISC by the IRS?
The IRS doesn’t allow certain electronic payments to be reported on Form 1099-MISC, which include credit card, debit card, gift card, and PayPal payments. QuickBooks Desktop automatically excludes these, and the payment companies will report those payments, so you don’t have to.
What type of corrections can I make to 1099 forms after submitting them?
You can make the following corrections to Form 1099 after submitting but before e-filing:
– You can increase or lower the amount or move an amount from one box to another, but you can’t zero out the form.
– You can edit/change the payer TIN that exists if you are off by a few numbers.
– You can change the payer name but can’t pick a different payer from the existing drop-down.
– You can edit the payer address information if it’s incorrect.
– You can edit the recipient TIN if you input the incorrect one, but it can’t be an existing one.
– You can change the recipient name in the profile but can’t choose a different recipient from the drop-down.
– You are allowed to edit the recipient address information if you need to fix it.
– You can change the Payer type from business to individual and vice-versa (EIN to SSN or SSN to EIN).
– Similarly, you can change the Recipient type from business to individual and vice-versa (EIN to SSN or SSN to EIN).
What are the different status types while E-file 1099 with the IRS?
If you have recently submitted your 1099 with the IRS, you can check the filing status and see one of the following status types:
– Pending means the forms are in queue to be sent on the scheduled date.
– Processing implies that the forms have been sent to the IRS and are awaiting a response of Acceptance or Rejection.
– Accepted means that your 1099s have been accepted by the IRS.
– Rejected means the forms have been rejected by the IRS, and you can learn about the reason by checking the email sent by the system. The changes can be made and the forms can be re-submitted without additional charges.
– Blocked implies that the forms have been blocked and won’t be sent to the IRS. You will not be able to unblock a form once it has been blocked by the IRS.
How can I create a 1099 in QuickBooks Desktop for Mac?
If you use QuickBooks Desktop for Mac, you can use the following steps to create Form 1099:
– Go to Vendors, select 1099 Forms, then click Print or E-file 1099, and select Get Started on 1099-MISCs for the 1099 form you want to create.
– Select vendors that need a 1099 form verify the vendor information is correct, and select Next.
– Map the vendor payment accounts from the drop-down under Account and select the account to which you want to link the payment.
– Review your included and excluded payments, and select View Included Payments or View Excluded Payments to see detailed reports.
– Select Next, review the vendors and amounts you’ll report, then select Next, and choose whether to print 1099s or e-file.

Edward Martin is a Technical Content Writer for our leading Accounting firm. He has over 10 years of experience in QuickBooks and Xero. He has also worked with Sage, FreshBooks, and many other software platforms. Edward’s passion for clarity, accuracy, and innovation is evident in his writing. He is well versed in how to simplify complex technical concepts and turn them into easy-to-understand content for our readers.